LG LDE3011ST User manual

ESPAÑOL
OWNER’S MANUAL
ELECTRIC DOUBLE OVEN RANGE
LDE3011ST
Please read this guide thoroughly before operating
and keep it handy for reference at all times.
P/No.: MFL63291203 www.lg.com
ENGLISH

2
Staple your receipt here.
Product Registration Information
Model:
Serial Number:
Date of Purchase:
INTRODUCTION
IMPORTANT SAFETY INFORMATION ....3-9
SURFACE CONTROLS COOKING
Locations of Surface Elements and Controls ............ 10
Hot Surface Indicator.................................................. 11
Using the Element ...................................................... 11
Recommended Surface Cooking Setting ................... 12
Tips to Protect the Glass/Ceramic Cooktop Surface .. 13
Glass/Ceramic Cooktop Surface ................................ 13
Cooking Areas ............................................................ 14
Using the Proper Cookware ....................................... 14
Home Canning Tips.................................................... 14
PARTS AND FEATURES
Parts and features ...................................................... 15
Control panel features ..........................................16-17
OPERATING INSTRUCTIONS
Clock........................................................................... 18
Minimum & Maximum Default Settings....................... 18
Timer On/Off............................................................... 19
Special Features of your Oven Control .................20-21
Using Oven Racks...................................................... 22
Oven Vent................................................................... 22
Cooking Mode .......................................................23-39
- Bake....................................................................... 23
- Baking layer cakes................................................. 24
- Broil........................................................................ 25
- Recommended Broiling guide................................ 26
- Timed cook............................................................. 27
- Delayed Timed Cook.............................................. 28
- Pizza ..................................................................... 29
- Warm ..................................................................... 30
- Proof ...................................................................... 31
- Sabbath Mode........................................................ 32
To turn on or off the oven light.................................... 33
Oven & Cooktop Lockout feature .............................. 33
Self Clean..............................................................34-36
MAINTENANCE
Care & Cleaning ....................................................37-38
Cleaning the Glass/Ceramic Cooktop ...................38-39
Removing & Replacing the Lift-off Oven door .......40-41
Door Care Instructions................................................ 41
TROUBLESHOOTING
Before Calling for Service .................................. 42-45
WARRANTY
Warranty for Customers in the U.S.A .......................46
THANK YOU!
Congratulations on your
purchase and welcome to the
LG family. Your new LG Electric
range combines precision
cooking features with simple
operation and stylish design.
Follow the operating and care
instructions in this manual and
your range will provide you with
many years of reliable service.

3
ENGLISH
IMPORTANT SAFETY INFORMATION
SAFETY PRECAUTIONS
7KLVDSSOLDQFHLVQRWLQWHQGHGIRUXVHE\SHUVRQV
(including children) with reduced physical, sensory
or mental capabilities, or lack of experience and
knowledge, unless they have been given supervision
or instruction concerning use of the appliance by a
person responsible for their safety.
7RFKHFNWKDWWKHDQWLWLSEUDFNHWLVSURSHUO\
installed:
Grasp the top rear edge of the range back guard
and carefully attempt to tilt it forward. Verify that the
DQWLWLSGHYLFHVDUHHQJDJHG
/RZHURYHQ5HPRYHWKHORZHURYHQGRRUDQG
visually inspect that the rear leveling leg is fully
LQVHUWHGLQWRWKHDQWLWLSEUDFNHW
5HIHUWRWKHLQVWDOODWLRQPDQXDOIRUSURSHUDQWLWLS
bracket installation.
%HFHUWDLQ\RXUDSSOLDQFHLVSURSHUO\LQVWDOOHGDQG
grounded by a qualified technician.
'RQRWUHSDLURUUHSODFHDQ\SDUWRIWKHDSSOLDQFH
unless specifically recommended in the manual.
$OORWKHUVHUYLFLQJVKRXOGEHUHIHUUHGWRDTXDOLILHG
technician.
$OZD\VGLVFRQQHFWSRZHUWRDSSOLDQFHEHIRUH
servicing by unplugging, removing the fuse or
switching off the circuit breaker.
READ ALL INSTRUCTIONS BEFORE USE
5HDGDQGIROORZDOOLQVWUXFWLRQVEHIRUHXVLQJ\RXURYHQWRSUHYHQWWKHULVNRIILUHHOHFWULFVKRFNSHUVRQDOLQMXU\
RUGDPDJHZKHQXVLQJWKHUDQJH7KLVJXLGHGRHVQRWFRYHUDOOSRVVLEOHFRQGLWLRQVWKDWPD\RFFXU$OZD\V
contact your service agent or manufacturer about problems that you do not understand.
WARNING
This symbol will alert you to hazards or unsafe practices which
could cause serious bodily harm or death.
CAUTION
This symbol will alert you to hazards or unsafe practices which could
cause bodily injury or property damage.
This is the safety alert symbol. This symbol alerts you to potential hazards that can
kill or hurt you and others. All safety messages will follow the safety alert symbol
and either the word WARNING or CAUTION. These words mean:
WARNING
'2127VWHSRUVLWRQWKHGRRU
Install the Anti-Tip Bracket packed
with range.
7KHUDQJHFRXOGEHWLSSHGDQGLQMXU\
might result from spilled hot liquid,
food, or the range itself.
If the range is pulled away from the
wall for cleaning, service, or any other
UHDVRQHQVXUHWKDWWKHDQWLWLSEUDFNHW
LVSURSHUO\UHHQJDJHGZKHQWKHUDQJH
is pushed back against the wall.
7RUHGXFHWKHULVNRIWLSSLQJRIWKH
appliance, the appliance must be
secured by properly installed Anti-
Tip devices.
To check if the devices are installed
properly, remove (necessary part or
parts)and verify that Anti-Tip
devices are engaged.

4
IMPORTANT SAFETY INFORMATION
READ ALL INSTRUCTIONS BEFORE USE
SAFETY PRECAUTIONS
(cont')
'2127728&++($7,1*(/(0(17625
,17(5,25685)$&(62)29(1
Heating elements may be hot even though they
are dark in color. Interior surfaces of an oven
become hot enough to cause burns. During and
after use, do not touch or let clothing or other
flammable materials contact heating elements or
interior surfaces of oven until they have had
sufficient time to cool. Other surfaces of the
appliance may become hot enough to cause
EXUQV$PRQJWKHVHVXUIDFHVDUHRYHQYHQW
openings and surfaces near these openings, oven
doors, and windows of oven doors.
8VH&DUH:KHQ2SHQLQJ'RRU
Let hot air or steam escape before you remove or
replace food in the oven.
'R1RW+HDW8QRSHQHG)RRG&RQWDLQHUV
%XLOGXSRISUHVVXUHPD\FDXVHFRQWDLQHUWREXUVW
DQGUHVXOWLQLQMXU\
%HFHUWDLQDOOSDFNLQJPDWHULDOVDUHUHPRYHG
from the appliance before operating.
Keep plastics, clothes, and paper away from parts
of the appliance that may become hot.
'2127IRUFHWKHGRRURSHQ
7KLVFDQGDPDJHWKHDXWRPDWLFGRRUORFNLQJ
system. Use care when opening the oven door
after the self cleaning cycle. Stand to the side of
the oven when opening the door to allow hot air
RUVWHDPWRHVFDSH7KHRYHQPD\VWLOOEH9(5<
+27
'2127XVHDVWHHOZRROSDG
,WZLOO6&5$7&+WKHVXUIDFH
'2127XVHKDUVKHWFKLQJDEUDVLYHFOHDQHUV
or sharp metal scrapers to clean the oven
door glass since they can scratch the surface.
Scratches may cause the glass to shatter.
%HFDUHIXOZKHQUHPRYLQJDQGOLIWLQJWKHGRRU
'2127OLIWWKHGRRUE\WKHKDQGOH
7KHGRRULVYHU\KHDY\
'2127VWHSRUVLWRQWKHGRRU
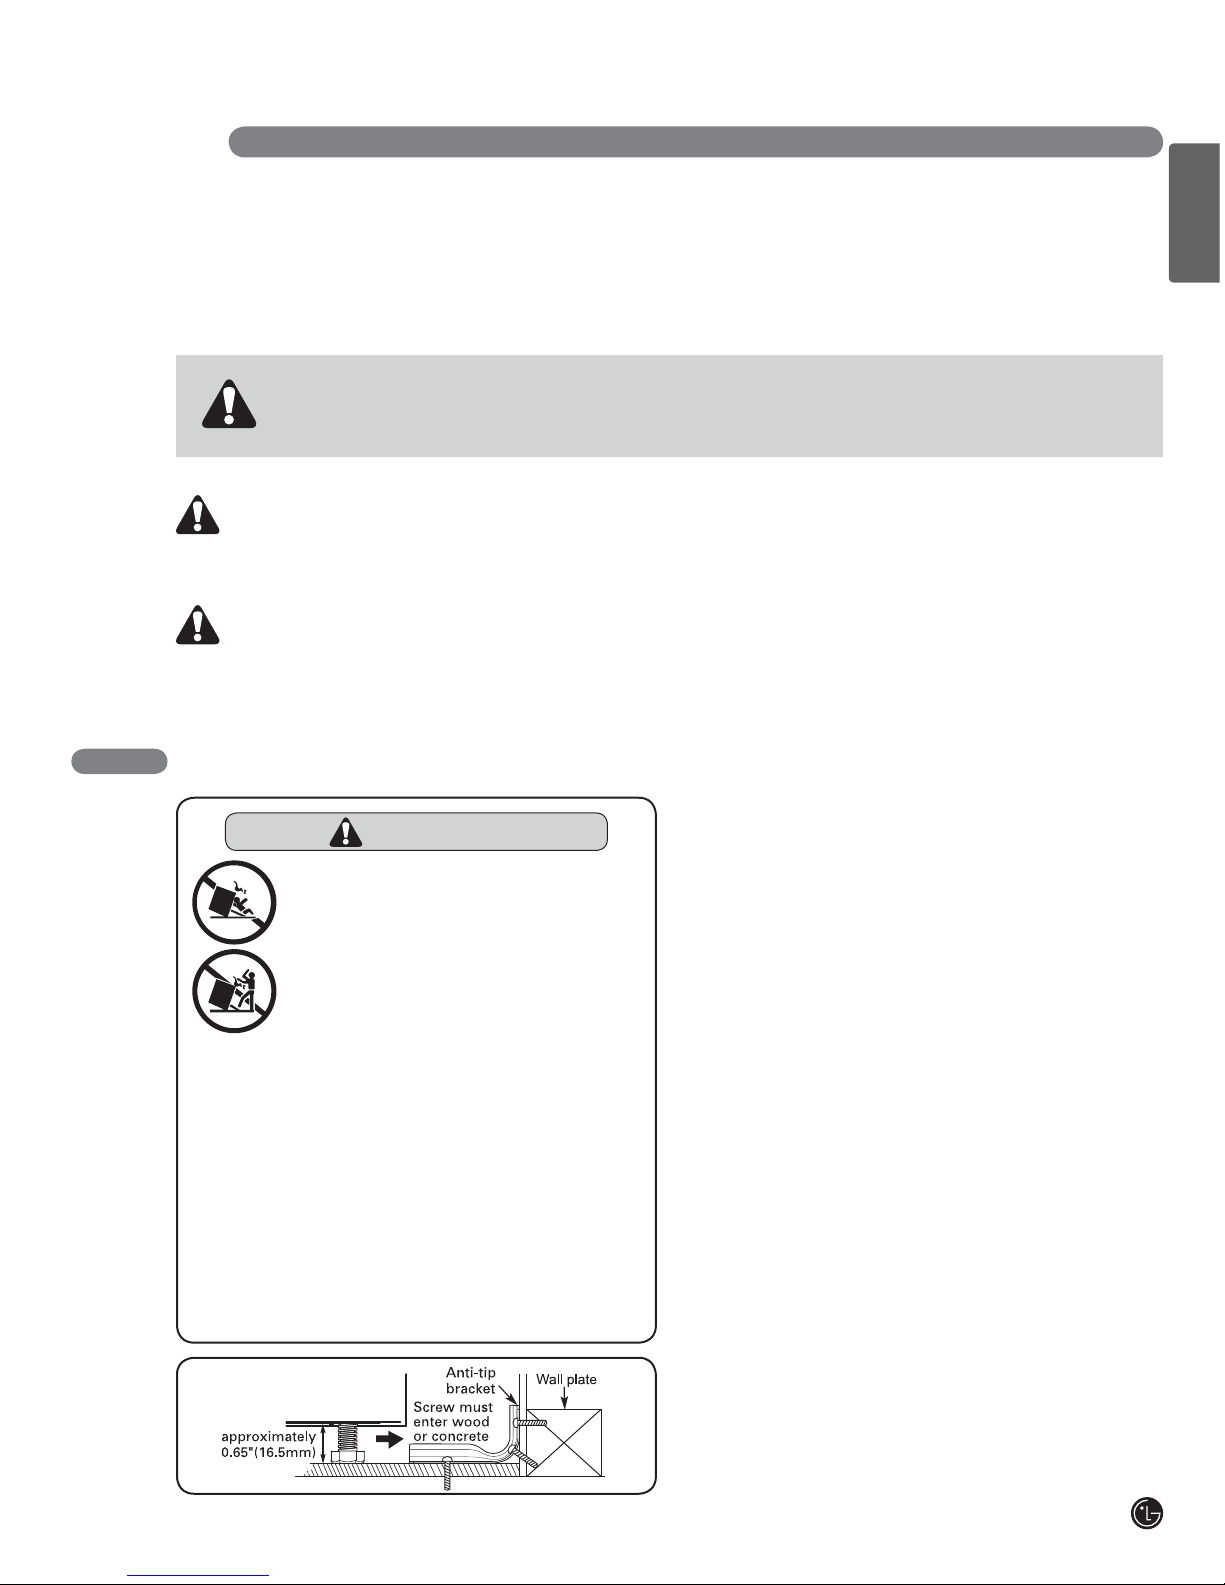
,QVWDOOWKHDQWLWLSEUDFNHWSDFNHGZLWKUDQJH
7KHUDQJHFRXOGEHWLSSHGDQGLQMXU\PLJKW
result from spilled hot liquid, food, or the range
itself.
,IWKHUDQJHLVSXOOHGDZD\IURPWKHZDOOIRU
cleaning, service, or any other reason, ensure
WKDWWKHDQWLWLSEUDFNHWLVSURSHUO\UHHQJDJH
when the range is pushed back against the wall.
WARNING
1(9(5XVH\RXUDSSOLDQFHIRUZDUPLQJRU
heating the room.
'2127XVHZDWHURQJUHDVHILUHV
Should an oven fire occur, leave the oven
door closed and turn the oven off. If the fire
continues, throw baking soda on the fire or
use a fire extinguisher.
8VHGU\SRWKROGHUVRQO\
0RLVWRUGDPSSRWKROGHUVRQKRWVXUIDFHV
PD\UHVXOWLQEXUQVIURPVWHDP'RQRWOHW
the pot holder touch hot heating elements.
'RQRWXVHDWRZHORURWKHUEXON\FORWK
6WRUDJHLQRURQDSSOLDQFH
)ODPPDEOHPDWHULDOVVKRXOGQRWEHVWRUHG
in an oven or near surface elements.
:HDUSURSHUDSSDUHO
/RRVHILWWLQJRUKDQJLQJJDUPHQWVVKRXOG
never be worn while using the appliance.

5
ENGLISH
IMPORTANT SAFETY INFORMATION
READ ALL INSTRUCTIONS BEFORE USE
ELECTRICAL SAFETY
3URWHFWLYH/LQHUVDo not use aluminum foil or
any other material to line the oven bottoms.
Improper installation of these liners may result in
a risk of electric shock or fire.
'R1RWallow aluminum foil or meat probe to
contact heating elements.
%HIRUHUHSODFLQJ\RXURYHQOLJKWEXOEVZLWFK
off the electrical power to the oven at the main
fuse or circuit breaker panel.
Failure to do so can result in severe personal
LQMXU\GHDWKRUHOHFWULFDOVKRFN
'2127OLQHWKHRYHQZDOOVUDFNVERWWRPRU
any other part of the oven with aluminum foil
or any other material.
Doing so will disrupt heat distribution, produce
poor baking results and cause permanent
damage to the oven interior (aluminum foil will
melt to the interior surface of the oven.)
PAN PLACEMENT
Doing so will cause permanent damage to the oven
bottom finish.
1HYHUSODFHSODVWLFVSDSHUFDQQHGIRRGVRU
combustible material in the oven.
:KHQFRRNLQJIRRGLQWKHRYHQDOZD\VXVHD
baking sheet or pan with 4 raised sides. 7KLV
will prevent food from sliding off.
WARNING
'2127SODFHDOXPLQXPIRLOGLUHFWO\RQWKH
oven bottom.
$OXPLQXPIRLO
WARNING
'RQRWSODFHIRRGRUFRRNZDUHRQWKHERWWRP
of the oven cavity.
WARNING
0DNHVXUHWKH32:(52))EHIRUHUHPRYLQJ
RUUHSODFHVRPHHOHFWULFDOSDUWV(VSHFLDOO\
a bulb in the oven lights)
)DLOXUHWRGRVRFDQUHVXOWLQVHYHUHSHUVRQDO
LQMXU\GHDWKRUHOHFWULFDOVKRFN
DEEP FAT FRYERS
8VHH[WUHPHFDXWLRQZKHQPRYLQJRUGLVSRVLQJRI
hot grease.

6
IMPORTANT SAFETY INFORMATION
READ ALL INSTRUCTIONS BEFORE USE
SURFACE COOKING UNITS
8VH3URSHU3DQ6L]HV7KLVDSSOLDQFHLV
equipped with one or more surface units of
different size. Select utensils having flat bottoms
large enough to cover the surface unit heating
element.
7KHXVHRIXQGHUVL]HGXWHQVLOVZLOOH[SRVHD
portion of the heating element to direct contact
and may result in ignition of clothing. Proper
relationship of utensil to burner will also improve
efficiency.
1HYHU/HDYH6XUIDFH8QLWV8QDWWHQGHGDW+LJK
Heat Settings. %RLORYHUVFDXVHVPRNLQJDQG
greasy spillovers that may ignite.
Glazed Cooking Utensils. Only certain types of
glass, glass/ceramic, ceramic, earthenware, or
RWKHUJOD]HGXWHQVLOVDUHVXLWDEOHIRUUDQJHWRS
service without breaking due to the sudden
change in temperature.
Utensil Handles Should Be Turned Inward and
1RW([WHQG2YHU$GMDFHQW6XUIDFH8QLWV7R
reduce the risk of burns, ignition of flammable
materials, and spillage due to unintentional
contact with the utensil, the handle of a utensil
should be positioned so that it is turned inward,
DQGGRHVQRWH[WHQGRYHUDGMDFHQWVXUIDFHXQLWV
%HVXUH\RXNQRZZKLFKFRQWUROSDGVRSHUDWH
each surface unit. Make sure you turned on the
correct surface unit.
SAFETY DURING USE
2YHQ5DFNV$OZD\VSODFHRYHQUDFNVLQ
desired position while oven is cool.
$
lways use pot holders or oven mitts when
removing food from the oven or Center Warming
element as cookware and plates will be hot.
You can be burned because cookware and plates
will be hot.
$OZD\VXVHDQRYHQPLWWWRUHPRYHWKH
temperature probe after cooking.
8VHFDXWLRQZLWKWKH7,0('%$.(RU
'(/$<('7,0('%$.(IHDWXUHV8VHWKH
automatic timer when cooking cured or frozen
PHDWVDQGPRVWIUXLWVDQGYHJHWDEOHV)RRGV
that can easily spoil, such as milk, eggs, fish,
meat or poultry, should be chilled in the
UHIULJHUDWRUILUVW(YHQZKHQFKLOOHGWKH\
should not stand in the oven for more than 1
hour before cooking begins, and should be
removed promptly when cooking is
completed.
Eating spoiled food can result in sickness from
food poisoning.
6KRXOGDQRYHQILUHRFFXUOHDYHWKHRYHQ
door closed and turn the oven off. If the fire
continues, throw baking soda on the fire or
use a fire extinguisher.
'2127SXWZDWHURUIORXURQWKHILUH
Flour may be explosive and water can cause a
JUHDVHILUHWRVSUHDGDQGFDXVHSHUVRQDOLQMXU\
'2127XVHWKHEURLOHUSDQZLWKRXWWKHJULG
'2127FRYHUWKHJULGZLWKDOXPLQXPIRLO
'RQRWXVHSODVWLFWRFRYHUIRRG
Plastic can melt onto oven surfaces. Use foil or
oven resistant lids only.
,IWKHRYHQLVKHDYLO\VRLOHGZLWKRLOVHOIFOHDQ
the oven before using the oven again. It could
cause a risk of fire.
Wipe up heavy soil on the oven bottom before
self clean. It requires longer cleaning cycles and
produces more smoke.

7
ENGLISH
IMPORTANT SAFETY INFORMATION
READ ALL INSTRUCTIONS BEFORE USE
CHILD SAFETY
GLASS/CERAMIC COOKING SURFACES
'2127728&+685)$&(81,7625$5($6
1($581,76
Surface units may be hot even though they are
GDUNLQFRORU$UHDVQHDUVXUIDFHXQLWVPD\
become hot enough to cause burns. During and
after use, do not touch, or let clothing or other
flammable materials contact surface units or
areas near units until they have had sufficient
WLPHWRFRRO7KLVLQFOXGHVWKHFRRNWRSDQGWKH
area above the oven door.
'R1RW&RRNRQD%URNHQ&RRNWRSIf the
cooktop should break, cleaning solutions and
spillovers may penetrate the broken cooktop and
create a risk of electric shock. Contact a qualified
technician immediately.
&OHDQ&RRNWRS:LWK&DXWLRQ Do not use
sponges or cloth to wipe spills on a hot cooking
area. Use a proper metal scraper.
'2127XVHWKHJODVVFRRNWRS surface as a
cutting board.
'2127SODFHRUVWRUH items that can melt or
catch fire on the glass cooktop, even when it is
not being used.
$OZD\VWXUQWKHVXUIDFHXQLWVRQDIWHUSODFLQJ
cookware.
'2127VWRUH heavy items above the cooktop
surface that could fall and damage it.
WARNING
&KLOGUHQVKRXOGEHNHSWDZD\IURPWKH
oven.
$FFHVVRU\SDUWVZLOOEHFRPHKRWZKHQWKH
broiler is in use.
CAUTION
'2127OHDYHVPDOOFKLOGUHQXQDWWHQGHG
near the appliance.
During the self clean cycle, the outside of the
oven can become very hot to the touch.
CAUTION
1(9(5OHDYHFKLOGUHQDORQHRU
unsupervised near the appliance when it is
in use or is still hot. Children should never
be allowed to sit or stand on any part of the
appliance as they could be injured or
burned.
1(9(5VWRUHLWHPVRILQWHUHVWWRFKLOGUHQLQ
cabinets above an appliance. Children
climbing on the appliance or on the
appliance door to reach items could be
seriously injured.
&KLOGUHQPXVWEHWDXJKWWKDWWKHDSSOLDQFH
DQGXWHQVLOVLQLWFDQEHKRW/HWKRWXWHQVLOV
cool in a safe place, out of reach of small
children. Children should be taught that an
appliance is not a toy. Children should not
be allowed to play with controls or other
parts of the appliance.

8
IMPORTANT SAFETY INFORMATION
READ ALL INSTRUCTIONS BEFORE USE
GLASS/CERAMIC COOKING SURFACES
(cont')
'2127SODFH aluminum foil or plastic items
such as salt and pepper shakers, spoon holders,
or plastic wrappings or any other material on the
range when it is in use.
0DNHVXUH\RXWXUQHGRQWKHFRUUHFWVXUIDFHXQLW
1(9(5FRRNGLUHFWO\RQWKHJODVV$OZD\VXVH
cookware.
$OZD\VSODFHWKHSDQLQWKHFHQWHURIWKH
surface unit you are cooking on.
1(9(5OHDYHVXUIDFHXQLWVXQDWWHQGHGDWKLJK
heat setting.
%RLORYHUVFDXVHVPRNLQJDQGJUHDV\VSLOORYHUV
that may catch on fire.
$OZD\VWXUQWKHVXUIDFHXQLWVRIIEHIRUH
removing cookware.
'2127XVHSODVWLFZUDSWRFRYHUIRRG
3ODVWLFPD\PHOWRQWRWKHVXUIDFHDQGEHYHU\
difficult to remove.
'2127WRXFKVXUIDFHXQLWVXQWLOLWKDV
cooled down.
7KHVXUIDFHHOHPHQWVPD\VWLOOEHKRWDQGEXUQV
may occur if the glass surface is touched before it
has cooled down sufficiently.
,PPHGLDWHO\FOHDQWKHVSLOOVRQFRRNLQJDUHDWR
prevent a tough cleaning chore later.
,IFDELQHWVWRUDJHLVSURYLGHGGLUHFWO\DERYH
cooking surface, limit it to items that are
infrequently used and can be safely stored in an
DUHDVXEMHFWHGWRKHDW7HPSHUDWXUHVPD\EH
unsafe for items such as volatile liquids, cleaners
or aerosol sprays.
:KHQZDUPLQJIRRGVGRQRWXVHFRQWDLQHUVWKDW
VHDO$OORZYHQWLQJIRUKHDWHGDLUWRHVFDSH
'2127XVHDVWHHOZRROSDG
,WZLOOVFUDWFKWKHVXUIDFH
'2127XVHVFUXESDGVRUDEUDVLYHFOHDQLQJ
pads.
7KH\PD\GDPDJH\RXUJODVVFRRNWRSVXUIDFH
&RRNZDUHZLWKURXJKRUERWWRPVFDQPDUNRU
scratch the cooktop surface.
'RQRWVOLGHDQ\WKLQJPHWDORUJODVVDFURVV
the cooktop.
'RQRWXVHFRRNZDUHZLWKGLUWRUGLUWEXLOWXS
on the bottom.

9
ENGLISH
IMPORTANT SAFETY INFORMATION
READ ALL INSTRUCTIONS BEFORE USE
SAFETY WHEN CLEANING
2SHQZLQGRZRUWXUQRQDYHQWLODWLRQIDQRU
hood before self cleaning.
'R1RW8VH2YHQ&OHDQHUVNo commercial
oven cleaner or oven liner protective coating of
any kind should be used in or around any part of
the oven.
%HIRUHVHOIFOHDQLQJWKHRYHQ5HPRYHEURLOHU
pan, all oven racks, meat probe and any other
utensils from the oven cavity.
1HYHUNHHSSHWELUGVLQWKHNLWFKHQ7KHKHDOWK
of birds is extremely sensitive to the fumes
released during an oven self clean cycle. Fumes
may be harmful or fatal to birds. Move birds to
ZHOOYHQWLODWHGURRP
&OHDQLQWKHVHOIFOHDQF\FOHRQO\SDUWVOLVWHGLQ
WKLVPDQXDO%HIRUHXVLQJWKHVHOIFOHDQIHDWXUHRI
the oven, remove the broiler pan and any utensils
of foods from the oven.
,WLVQRUPDOIRUWKHFRRNWRSRIWKHUDQJHWR
EHFRPHKRWGXULQJDVHOIFOHDQF\FOH7KHUHIRUH
touching the cooktop during a clean cycle should
be avoided.
,PSRUWDQW,QVWUXFWLRQ In the event the self clean
error code F is displayed, and three long beeps
sound, the oven is malfunctioning in the self clean
mode. Switch off the electrical power to the main
fuse or breaker and have the unit serviced by a
qualified technician.
0DNHVXUHRYHQOLJKWVDUHFRROEHIRUH
cleaning.

10
LOCATIONS OF SURFACE ELEMENTS AND CONTROLS
7KHUDGLDQWVXUIDFHHOHPHQWVDUHORFDWHGRQWKHFRRNWRSDVEHORZ7KHUDGLDQWFRQWUROSDGORFDWLRQVDUHFRUUHODWLYH
WR5DGLDQWVXUIDFHHOHPHQWVRQWKHFRRNWRSDVVKRZQEHORZ
SURFACE CONTROLS COOKING
/()75($5(/(0(17,1',&$725
(Single element)
5,*+75($5(/(0(17,1',&$725
(Single element)
/()7)5217(/(0(17,1',&$725
(Single element)
5,*+7)5217(/(0(17,1',&$725
(Single element))
+6+RW6XUIDFH0(66$*(
$FWLYDWHGZKHQWKHXQLWLVKRWWRWKHWRXFKDIWHULWLV
turned off.
$FWLYDWHGGXULQJ6HOI&OHDQ&\FOH
$FWLYDWHGHYHQDIWHUWKHXQLWLVWXUQHGRII
'LVSOD\HGXQWLOWKHXQLWKDVFRROHGGRZQWR
DSSUR[LPDWHO\Ý)Ý&
3)3RZHU)DLOXUH0(66$*(
7KH3)PHVVDJHZLOODSSHDUZKHQHYHUWKHUHKDV
EHHQDSRZHULQWHUUXSWLRQWRWKHDSSOLDQFH7RFOHDU
the PF message press ON/OFF control pad to reset
and be sure to reset the clock with the correct time of
day.

11
ENGLISH
To turn on a SINGLE
surface unit:
(Left Rear, Right Rear, Left Front)
➊Press 212)) for the desired
HOHPHQWSRVLWLRQ7KHGLVSOD\ZLOO
flash .
(If no further pads are pressed
within 10 seconds, the display will
disappear.)
➋Press +once to turn on the
power level Hi or –once to /R.
➌Use the –/ +to choose the
desired power setting.
–/ +is continuously accessible.
$GMXVWDEOHDWDQ\WLPHZKLOHWKH
element is ON.)
➍7RWXUQRIIWKHXQLWDIWHUFRRNLQJ
press 212)) once.
NOTE:
(DFKWLPHDSDGLVSUHVVHGDEHHSZLOOVRXQG
7KHSRZHUOHYHOGHFUHDVHVRULQFUHDVHVE\IURP
9.0 through 3.0. (by 0.2 from 3.0 through 1.0)
/R is the lowest power level available.
NOTE:
7RVFUROOWKURXJKWKHSRZHUOHYHOVTXLFNO\SUHVVDQG
hold the –or +key pads until the power level
desired is reached.
HOT SURFACE INDICATOR
7KHGLVSOD\ZLOO)ODVK+6+RW6XUIDFH
When the surface is too hot to touch
because of the heating element. It will
remain on after the element is turned
off and the surface has cooled to
approximately
150 deg F.
USING THE ELEMENT
SURFACE CONTROLS COOKING
CAUTION
'2127WRXFKVXUIDFHHOHPHQWVXQWLOLWKDV
cooled down sufficiently.
7KHVXUIDFHHOHPHQWVPD\VWLOOEHKRWDQGEXUQV
may occur.
CAUTION
685)$&((/(0(17&<&/(6
:KHQFRRNLQJRQWKHVXUIDFHHOHPHQWVLWLVSRVVLEOH
for the element to cycle on and off during cooking.
7KLVZLOOKDSSHQPRUHIUHTXHQWO\ZKHQDORZHU
power is selected however it can also occur on
higher settings as well.
CAUTION
1(9(5OHDYHIRRGXQDWWHQGHGDWKLJKRUPHGLXP
high setting.
%RLORYHUVFDQFDXVHVPRNH
Greasy spillovers may catch on fire.
CAUTION
8VHRQO\FRRNZDUHDQGGLVKHVUHFRPPHQGHGDV
safe for oven and cooktop use.
Always use oven mitts when removing food from the
warming center as cookware and plates will be hot.
:KHQZDUPLQJIRRGVGRQRWXVHFRQWDLQHUVWKDW
seal. Allow venting for heated air to escape.
'2127XVHSODVWLFZUDSWRFRYHUIRRGV
Plastic may melt onto the surface and be very difficult to clean.
)RRGVKRXOGEHNHSWLQLWVFRQWDLQHUDQGFRYHUHG
with a lid or aluminum foil to maintain food quality.

12
Element Lv Recommended Use
Single 8.5-Hi %ULQJOLTXLGWRDERLO
6WDUWFRRNLQJ
5.5-8.0
+ROGDUDSLGERLOIU\LQJGHHSIDWIU\
4XLFNO\EURZQRUVHDUIRRG
3.5-5.0 0DLQWDLQDVORZERLO
)U\RUVDXWHIRRGV
&RRNVRXSVVDXFHVDQGJUDYLHV
2.2-3.0 6WHZRUVWHDPIRRG
6LPPHU
LO-2.0 .HHSIRRGZDUP
0HOWFKRFRODWHRUEXWWHU
RECOMMENDED SURFACE COOKING SETTING
SURFACE CONTROLS COOKING

13
ENGLISH
TIPS TO PROTECT THE GLASS/CERAMIC COOKTOP SURFACE
Cleaning
6HHSDJHVaIRUPRUHLQIRUPDWLRQ
%HIRUHILUVWXVHFOHDQWKHFRRNWRS
&OHDQ\RXUFRRNWRSGDLO\RUDIWHUHDFKXVH7KLVZLOO
NHHS\RXUFRRNWRSORRNLQJJRRGDQGFDQSUHYHQW
GDPDJH
,IDVSLOORYHURFFXUVZKLOHFRRNLQJLPPHGLDWHO\FOHDQ
WKHVSLOOIURPWKHFRRNLQJDUHDZKLOHLWLVKRWWR
SUHYHQWDWRXJKFOHDQLQJ8VLQJH[WUHPHFDUHZLSH
VSLOOZLWKDFOHDQGU\WRZHO
Do notDOORZVSLOOVWRUHPDLQRQWKHFRRNLQJDUHDRU
WKHFRRNWRSWULPIRUDORQJSHULRGRIWLPH
Do notXVHDEUDVLYHFOHDQVLQJSRZGHUVRUVFRXULQJ
SDGVWKDWFDQVFUDWFKWKHFRRNWRS
Do notXVHFKORULQHEOHDFKDPPRQLDRURWKHU
FOHDQVHUVQRWVSHFLILFDOO\UHFRPPHQGHGIRUXVHRQ
JODVVFHUDPLF
To Prevent Other Damages
'RQRWDOORZSODVWLFVXJDURUIRRGVZLWKKLJKVXJDU
FRQWHQWWRPHOWRQWRWKHKRWFRRNWRS6KRXOGWKLV
KDSSHQFOHDQLPPHGLDWHO\6HH&OHDQLQJSDJHV
a
Do notOHWDSDQERLOGU\DVWKLVZLOOGDPDJHWKH
VXUIDFHDQGSDQ
Do notXVHFRRNWRSDVDZRUNVXUIDFHRUFXWWLQJERDUG
Do notFRRNIRRGGLUHFWO\RQWKHVXUIDFH
To Prevent Marks and Scratches
'RQRWXVHJODVVSDQV7KH\PD\VFUDWFKWKHVXUIDFH
Do notSODFHDWULYHWRUZRNULQJEHWZHHQWKHVXUIDFH
DQGSDQ7KHVHLWHPVFDQPDUNRUVFUDWFKWKHWRS
'RQRWVOLGHDOXPLQXPSDQVDFURVVDKRWVXUIDFH7KH
SDQVPD\OHDYHPDUNVZKLFKQHHGWREHUHPRYHG
SURPSWO\
6HH&OHDQLQJSDJHVa
0DNHVXUHWKHVXUIDFHDQGWKHSDQERWWRPDUHFOHDQ
EHIRUHWXUQLQJRQWRSUHYHQWVFUDWFKHV
7RSUHYHQWVFUDWFKLQJRUGDPDJLQJWRWKHJODVV
FHUDPLFWRSGRQRWOHDYHVXJDUVDOWRUIDWVRQWKH
FRRNLQJDUHD:LSHWKHFRRNWRSVXUIDFHZLWKDFOHDQ
FORWKRUSDSHUWRZHOEHIRUHXVLQJ
Do notVOLGHKHDY\PHWDOSDQVDFURVVWKHVXUIDFH
VLQFHWKHVHPD\VFUDWFK
To Prevent Stains
Do not XVHDVRLOHGGLVKFORWKRUVSRQJHWRFOHDQWKH
FRRNWRSVXUIDFH$ILOPZLOOUHPDLQZKLFKPD\FDXVH
VWDLQVRQWKHFRRNLQJVXUIDFHDIWHUWKHDUHDLVKHDWHG
&RQWLQXRXVO\FRRNLQJRQDVRLOHGVXUIDFHZLOOUHVXOWLQ
UHVXOWLQDSHUPDQHQWVWDLQ
GLASS/CERAMIC COOKTOP SURFACE
Cooktop Surface Notes:
Cooktop may emit light smoke and odorWKHILUVW
IHZWLPHVWKHFRRNWRSLVXVHG7KLVLVQRUPDO
Glass cooktops retain heat for a period of time
after the elements are turned off. 7XUQWKH
HOHPHQWVRIIDIHZPLQXWHVEHIRUHIRRGLVFRPSOHWHO\
FRRNHGDQGXVHWKHUHWDLQHGKHDWWRFRPSOHWH
FRRNLQJ:KHQWKHKRWVXUIDFHOLJKWWXUQVRIIWKH
FRRNLQJDUHDZLOOFRROGRZQHQRXJKWRWRXFK
%HFDXVHRIWKHZD\WKHFRRNWRSUHWDLQVKHDWWKH
HOHPHQWVZLOOQRWUHVSRQGWRFKDQJHVLQWKHVHWWLQJV
DVTXLFNO\DVFRLOHOHPHQWV
,QWKHHYHQWRIDSRWHQWLDOERLORYHUUHPRYHWKHSDQ
IURPWKHFRRNLQJVXUIDFH
Do not attempt to lift the cooktop.
7KHVPRRWKWRSVXUIDFHPD\DSSHDUGLVFRORUHGZKHQ
LWLVKRW7KLVLVQRUPDODQGZLOOGLVDSSHDUZKHQWKH
VXUIDFHFRROV
SURFACE CONTROLS COOKING

14
COOKING AREAS
7KHFRRNLQJDUHDVRQ\RXUUDQJHDUHLGHQWLILHGE\
SHUPDQHQWFLUFOHVRQWKHJODVVFRRNWRSVXUIDFH)RU
WKHPRVWHIILFLHQWFRRNLQJILWWKHSDQVL]HWRWKH
HOHPHQWVL]H
Pans should not extend more than 1/2to 1-inch
beyond the cooking area.
:KHQDFRQWUROLVWXUQHGRQDJORZFDQEHVHHQ
WKURXJKWKHJODVVFRRNWRSVXUIDFHThe element will
cycle on and off to maintain the preset heat
setting, even on Hi.
)RUPRUHLQIRUPDWLRQRQFRRNZDUHUHIHUWR&RRNZDUH
5HFRPPHQGDWLRQV
HOME CANNING TIPS
Be sure the canner is centered over the surface unit.
Make sure the canner is flat on the bottom.
7KHEDVHPXVWQRWEHPRUHWKDQLQFKODUJHUWKDQWKH
HOHPHQW8VHRIZDWHUEDWKFDQQHUVZLWKULSSOHGERWWRPV
PD\H[WHQGWKHWLPHUHTXLUHGWREULQJWKHZDWHUWRDERLO
DQGFRRNWRSVPD\EHGDPDJHG
6RPHFDQQHUVDUHGHVLJQHGZLWKVPDOOHUEDVHVIRUXVH
RQVPRRWKWRSVXUIDFHV
8VHWKHKLJKKHDWVHWWLQJRQO\XQWLOWKHZDWHUFRPHVWRD
ERLORUSUHVVXUHLVUHDFKHGLQWKHFDQQHU
5HGXFHWRWKHORZHVWKHDWVHWWLQJWKDWPDLQWDLQVWKHERLO
RUSUHVVXUH,IWKHKHDWLVQRWWXUQHGGRZQWKHFRRNWRS
PD\EHGDPDJHG
USING THE PROPER COOKWARE
8VLQJWKHULJKWFRRNZDUHFDQSUHYHQWPDQ\SUREOHPV
VXFKDVIRRGWDNLQJORQJHUWRFRRNRUDFKLHYLQJ
LQFRQVLVWHQWUHVXOWV3URSHUSDQVZLOOUHGXFHFRRNLQJ
WLPHVDQGFRRNIRRGPRUHHYHQO\6WDLQOHVVVWHHOLV
UHFRPPHQGHG
Check pans for flat bottoms by
using a straight edge or ruler
➊3ODFHDUXOHUDFURVVWKHERWWRP
RIWKHSDQ
➋ +ROGLWXSWRWKHOLJKW
➌ 1ROLJKWVKRXOGEHYLVLEOHXQGHU
WKHUXOHU
NOTE:
'RQRWXVHDVPDOOSDQRQDODUJHHOHPHQW1RWRQO\
GRHVWKLVZDVWHHQHUJ\EXWLWFDQDOVRUHVXOWLQ
VSLOORYHUVEXUQLQJRQWRWKHFRRNLQJDUHDZKLFK
UHTXLUHVH[WUDFOHDQLQJ
'RQRWXVHQRQIODWVSHFLDOW\LWHPVWKDWDUH
RYHUVL]HGRUXQHYHQVXFKDVURXQGERWWRPZRNV
ULSSOHGERWWRPDQGRURYHUVL]HGFDQQHUVDQGJULGGOHV
'RQRWXVHIRLORUIRLOW\SHFRQWDLQHUV)RLOPD\PHOW
RQWRWKHJODVV,IPHWDOPHOWVRQWKHFRRNWRSGRQRW
XVH&DOODQDXWKRUL]HG6HUYLFHDJHQW
SURFACE CONTROLS COOKING
Single element
Recommended
)ODWERWWRPDQG
VWUDLJKWVLGHV
+HDY\JDXJHSDQV
3DQVL]HVPDWFKWKH
DPRXQWRIIRRGWREH
SUHSDUHGDQGWKHVL]H
RIWKHVXUIDFHHOHPHQW
:HLJKWRIKDQGOHGRHV
QRWWLOWSDQ3DQLVZHOO
EDODQFHG
7LJKWILWWLQJOLGV
)ODWERWWRPZRNV
Incorrect
&XUYHGJURRYHGRUZDUSHG
SDQERWWRPV3DQVZLWK
XQHYHQERWWRPVGRQRWFRRN
HIILFLHQWO\DQGVRPHWLPHV
PD\QRWERLOOLTXLG
9HU\WKLQJDXJHPHWDORU
JODVVSDQV
3DQVDUHVPDOOHURUODUJHU
WKDQWKHHOHPHQW
&RRNZDUHZLWKORRVHRU
EURNHQKDQGOHV+HDY\
KDQGOHVWKDWWLOWWKHSDQ
/RRVHILWWLQJOLGV
:RNVZLWKDULQJVWDQG
ERWWRP

15
ENGLISH
PARTS AND FEATURES
PARTS AND FEATURES
Template Screws (6 ea) Anchors (6 ea)Anti-tip bracket
Automatic oven light switch
Gasket
Lower oven door
Anti-tip bracket
Ceramic glass
Name & Rating label
Single element
Single element Single element
Standard rack(3ea)
Upper oven door
Racks
Racks
Warning label
Single element
Accessories for cooking
Accessories for installation
Standard rack(3 ea)

16
CONTROL PANEL FEATURES
PARTS AND FEATURES
5($'7+(,16758&7,216&$5()8//<%()25(86,1*7+(29(1For satisfactory use of your oven,
become familiar with the various features and functions of the oven as described below. 'HWDLOHGLQVWUXFWLRQV
IRUHDFKIHDWXUHDQGIXQFWLRQDUHOLVWHGLQWKLV2ZQHUV0DQXDO
833(529(1
%$.(8VHWRVHOHFWWKH%DNHIXQFWLRQRIWKH
upper oven.
%52,/8VHWRVHOHFWWKH%URLOIXQFWLRQRIWKH
upper oven.
:$50 Use to select the Warm function of the
upper oven.
3,==$ Use to select the Pizza function of the
upper oven.
833(5&/($52)) Use to stop cooking,
cancel settings of the upper oven.
833(5/,*+7 Use to turn the Oven lights of
the upper oven on and off.
833(56(/)&/($1Use to select the Self
Clean of the upper oven.
833(57,0(5212))Use to set or cancel the
timer of the upper oven.
/2:(529(1
%$.(8VHWRVHOHFWWKH%DNHIXQFWLRQRIWKH
lower oven.
%52,/8VHWRVHOHFWWKH%URLOIXQFWLRQRIWKH
lower oven.
:$50Use to select the Warm function of the
lower oven.
3522)Use to select the Proof function of the
lower oven.
/2:(5&/($52)) Use to stop cooking,
cancel settings of the lower oven.
/2:(5/,*+7 Use to turn the Oven lights of
the lower oven on and off.
/2:(56(/)&/($1 Use to select the Self
Clean of the lower oven.
/2:(57,0(5212)) Use to set or cancel
the timer of the lower oven.
9 10 11 12 13
1 2 3 4 56 7 8 17 18
14 15 16 19 20 22 21
1
11
12
13
14
15
16
2
3
4
5
6
7
8
9
10

17
ENGLISH
CONTROL PANEL FEATURES
(cont')
&20021)81&7,21
&/2&. Use to set the time of day.
6(77,1* Use to set the time of day.
67$577,0(8VHWRVHWGHOD\WLPH%DNH6HOI
clean only)
&22.7,0( Use to set the length of the cook
WLPH%DNHRQO\
START :8VHWR67$57DOOIXQFWLRQVLQWKHRYHQ
7RDFWLYDWH/2&.287SUHVVDQGKROGIRU
seconds.
180%(53$'6 Use to enter a temperature and
all times.
NOTE:
,I)²DQGDQXPEHUDSSHDULQWKHGLVSOD\DQGWKH
oven control signals, this indicates a function
error code.
See page 42.
7RXFKWKH833(5or/2:(5&/($52)) pad.
$OORZWKHRYHQWRFRROIRURQHKRXU3XWWKHRYHQEDFN
into operation.
If the function error code repeats, disconnect the
power to the oven and call for service.
If your oven was set for a timed oven operation
and a power outage occurred, the clock and all
programmed functions must be reset.
The time of day will flash in the display when
there has been a power outage.
PARTS AND FEATURES
19
20
21
22
17
18

18
CLOCK
How to set the Clock
7KHFORFNPXVWEHVHWWRWKHFRUUHFWWLPHRIGD\IRU
the automatic oven timing functions to work properly.
7KHWLPHRIGD\FDQQRWEHFKDQJHGGXULQJDWLPHG
baking or Self Clean cycle.
CLOCK ➊7RXFKWKH&/2&. pad once to
set.
1 2 3 ➋7RXFKWKHnumber pad to enter
WKHWLPH7RXFKWKHQXPEHUSDG
with the correct time of day. For
example, to set 12:34, touch the
number pad 1, 2, 3 and 4.
If number pad is not touched
within 30 seconds after you touch
the &/2&. pad, the display
reverts to the original setting. If
this happens, touch the &/2&.
pad and reenter the time of day.
START
LOCKOUT
➌7RXFKSTART.7KLVHQWHUVWKH
time and starts the clock.
7RFKHFNWKHWLPHRIGD\ZKHQWKHGLVSOD\LVVKRZLQJ
other information, simply touch the &/2&. pad.
How to change hour mode on Clock
(12HR or 24HR)
<RXUFRQWUROLVVHWWRXVHDKRXUFORFN,I\RXZRXOG
SUHIHUWRKDYHDKRXUWLPHFORFNIROORZWKHVWHSV
below.
SETTING ➊7RXFKDQGKROG&/2&. for
3 seconds.
1 2 ➋If touching the #1 once or more,
\RXFDQFKDQJHKRXURU
KRXU$QGVHOHFWKRXURU
KRXU
START
LOCKOUT
➌7RXFKWKHSTART pad to accept
the desired change.
Power outage
If a flashing time is in the display, you
have experienced a power failure.
5HVHWWKHFORFN7RXFKWKH&/2&.
pad once to reset. Enter the
correct time of day by touching the
appropriate number pads.
7RXFKWKHSTART pad.
MINIMUM & MAXIMUM DEFAULT SETTINGS
$OORIWKHIHDWXUHVOLVWHGKDYHPLQLPXPDQGPD[LPXP
time or temperature settings that may be entered into
WKHFRQWURO$QHQWU\DFFHSWDQFHEHHSZLOOVRXQGHDFK
time a control pad is touched.
$QHQWU\HUURUWRQHVKRUWPHORG\ZLOOVRXQGLIWKH
entry of the temperature or time is below the minimum
or above the maximum settings for the feature.
OPERATING INSTRUCTIONS
)($785(
&/2&.7,0(
.,7&+(1
7,0(5
COOKING
7,0(
%52,/7(03
%$.(7(03
3522)
:$50
6(/)&/($1
0,17(03
7,0(
0$;7(03
7,0(
'HIDXOW
1:00 Hr. / Min.
0:00 Hr. / Min.
0:01 Min.
0:01 Min.
0:01 Min.
0:01 Min.
/R)&
ʞʝ
3 Hr.
11:59 Hr. / Min.
23:59 Hr. / Min.
11:59 Hr. / Min.
11:59 Hr. / Min.
11:59 Hr. / Min.
11:59 Hr. / Min.
+Lʞʝ
ʞʝ
)&KRXUV
5 Hr.
12 Hr.
24 Hr.
12 Hr.
24 Hr.
12 Hr.
24 Hr.
3 Hr.
12 Hr.
12 Hr.
3 Hr.
4 Hr.

19
ENGLISH
TIMER ON/OFF
7KH833(5or/2:(57,0(5212)) serves as an extra timer in the kitchen that will beep when the
set time has run out. It does not start or stop cooking.
7KH833(5or/2:(57,0(5212)) feature can be used during any of the other oven control
IXQFWLRQV7KH833(5 and /2:(57,0(5 can be operated independently of each other.
To set the Timer
(example to set 5 minutes):
➊7RXFK833(5or/2:(57,0(5
212)) twice.
0:00 and HR inside will appear
and 7,0(5
will flash in the display.
➋
7RXFK5in the number pad.
You can see 0:05 in the display
➌7RXFK7,0(5WRVWDUWWKH7LPHU.
7KHWLPHZLOOFRXQWGRZQZLWK
and the time will show in the display.
NOTE:
If 833(5or/2:(57,0(521
2)) is not touched, the timer will
return to the time of day.
➍When the set time has run out,
(QGZLOOVKRZLQWKHGLVSOD\7KH
indicator tones will sound every
15 seconds until 833(5or
/2:(57,0(5212)) is
touched.
NOTE:
If the remaining time is not in the display, recall the
UHPDLQLQJWLPHE\WRXFKLQJWKH833(5RU/2:(5
7,0(5212))
NOTE:
,I\RXWRXFK833(5or/2:(57,0(5212))
once, it allows you to set the time in seconds.
(for example: if you touch 50, it means 50 seconds)
,I\RXWRXFK833(5or/2:(57,0(5212))
twice, it allows you to set the time in minutes.
(for example: if you touch 5, it means 5 minutes)
To cancel the Timer before the set time
has run out:
➊7RXFK833(5or/2:(57,0(5
212)) once.
7KHGLVSOD\ZLOOUHWXUQWRWKHWLPH
of day.
OPERATING INSTRUCTIONS
5
or
UPPER
TIMER ON/OFF
LOWER
TIMER ON/OFF
or
UPPER
TIMER ON/OFF
LOWER
TIMER ON/OFF
or
UPPER
TIMER ON/OFF
LOWER
TIMER ON/OFF
or
UPPER
TIMER ON/OFF
LOWER
TIMER ON/OFF

20
How to adjust the oven thermostat
(For both the Upper & Lower ovens)
You may find that your new oven cooks differently
than the one it replaced. Use your new oven for a few
weeks to become more familiar with it. If you still think
\RXUQHZRYHQLVWRRKRWRUWRRFROG\RXFDQDGMXVW
the thermostat yourself.
Do not use thermometers,such as those found in
grocery stores, to check the temperature setting of
\RXURYHQ7KHVHWKHUPRPHWHUVPD\YDU\²
degrees.
NOTE:
7KLVDGMXVWPHQWZLOOQRWDIIHFWWKHEURLOLQJRUWKH6HOI
&OHDQWHPSHUDWXUHV7KHDGMXVWPHQWZLOOEHUHWDLQHG
in memory after a power failure.
7KHRYHQWHPSHUDWXUHFDQEHLQFUHDVHGRU
GHFUHDVHGDVPXFKDV)RU&
NOTE:
Once the temperature is increased or decreased, the
GLVSOD\ZLOOVKRZWKHDGMXVWHGWHPSHUDWXUHXQWLOLWLV
UHDGMXVWHG
To Adjust the Oven Temperature
(For the Lower oven only)
➊
7RXFK6(77,1* pad 1 times for the
ORZHURYHQ/$-ZLOODSSHDULQ
the display.
➋Using the number pad enter the
temperature correction you wish
WRDGMXVW([DPSOHWRDGMXVWWKH
oven temperature UP 15 degrees,
touch 15.
➌7RXFKSTART pad to accept the
change.
➍7RORZHUWKHRYHQWHPSHUDWXUH
enter 15 then touch 6(77,1* pad
WR'(&5($6(WKHWHPSHUDWXUH
IRUYDOXH
➎7RXFK67$57SDGWRDFFHSWWKH
change.
(For the Upper oven only)
➊7RXFK6(77,1* pad 2 times for
WKHORZHURYHQ´8$-ZLOODSSHDU
in the display.
➋Using the number pad enter the
temperature correction you wish
WRDGMXVW
([DPSOHWRDGMXVWWKHRYHQ
temperature UP 15 degrees,
touch 15.
➌7RXFKSTART pad to accept the
change.
➍7RORZHUWKHRYHQWHPSHUDWXUH
enter 15 then touch 6(77,1* pad
WR'(&5($6(WKHWHPSHUDWXUH
IRUYDOXH
➎7RXFKSTART pad to accept the
change.
OPERATING INSTRUCTIONS
SPECIAL FEATURES OF YOUR OVEN CONTROL
<RXUQHZWRXFKSDGFRQWUROKDVDGGLWLRQDOIHDWXUHVWKDW\RXPD\FKRRVHWRXVH7KHIROORZLQJSDJHV
describe these features and how you may activate them.
7KHVSHFLDOIHDWXUHPRGHVFDQRQO\EHDFWLYDWHGZKLOHWKHGLVSOD\LVVKRZLQJWKHWLPHRIGD\
7KH\UHPDLQLQWKHFRQWUROҋVPHPRU\XQWLOWKHVWHSVDUHUHSHDWHG
When the display shows your choice, touch the STARTSDG7KHVSHFLDOIHDWXUHVZLOOUHPDLQLQPHPRU\DIWHUD
power failure.
SETTING
SETTING
START
LOCKOUT
START
LOCKOUT
START
LOCKOUT
START
LOCKOUT
SETTING
SETTING
1 5
1 5
Other manuals for LDE3011ST
3
Table of contents
Other LG Range manuals

LG
LG LSC5683WS User manual

LG
LG LSB5611SB Use and care manual

LG
LG LRE30755SB - 30in Electric Range Use and care manual

LG
LG LDG4313 Series User manual

LG
LG LDG3016ST User manual

LG
LG LTEL7337F.BRSLLGA User manual

LG
LG LSG4513BD User manual

LG
LG LSIS3018SS User manual

LG
LG LRG3021ST User manual

LG
LG LUTD4919SN User manual