LG GF-L570MBNL User manual

www.lg.com
OWNER'S MANUAL
REFRIGERATOR
Read this owner's manual thoroughly before operating the appliance and keep
it handy for reference at all times.
MFL70525072
Rev.00_052720 Copyright © 2020 LG Electronics Inc. All Rights Reserved.
EN ENGLISH

TABLE OF CONTENTS This manual may contain images or
content different from the model you
purchased.
This manual is subject to revision by the
manufacturer.
SAFETY INSTRUCTIONS .......................................................3
IMPORTANT SAFETY INSTRUCTIONS.................................................... 3
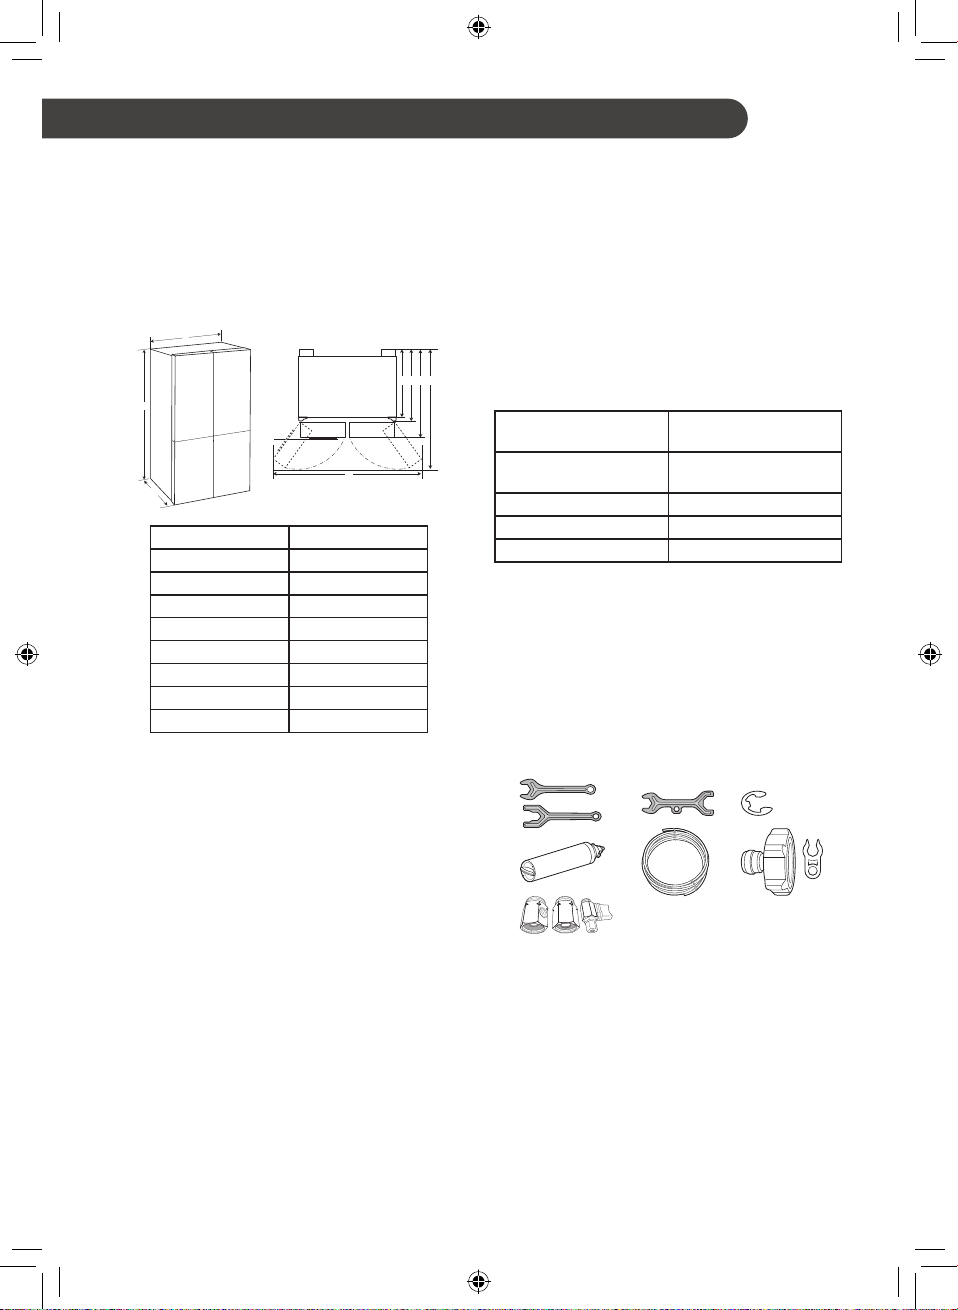
INSTALLATION ......................................................................10
Before Installation..................................................................................... 10
Dimensions and Clearances..................................................................... 10
Ambient Temperature ............................................................................... 10
Removing/Assembling the Doors ............................................................. 11
Leveling .................................................................................................... 13
Connecting the Water Line (Plumbed models Only)................................. 14
Assembling the Water Filter...................................................................... 15
Connecting the Appliance......................................................................... 16
Moving the Appliance ............................................................................... 16
OPERATION ...........................................................................17
Parts and Functions.................................................................................. 17
Notes for Operation .................................................................................. 21
Using Control Panel.................................................................................. 23
Water and Ice Dispenser .......................................................................... 24
Automatic Icemaker.................................................................................. 25
Detaching the In-Door Ice Bin .................................................................. 26
Folding Door Mullion................................................................................. 27
Door in Door ( * ) ...................................................................................... 27
InstaView Function ( * ) ............................................................................ 27
Water Dispenser Tank (Non plumbed models only) ................................. 28
Using the Folding Shelf ( * )...................................................................... 29
Other Functions ........................................................................................ 29
SMART FUNCTIONS .............................................................30
LG ThinQ Application................................................................................ 30
Smart Diagnosis ....................................................................................... 31
MAINTENANCE......................................................................33
Notes for Cleaning.................................................................................... 33
Cleaning the Condenser Cover ................................................................ 33
Cleaning the Water Dispenser.................................................................. 34
Cleaning the Fridge Shelf ......................................................................... 34
Cleaning the Folding Shelf ( * )................................................................. 34
Cleaning the Vegetable Drawer................................................................ 35
Cleaning the Door-in-Door Compartment................................................. 36
Cleaning the Freezer Drawer ................................................................... 36
Replacing the Pure N Fresh Filter ............................................................ 37
Replacing the Water Filter (Plumbed models Only).................................. 38
TROUBLESHOOTING ...........................................................40

3
SAFETY INSTRUCTIONS EN
The following safety guidelines are intended to prevent
unforeseen risks or damage from unsafe or incorrect
operation of the appliance.
The guidelines are separated into ‘WARNING’ and ‘CAUTION’
as described below.
This symbol is displayed to indicate matters and
operations that can cause risk. Read the part with this
symbol carefully and follow the instructions in order to
avoid risk.
WARNING
This indicates that the failure to follow the instructions can
cause serious injury or death.
CAUTION
This indicates that the failure to follow the instructions can
cause the minor injury or damage to the product.
IMPORTANT SAFETY INSTRUCTIONS
WARNING
To reduce the risk of explosion, fire, death, electric shock,
injury or scalding to persons when using this product,
follow basic precautions, including the following:
Technical Safety
•This appliance is not intended for use by persons (including
children) with reduced physical, sensory or mental capabilities, or
lack of experience and knowledge, unless they have been given
supervision or instruction concerning use of the appliance by a
person responsible for their safety. Children should be supervised
to ensure that they do not play with the appliance.
•If the power cord is damaged or the hole of the outlet socket is
loose, do not use the power cord and contact an authorized
service centre.

4
EN
•Do not damage the refrigerant circuit.
•Do not use mechanical devices or other means to accelerate the
defrosting process.
•Keep ventilation openings, in the appliance enclosure or in the
built-in structure, clear of obstruction.
•Do not use electrical appliances inside the refrigerator.
•The refrigerant and insulation blowing gas used in the appliance
require special disposal procedures. Consult with service agent or
a similarly qualified person before disposing of them.
•This appliance is intended to be used in household and similar
applications only. It should not be used for commercial, or catering
purposes, or in any mobile application such as a caravan or boat.
•Do not store explosive substances such as aerosol cans with a
flammable propellant in this appliance.
This symbol alerts you to flammable materials that
can ignite and cause a fire if you do not take care.
•This appliance contains a small amount of isobutane refrigerant
(R600a), but it is also combustible. When transporting and
installing the appliance, care should be taken to ensure that no
parts of the refrigerating circuit are damaged.
•When positioning the appliance, ensure the supply cord is not
trapped or damaged.
•Do not locate multiple portable outlet-sockets or portable power
supplies at the rear of the appliance.
•Disconnect the power cord before cleaning the appliance or
replacing the inside lamp (where fitted).
•Securely plug the power plug in the outlet socket after completely
removing any moisture and dust.
•Never unplug the appliance by pulling on the power cable. Always
grip the power plug firmly and pull straight out from the outlet
socket.

5
EN
•Do not spray water or inflammable substances (toothpaste,
alcohol, thinner, benzene, flammable liquid, abrasive, etc.) over
the interior or exterior of the appliance to clean it.
•Do not clean the appliance with brushes, cloths or sponges with
rough surfaces or which are made of metallic material.
•Only qualified service personnel from LG Electronics service
centre should disassemble, repair, or modify the appliance.
Contact an LG Electronics customer information centre if you
move and install the appliance in a different location.
•Do not use a hair drier to dry the inside of the appliance or place
a candle inside to remove the odours.
•Do not tilt the appliance to pull or push it when transporting.
•Make sure not to get a body part such as a hand or foot stuck
while moving the appliance.
Risk of Fire and Flammable Materials
•If a leak is detected, avoid any naked flames or potential sources
of ignition and air the room in which the appliance is standing for
several minutes. In order to avoid the creation of a flammable gas
air mixture if a leak in the refrigerating circuit occurs, the size of
the room in which the appliance is used should correspond to the
amount of refrigerant used. The room must be 1 m² in size for
every 8 g of R600a refrigerant inside the appliance.
•Refrigerant leaking out of the pipes could ignite or cause an
explosion.
•The amount of refrigerant in your particular appliance is shown on
the identification plate inside the appliance.
Installation
•This appliance should only be transported by two or more people
holding the appliance securely.
•Install the appliance on a firm and level floor.
•Do not install the appliance in a damp and dusty place. Do not
install or store the appliance in any outdoor area, or any area that
is subject to weathering conditions such as direct sunlight, wind,
rain, or temperatures below freezing.

6
EN
•Do not place the appliance in direct sunlight or expose it to the
heat from heating appliances such as stoves or heaters.
•Be careful not to expose the rear of the appliance when installing.
•Install the appliance in a place where is easy to unplug the power
plug of the appliance.
•Be careful not to let the appliance door fall during assembly or
disassembly.
•Be careful not to pinch, crush, or damage the power cable during
assembly or disassembly of the appliance door.
•Be careful not to point the power plug up or let the appliance lean
against the power plug.
•Do not connect a plug adapter or other accessories to the power
plug.
•Do not modify or extend the power cable.
•Ensure that the outlet socket is properly grounded, and that the
earth pin on the power cord is not damaged or removed from the
power plug. For more details on grounding, inquire at an LG
Electronics customer information centre.
•This appliance is equipped with a power cord having an
equipment-grounding conductor and a grounding power plug. The
power plug must be plugged into an appropriate outlet socket that
is installed and grounded in accordance with all local codes and
ordinances.
•Never start up an appliance showing any signs of damage. If in
doubt, consult your dealer.
•Dispose of all packaging materials (such as plastic bags and
styrofoam) away from children. The packaging materials can
cause suffocation.
•Do not plug the appliance into multiple outlet sockets, power
boards, or an extension power cable.
•Do not use an extension cord or double adapter.

7
EN
Operation
•Do not use the appliance for any purpose (storage of medical or
experimental materials or shipping) other than any domestic
household food storage use.
•If water penetrates electrical parts of the appliance, disconnect
power plug and contact an LG Electronics customer information
centre.
•Unplug the power plug during a severe thunderstorm or lightening
or when not in use for a long period of time.
•Do not touch the power plug or the appliance controls with wet
hands.
•Do not bend the power cable excessively or place a heavy object
on it.
•Immediately unplug the power plug and contact an LG Electronics
customer information centre if you detect a strange sound, odour,
or smoke coming from the appliance.
•Do not place hands or metallic objects inside the area emitting the
cold air, cover or heat releasing grille on the back.
•Do not apply excessive force or impact to the back cover of the
appliance.
•Be careful of nearby children when you open or close the
appliance door. The door may bump the child and cause injury.
•Avoid the danger of children getting trapped inside the appliance.
A child trapped inside the appliance can cause suffocation.
•Do not put animals, such as pets into the appliance.
•Do not place heavy or fragile objects, containers filled with liquid,
combustible substances, flammable objects (such candles, lamps,
etc.), or heating devices (such as stoves, heaters, etc.) on the
appliance.
•Do not place any electronic appliance (such as heater and mobile
phone) inside the appliance.

8
EN
•If there is a gas leakage (isobutane, propane, natural gas, etc.),
do not touch the appliance or power plug and ventilate the area
immediately. This appliance uses a refrigerant gas (isobutane,
R600a). Although it uses a small amount of the gas, it is still
combustible gas. Gas leakage during appliance transport,
installation or operation can cause fire, explosion or injury if
sparks are caused.
•Do not use or store flammable or combustible substances (ether,
benzene, alcohol, chemical, LPG, combustible spray, insecticide,
air freshener, cosmetics, etc.) near the appliance.
•Fill with potable water only into icemaker or dispenser water tank.
Disposal
•When discarding the appliance, remove the door gasket while
leaving the shelves and baskets in place and keep children away
from the appliance.
CAUTION
To reduce the risk of minor injury to persons, malfunction,
or damage to the product or property when using this
product, follow basic precautions, including the following:
Operation
•Do not touch frozen food or the metal parts in the freezer
compartment with wet or damp hands. It may cause frostbite.
•Do not place glass containers, bottles or cans (especially those
containing carbonated drinks) in the freezer compartment, shelves
or ice bin that will be exposed to temperatures below freezing.
•The tempered glass on the front side of the appliance door or the
shelves can be damaged by an impact. If it is broken, do not
touch it with hands.
•Do not hang from the appliance doors, storage room, shelf or
climb up into it.

9
EN
•Do not store an excessive amount of water bottles or containers
for side dishes on the door baskets.
•Do not open or close the appliance door with excessive force.
•If the hinge of the appliance door is damaged or operates
improperly, stop using the appliance and contact an authorized
service centre.
•Prevent animals from nibbling on the power cable or water hose.
•Never eat frozen foods immediately after they have been taken
out in the freezer compartment.
•Do not use a thin crystal cup or chinaware when dispensing.
•Make sure not to get a hand or foot stuck upon opening or closing
the appliance door or door in door.
•Do not place heavy objects on top of the door in door.
Maintenance
•Do not clean glass shelves or covers with warm water when they
are cold. They may break if exposed to sudden temperature
changes.
•Do not insert the shelves upside down. The shelves may fall.
•To remove frost from the appliance, contact an LG Electronics
customer information centre.
•Dispose of the ice inside the ice bin in the freezer compartment
during an extended power outage.

10
EN
Before Installation
Dimensions and Clearances
Ventilation around the refrigerator is important
to provide efficient operation. Allow at least 5
mm clearance on each side of the refrigerator
and over 50 mm clearance between the back of
the refrigerator and the wall when installed.
A
C
B
H
DE
F
G
-Size (mm)
A 835
B 1787
C 734
D 617
E 688
F 729
G 1065
H 1562
Ambient Temperature
•The appliance is designed to operate within a
limited range of ambient temperatures,
depending on the climate zone. Do not use
the appliance at a temperature exceeding the
limit.
•The internal temperature could be affected by
the location of the appliance, the ambient
temperature, the frequency of door opening
and so on.
•The climate class can be found on the rating
label.
Climate Class Ambient Temperature
Range ºC
SN (Extended
Temperate) +10 - +32
N (Temperate) +16 - +32
ST (Subtropical) +16 - +38
T (Tropical) +16 - +43 / +10 - +43*
*Australia, India, Kenya
NOTE
•The appliances rated from SN to T are
intended to be used at an ambient
temperature between 10 ºC and 43 ºC.
Accessories
*1:This feature is only available on some models.
a b c
d e f
g
a Spanner A*1
b Spanner B*1
c C-Clip (Snap Ring)*1
d Water Filter
e Water Tube
f Tube Connector and Clip*1
g Tube Connector and Valve*1
INSTALLATION

11
EN
Removing/Assembling the
Doors
•When it is necessary to move the appliance
through a narrow opening, removing the doors
is the recommended procedure.
WARNING
•Disconnect the power cord, house fuse or
circuit breaker before installing or servicing the
appliance. Failure to follow these instructions
may result in death, fire or electric shock.
Removing the Fridge Doors
1Remove the connected water tube by
pressing the collet towards the tube
connector.
Collet
Tube connector
Water tube
NOTE
•The water supply line is connected to the top
right part in the back of the appliance.
2Remove the screw of the hinge cover on
top of the appliance by rotating it
counterclockwise.
3Remove the connector by pulling it in both
directions by pressing down on the hook of
the wire harness connector.
4Unscrew the groud wire . Rotate the hinge
lever counterclockwise. Lift the top hinge
free of the hinge lever latch.
Hinge Lever
Latch
CAUTION
•It is recommended that two or more people
carry out the door removal and refitting.
•When removing the upper hinge, be careful
that the door does not fall forward.
5Lift the door off of the middle hinge pin and
remove the door.
CAUTION
•Place the door on a non-scratching surface
with the inner side facing up.

12
EN
Refitting the Fridge Doors
Mount the doors in the reverse sequence of
their removal once the appliance has been
passed through all access doors.
NOTE
•If the water tube end is damaged, it should be
trimmed to ensure it does not leak when
refitted.
Not straight Damaged Stretched
•While pressing the collet toward the tube
connector, gently insert the water tube until
only one line is visible. Pull on the water tube
to make sure that the tube is tightly fastened.
Collet
Water tube
Insert line
<Correct>
<Incorrect>
Removing the Freezer Doors
1Remove the two hinge bolts.
2Twist the hinge to raise the pivoting end so
that the door can be lifted off. Lift the door
off the lower hinge pin and remove it.
3Remove the door by lifting it off the lower
hinge pin.
Lower Hinge
Refitting the Freezer Doors
Mount the doors in the reverse sequence of
their removal once the appliance has been
passed through all access doors.

13
EN
Leveling
If the appliance seems unsteady, or the doors
do not close easily, adjust the appliance’s tilt.
Leveling the appliance
If both the fridge and freezer doors on one side
are equally lower than the opposite side as in
the diagram below, then adjust the foot of the
lower side by turning the nut above the foot with
the spanner so that the doors become level
with the higher side.This condition may be
caused by an uneven floor.
NOTE
•Because the hinge pin may fall out, do not
adjust the height of the appliance door more
than 3 mm.
Door Alignment
If the gap between the doors is uneven, follow
the instructions below to align the doors evenly.
Adjusting the Height of the
Freezer Door
1Turn the keeper nut clockwise using the
spanner .
2Turn the adjustment hinge pin clockwise or
counterclockwise using the spanner .
To lower the door, turn the adjustment hinge
pin clockwise. To raise the door, turn the
adjustment hinge pin counterclockwise.
3Fasten the keeper nut by turning it
counterclockwise.
CAUTION
•Do not adjust the height of the appliance door
more than 3 mm.
NOTE
•Leveling the doors may not be possible when
the floor is not leveled, or is of weak or poor
construction.
•The refrigerator is heavy and should be
installed on a rigid and solid surface.
•Some timber flooring may cause levelling
difficulties if it flexes excessively.

14
EN
Adjusting the Height of the Left
Fridge Door
If the left door is lower, lift the left door, and turn
the hinge bolt using the spanner as in the
drawing.
Adjusting the Height of the Right
Fridge Door
<Type1>
If the right door is lower, lift the right door, and
use the spanner to turn the keeper nut
clockwise until the heights are balanced.
<Type2>
If the right door is lower, lift the right door, and
use a pair of long nose pliers to additionally
insert a snap ring until the heights are
balanced.
Connecting the Water Line
(Plumbed models Only)
Water Supply Requirements
A cold water supply with water pressure
between 138 kPa and 827 kPa (1.4-8.4 kgf/cm²)
is requried to operate the water dispenser. If the
refrigerator is installed in an area with low water
pressure (below 138 kPa), you can install a
booster pump to compensate for the low
pressure.
If a reverse osmosis water filtration system is
connected to your cold water supply, the water
pressure to the reverse osmosis system needs
to be a minimum of 138 kPa to 827 kPa
(1.4-8.4 kgf/cm²)
WARNING
•Unplug the appliance before carrying out any
work on connecting the water line. Failure to
do so may cause electric shock.
•Only connect the water line to a cold water
supply. Failure to do so may cause the water
filter to malfunction. Water hammer (water
banging in the pipes) in house plumbing can
cause damage to appliance parts and can
lead to water leakage or flooding.
•Connecting the water line must only be
installed by a qualified plumber and in
accordance with local legislation and
regulations governing water quality.
•Connect the water supply line (for plumbed
models only) to a potable water source only.
Otherwise, impurities in the water may cause
illness.
NOTE
•This water line installation is not covered by
the appliance warranty.

15
EN
Connecting the Water Tube to the
Appliance
1Unscrew the metal threaded collar nut at
the back of the appliance and place it over
one end of the water tube.
2Firmly push the water tube onto the water
inlet valve and tighten up the collar nut.
Assembling the Water Filter
1Unplug the appliance.
2Turn off the water supply to the appliance.
3Open the Water filter cover.
4Insert the water filter into the filter head and
rotate it clockwise until the arrow on the
filter lines up with the arrow on the filter
head. Swing the filter back into the
compartment.
5Refit the Water filter cover.
6Turn on the water supply and switch on the
appliance. Check the filter for any leaks.
Checking the Water Connection
1Turn on the water supply and switch on the
appliance. Carefully check all fittings for
possible leaks due to poorly fitted hoses.
2Press and hold the Water Filter button for
three seconds. This resets the Replacement
Filter icon. The new water filter has been
activated.
3Place a cup under the water dispenser to
verify that water is flowing through the
appliance.
4Check the connecting tube and joints for
leaks once again.
5The water filter should be fixed at a
appropriate place where it is easy to reach
for replacement purposes.

16
EN
Connecting the Appliance
After installing the apopliance connect the
power plug into a socket outlet.
NOTE
•After connecting the power supply cord (or
plug) to the outlet, wait 2 or 3 hours before
you put food into the appliance. If you add
food before the appliance has cooled
completely, your food may spoil.
Moving the Appliance
1Remove all food from inside the appliance.
2Pull the power plug out, insert and fix it into
the power plug hook at the rear or on top of
the appliance.
3Tape parts such as shelves and the door
handle to prevent from falling off while
moving the appliance.
4Move the appliance with more than two
people carefully. When transporting the
appliance over a long distance, keep the
appliance upright.
5After installing the appliance, connect the
power plug into a socket out to switch on
the appliance.

17
OPERATION EN
Parts and Functions
Exterior
3
1
2
5
1
2
5
4
Control Panel
Sets the fridge and freezer temperatures, the water filter condition and the dispenser mode.
Filtered Water and Ice Dispenser
Dispenses purified water and ice.
Door-in-Door ( * )
The Door-in-Door is a double layered door system. It can be opened individually or together with
the main door. You can conveniently locate and access your favourite snacks or food items.
InstaView Door in Door ( * )
The InstaView Door in Door compartment allows for easy access to commonly used food items.
Door-in-Door Lever ( * )
You can open the Door-in-Door by pulling the lever at the bottom of the door.
1
2
3
4
5
NOTE
•(*) means that this feature varies depending on the model purchased.
•The appearance or components of the appliance may differ from model to model.

18
EN
Interior
4
13
7
1
5
3
2
6
8
10
11
12
9
1
7
4
2
3
5
6
8
9
10
11
12
13
14
14

19
EN
Automatic Icemaker ( * )
This is where ice is automatically produced and stored.
LED Lamp
The LED lamps inside the appliance light up when you open the door.
NOTE
When the freezer door is opened, the LED lamp on the bottom of the fridge door lights up.
Pure N Fresh
This function reduces and removes odors inside the fridge compartment.
Fridge Door Basket
This is where small packages of refrigerated foods, drinks and sauce containers are stored.
Folding Door Mullion
This blocks the cold air of the fridge from escaping when the doors are closed.
CAUTION
•To reduce the risk of scratching the door or breaking the center door mullion, make sure that
the fridge door mullion is always folded in.
•The door alarm will sound every 30 seconds if the door remains open longer than one minute.
Ensure that the folding mullion is folded in before closing the left-hand door.
Water Filter
This filter purifies water.
NOTE
This filter should be replaced every 6 months.
Freezer Tray
This is where frozen foods such as the meat, fish, and ice cream, can be stored.
•The sliding trays allow easy access and convenience of use.
Freezer Drawer
This is for long-term storage of frozen items.
•Preserve small packaged frozen food or frequently-taken out foods. To use larger space,
remove drawers.
1
2
3
4
5
6
7
8

20
EN
Smart Diagnosis Unit
Use this function when contacting LG Electronics customer information centre to help make an
accurate diagnosis when the appliance operates abnormally or a failure occurs.
Door-in-Door ( * )
A convenient storage area for frequently-used items that require easy access.
Fridge Shelf
This is where refrigerated foods and other items are stored.
•The shelf height can be adjusted by inserting the shelf in another groove of different height.
•Store the foods with higher moisture content at the front of the shelf.
•The actual number of shelves will differ from model to model.
Folding Shelf ( * )
Shelf is adjustable to meet individual storage needs.
Vegetable Drawer
This is where fruits and vegetables are stored to remain fresh for as long as possible.
Water Tank (*)
This is where water to supply the dispenser or the automatic icemaker is stored. It requires
manual filling.
9
10
11
12
13
14
NOTE
•(*) means that this feature varies depending on the model purchased.
This manual suits for next models
1
Table of contents
Other LG Refrigerator manuals