CAUTION
RISK OF ELECTRIC SHOCK
DO NOT OPEN
CAUTION: TO REDUCE THE RISK OF ELECTRIC SHOCK DO
NOT REMOVE COVER (OR BACK) NO USER-SERVICEABLE
PARTS INSIDE REFER SERVICING TO QUALIFIED SERVICE
PERSONNEL.
This lightning ash with arrowhead symbol
within an equilateral triangle is intended to
alert the user to the presence of uninsulated
dangerous voltage within the product’s
enclosure that may be of sucient
magnitude to constitute a risk of electric shock to persons.
The exclamation point within an equilateral
triangle is intended to alert the user to
the presence of important operating and
maintenance (servicing) instructions in the
literature accompanying the product.
WARNING: TO PREVENT FIRE OR ELECTRIC SHOCK
HAZARD, DO NOT EXPOSE THIS PRODUCT TO RAIN OR
MOISTURE.
WARNING: Do not install this equipment in a conned
space such as a book case or similar unit.
CAUTION: The apparatus shall not be exposed to water
(dripping or splashing) and no objects lled with liquids,
such as vases, shall be placed on the apparatus.
CAUTION: Do not block any ventilation openings. Install in
accordance with the manufacturer’s instructions.
Slots and openings in the cabinet are provided for
ventilation and to ensure reliable operation of the product
and to protect it from over heating. The openings shall
be never be blocked by placing the product on a bed,
sofa, rug or other similar surface. This product shall not be
placed in a built-in installation such as a bookcase or rack
unless proper ventilation is provided or the manufacturer’s
instruction has been adhered to.
CAUTION concerning the Power Cord
The Power Plug is the disconnecting device. In case of an
emergency, the Power Plug must remain readily accessible.
NOTICE: For safety marking information including product
identication and supply ratings, please refer to the main
label on the bottom or rear of the apparatus.
CAUTION: Only use the AC adapter supplied with this
device. Do not use a power supply from another device
or another manufacturer. Using any other power cable or
power supply may cause damage to the device and void
your warranty.
IMPORTANT SAFETY
INSTRUCTIONS
1. Read these instructions.
2. Keep these instructions.
3. Heed all warnings.
4. Follow all instructions.
5. Do not use this apparatus near water.
6. Clean only with dry cloth.
7. Do not block any ventilation openings. Install in
accordance with the manufacturer’s instructions.
8. Do not install near any heat sources such as radiators,
heat registers, stoves, or other apparatus (including
amplifiers) that produce heat.
9. Do not defeat the safety purpose of the polarized or
grounding-type plug. A polarized plug has two blades
with one wider than the other. A grounding type plug
has two blades and a third grounding prong. The wide
blade or the third prong are provided for your safety. If
the provided plug does not fit into your outlet, consult
an electrician for replacement of the obsolete outlet.
10. Protect the power cord from being walked on or
pinched particularly at plugs, convenience receptacles,
and the point where they exit from the apparatus.
11. Only use attachments/accessories specified by the
manufacturer.
12. Use only with the cart, stand, tripod,
bracket, or table specified by the
manufacturer, or sold with the
apparatus. When a cart is used, use
caution when moving the cart/
apparatus combination to avoid injury
from tip-over.
13. Unplug this apparatus during lightning storms or when
unused for long periods of time.
14. Refer all servicing to qualified service personnel.
Servicing is required when the apparatus has been
damaged in any way, such as power-supply cord or
plug is damaged, liquid has been spilled or objects
have fallen into the apparatus, the apparatus has been
exposed to rain or moisture, does not operate normally,
or has been dropped.
Especicación
Specication
ESPAÑOL
Suministro de energía 12 V 01 A
(Adaptador ca/cc : WA-12M12FU)
Consumo de energía 5 W
Dimensiones
(An x Alt x P)
Aproximadamente
110 mm x 30.5 mm x 110 mm
Peso neto (Aprox.) 0.25 kg
El diseño y las especicaciones están sujetos a cambio sin
previo aviso.
ENGLISH
Power Supply 12 V 01 A
(AC adapter : WA-12M12FU)
Power consumption 5 W
Dimensions
(W x H x D)
Approx.
110 mm x 30.5 mm x 110 mm
Net Weight (Approx.) 0.25 kg
Design and specications are subject to change without
notice.
Acerca del núcleo de ferrita (opcional)
About Ferrite Core (Optional)
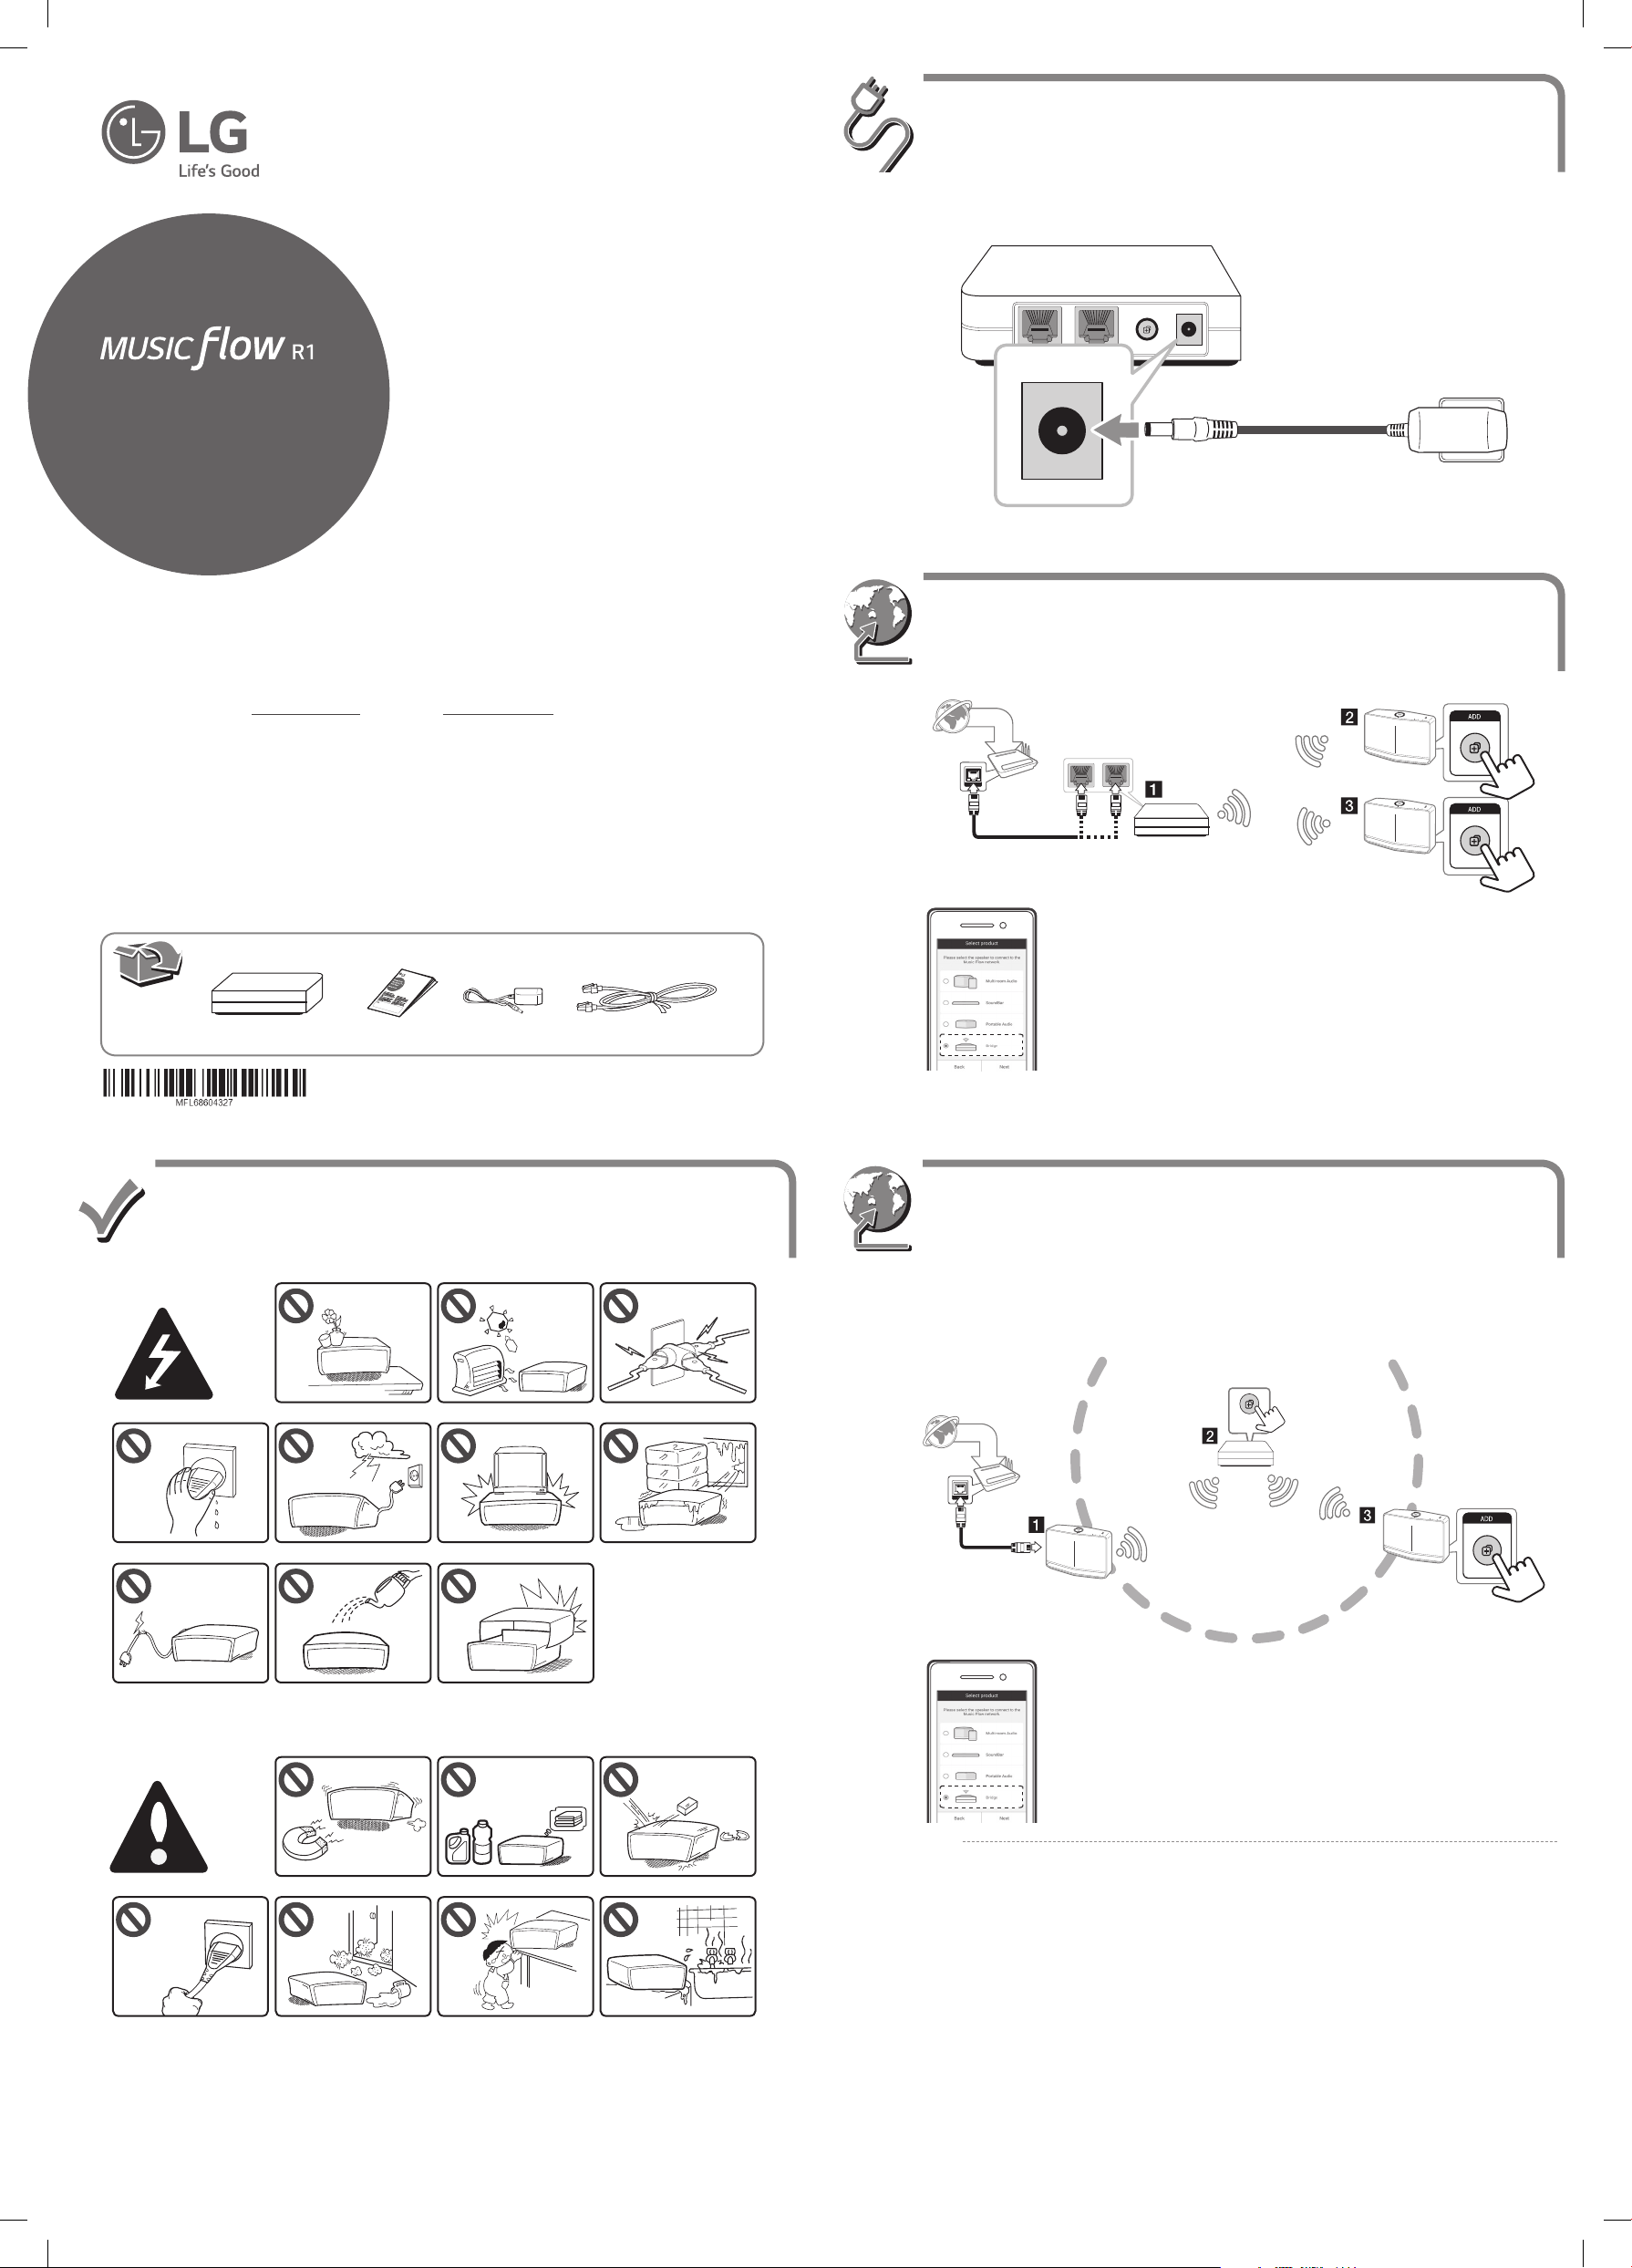
Restablecer el puente
Reset the Bridge
ADD
ADD DC IN
ADD DC IN
Oprima sin soltar el botón ADD por 8 segundos. /
Press and hold the ADD button for 8 seconds.
Cómo acoplar el núcleo de ferrita
Este núcleo de ferrita puede reducir o eliminar las interferencias
eléctricas.
1. Jale el tope [a] del núcleo de ferrita para abrirlo.
2. Enrolle el cable LAN en el núcleo de ferrita.
3. Cierre el núcleo de ferrita hasta escuchar un clic.
How to attach the ferrite core
This ferrite core can reduce or eliminate electrical interference.
1. Pull the stopper [a] of the ferrite core to open.
2. Wind the LAN cable on the ferrite core.
3. Close the ferrite core until it clicks.
PRECAUCIÓN
RIESGO DE CHOQUE
ELÉCTRICO. NO ABRIR.
PRECAUCIÓN: PARA REDUCIR EL RIESGO DE CHOQUE
ELÉCTRICO, NO RETIRE LA CUBIERTA (O LA PARTE
POSTERIOR). EN EL INTERIOR NO HAY PIEZAS REPARABLES
POR EL USUARIO. SOLICITE AYUDA AL PERSONAL DE
SERVICIO CALIFICADO.
El símbolo del rayo con punta de echa
dentro de un triángulo equilátero pretende
alertar al usuario de la presencia de voltaje
peligroso no aislado en el interior del
armario del producto que puede tener la
magnitud suciente para constituir un riesgo de choque
eléctrico para las personas.
El signo de exclamación dentro de un
triángulo equilátero pretende alertar al
usuario de la presencia de instrucciones
importantes (de servicio) para el
funcionamiento y mantenimiento en la
información que acompaña al producto.
ADVERTENCIA: PARA REDUCIR EL RIESGO DE INCENDIO O
CHOQUE ELÉCTRICO, NO EXPONGA ESTE PRODUCTO A LA
LLUVIA NI A LA HUMEDAD.
ADVERTENCIA: no instale el equipo en un espacio
cerrado, como en un librero o mueble similar.
PRECAUCIÓN: el aparato no debe exponerse al agua
(goteo o salpicaduras) y no debe colocar sobre el aparato
objetos llenos de líquidos, como oreros.
PRECAUCIÓN: no obstruya ninguno de los oricios
de ventilación. Instale conforme a las instrucciones del
fabricante.
Las ranuras y oricios del armario cumplen un propósito
de ventilación y aseguran el funcionamiento adecuado
del producto, a n de protegerlo de un posible
sobrecalentamiento. Los oricios no deben obstruirse. El
producto no debe colocarse sobre una cama, sofá, tapete
o una supercie similar. Este producto no debe colocarse
en una instalación empotrada, como un librero o estante,
a menos que haya una buena ventilación y se respeten
todas las instrucciones del fabricante.
PRECAUCIÓN relacionada con el cable de alimentación
Para desconectar la alimentación principal, retire el
cable principal de alimentación. Durante la instalación
del producto, asegúrese de que el tomacorriente sea
fácilmente accesible.
AVISO: Para la informacion relacionada con la seguridad,
incluida la identicacion del producto y las caracteristicas
electricas, consulte la etiqueta principal de la base parte
inferior del aparato.
PRECAUCIÓN: use solo el adaptador de CA suministrado
con este dispositivo. No utilice una fuente de alimentacion
de otro dispositivo o de otro fabricante. El uso de otros
cables o unidades de alimentacion puede causar danos a
la unidad e invalidar la garantia.
Instrucciones importantes
de seguridad
1. Lea estas instrucciones.
2. Guarde estas instrucciones.
3. Siga todas las advertencias.
4. Siga todas las instrucciones.
5. No use este aparato cerca del agua.
6. Limpie únicamente con un paño seco.
7. No obstruya ninguna salida de ventilación. Instale de
acuerdo con las instrucciones del fabricante.
8. No instale cerca de fuentes de calor como radiadores,
registros de calefacción, estufas u otros aparatos
(incluyendo amplicadores) que produzcan calor.
9. Respete el uso de la conexión del tomacorriente
polarizado o con conexión a tierra. Un tomacorriente
polarizado tiene una cuchilla más ancha que la otra.
Un tomacorriente con tierra tiene dos cuchillas y una
pata para tierra. La cuchilla más ancha o la pata para
tierra sirven como protección. Si el tomacorriente
proporcionado no se ajusta a su tomacorriente,
póngase en contacto con un electricista para que lo
reemplace.
10. Proteja el cable de alimentación para que no caminen
sobre él o quede atorado, particularmente en
contactos, en receptáculos y en el punto por donde
sale del aparato.
11. Solamente use los aditamentos / accesorios
especicados por el fabricante.
12. Use únicamente con el carro, estante,
trípode, soporte o mesa especicados
por el fabricante o que haya sido
vendido junto con el aparato. Cuando
use un carro, tenga cuidado cuando
mueva la unidad / carro para evitar
accidentes por vuelcos.
13. Desconecte este aparato durante tormentas eléctricas
o cuando no vaya a usarlo por períodos prolongados.
14. Haga que todo el mantenimiento sea realizado
solamente por personal técnico cualicado.Solicite
mantenimiento cuando el aparato haya sufrido
cualquier tipo de daño, por ejemplo, si el cable de
alimentación o el tomacorriente están dañados,
cuando se haya derramado líquido sobre el aparato
o hayan caído objetos sobre él, cuando haya sido
expuesto a lluvia o humedad, cuando no funcione con
normalidad o cuando haya sufrido una caída.
MR140-R0.BCOLLLK_SIM_MFL68604327.indd 2 2015-06-09 2:02:15