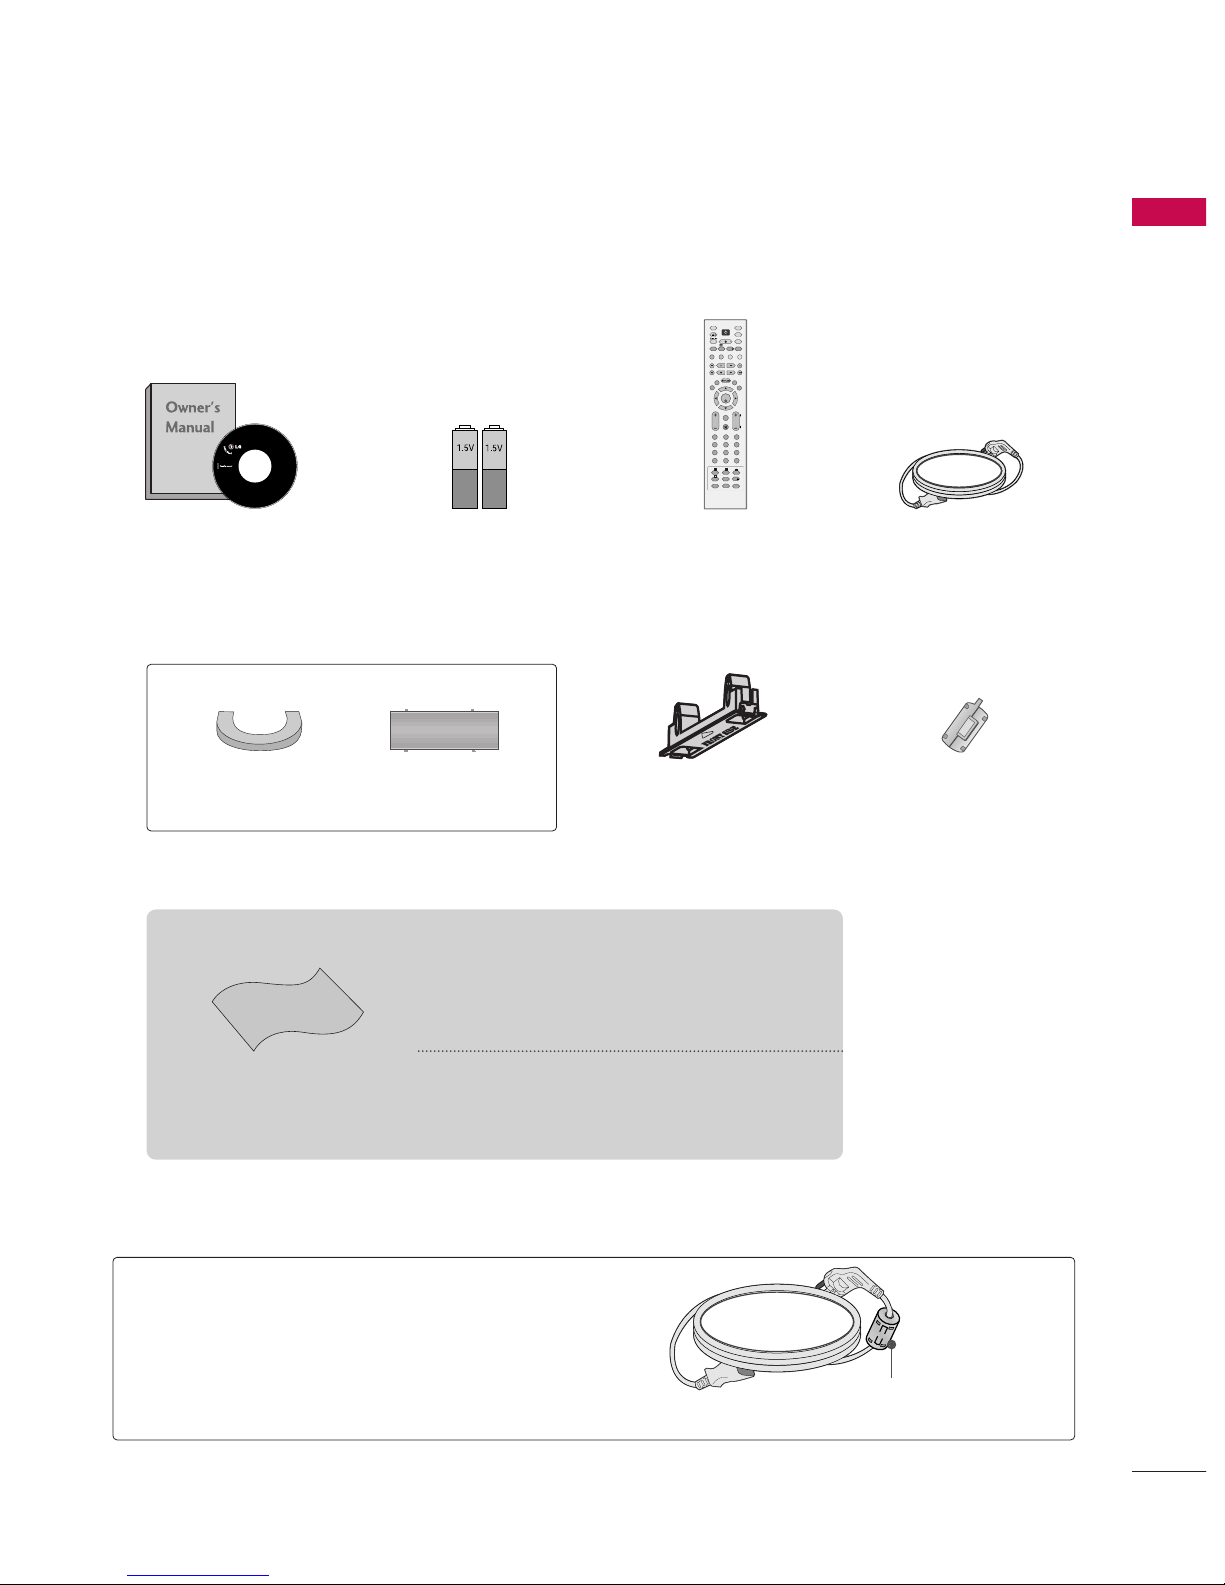
LG 50PG7 Series User manual

IIDD NNuummbbeerr::5513: 50PG79ED
OWNER’S MANUAL
PPLLAASSMMAA TTVV MMOODDEELLSS
5500PPGG77******
PLASMA TV
PPlleeaassee rreeaadd tthhiiss mmaannuuaall ccaarreeffuullllyy bbeeffrree
ppeerraattiinngg yyuurr TTVV..
RReettaaiinn iitt ffrr ffuuttuurree rreeffeerreennccee..
RReeccrrdd mmddeell nnuummbbeerr aanndd sseerriiaall nnuummbbeerr ff
tthhee TTVV..
RReeffeerr tt tthhee llaabbeell nn tthhee bbaacckk ccvveerr aanndd
qquuttee tthhiiss iinnffrrmmaattiinn..
TT yyuurr ddeeaalleerr wwhheenn rreeqquuiirriinngg sseerrvviiccee..
DVB is a registered trademark
of the DVB Project

Manufactured under license fr m D lby
Lab rat ries. ‘D lby’ and the ‘d uble-D’
symb l are trademarks f D lby
Lab rat ries.

Protection Cover Ferrite Core
i
OK
TVD/A
INPUT
DVD
SIMPLINK
EXIT
VOL
SIZE
INDEX
TIME
REVEAL
Q.VIEW
PR
MARK
LIVE
I/II
TEXT
GUIDE
VCR
POWER
123
456
789
0
LIST
?
MODE
BRIGHT
MENU
MUTE
INPUT
FAV
SLEEP
PAGE
USB
INFO
i
PIPPR- PIPPR+
PIPINPUTSWAP
TIME
SHIFT
TIME
SHIFT
SUBTITLE
RATIO
PIP
1
ACCESSORIES
ACCESS RIES
Ensure that the following accessories are included with your TV. If an accessory is missing, please contact the
dealer where you purchased the product.
wner’s Manual Batteries Remote Control Power Cord
Polishing Cloth
Polishing cloth for use on
the screen.
This feature is not available for all models.
* Lightly wipe any stains or fingerprints on the
surface of the TV with the polishing cloth.
Do not use excessive force. This may cause
scratching or discolouration.
Cable management clip
A
Image sh wn may differ fr m y ur TV.
Ferrite c re can be used t reduce the electr magnetic
wave when c nnecting the p wer c rd.
The cl ser the l cati n f the ferrite c re t the p wer
plug, the better it is.
se of Ferrite Core
Install as cl se as p ssible t
the p wer plug.

CONTENTS
2
CONTENTS
ACCESS RIES
. . . . . . . . . . . . . . . . . . . . . . . . . . . . . . . . . . . . . . . . . . .
1
PREPARATI N
H me Menu . . . . . . . . . . . . . . . . . . . . . . . . . . . . . 4
Fr nt Panel C ntr ls . . . . . . . . . . . . . . . . . . . . . . 5
Back Panel Inf rmati n . . . . . . . . . . . . . . . . . . . . 6
Back C ver f r Wire Arrangement . . . . . . . . . . . . 7
Deskt p Pedestal Installati n . . . . . . . . . . . . . . . . 8
Swivel Stand . . . . . . . . . . . . . . . . . . . . . . . . . . . . . 8
Wall M unt: H riz ntal Installati n . . . . . . . . . . . .9
N t Using the Desk-type Stand . . . . . . . . . . . . . . . . .9
Please Set it up Carefully s the Pr duct d es n t
Fall Over. . . . . . . . . . . . . . . . . . . . . . . . . . . . . . .10
Antenna C nnecti n . . . . . . . . . . . . . . . . . . . . . . 11
EXTERNAL EQUIPMENT SETUP
HD Receiver Setup . . . . . . . . . . . . . . . . . . . . . . . . . . . . . . . . . . . . . . . . . . 12
DVD Setup . . . . . . . . . . . . . . . . . . . . . . . . . . . . . . . . . . . . . . . . . . . . . . . . . . . . . . 14
VCR Setup . . . . . . . . . . . . . . . . . . . . . . . . . . . . . . . . . . . . . . . . . . . . . . . . . . . . . . 16
Digital Audi Output Setup . . . . . . . . . . . . . . . . . . . . . . . . . . . . . 18
Other A/V S urce Setup . . . . . . . . . . . . . . . . . . . . . . . . . . . . . . . . . . 19
USB In Setup . . . . . . . . . . . . . . . . . . . . . . . . . . . . . . . . . . . . . . . . . . . . . . . . . . 20
PC Setup . . . . . . . . . . . . . . . . . . . . . . . . . . . . . . . . . . . . . . . . . . . . . . . . . . . . . . . . 21
- Screen Setup f r PC M de . . . . . . . . . . . . . . . . . . . . . . . . . 24
WATCHING TV / PR GRAMME C NTR L
Rem te C ntr l Key Functi ns . . . . . . . . . . . . . .26
Turning n the TV . . . . . . . . . . . . . . . . . . . . . . . . 28
Initializing Setup . . . . . . . . . . . . . . . . . . . . . . . . . 28
Pr gramme Selecti n . . . . . . . . . . . . . . . . . . . . . 29
V lume Adjustment . . . . . . . . . . . . . . . . . . . . . . 29
On-Screen Menus Selecti n and Adjustment . . 30
Fact ry Reset . . . . . . . . . . . . . . . . . . . . . . . . . . . . 31
M del Inf . . . . . . . . . . . . . . . . . . . . . . . . . . . . . . 32
Aut Pr gramme Tuning . . . . . . . . . . . . . . . . . . .33
Manual Pr gramme Tuning . . . . . . . . . . . . . . . . . 35
Fine Tuning . . . . . . . . . . . . . . . . . . . . . . . . . . . . . 37
Assigning a Stati n Name . . . . . . . . . . . . . . . . . 38
B ster . . . . . . . . . . . . . . . . . . . . . . . . . . . . . . . . 39
Pr gramme Edit . . . . . . . . . . . . . . . . . . . . . . . . . .40
Input List . . . . . . . . . . . . . . . . . . . . . . . . . . . . . . . 42
Calling Up the Channel List . . . . . . . . . . . . . . . . 43
Input S urce Selecti n . . . . . . . . . . . . . . . . . . . . 44
SIMPLINK . . . . . . . . . . . . . . . . . . . . . . . . . . . . . . 45
Key L ck . . . . . . . . . . . . . . . . . . . . . . . . . . . . . . . 47
DVR
(DIGITAL VIDEO RECORDER)
Timeshift M de . . . . . . . . . . . . . . . . . . . . . . . . . . 48
Rec rding . . . . . . . . . . . . . . . . . . . . . . . . . . . . . . 51
Manual Rec rding . . . . . . . . . . . . . . . . . . . . . . . . 54
Rec rded TV . . . . . . . . . . . . . . . . . . . . . . . . . . . . 55
Scheduled List . . . . . . . . . . . . . . . . . . . . . . . . . . . 59
HDD F rmat . . . . . . . . . . . . . . . . . . . . . . . . . . . . 60
Rec rd Quality . . . . . . . . . . . . . . . . . . . . . . . . . . 61
T Use the USB Device . . . . . . . . . . . . . . . . . . . 62
Ph t List . . . . . . . . . . . . . . . . . . . . . . . . . . . . . . 63
Music List . . . . . . . . . . . . . . . . . . . . . . . . . . . . . . 67
EPG(ELECTR NIC PR GRAMME GUIDE)
Switch n/ ff EPG . . . . . . . . . . . . . . . . . . . . . . . 70
Select a pr gramme . . . . . . . . . . . . . . . . . . . . . . 70
Butt n Functi n in NOW/NEXT Guide M de . 71
Butt n Functi n in Extended Descripti n B x . 71
Butt n Functi n in 7 Days Guide M de . . . . . . 72
PICTURE C NTR L
Watching PIP(Picture-In-Picture) . . . . . . . . . . . .73
Picture Size (Aspect Rati ) C ntr l . . . . . . . . . .76
Preset Picture Settings
- Picture M de - Preset . . . . . . . . . . . . . . . . 77
- Aut C l ur T ne C ntr l
(Warm/Medium/C l) . . . . . . . . . . . . . . . .78
Manual Picture Adjustment
- Picture M de - User Opti n . . . . . . . . . . . 79
- C l ur Temperature - User Opti n. . . . . .80
Brightness Adjustment . . . . . . . . . . . . . . . . . . . . . . 81
XD - Picture Impr vement Techn l gy . . . . . . . . . . . 82
Advanced - Cinema . . . . . . . . . . . . . . . . . . . . . . . 83
Advanced - Black( Darkness) Level . . . . . . . . . . 84
Picture Reset . . . . . . . . . . . . . . . . . . . . . . . . . . . . 85
Image Sticking Minimizati n(ISM)Meth d . . . . . . . .86
L w-P wer Picture M de
. . . . . . . . . . . . . . . . . . . . 87

CONTENTS
3
After reading this manual, keep it handy f r future reference.
S UND & LANGUAGE C NTR L
Aut V lume Leveller ( Aut V lume) . . . . . . . . 88
Preset S und Settings- S und M de . . . . . . . . 89
S und Setting Adjustment - User M de . . . . . . . . 90
Balance . . . . . . . . . . . . . . . . . . . . . . . . . . . . . . . . .92
TV Speakers On/ Off Setup . . . . . . . . . . . . . . . . 93
I/II
- Stere /Dual Recepti n . . . . . . . . . . . . . . . . . 94
- Speaker S und Output Selecti n . . . . . . . . 94
Subtitle . . . . . . . . . . . . . . . . . . . . . . . . . . . . . . . . 95
TIME SETTING
Cl ck Setting . . . . . . . . . . . . . . . . . . . . . . . . . . . . 96
Aut On/ Off Timer Setting . . . . . . . . . . . . . . . .98
Sleep Timer Setting . . . . . . . . . . . . . . . . . . . . . . .99
Aut Sleep Setting . . . . . . . . . . . . . . . . . . . . . . .100
PARENTAL C NTR L / RATINGS
Set Passw rd & L ck System . . . . . . . . . . . . . . 101
Pr gramme Bl cking . . . . . . . . . . . . . . . . . . . . . 103
Parental Guidance . . . . . . . . . . . . . . . . . . . . . . . 104
External Input Bl cking . . . . . . . . . . . . . . . . . . . 105
TELETEXT
Switch On/Off . . . . . . . . . . . . . . . . . . . . . . . . . 106
Simple Text . . . . . . . . . . . . . . . . . . . . . . . . . . . . 106
TOP Text . . . . . . . . . . . . . . . . . . . . . . . . . . . . . . 106
Fastext . . . . . . . . . . . . . . . . . . . . . . . . . . . . . . . . 107
Special Teletext Functi ns . . . . . . . . . . . . . . . . 107
APPENDIX
Tr ublesh ting . . . . . . . . . . . . . . . . . . . . . . . . .108
Maintenance . . . . . . . . . . . . . . . . . . . . . . . . . . . .110
Pr duct Specificati ns . . . . . . . . . . . . . . . . . . . . 111
Pr gramming the Rem te C ntr l . . . . . . . . . 112
IR C des . . . . . . . . . . . . . . . . . . . . . . . . . . . . . . . 114
External C ntr l Thr ugh RS-232C . . . . . . . . . 117
Open S urce License . . . . . . . . . . . . . . . . . . . . 123

PREPARATION
4
PREPARATION
HOME MEN
This menu is a contents guide.
In Home Menu, you enter the Recorded TV and the Guide of X-ST DIO, the X-ST DIO recording schedule,
Manual Recording, Photo List, Music List
TV
DVD
SIMPLINK
EXIT
VOL
Q.VIEW
PR
MARK
LIVE
TEXT
GUIDE
VCR
MODE
BRIGHT
MENU
MUTE
PAGE
INFO
i
PIP PR- PIP PR+
PIP INPUTSWAP
TIME
SHIFT
TIME
SHIFT
PIP
OK
D/A
INPUT
POWER
INPUT
Schedule GGpp..5599
Manual Rec GGpp..5544
Recorded TV GGpp..5555
Guide GGpp..7700
Photo List GGpp..6633
Music List GGpp..6677

OK
MENU
INPUT P
PREPARATION
5
FRONT PANEL CONTROLS
■
Image sh wn may differ fr m y ur TV
■
If y ur TV has a pr tecti n film attached, rem ve the film and then wipe the pr duct with a p lishing cl th.
PROGRAMMEVOL MEMEN OKINP T
OKOK
MENUMENU
INPUTINPUT PRVOLVOL
OK
MENU
INPUT P
Remote Control Sensor
POWER Button
Power/Standby Indicator
• illuminates red in standby m de.
• illuminates green when the TV is
switched n.

PREPARATION
6
PREPARATION
BACK PANEL INFORMATION
■
Image sh wn may be s mewhat different fr m y ur TV.
AV IN 1
L/ MONO
R
AUDIO
VIDEO
S-VIDEO
2
Power Cord Socket
This TV perates n an AC p wer. The v ltage is
indicated n the Specificati ns page. Never
attempt t perate the TV n DC p wer.
HDMI Input
C nnect a HDMI signal t HDMI IN.
Or DVI(VIDEO)signal t HDMI/DVI p rt with DVI
t HDMI cable.
RGB/DVI Audio Input
C nnect the audi fr m a PC.
OPTICAL DIGITAL A DIO O T
C nnect digital audi fr m vari us types f equipment.
N te: In standby m de, these p rts d n t w rk.
Component Input
C nnect a c mp nent vide /audi device t
these jacks.
RGB Input
C nnect the utput fr m a PC.
RS-232C IN (CONTROL & SERVICE) PORT
C nnect t the RS-232C p rt n a PC.
Audio/Video Input (AV IN 1)
C nnect audi /vide utput fr m an external
device t these jacks.
Antenna Input
C nnect RF antenna t this jack.
1
2
3
4
5
6
7
8
1
AV IN 1
V IN 1
L/
L/
MONO
MONO
R
AUDIO
AUDIO
VIDEO
VIDEO
S-VIDEO
S-VIDEO
2
2 3 459
8
9
AV IN 1
L/MONO
R
AUDIO
VIDEO
S-VIDEO
2
3
SB Input
HDMI Input
C nnect a HDMI signal
t HDMI IN.
S-Video Input
C nnect S-Vide ut
fr m an S-VIDEO device.
Audio/Video Input
C nnect audi /vide
utput fr m an external
device t these jacks.
76

PREPARATION
7
C nnect the cables as necessary.
T c nnect additi nal equipment, see the
EEXXTTEERRNNAALL EEQQUUIIPPMMEENNTT SSEETTUUPPsecti n.
1
Install the CCAABBLLEE MMAANNAAGGEEMMEENNTT CCLLIIPPas sh wn.
2
CABLE MANAGEMENT CLIP
H ld the CCAABBLLEE MMAANNAAGGEEMMEENNTT CCLLIIPPwith b th hands and pull it upward.
How to remove the cable management clip
Separate CABLE MANAGEMENT fr m TV by
pressing tw latches.
BACK COVER FOR WIRE ARRANGEMENT
■
Image sh wn may be s mewhat different fr m y ur TV.

PREPARATION
8
PREPARATION
OK
MENU
INPUT P
DESKTOP PEDESTAL INSTALLATION
For adequate ventilation allow a clearance of 4” (10cm) all around the TV.
AThe TV can be installed in various ways such as on a wall, or on a desktop etc.
A The TV is designed to be mounted horizontally.
Power Supply
Circuit breaker
EARTHING
Ensure that y u c nnect the earth wire t prevent p ssible
electric sh ck. If gr unding meth ds are n t p ssible, have
a qualified electrician install a separate circuit breaker.
D n t try t earth the TV by c nnecting it t teleph ne
wires, lightening r ds r gas pipes.
4 inches
4 inches
4 inches
4 inches
SWIVEL STAND
After installing the TV, you can adjust the TV set manually to the left or right direction by 20 degrees to suit
your viewing position.

PREPARATION
9
WALL MO NT: HORIZONTAL INSTALLATION
For adequate ventilation allow a clearance of 4” (10cm) all around the TV. We recommend that you use a
wall mounting bracket of LG brand when mounting the TV to a wall.
4 inches
4 inches
4 inches
4 inches
4 inches
NOT SING THE DESK-TYPE STAND
When installing the wall-mounted unit, use the
protection cover for desk-type stand installation.
Insert the PROTECTION COVER into the TV until
clicking sound.
■
Image sh wn may differ fr m y ur TV.

10
PREPARATION
PREPARATION
PLEASE SET IT UP CAREFULLY SO THE PRODUCT DOES
NOT FALL OVER.
AYou should purchase necessar components to fix the TV to the wall.
APosition the TV close to the wall to avoid the possibilit of it falling when pushed.
AThe instructions shown below are a safer wa to set up the TV, which is to fix it to the wall, avoiding the
possibilit of it falling forwards if pulled. This will prevent the TV from falling forward and causing injur .
This will also prevent the TV from damage. Ensure that children do not climb or hang from the TV.
NOTE
!
G When moving the TV undo the cords first.
G Use a platform or cabinet strong and large enough to support the size and weight of the TV.
G To use the TV safel make sure that the height of the bracket on the wall and on the TV is the same.
2
3
1
1
2
Use the eye-bolts or TV brackets/bolts to fix the product to the wall as shown in the picture.
(If your TV has bolts in the eyebolts, loosen then bolts.)
Insert the eye-bolts or TV brackets/bolts and tighten them securely in the upper holes.
Secure the wall brackets with the bolts on the wall. Match the height of the bracket that is mounted on the
wall.
3Use a sturdy rope to tie the product. It is safer to tie the rope so it is horizontal between the wall
and the product.

AV IN 1
L/MONO
R
AUDIO
VIDEO
S-VIDEO
2
PREPARATION
11
AV IN 1
L/MONO
R
AUDIO
VIDEO
S-VIDEO
2
ANTENNA CONNECTION
AV IN 1 AV OUT
L/ MONO
R
AUDIO
VIDEO
L
R
AUDIO
VIDEO
2
■F r ptimum picture quality, adjust antenna directi n.
■An antenna cable and c nverter are n t supplied.
■T prevent damage d n t c nnect t the mains utlet until all c nnecti ns are made between the devices.
Multi-family Dwellings/Apartments
(Connect to wall antenna socket)
Single-family Dwellings /Houses
(Connect to wall jack for outdoor antenna)
Outdoor
Antenna
(VHF, HF)
Wall
Antenna
Socket
RF Coaxial Wire (75 ohm)
Antenna
UHF
Signal
Amplifier
VHF
■In p r signal areas, t achieve better picture quality it may be necessary t install a signal amplifier t the
antenna as sh wn ab ve.
■If signal needs t be split f r tw TVs, use an antenna signal splitter f r c nnecti n.

EXTERNAL EQ IPMENT SET P
12
EXTERNAL EQ IPMENT SET P
HD RECEIVER SET P
■To avoid damaging any equipment, never plug in any power cords until you have finished connecting all equipment.
■
Image shown may differ from your TV.
Connecting with a component cables
AAV IN 1
L/MONO
R
AUDIO
VIDEO
S-VIDEO
AV IN 1
L/MONO
R
AUDIO
VIDEO
S-VIDEO
AV IN 1
L/MONO
R
AUDIO
VIDEO
S-VIDEO
1
2
■This TV can receive Digital RF/Cable signals with ut an external digital set-t p b x. H wever, if y u d receive
Digital signals fr m a digital set-t p b x r ther digital external device, refer t the diagram as sh wn bel w.
C nnect the vide utputs (Y, PB, PR)f the digital set
t p b x t the CCOOMMPPOONNEENNTT IINN VVIIDDEEOOjacks n the
TV.
C nnect the audi utput f the digital set-t p b x t
the CCOOMMPPOONNEENNTT IINN AAUUDDIIOOjacks n the TV.
Turn n the digital set-t p b x.
(Refer t the wner’s manual f r the digital set-t p b x.)
Select CCmmppnneenntt 11input s urce using the IINNPPUUTT
butt n n the rem te c ntr l.
If c nnected t CCOOMMPPOONNEENNTT IINN 22input, select
CCmmppnneenntt 22input s urce.
2
3
4
1
Signal
480i
480p
576i
576p
720p
1080 i
1080 p
C mp nent 1/2
Yes
Yes
Yes
Yes
Yes
Yes
Yes
HDMI 1/2/3
N
Yes
N
Yes
Yes
Yes
Yes

EXTERNAL EQ IPMENT SET P
13
Connecting a set-top box with an HDMI cable
AV IN 1
L/MONO
R
AUDIO
VIDEO
S-VIDEO
AV IN 1
L/MONO
R
AUDIO
VIDEO
S-VIDEO
AV IN 1
L/MONO
R
AUDIO
VIDEO
S-VIDEO
Connecting with an HDMI to DVI cable
AV IN 1
L/MONO
R
AUDIO
VIDEO
S-VIDEO
AAV IN 1
L/MONO
R
AUDIO
VIDEO
S-VIDEO
AV IN 1
L/MONO
R
AUDIO
VIDEO
S-VIDEO
C nnect the digital set-t p b x t HHDDMMII//DDVVII IINN 11,
HHDDMMII IINN 22r HHDDMMII IINN 33jack n the TV.
Turn n the digital set-t p b x.
(Refer t the wner’s manual f r the digital set-t p b x.)
Select HHDDMMII11, HHDDMMII22 r HHDDMMII33 input s urce using
the IINNPPUUTTbutt n n the rem te c ntr l.
C nnect the digital set-t p b x t HHDDMMII//DDVVII IINN 11
jack n the TV.
C nnect the audi utput f the digital set-t p b x t
the AAUUDDIIOO IINN ((RRGGBB//DDVVII))jack n the TV.
Turn n the digital set-t p b x. (Refer t the wner’s
manual f r the digital set-t p b x.)
Select HHDDMMII11input s urce using the IINNPPUUTTbutt n
n the rem te c ntr l.
1
12
2
3
1
2
3
4
1
GGIf the digital set-t p b x supp rts Aut HDMI functi n, the
utput res luti n f the s urce device will be aut matically
set t 1280x720p.
GGIf the digital set-t p b x player d es n t supp rt Aut
HDMI, y u need t set the utput res luti n appr priately.
T get the best picture quality, adjust the utput res luti n
f the s urce device t 1920x1080i/1080p.
N TE
!

EXTERNAL EQ IPMENT SET P
14
EXTERNAL EQ IPMENT SET P
DVD SET P
Connecting with a component cables
2
AAV IN 1
L/MONO
R
AUDIO
VIDEO
S-VIDEO
AV IN 1
L/MONO
R
AUDIO
VIDEO
S-VIDEO
AV IN 1
L/MONO
R
AUDIO
VIDEO
S-VIDEO
Component Input ports
To achieve better picture quality, connect a DVD player to the component input ports as shown below.
C mp nent p rts n the TV
YPBPR
Vide utput p rts
n DVD player
Y
Y
Y
Y
PB
B-Y
Cb
Pb
PR
R-Y
Cr
Pr
C nnect the vide utputs (Y, PB, PR)f the DVD t the
CCOOMMPPOONNEENNTT IINN VVIIDDEEOOjacks n the TV.
C nnect the audi utputs f the DVD t the
CCOOMMPPOONNEENNTT IINN AAUUDDIIOOjacks n the TV.
Turn n the DVD player, insert a DVD.
Select CCmmppnneenntt 11input s urce using the IINNPPUUTT
butt n n the rem te c ntr l.
If c nnected t CCOOMMPPOONNEENNTT IINN 22input, select
CCmmppnneenntt 22input s urce.
Refer t the DVD player's manual f r perating
instructi ns.
1
2
2
3
4
1
5

EXTERNAL EQ IPMENT SET P
15
Connecting with a S-Video cable
2
AV IN 1
L/MONO
R
AUDIO
VIDEO
S-VIDEO
AV IN 1
L/MONO
R
AUDIO
VIDEO
S-VIDEO
AV IN 1V IN 1
L/L/MONO
MONO
R
AUDIOAUDIO
VIDEOVIDEO
S-VIDEOS-VIDEO
S-VIDEO L R
VIDEO ANT IN
OUTPUT
SWITCH
ANT OUT
C nnect the S-VIDEO utput f the DVD t the SS--
VVIIDDEEOOinput n the TV.
C nnect the audi utputs f the DVD t the AAUUDDIIOO
input jacks n the TV.
Turn n the DVD player, insert a DVD.
Select AAVV11input s urce using the IINNPPUUTTbutt n n
the rem te c ntr l.
If c nnected t AAVV IINN 22input, select AAVV22input
s urce.
Refer t the DVD player's manual f r perating
instructi ns.
2
AV IN 1
L/MONO
R
AUDIO
VIDEO
S-VIDEO
AV IN 1
L/MONO
R
AUDIO
VIDEO
S-VIDEO
AV IN 1
L/MONO
R
AUDIO
VIDEO
S-VIDEO
Connecting the HDMI cable
C nnect the HDMI utput f the DVD t the
HHDDMMII//DDVVII IINN 11,HHDDMMII IINN 22r HHDDMMII IINN 33jack n
the TV.
Select HHDDMMII11, HHDDMMII22r HHDDMMII33input s urce using
the IINNPPUUTTbutt n n the rem te c ntr l.
Refer t the DVD player's manual f r perating
instructi ns.
GGThe TV can receive vide and audi signals simultane usly
when using a HDMI cable.
GGIf the DVD d es n t supp rt Aut HDMI, y u must set the
utput res luti n appr priately.
N TE
!
2
3
4
1
5
2
3
1
1
2
1

EXTERNAL EQ IPMENT SET P
16
EXTERNAL EQ IPMENT SET P
VCR SET P
■To avoid picture noise (interference), allow adequate distance between the VCR and TV.
■Typically a frozen still picture from a VCR. If 4:3 picture format is used for an extended period the fixed
images on the sides of the screen may remain visible.
AV IN 1
L/L/MONO
MONO
R
AUDIOAUDIO
VIDEOVIDEO
S-VIDEOS-VIDEO
OUTPUT
SWITCH
ANT IN
R
S-VIDEO VIDEO
ANT OUT L
AV IN 1
L/MONO
R
AUDIO
VIDEO
S-VIDEO
AV IN 1
L/MONO
R
AUDIO
VIDEO
S-VIDEO
2
2
Wall Jack
Antenna
Connecting with a RF Cable
C nnect the AANNTT OOUUTTs cket f the VCR t the AANNTTEENNNNAA IINNs cket n the TV.
C nnect the antenna cable t the AANNTT IINNs cket f the VCR.
Press the PPLLAAYYbutt n n the VCR and match the appr priate channel between the TV and VCR f r
viewing.
1
2
2
3
1

EXTERNAL EQ IPMENT SET P
17
Connecting with an RCA cable
AV IN 1
L/MONO
R
AUDIO
VIDEO
S-VIDEO
LR
S-VIDEO VIDEO
OUTPUT
SWITCH
ANT IN
ANT OUT
AV IN 1
L/MONO
R
AUDIO
VIDEO
S-VIDEO
AV IN 1V IN 1
L/L/MONO
MONO
R
AUDIOAUDIO
VIDEOVIDEO
S-VIDEOS-VIDEO
2
2
C nnect the AAUUDDIIOO/VVIIDDEEOOjacks between TV and
VCR. Match the jack c l urs (Vide = yell w, Audi Left
= white, and Audi Right = red)
Insert a vide tape int the VCR and press PLAY n
the VCR. (Refer t the VCR wner’s manual.)
Select AAVV11input s urce using the IINNPPUUTTbutt n n
the rem te c ntr l.
If c nnected t AAVV IINN 22input, select AAVV22input
s urce.
GGIf y u have a m n VCR, c nnect the audi cable fr m the
VCR t the AAUUDDIIOO LL//MMOONNOOjack f the TV.
N TE
!
GGIf b th S-VIDEO and VIDEO s ckets have been c nnected t
the S-VHS VCR simultane usly, nly the S-VIDEO can be
received.
N TE
!
AV IN 1
L/MONO
R
AUDIO
VIDEO
S-VIDEO
AV IN 1V IN 1
L/L/MONO
MONO
R
AUDIOAUDIO
VIDEOVIDEO
S-VIDEOS-VIDEO
S-VIDEO L R
VIDEO ANT IN
OUTPUT
SWITCH
ANT OUT
AV IN 1
L/MONO
R
AUDIO
VIDEO
S-VIDEO
2
2
Connecting with a S-Video cable
C nnect the S-VIDEO utput f the VCR t the SS --
VVIIDDEEOOinput n the TV set. The picture quality is
impr ved; c mpared t n rmal c mp site (RCA cable)
input.
C nnect the audi utputs f the VCR t the AAUUDDIIOO
input jacks n the TV.
Insert a vide tape int the VCR and press PLAY n the
VCR. (Refer t the VCR wner’s manual.)
Select AAVV11input s urce using the IINNPPUUTTbutt n n
the rem te c ntr l.
If c nnected t AAVV IINN 22input, select AAVV22input
s urce.
1
2
2
3
1
2
3
4
1
1

EXTERNAL EQ IPMENT SET P
18
EXTERNAL EQ IPMENT SET P
DIGITAL A DIO O T SET P
Sending the TV’s audio signal to external audio equipment via the Digital Audio Output (Optical) port.
AV IN 1V IN 1
L/L/MONO
MONO
R
AUDIOAUDIO
VIDEOVIDEO
S-VIDEOS-VIDEO
C nnect ne end f an ptical cable t the TV Digital
Audi (Optical)Output p rt.
C nnect the ther end f the ptical cable t the
digital audi (ptical)input n the audi equipment.
Set the “TV Speaker pti n - Off ” in the AUDIO
menu.(Gpp..9933). Refer t the external audi equipment
instructi n manual f r perati n.
1
2
2
3
1
GD n t l k int the ptical utput p rt. L king at the
laser beam may damage y ur visi n.
CAUTI N
GGWhen c nnecting with external audi equipments, such as
amplifiers r speakers, please turn the TV speakers ff.
N TE
!
This manual suits for next models
1
Table of contents
Other LG TV manuals