LG WD-16220FDB User manual

100
WASHING MACHINE
SERVICE MANUAL
READ THIS MANUAL CAREFULLY TO DIAGNOSE TROUBLE
CORRECTLY BEFORE OFFERING SERVICE.
MODEL : WD(M)-16220(5)FD/16220(5)FDB(N)
WD(M)-14220(5)FD/14220(5)FDB(N)
WD(M)-12220(5)FD/12220(5)FDB(N)
WD(M)-10220(5)FD/10220(5)FDB(N)
CAUTION
website : http://www.LGEservice.com
e-mail : http://LGEservice.com/techsup.html
All manuals and user guides at all-guides.com
all-guides.com

2
CONTENTS
. SPECIFICATION............................................................................................................................3
2. FEATURES & TECHNICAL EXPLANATION .................................................................................4
3. PARTS IDENTIFICATION ............................................................................................................ 6
4. INSTALLATION............................................................................................................................. 7
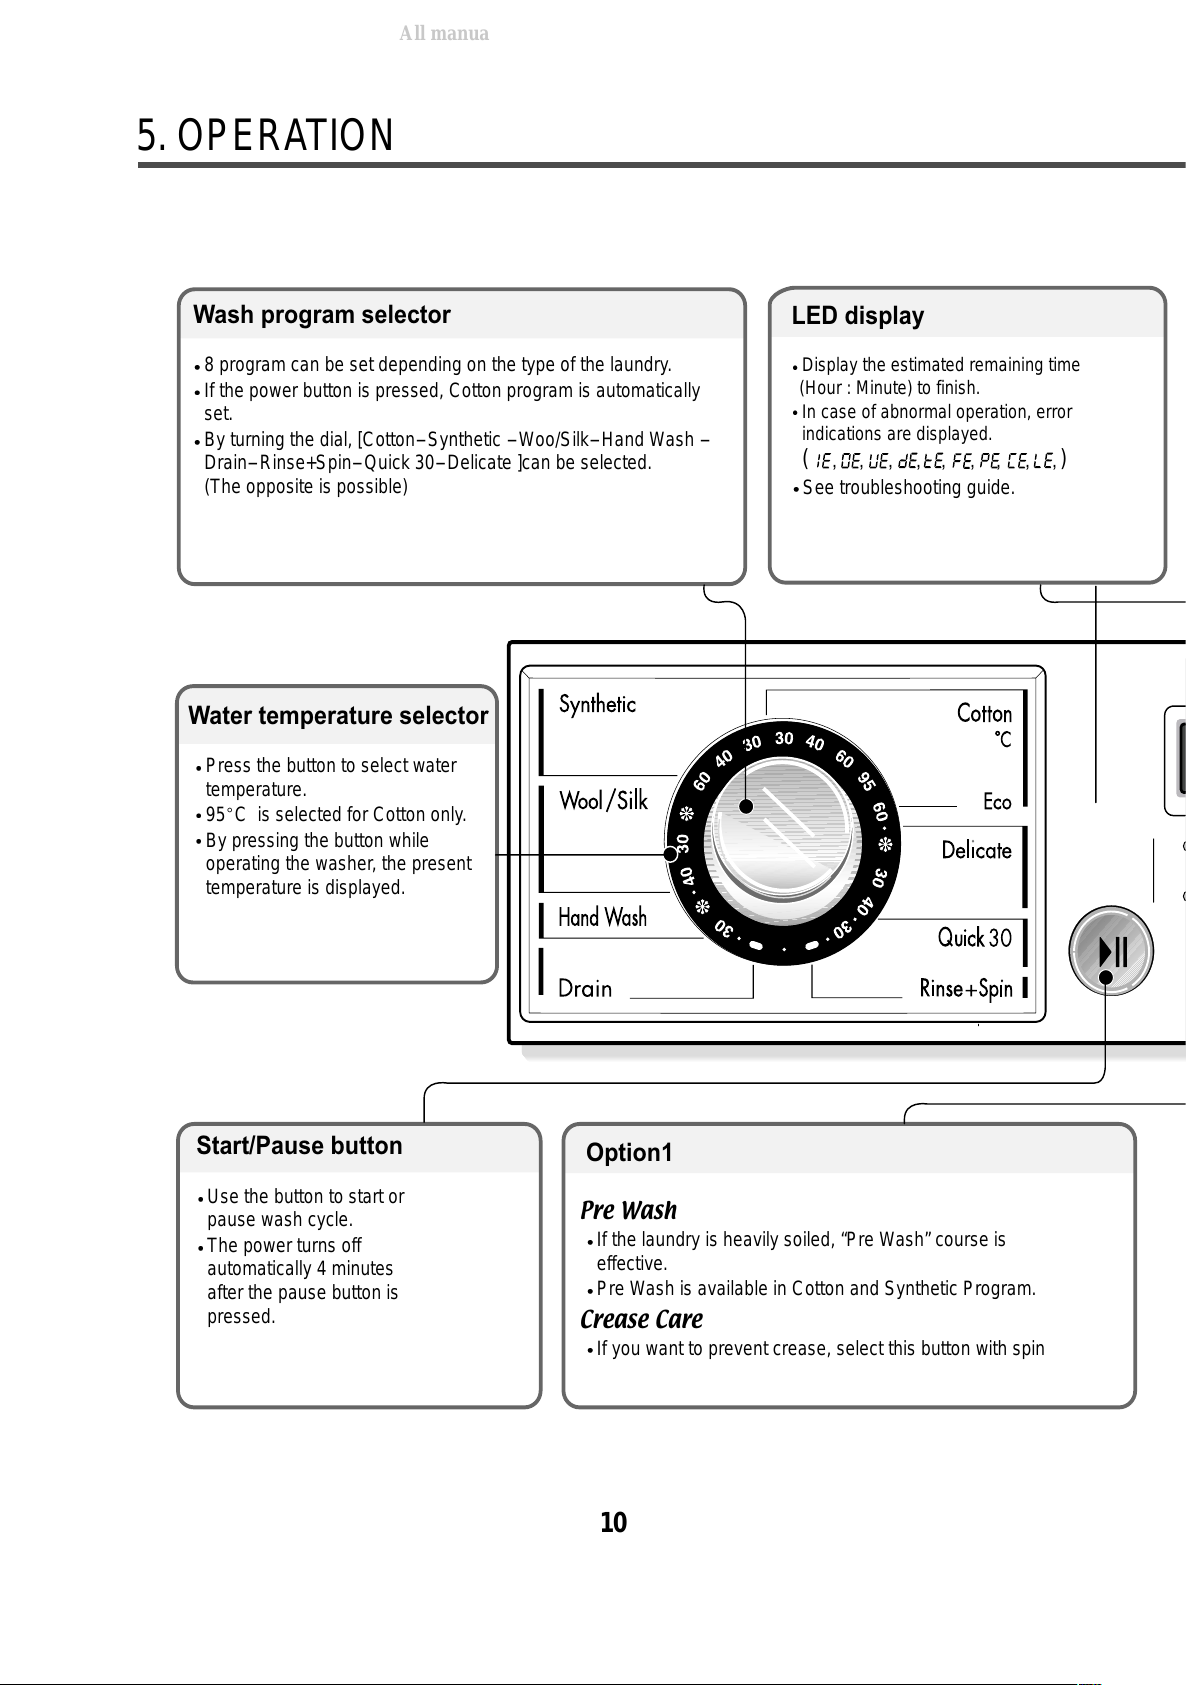
5. OPERATION................................................................................................................................ 0
6. WIRING DIAGRAM / PROGRAM CHART................................................................................... 2
7. TROUBLESHOOTING................................................................................................................. 3
7- .BEFORE PERFORMING SERVICE.................................................................................... 3
7-2.QC TEST MODE.................................................................................................................. 3
7-3.HOW TO KNOW THE WATER LEVEL FREQUENCY......................................................... 3
7-4.ERROR DISPLAY................................................................................................................ 4
8. ERROR DIAGNOSIS AND CHECK LIST.................................................................................... 6
8- . DIAGNOSIS AND ANSWER FOR ABNORMAL OPERATION........................................... 6
8-2. FAULT DIAGNOSIS AND TROUBLESHOOTING .............................................................. 9
9. DISASSEMBLY INSTRUCTIONS ...............................................................................................26
0. EXPLODED VIEW AND PARTS LIST .......................................................................................33
0- . THE EXPLODED VIEW OF CABINET ASSEMBLY .........................................................33
0-2. THE EXPLODED VIEW OF CONTROL PANEL AND DISPENSER ASSEMBLY ............34
0-3. THE EXPLODED VIEW OF DRUM AND TUB ASSEMBLY .............................................35
APPENDIX (Replacement parts list) ...........................................................................................36
All manuals and user guides at all-guides.com

3
. SPECIFICATION
ITEM
POWER SUPPLY 220-240V~, 50Hz
PRODUCT WEIGHT 65kg
WASHING 230W
SPIN ( 400rpm) 440W
DRAIN MOTOR 38W
WASH HEATER 2000W
WASH 45rpm
600 rpm : 400/800/ 200/ 600 rpm
SPIN 400 rpm : 400/800/ 000/ 400 rpm
200 rpm : 400/800/ 000/ 200 rpm
000 rpm : 400/600/800/ 000 rpm
OPERATION WATER PRESSURE 0.3- 0kgf/cm
2
(30- 000kPa)
CONTROL TYPE Electronic
WASH CAPACITY Rating
Synthetic (3.5kg), Wool/Silk (2kg), Hand Wash (2kg), Delicate (3kg), Quick 30(5kg)
DIMENSION 600mm(W) 600mm(D) 850mm(H)
WASH PROGRAM Cotton, Synthetic, Wool/Silk, Hand Wash, Delicate, Quick 30
RINSE Super, Normal, Rinse Hold
DOOR SWITCH TYPE Bi-Metal type
WATER LEVEL 9 steps (by sensor)
RESERVATION From 3 hours to 9 hours
SENSING OF THE LAUNDRY AMOUNT
Adapted
FUZZY LOGIC Adapted
DISPLAY OF THE REMAINING TIME
Adapted
ERROR DIAGNOSIS 9 items
POWER AUTO OFF Adapted
CHILD LOCK Adapted
AUTO RESTART Adapted
RAPID Adapted
ELECTRICITY
CONSUMPTION
REVOLUTION
SPEED
WD(M)- 6220(5)FB/ 6220(5)FBB(N)
WD(M)- 4220(5)FB/ 4220(5)FBB(N) WD(M)- 2220(5)FB/ 2220(5)FBB(N)
WD(M)- 0220(5)FB/ 0220(5)FBB(N)
All manuals and user guides at all-guides.com

4
Jumbo drum
LG’s jumbo drum can wash about 40% more load than
conventional washing machine. A bigger drum improves the
wash performance.
More economical by Intelligent Wash System
Intelligent Wash System detects the amount of load and
water temperature, and then determines the optimum water
level and washing time to minimize energy and water
consumption.
Direct Drive system
The advanced Brushless DC motor rotates the Drum directly
without belt and pulley.
Child-Lock
The Child-Lock system has been developed to prevent
children from pressing any button to change the program
during operation.
Low noise speed control system
By sensing the amount of load and balance, automatical
distributes load evenly to minimize the spinning noise level.
uto Restart
Although the washing machine is turned off by a power failure,
it restarts automatically where it stopped when power is
supplied again. And it will be the same the machine is
unplugged and is plugged in again.
Water circulation
Spray detergent solution and water onto the load over and
over. Clothes are soaked more quickly and thoroughly during
wash cycle. The detergent suds can be removed more easily
by the water shower during rinse cycle. The water circulation
system uses both water and detergent more efficiently.
2. FEATURES & TECHNICAL EXPLANATION
2- .FEATURES
40%
All manuals and user guides at all-guides.com

5
2-2.DETERMINE WASHING TIME BY FUZZY LOGIC
To get the best washing performance optimal time is determined by sensing of water temperature,
selected washing temperature and laundry amount.
2-3.WATER LEVEL CONTROL
This model adopts a pressure sensor which can sense the water level in the tub.
Water supply is stopped when the water level to the preset level, then the washing program proceeds.
Spinning does not proceed until the water in the tub reduces a certain level.
2-4.THE DOOR CAN NOT BE OPENED
While program is operating.
FUZZY
LOGIC
laundry
amount
selected
washing
temperature
water
temperature
washing time
rinsing time
spin rhythm, time
the best
washing
performance
SENSING
PROCESSING
DETERMINATION
EFFECT
All manuals and user guides at all-guides.com

6
3. PARTS IDENTIFICATION
Inlet hose Wrench
Power plug
Control panel
Door
Lower cover
Adjustable feet
(For detergent and
fabric softener)
Drawer
Drum
Lower cover cap
Drain plug
If the supply cord is damaged,
it must be replaced by the
manufacturer or its service agents
or a similarly qualified person in
order to avoid a hazard.
Drain pump filter
Pre
Pre-wash
wash
TimeSave
ime Save
Crease Care
Crease Care
Rinse+
1200
800
ACCESSORIES
All manuals and user guides at all-guides.com
all-guides.com

7
Before servicing ask the customer what the trouble is.
Check the adjustment (power supply is 220-240V~, remove the transit bolts....)
Check the troubles referring to the troubleshooting.
Decide service steps referring to disassembly instructions.
Then, service and repair.
After servicing, operate the appliance to see whether it works OKor NOT.
STANDARD INSTALLATION
The appliance should be installed as follows.
REMOVE THE TRANSIT INSTALL THE APPLIANCE ADJUST THE
BOLTS ON FLAT AND FIRM SURFACE HORIZONTAL
Remove the transit bolts Turn the leveling feet to
(4EA: ) with supplied spanner. set the appliance horizontally.
Keep the transit bolts and
spanner for future use.
Insert the provided 4 caps
into the hole
The appliance goes up by
rotating the feet clockwise.
The appliance comes down by
rotating the feet counter-
clockwise.
4. INSTALLATION
1
Pre
Pre-wash
wash
TimeSave
imeSave
CreaseCareCreaseCare
RinseRinse+
1200
1200
800
800
High
Low
All manuals and user guides at all-guides.com

8
HOW TO CONNECT INLET HOSE
Check that the rubber washer is inside of the
valve connector.
Connect the inlet hose firmly to prevent leak.
CONNECT DRAIN HOSE
CONNECT POWER PLUG
Pre
Pre-wash
wash
TimeSave
imeSave
CreaseCare
CreaseCare
Rinse
Rinse+
1200
1200
800
800
PrePre-washwash
TimeSave
imeSave
CreaseCare
CreaseCare
Rinse
Rinse+
1200
1200
800
800
Pre
Pre
-wash
wash
TimeSave
imeSave
CreaseCare
CreaseCare
Rinse
Rinse
+
1200
1200
800
800
Make sure that the hose is not twisted.
The drain hose should be placed under 00cm from the floor.
Connect the power plug to the wall outlet. Avoid connecting several electric devices,
It may be the cause of a fire.
Avoid submerging the end of the hose.
All manuals and user guides at all-guides.com

9
TEST OPERATION
Pre
Pre-wash
wash
TimeSave
imeSave
CreaseCare
CreaseCare
Rinse
Rinse+
1200
1200
800
800
Pre
Pre-wash
wash
TimeSave
imeSave
CreaseCare
CreaseCare
Rinse
Rinse+
1200
1200
800
800
Pre
Pre-wash
wash
TimeSave
imeSave
CreaseCare
CreaseCare
RinseRinse+
1200
1200
800
800
Connect the power plug to
the outlet. In case of coloureds program.
Connect the inlet hose.
Preparation Press the power button. Press
the
Start/Pause
for washing. button.
Press the Temp. button Check if the drum rotates Check if water is supplied
and the present temperature will clockwise and counterclockwise. through the detergent dispenser.
be displayed.
Power off and then power on.
Check if the door can be
opened after 3 minutes.
Turn off Wash and Rinse after
pressing the Start/Pause button
and start the machine again.
Check drain and spin.
If SVC is needed during
check, remove
the remaining water by pulling
out the hose cap.
Check the water heating. Check automatic reverse Check the water supply.
turn.
Check drain and spin
Power off and open the
Water removal
door
All manuals and user guides at all-guides.com

10
5. OPERATION
Pre Wash
Time Save
Crease Care
Rinse+
1200
800
LED display
Display the estimated remaining time
(Hour : Minute) to finish.
In case of abnormal operation, error
indications are displayed.
( )
See troubleshooting guide.
Water temperature selector
Press the button to select water
temperature.
95 C is selected for Cotton only.
By pressing the button while
operating the washer, the present
temperature is displayed.
Wash program selector
8 program can be set depending on the type of the laundry.
If the power button is pressed, Cotton program is automatically
set.
By turning the dial, [Cotton
-
Synthetic
-
Woo/Silk
-
Hand Wash
-
Drain
-
Rinse+Spin
-
Quick 30
-
Delicate ]can be selected.
(The opposite is possible)
Start/Pause button
Use the button to start or
pause wash cycle.
The power turns off
automatically 4 minutes
after the pause button is
pressed.
Pre Wash
If the laundry is heavily soiled, “Pre Wash” course is
effective.
Pre Wash is available in Cotton and Synthetic Program.
Crease Care
If you want to prevent crease, select this button with spin
Option1
,,,,,,,,,
All manuals and user guides at all-guides.com

11
Pre Wash
Time Save
Crease Care
Rinse+
12001200
800800
Power button
Press the button to turn power on
and off.
Press the button to cancel the
delay finish.
Child - Lock
Child Lock system can be set and canceled by pressing
and holding both [Option ] and [Option 2] button
simultaneously more than 2 seconds.
Once Child Lock is set, all buttons are inoperable
except power button.
Child Lock system can be set anytime even during
Power-off and operation.
It is automatically cancelled when an operational error
occur.
Time Delay
Press the button when delayed washing is
needed.
When the button is pressed, is displayed,
maximum delay of hours can be set.
Each press advances time delay by the hour.
Use [Power] button to cancel [Time Delay]
[Time Delay] means the time required from the
present to the completion of washing.
Spin button
By pressing the Spin button the spin
speed can be chosen.
Time Save
By selecting the Time Save option, the wash time may be reduced, depending on the program selected.
This option is available with Cotton, Synthetic program.
Rinse+
If you wish to rinse more, the Rinse+option will remove any trace of detergents.
Option2
All manuals and user guides at all-guides.com
all-guides.com

* Water Supply W·S * Intermittent Spin I·S * Disentangle D·T
* Basic Cycle
* Optional Cycle
* Pre-Setting Time Water Supply - 120 sec. * Basic time is minute in washing chart
Drain - 60 sec. * The actual program time can be varied with the load amount,
* ~ Time for varies as the temperature or the amount of laundry water temperature or ambient tempe rature
Washing Rinse Spin
W
·
S
Pre Main
Washing
Drain
I
·
S
W
·
S
Rinsing
Washing Staycooling
Heating
Washing
Drain
W
·
S
1 2 3 7654 98 10
Normal
Drain
I
·
S
11 12
1
W
·
S
Rinsing
13 14
Drain
I
·
S
15 16
2
W
·
S
Rinsing
17 18
Drain
I
·
S
19 20
W
·
S
Rinsing
21 22
Drain
I
·
S
23 24
W
·
S
Rinsing
25 26
Rinse +
Drain
Spin
D·T
A
U
T
O
O
F
F
3 4
27 28 29 20
E
N
D
20
Cotton(BIG)
Normal
Working
Time
(Hour Minute)
About 2 45
120 MIN 60 MIN120240 60120 60 60 240 120 360 60 240 120 360 60 240 120 360 60 240 120 360 60 480 120 20 20
C
Y
C
L
E
S
T
E
P
C
O
U
R
S
E
Time
(SEC)
842
~
87
Synthetic
Delicate
Wool/Silk
About 1 03
About 1 01
About 1 29
4
18
Drain About 1
Rinsing
+ Spin About 20
4
18
26
~
51
Handwash About 55
4
24
Quick About 30
Cotton(Small) About 2 41
842
~
47
12
6. WIRING DIAGRAM / PROGRAM CHART
MAIN PWB(DD)
DISPLAY
PWB
: TERMINAL+ HOUSING (#250)
: TERMINAL (#250)
PRESSUREPRESSURE
SENSORSENSOR
THERMISTORTHERMISTOR
(S)(S)(S)(S) (G)(G)
DOOR LOCK S/WDOOR LOCK S/W
HEATERHEATER
WIRE COLOR : BASE/LINE
: EARTH TERMINAL
: "n" PIN CONNECTOR
n
+
Hb
Ha
GND
Motor
WH
2
2
1
1
NA
WHWH
BLBL
12
12
3
3WH
VLVL WHWH WHWH
BLBL
OROR
WH
2
23
3
W
1
1
VU
5
5
4
4
3
3
2
2
1
1
YLYL
RDRD BLBL GYGY BLBL
RDRD WHWH
2
NA
2
1
143 43 1 3
2
RD
1 3
25
5
NA321 2 31 4
4
CIRCULATION
32
1
INLET VALVEINLET VALVE
1
P
E
R
1
2
H
T
O
21
2
M
I
A
N
PTC
PUMP
DRAIN PUMP
3
BKBK
NA
BKBK
1
2122
BKBK
1
21
RDRD
BLBL
WHWH
GYGY
BKBK
WHWH SBLSBL
BKBK
WH
BKBK
YLYL
BNBN
RDRD
YLYLBKBK
1RDRD
1
NA
RDRD
POWER
CORD
GN/YLGN/YL
WH
WASHINGWASHING
GNGN
FUSEFUSE
YLYL
RDRD YLYL
YLYL
GNGN
BK
P
C
C
P
BLBL BNBN
NA
1 2
6
1 2
6
3 4
3 4
1
3
BL
2
1
3 2
RD
21
21
3
3
WH
32
1
32
1
All manuals and user guides at all-guides.com

13
7. TROUBLESHOOTING
7- .BEFORE PERFORMING SERVICE
Be careful of electric shock or disconnecting the parts while troubleshooting.
Voltage of each terminal in 220-240V~ and DC while applying an electric current.
7-2.QC TEST MODE.
Pressing Option1, and Spin button simultaneously.
Power supply on with pressing upper two button.Then buzzer sound twice.
Press the Start/Pause button as follows.
Press the Start/Pause button more 4 times until stop spinning
7-3.HOW TO KNOW THE WATER LEVEL FREQUENCY
Press the
Rinse and Spin button simultaneously.
ex) 24 : Water level frequency = 24 0-
=24.
The digits means water level frequency ( 0- )
Pressing number of
Start/Pause button
Checking Point Display Status
None All lamps turn on
time Clockwise spin (right) Drum rpm (About 40~50)
2 times Low speed Spin Drum rpm (About 53~65)
3 times High speed Spin Drum rpm (About 40~ 60)
4 times Inlet valve for prewash operation Water level frequency (25~65)
5 times Inlet valve for mainwash operation Water level frequency (25~65)
Hot inlet valve in case of hot water fill
6 times Inlet valve for mainwash operation Water level frequency (25~65)
7 times Counterclockwise spin (left) Drum rpm (About 40~50)
8 times
Heater is in operation for 3 sec.
Water temperature
9 times Circulation pump operation Water level frequency
0 times Draining pump operation Water level frequency
times
Auto off operation
All manuals and user guides at all-guides.com

14
ERROR SYMPTOM CAUSE
1WATER INLET Water has not reached to the pre-set level within 8 min. since
ERROR inlet valve operated, or water has not reached to the normal
level within 25 min.
Load is too small.
2IMBALANCE The appliance is tilted.
ERROR Laundry is gathered to one side.
Non-distributable things are put into the drum.
3DRAIN ERROR Water has not drained enough within 0 min.
4OVERFLOW Water is automatically being pumped out because too much
ERROR water is in the tub.
5SENSOR
PRESSURE The sensor pressure switch is out of order.
S/W ERROR
6DOOR OPEN The
Start/Pause
button is pressed with the door open.
ERROR The door switch is out of order.
7HEATING
ERROR The THERMISTOR is out of order.
7-4.ERROR DISPLAY.
If you press the Start/Pause button when an error in displayed, any error except will disappear and
the machine will change into pause status.
In case of if the error is not resolved within 20 sec. In the case of other errors,
if the error is not resolved within 4 min., power will be turned off automatically and the error only will be
blinked. But in the case of , power will not be turned off.
All manuals and user guides at all-guides.com

15
ERROR SYMPTOM CAUSE
8
9
• MAIN PWB ASSEMBLY is out of order
Replace the MAIN PWB ASSEMBLY
• Winding in the STATOR ASSEMBLY is short-circuited.
Replace the STATOR ASSEMBLY
• The connector (3-pin, male, white) in the LEAD WIRE ASSEMBLY
is not connected to the connector (3-pin, female, white) of
STATOR ASSEMBLY.
Reconnect or repair the connector
• The electric contact between the connectors 3-pin, male, white in
the LEAD WIRE ASSEMBLY and 4-pin, female, natural in the
MAIN PWB ASSEMBLY is bad or unstable.
Reconnect or repair the contact in the connector
• The LEAD WIRE ASSEMBLY between the STATOR ASSEMBLY
and MAIN PWB ASSEMBLY is cut (open circuited).
Repair the damaged (open-circuited) the LEAD WIRE
ASSEMBLY
• The hall sensor is out of order/defective.
Replace the STATOR ASSEMBLY
CURRENT
ERROR
LOCK
ERROR
All manuals and user guides at all-guides.com

16
SYMPTOM GUIDE FOR SERVICE CALL
NO POWER
WATER INLET TROUBLE
8- .DIAGNOSIS AND ANSWER FOR ABNORMAL OPERATION
8. ERROR DIAGNOSIS AND CHECK LIST
YES
YES
YES
NO
NO
YES
NO
NO
Is the power plug connected firmly to
220-240V~ outlet?
Power failure? or Breaker opened?
Is the outlet controlled by a switch
Visit to check
Is displayed?
Is the tap opened?
Is the tap frozen?
Is the water supply shut-off?
Is filter in the inlet valve clogged with foreign
material?
Visit to check
Clean the filter of
inlet valve
All manuals and user guides at all-guides.com
all-guides.com

17
SYMPTOM GUIDE FOR SERVICE CALL
DOOR OPEN ERROR
DRAIN TROUBLE
NO
YES
YES
NO
NO
YES
Did you press the Start/Pause button when
the door is open?
Visit to check
Check if the door switch is O.K
Is displayed?
Is the debris filter clogged with foreign
material such as pins, coins, etc?
Is the drain hose frozen with water, kinked,
or crushed?
Visit to check
Close the door
Clean up
the filter.
All manuals and user guides at all-guides.com

18
SYMPTOM GUIDE FOR SERVICE CALL
Suds overflow from the
appliance.
(In this condition, wash and
spin do not operate
normally)
No effect of softener
YES
YES
YES
YES
YES
Is low-sudsing detergent for the drum
washing machine used?
Is the proper amount of detergent used
as recommended?
Recommend to reduce the amount
of detergent.
Is softener put in the correct compartment of
the drawer?
Is the drawer closed during wash?
Is the softener cap clogged?
Explain how to use softener
Clean the compartment for softener
Visit to check
LOW-SUDSING
DETERGENT
Compartment for softener
This appliance has the automatic suds sensing function which
operates under much suds condition for good rinse and
preventing overflow.
When much suds are sensed, the suds removing function such
as drain, water input, and pause will operate without rotating the
drum.
All manuals and user guides at all-guides.com

19
8-2.FAULT DIAGNOSIS AND TROUBLESHOOTING
. Be careful of electric shock or disconnecting the parts while troubleshooting.
2. First of all, check the connection of each part terminal with wiring diagram.
3. If you replace the MAIN PWB ASSEMBLY, put in the connectors correctly.
NO
NO
YES
YES
MAIN PWB ASSEMBLY(MAIN)
(1)
NO
YES
Check the fuse
Replace PWB
ASSEMBLY
Check the harness
Assembly
When measuring the voltage of the outlet,
is the voltage AC 220-240V?
Is the led ( ) on?
When measuring the voltage of White(3Pin)
connector of the PWB ASSEMBLY is the voltage
AC 220-240V?
Replace PWB ASSEMBLY
NO POWER
CAUTION
All manuals and user guides at all-guides.com

20
NO
YES
NO
NO
YES
NO
YES
YES
NO
NO
YES
YES
YES
NO
NO
NO
YES
Wiring diagram
Option (Hot)
Option (Hot)
MAX
max
Is water supply shut-off?
Is the tap opened?
When you press both Rinse button and Spin button
simultaneously, is the water level frequency below
240?
Is the inlet valve filter clogged with impurity?
Is resistance between each terminal of INLET
VALVE ASSEMBLY is 2~8
k
?
Check the voltage of the inlet valve connector
220 - 240V~.
(Refer to 7-2 QC TEST MODE)
Is water supplied?
Are replaceptacles correctly connected to the
terminals of the INLET VALVE ASSEMBLY?
Is detergent put in the correct compartment of
the drawer?
Is the detergent caked or hardened?
Open the tap.
Check the AIR CHAMBER
and the tube clogged
with impurity.
Clean the filter.
Replace the INLET VALVE
ASSEMBLY.
Replace the MAIN PWB
ASSEMBLY
Refer to
NO WATER SUPPLY
Check the wiring on the
dispenser.
Put the detergent in the
correct position
PRE+MAIN
MAIN WASH
: Detergent
Clean the drawer.
NO WATER SUPPLY
DETERGENT DOES NOT FLOW IN
All manuals and user guides at all-guides.com
This manual suits for next models
44
Table of contents
Other LG Washer manuals
Popular Washer manuals by other brands

Bosch
Bosch XQG100-WGA154A00W User manual and installation instructions

GE
GE Appliances Profile WNSE4200 owner's manual

Siemens
Siemens WXLP165AGB Instruction manual and installation instructions

Maytag
Maytag MHW4200BG2 Use & care guide

Maytag
Maytag MHW8630HC0 Use & care guide

Blomberg
Blomberg LWF284421G user manual