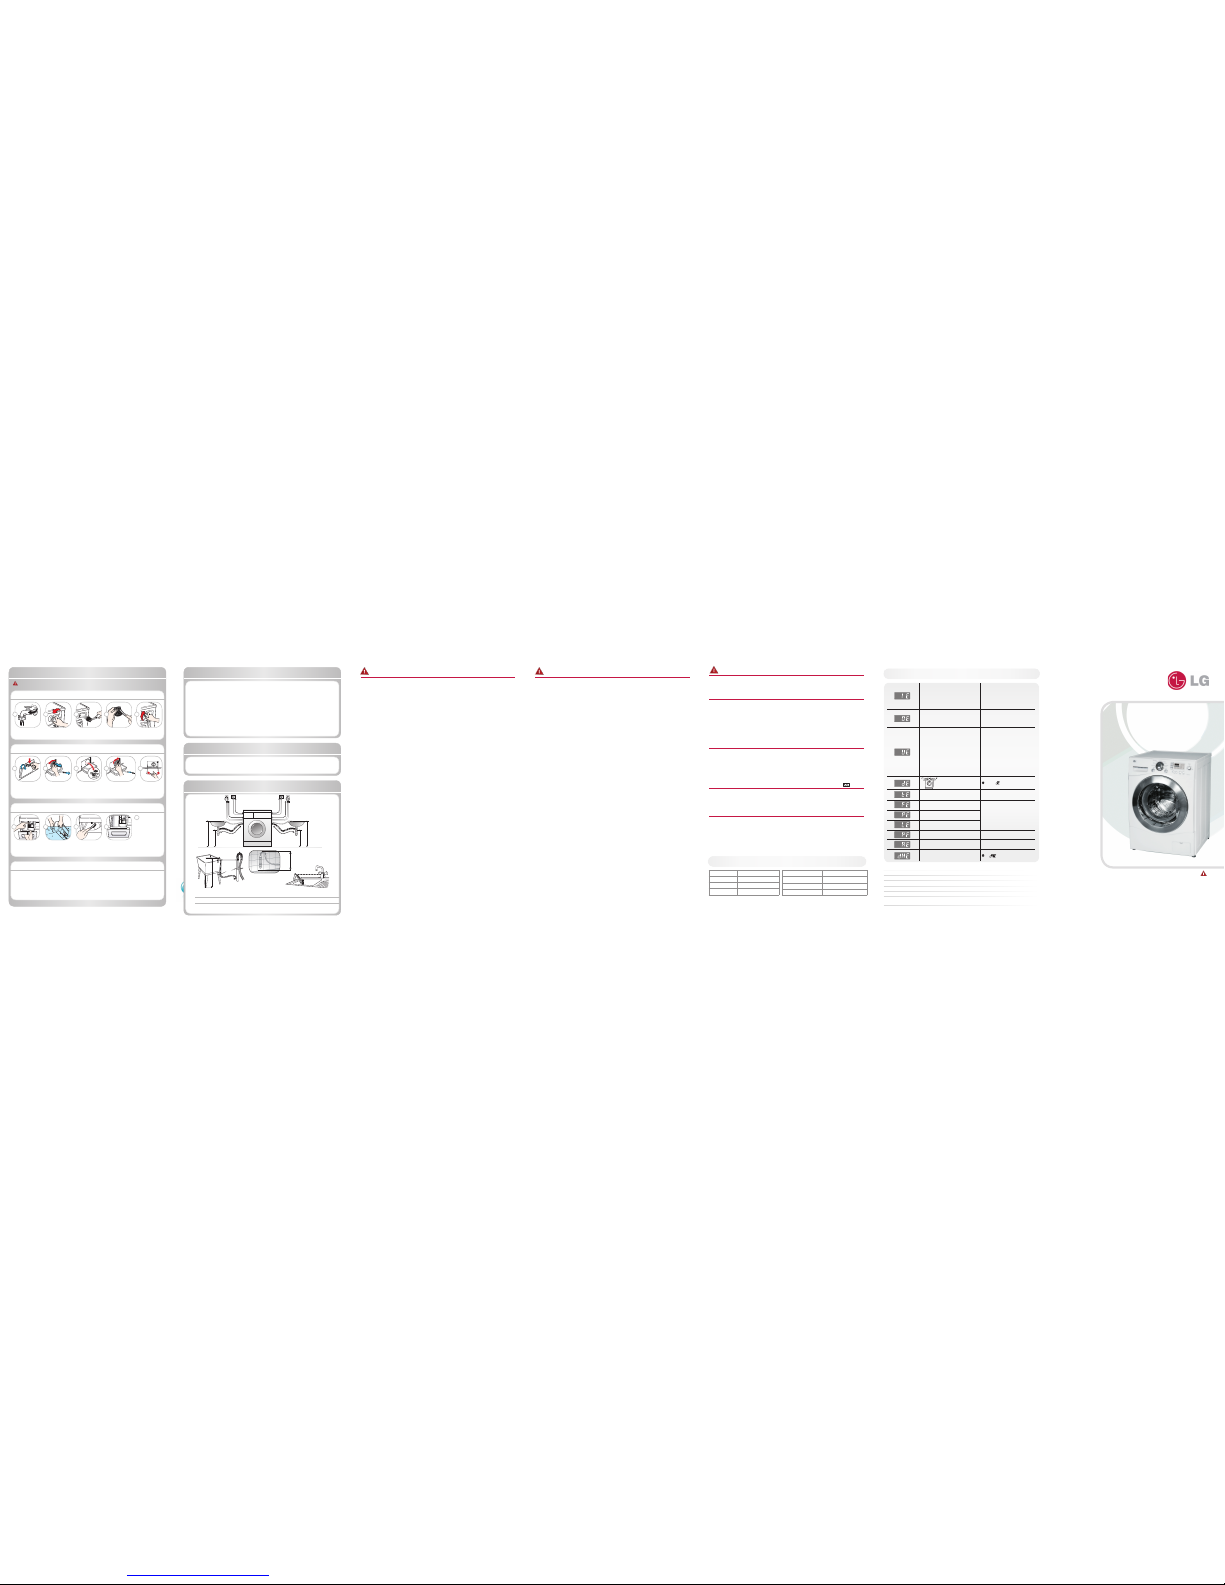
Hose
Retainer
Tie
strap
max. 100 cm
min. 60 cm
N
Owner‘s Manual
WD14030RD
Safe ty instruct ions fo r use
Read all instructions and ex planations of the installation before use. Follo w the instructions carefully. Keep the operating in struc-
tions handy for later use. If the a ppliance is sold or passed on then ensure that the new owner al ways receives these operating
instructions. The fo llowing warnings must be strictly observed for s afety reasons. They must be read before insta lling the appli-
ance and putting it into o peration.
• Intended use: This appliance h as been designed exclusively for use in dry-interior hou seholds. It has not been designed for
use in commercial or industrial a pplications, (for example, Beauty salons L aundromats etc). Use the appliance only with cold
drinking grade water and only for w ashing textiles with washing detergents designed fo r washing machines. Every other use
is improper and may lead to injuries, wher eby the liability of the manufacturer will cease.
• This appliance may only be used by ad ults. Do not allow children to touch the controls or to play wi th the product.
• This appliance is not intended fo r use by persons (including children) with reduced phys ical, sensory or mental capabilities,
or lack of experience and kno wledge, unless they have been given supervision or inst ruction concerning use of the appliance
by a person responsible for t heir safety.
• Never modify the applia nce as this is dangerous.
• This appliance is heavy. Transpor t with care and ensure that the transit bolts are re fi tted during the machines delivery to
any new location.
• Remove all packaging and transp ort bolts before using the appliance. Ot herwise serious damage may result.
• All installation work mus t be carried out by a qualified fitter or tec hnician.
• Have electrical conne ctions done by a qualified electrician.
• Never place the appliance on t he power cord.
• If the appliance is placed on a c arpet then place the feet so that air can circulate undern eath the appliance.
• Always unplug the machine and turn o ff the water supply after use. Disconnect a ppliance by pulling only the plug - never
disconnect by pulling the power co rd. Never touch the plug with wet fingers or hands.
• Do not overload the applianc e.
• Wash only machine-washable tex tiles. If you have doubts regarding this, then obser ve the markings on the label.
• Never place electrical he aters, candles etc. in the vicinity of the applianc e.T hey could cause the appliance to ignite or part s
to warp.
• Protect the appliance fr om wet and damp. Otherwise, there is danger of electr ic shock and fire.
• Connect the appliance t o a suitable wall socket for 240V. Never use an extension cord o r double adapter.
• Empty all pockets. H ard or sharp objects such as coins, needles, nails, s crews or stones may cause serious damage.
Unbalanced mass may create he avy vibrations. If heavy vibrations re main also without load, call for an authorized custome r
service.
• Do not wash or dry ar ticles that have been cleaned in, washed in, soaked in, or dabbe d with combustible or explosive
substances (such as wa x, oil, paint, gasoline, degreasers, dry-clea ning solvents, kerosene, etc.). This may result in fire or
explosion. Do not spray or use s tain remover products near or directly on the machin e as it can damage the machines finish.
• Never insert produc ts coated with mineral oils (e.g. nylon coating, plastic belt s, etc. ) into the machine. If a stain remover has
been used then make sure that the s olvent has been carefully washed out before inser ting the clothes into the appliance. Do
not load oily clothes in to the machine as t he oil may remain in the tub after a whole cycle resulting in fire dur ing drying.
• Do not operate the applianc e at locations where flammable substances are pr esent such as oil, benzene or highly inflam-
mable gas. Such materials may cause fi re or explosion. Never use combustible detergent s.
• Only add the prescribed amo unt of softener. Excessive amounts may damage or stain th e clothes
• After washing, keep the dr um door open to protect the door seal.
• Make sure that all water has run of f before opening the door. Never open the door if water still rema ins. There may be a
danger of scalding.
• Animals and children may get into the washi ng machine. So always check the appliance before using it.
• During washing, the glass doo r becomes very hot. Keep children away from the applia nce when in operation.
• Never try to repair the mach ine yourself. Incorrect repairs may result in injuries and /or serious defects to the machine.
• The product should be ser viced and repaired only by the authorised cus tomer service using original replacement par ts.
• When disposing of your old machine, the p ower cable must be capped or cut off, and the door l ock must be made unusable
in order to protect children.
• When placing on a carpeted fl oor,make su re that the opening in the socket is not blocked.
• If the appliance has been un der water then contact the customer servic e.D o not use the machine as it may impose an
electric shock or fire ha zard.
• The lower filter cover as well as th e dispenser drawer may not be opened during the operation.
• Keep all washing powder and deterg ents away from children. There is a danger of poisoning
Please read safety inst ructions carefully before operating the machin e.
Thank you for b uying an LG fully automat ic washing machine.
Please read t his owner‘s manual ca refully, it provides instr uctions on safe inst allation, use and maint enance.
Keep it handy fo r future reference of thi s machine. Make a note of the mod el and serial numbers of y our washing machine.
Safe ty instucti ons for t he inst allati on
Install or store the app liance where it will not be exposed to sub-zero temperatures or ex posed to the weather. Fit the power plug
to a grounded wall socket that com plies with all statutory regulations and ordina nces. Ensure that the base opening is free from
obstruction by car peting if the washing machine is installed on a carpeted floo r. In countries where there is a r isk of cockroach
infestation or other vermin, pay p articular attention t o keep the appliance and its surroundings in a clean conditio n at all times.
Any damage which may be caused by co ckroaches or other vermin is not covered by the appliance g uarantee.
CAUTION abou t positioning the appliance
Install the was hing machine on a flat hard floor. Make sur e that air circulation aroun d the washing machine is
not impeded by car pets, rug etc.
•
Never try to correc t any unevenness in the floor using pieces of wood, cardb oard or similar materials under the washing machine.
•
If it is not possible to posi tion the washing machine away from a gas coo ker or coal burning stove, an insulation pa nel
(85x60cm) covere d with aluminum foil on the side facing the cooker or stove, must be inser ted between the two appliances.
•
The washing machine must not be inst alled in rooms where the temperature may drop below 0°C.
•
Please ensure that when the wash ing machine is installed , that a Ser vice Technician can gain easy access in the even t of a
breakdown.
•
Adjust all four feet using the trans it bolt spanner provided to ensure that the ap pliance is stable, with 20mm clearnace b etween
the top of the washing machine and under side of the worktop.
CAUTION abou t the power cord
We recommend connecting mos t appliances to a dedicated circuit wh ich is protected by a mains fuse. That is, a singl e outlet
supplying power only to the app liance concerned, without a ny additional outlets or bran ch circuits. Check the speci fications
of this owner‘s manual. Do not overload wa ll sockets. Overloaded wall so ckets, loose or damaged wall so ckets or extension
cords, frayed power cords , damaged or cracked wire insulation are dangerous. Any of these conditions could result in electr ic
shock or fire. Periodically exa mine the cord of your appliance, and if its appear ance indicates damage or deterioration, unplug i t,
discontinue use of the applian ce, and have the cord replaced with an exact replacement par t by an authorized servicer. Protect
the power cord from physica l or mechanical abuse, such as being t wisted, kinked, pinched, squashed in a jamb of a door, or
walked upon. Pay particula r attention to plugs, wall outlets, and the point wh ere the cord exits the appliance.
CAUTION abou t location and moving
This equipment is not designed for ma ritime use or for use mobile installa tions such as caravans, aircraf t etc. Turn off the
stopcock if the machine is to b e left for any length of time (e.g. if you are going o n holiday), especially if there is no flo or drain
(gully) in the immediate vicinit y.If r elocating the appliance use the original pack ing material. Packaging material (e.g. plastic film,
Styrofoam) can be d angerous for children. There is a risk of suffocation! K eep all packaging well away from children and do not
allow children to play inside the bowl as t hey may become trapped.
CAUTION abou t the floor surface
• The installation surf ace must be clean, dry and level.
• Install washing machine on a flat hard fl oor. Poorly constructed timb er base floors can contri bute to excessive noise and
vibration.
• Proper placement and levelling of the was hing machine ensure long, regular and reliable operation.
• The washing machine must be per fectly level and firmly in position.
• It must not “see-saw” across c orners under load.
• The installation surf ace must be clean, free from floor wax and other lubr icant coatings.
• Do not allow the feet of the washing machine to ge t wet. If feet of the washing machine get wet, slipping may occur.
Name of product Front loading washing machine
Power supply 240 V~, 50 Hz
Size WxDxH mm: 600 x 640 x 850
Weight 72 kg
Max. Watt
2400 W (Wash) / 1700 W (D ry)
Capacity 8. 5 kg
(Wash) /
4.5 kg
(Dry)
Water consumpti on 73 l (8.6 l / kg)
Permissible wat er pressure 1.0-8 bar (100-800k Pa)
Technical Speci fication
P/No. :MFL5 9755504
1 3
5
2 4
Turn of f the wat er
tap
Unsc rew the wate r
inlet h ose
Pull ou t the water
inlet f ilter
Clea n the filte r using
a hard b rist le bru sh
Pull ou t the
disp enser d rawer
Clea n the dispen ser
drawe r under flo w-
ing wat er
Clea n inside the
rece ss wit h an old
toot hbru sh
Inse rt th e dispe nser
drawe r
Clean ing the wa ter inle t filte r
Clean ing the di spens er drawe r
Open t he lower fil ter
cove r and pul l out
the dr ain hose.
Unpl ug the d rain ho se
plug
Then o pen the
filt er by turnin g to
the le ft
Remov e any
extr aneous matte r
from t he pump filt er
Afte r cleanin g, refit t he
drai n filte r cap and ti ghten i t
by tur ning it cloc kwise. and
inse rt th e drain p lug
Tigh ten up t he inle t
hose
Clos e the low er
cove r
Once y ou
have f inished
cleani ng, replac e
the dra wer and
run a rin se cycle
witho ut laundry or
soap.
Warnin g: Before cle aning th e washin g machine i nterior, unplu g the elec trical power c ord to avoid the r isk of electr ic
shock .
Ext erior
Prope r care of your w ashing mac hine can ex tend it s servic e life.
The ou tside of th e machi ne can b e cleaned wi th warm wat er and
a neut ral non-abr asive hous ehold dete rgent. Imme diately wi pe
off an y spillage. W ipe with da mp clot h. Avoid stri king the su rface
with s harp obje cts. Ne ver hose dow n the machin e!
Inter ior
Dry a round the wa shing mach ine door
open ing, fl exibl e gaske t and door gla ss.
Run wa shing m achine thr ough a compl ete
cycl e using h ot water. Repea t process i f
nece ssar y.
Clean ing in gen eral Impor tant: Do not u se methyla ted spirit s, solvent s or similar p roducts.
Safe ty instruct ions fo r use
To minimize the risk of fir e within the inner bowl, the fo llowing should be observe d:
• Items that have been spott ed or soaked with vegetable or cooking oil co nstitute a fire hazard and should not be
placed in a tumble dryer.
Oil-affected items ca n ignite spontaneously, especially when exposed to heat s ources Such as in a tumble dryer.
The items become warm, causin g an oxidation reaction in the oil. Oxidation creates he at. If the heat cannot
escape, the items can beco me hot enough to catch fire. Piling, stacking or storing oil-a ffected items can prevent
heat from escaping and so cre ate a fire hazard.
If it is unavoidable that fabri cs that contain vegetable or cooking oil or h aveb een contaminated by hair care prod-
ucts be placed in a tumble dr yer they should first be washed in hot water with extr a detergent-this will reduce,
but not eliminate, the hazard. Th e ‘cool down’ cycle of tumble dryers should be used to reduce t he temperature
of the items. They should not be remo ved from the tumble dryer or piled or stacked while hot .
• Items that have been previously c leaned in, washed in, soaked in or spotted with petr ol/gasoline, dry-cleaning
solvents or other flammable o r explosive substances should not be placed in a tumble dr yer.
Highly flammable substanc es commonly used in domestic environments include ace tone, denatured alcohol,
petrol/gasoline, kerosen e,s pot removers (some brands), turpentine, waxes and wa x removers.
• Items containing foam rub ber (also known as latex foam) or similarly testured rubber li ke materials should not be
dried in a tumble dryer on a heat se tting.
Foam rubber materials ca n, when heated, produce fire by spontaneous combu stion.
• Fabric softeners o r similar products should not be used during a drying c ycle, to eliminate the effects of static
electricity unles s this practice is specifically recommended by t he manufacturer of the fabric softener or pro duct.
• Undergarments that co ntain metal reinforcements should not be placed in a tumb le dryer.
Damage to the tumble dryer ca n result if metal reinforcements come loose during d rying.
When available a drying rac k could be used for such items.
• Plastic articles su ch as shower caps or babies waterproof napkin cove rs should not be placed in a tumble dryer.
• Rubber-backed articles, clot hes fitted with foam rubber pads, pillows, r ubber boots and rubber-coated tennis
shoes should not be placed in a tumble d ryer.
Cleaning and Maintenan ce
Clean ing the dr ain pum p filte r
nThe external hot water supp ly MUST NOT exceed 70 deg C
nPermissible cold water temperat ure : 4-25˚C
nNo further back flow protection required for connection to t he water supply.
eThe appearance and sp ecifications may be varied without notice to lmp rove the units quality.
eSpecifications sub ject to change by manufacturer.
Installatio n of drain hose
• T he drain hose should not be placed higher than 100 cm above the floo r.
• Pro per securing of the drain hose will protect the floo r from damage due to any water leakage.
• I f the drain hose is too long do not force back into the washing mac hine. This will cause abnormal
noise and cause the machine to malfu nction and leak.
Electrical c onnec tion
1. Do not use an extension cord or double ad apter.
2. Have damaged supply cords rep laced by the manufacturer or its service agent s or a similarly qualified
person to prevent danger.
3. Always unplug the machine and tur n off the water supply after use.
4. Connect the machine to an ear thed socket in accordance with current wir ing regulations.
5. The appliance must be pos itioned so that the plug is easily accessible.
• Re pairs to the washing machine must only be carried out by quali fied personnel. Repairs carried out by inex-
perienced persons may caus e injury or serious malfunctioning. Cont act your local service centre.
•
Do not install your washing machine in r ooms where temperature below freezing may occur. Frozen hoses may
burst under pressure. The ele ctronic control unit may become unreliable at tempera tures below freezing point.
• If the appliance is delivered in the winter mon ths and temperatures are below fre ezing: Leave the washing
machine standing at room temper ature for a few hours before putting it into operat ion.
Rattling and cl anking noise Extraneous o bjects such as coins or safety pins maybe in drum or p ump.
Thumping sound Heavy wash loads may prod uce a thumping sound. This is usually normal.
Vibrating noi se Have all transit bolts and p acking been removed?
Water leaks. C heck and tighten hose connections. Unclog dr ain pipe. Contact plumber if necessary.
Excessive suds Too much dete rgent or unsuitable detergent.
Washing machine does n ot start Power cord may not be plugged in or conne ction may be loose.
Washing machine won’t s pin Check that the door is shut .
Check that foreign object s may be blocking the drain causing the water not to drain out .
Door does not ope n Once started, th e door can not be opened for safety reasons.
At the end of the cycle or when St art Pause is pressed, wait one or two minute s before opening the door to
allow the electric lock ing mechanism time to release.
Troubleshooting
• Water supply is not adequate in area
• Water supply taps are not completely
open.
• Water inlet hose(s) are kinked.
• The fi lter of the inlet hose(s) are
clogged.
Check another tap in the house.
Fully open tap.
Straighten hose(s).
Check the filter of the inlet hose(s).
• Drain hose is kinked or clogged.
• The drain fi lter is clogged.
Clean and straighten the drain hose.
Clean the drain filter.
For more detailed information, please
refer to “Cleaning the drain pump filter”
• Load is too small.
• Load is out of balance.
• The appliance has an unbalance detection
and correction system. If individual heavy
articles are loaded (ex. bath mat, both
robe, etc.), this system may stop spinning
or even interrupt the spin cycle altogether.
• If the laundry is still too wet at the end of
the cycle, add smaller articles of laundry
to balance the load and repeat the spin
cycle. Floor is unstable.
Feet are not adjusted
Add 1 or 2 similar items to help balance
the load.
Rearrange load to allow proper spinning
• Is the door opened or not
completely closed?
Close the door completely.
If the " " does not clear, call for
service.
Unplug the power plug and call for
service.
• Water overfi lls due to the faulty water
valve.
Close the water tap.
Unplug the power plug.
Call for service.
Restart the cycle.
• Water level sensor has malfunctioned.
• Over load in motor.
• The washer experienced a power
failure.
Turn the tap on.
If “ ” is not released, unplug
power plug and call for service.
• Check water supply.
Call for service.• Water leaks
CAUTION
This appliance is not intended fo r use by persons (including children) with reduced phys ical, sensory or mental
capabilities, or lack of exper ience and knowledge, unless they have been given super vision or instruction concer-
ning use of the appliance by a perso n responsible for their safety.
The fl oor should be a solid surface.
Adjust the feet so that the machine
does not rock from side to side or front
to back.