LIBERTY AV SOLUTIONS iR37 User manual

2 iR37 Build & Operations Manual • LIBERTY AV
CONTENTS
1. Parts ............................................................................................................................ 4
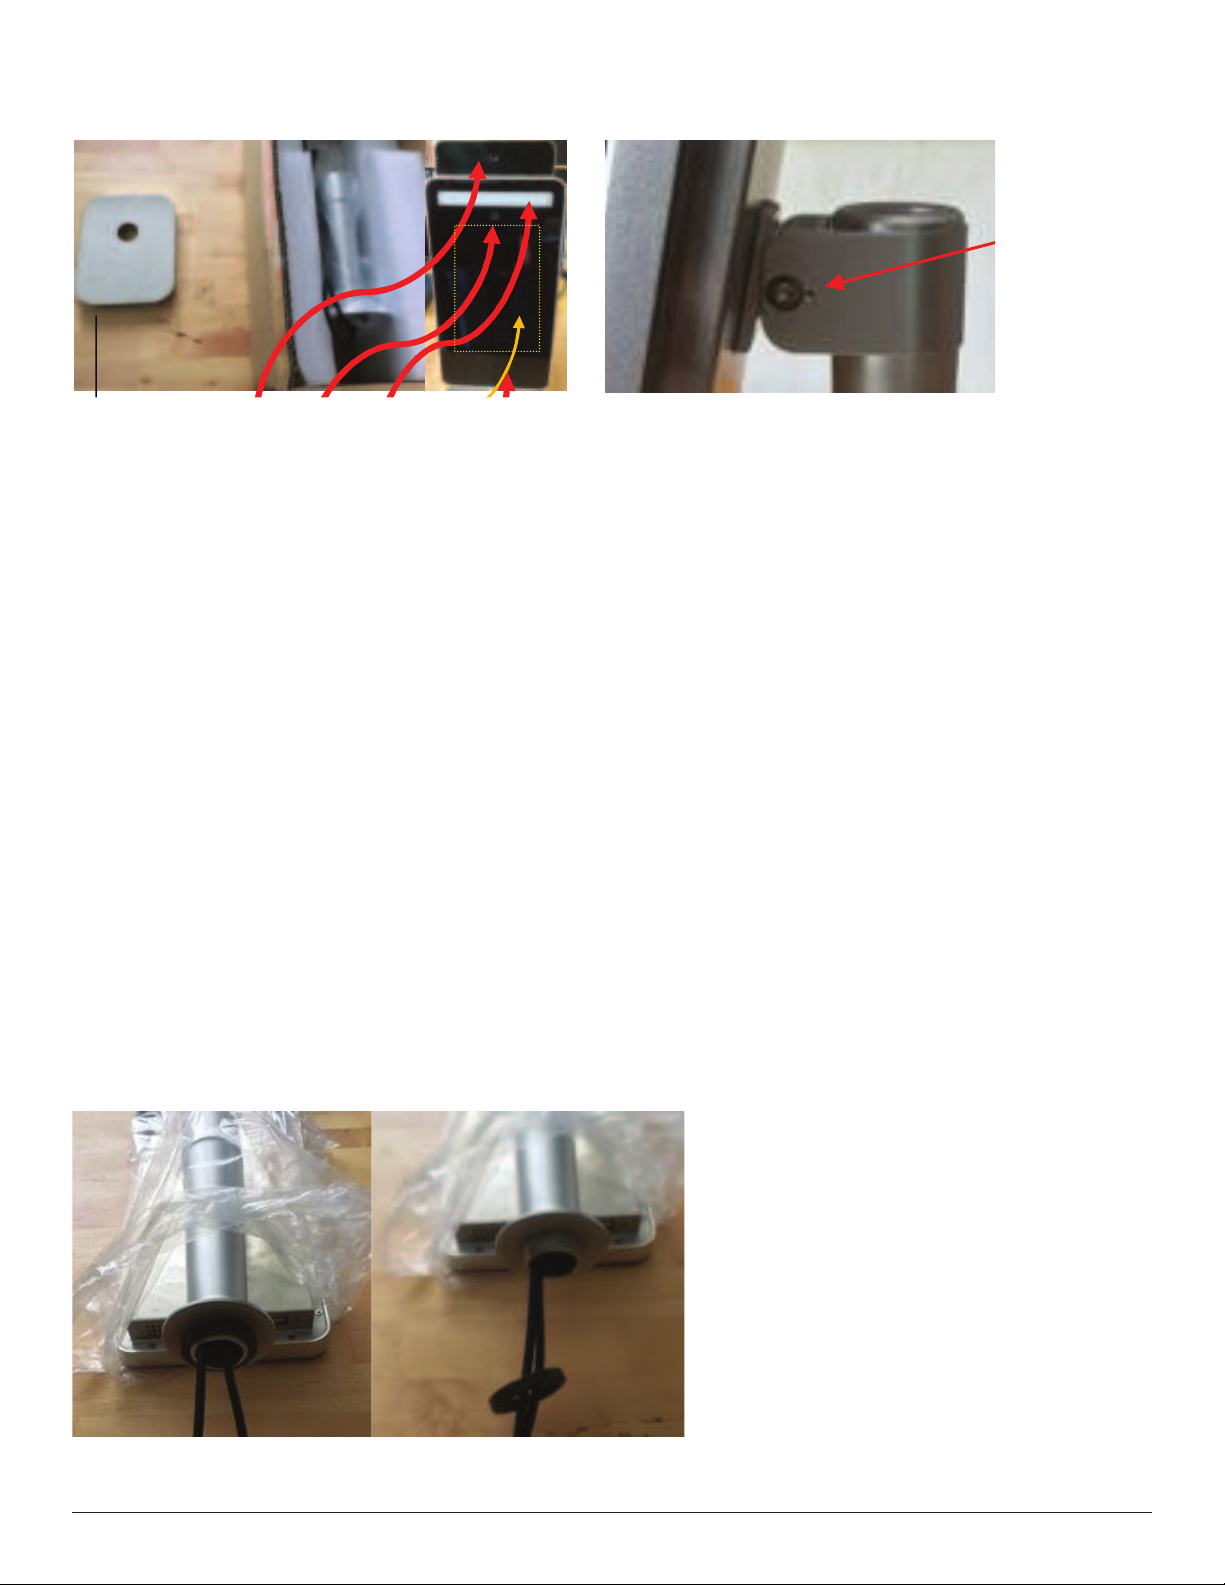
2. Assembly – Desk Stand ............................................................................................. 4
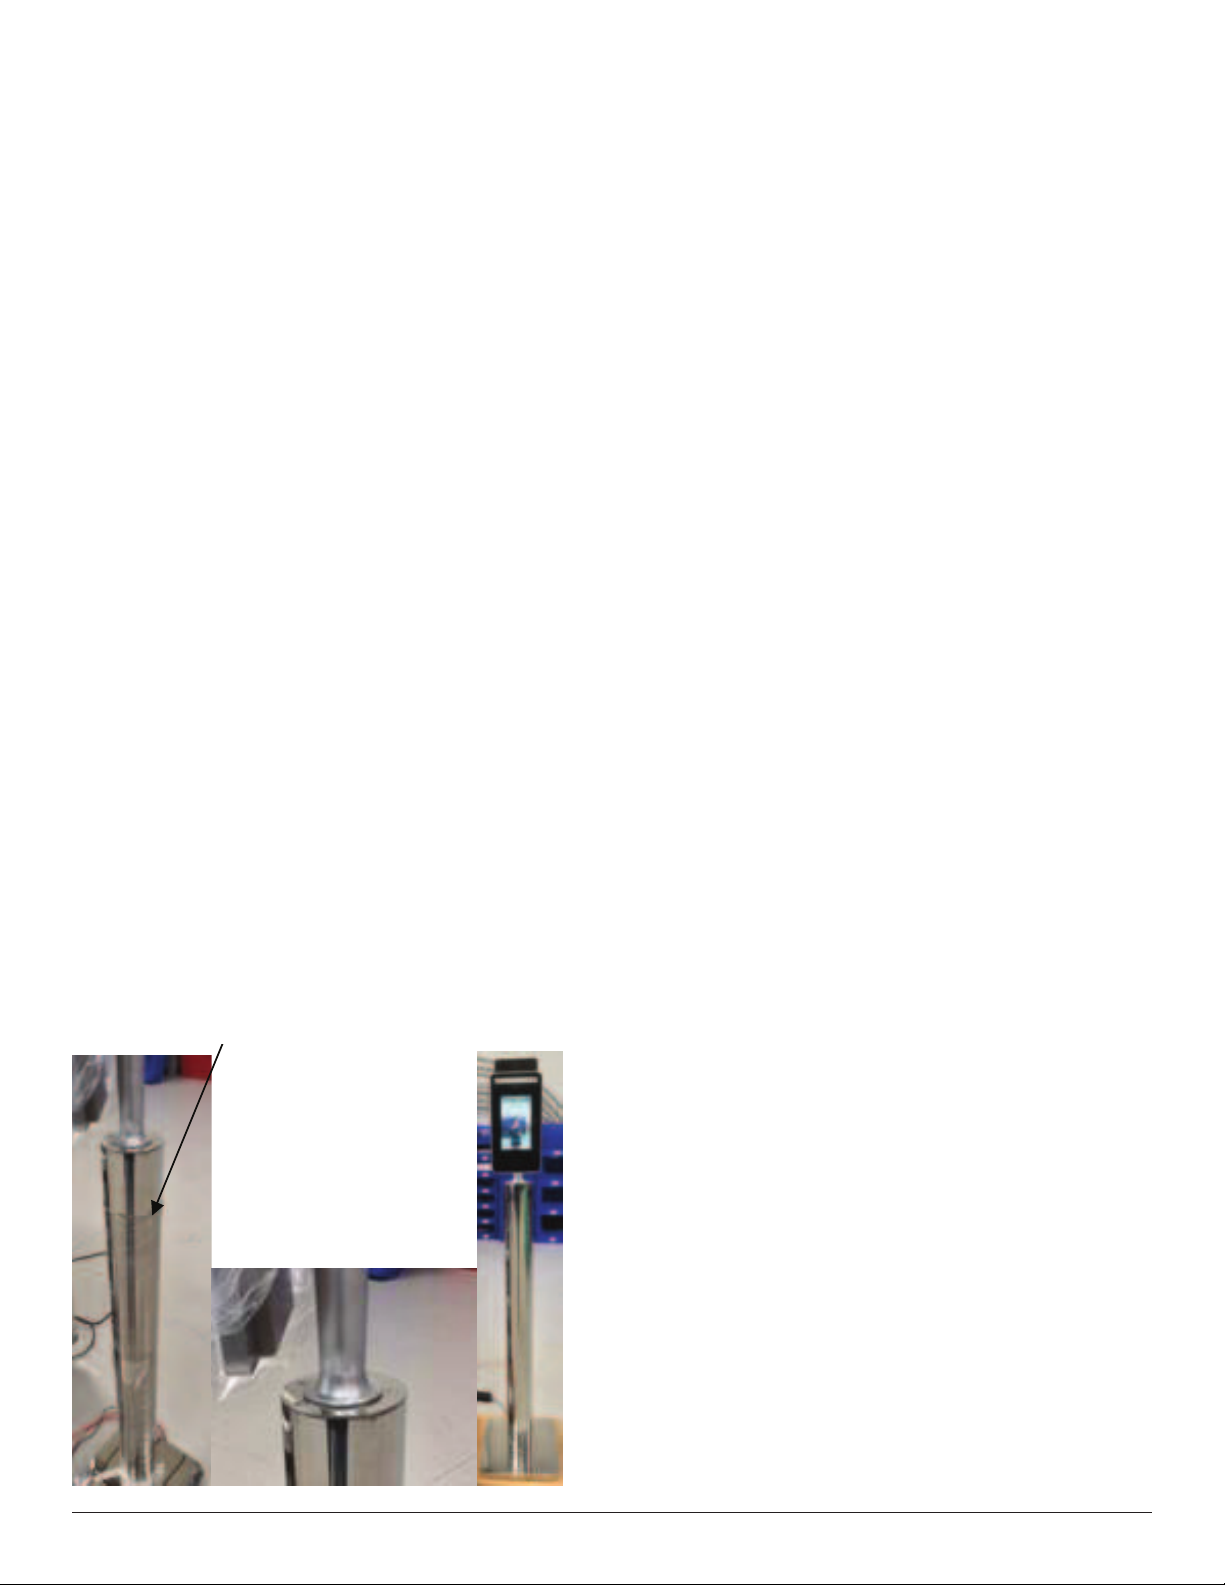
3. Assembly – Floor Stand ............................................................................................. 6
4. Initial Screen ............................................................................................................... 9
5. Default Screen ............................................................................................................ 10
6. Top-Level Menu ......................................................................................................... 11
7. Device Information .................................................................................................... 12
8. Device Management .................................................................................................. 13
9. Facial Recognition ...................................................................................................... 14
10. Query Attendance Data .......................................................................................... 15
11. Import Facial Image ................................................................................................. 16
12. Privacy Protection – GDPR/ Data Protection ........................................................ 17
13. Visitor Notication ................................................................................................... 18
14. Visitor Identication Switch .................................................................................... 18
15. Temp Display Format Switch .................................................................................. 19
16. High Temp Alarm Settings ...................................................................................... 19
17. Temperature Display Switch .................................................................................. 20
18. System Settings ........................................................................................................ 20
19. Base URL ................................................................................................................... 21
20. Voice Settings ........................................................................................................... 22
21. Prompt Text .............................................................................................................. 25
22. Abnormal prompt text ............................................................................................ 26
23. Display Usage Statement ........................................................................................ 26
24. Range Switch ............................................................................................................ 27
25. Change Password .................................................................................................... 28
26. Date Display Format ................................................................................................ 28

3iR37 Build & Operations Manual• LIBERTY AV
27. Network Settings ..................................................................................................... 29
28. Display Settings ........................................................................................................ 30
29. Set Gate Opening ..................................................................................................... 31
30. Flashlight Setting ..................................................................................................... 32
31. System Update.......................................................................................................... 32
32. Face Database........................................................................................................... 33
33. Setting Time Zone and Date and Local Time ........................................................ 34
34. Second System Menu .............................................................................................. 35
35. Data Management – Scan Deletion ....................................................................... 36
36. Mail Settings – Alert Notications .......................................................................... 37
37. Capture Resolution .................................................................................................. 38

4 iR37 Build & Operations Manual • LIBERTY AV
1. PARTS
2. ASSEMBLY – DESK STAND
a. Tablet
1. Heimann thermometer sensor
2. Himax camera
3. Camera LED light
4. 7” Android touch screen
5. Ultrasonic distance sensor – do not touch/ press.
b. Base
c. PSU
1. Uses a 13a standard UK plug to IEC female aka “kettle plug”.
• Standard supplied length is 6 ft 5 inches
2. LV supply 12v 3amp output
• Standard supplied length is 5 ft
d. Allen key
1. Key to tighten and lock screen tilt in desired position.
2. Gently tighten both left and right hand (small) Allen key bolts.
a. Unscrew and remove black collar from screen pole.
pol
Allen key bolts
Base a-1 a-2 a-3 a-4 a-5

5iR37 Build & Operations Manual• LIBERTY AV
b. Leave large vinyl washer in place.
c. Thread captive cables x3 through base aperture, fattest rst, top in bottom out.
d. Thread cables through black threaded collar.
1. Do largest connector rst then in diminishing size. For ease, do largest connector rst then in diminishing size.
2. Thread collar onto pole.
3. Hand tighten clamping column and base together – ensure base is orientated such that the cable slot is to the
rear of iR37.
4. Fanout cables to rear of screen base aperture.
5. Place into position.
6. Connect LV connector to captive connector of same type.
7. Connect IEC to PSU.
8. Plug in power cable to 13a socket.
9. Switch on power at socket.
* Note there is NO on/o switch on the iR37 unit itself.
o posi
Connect IEC to PSU

6 iR37 Build & Operations Manual • LIBERTY AV
3. ASSEMBLY – FLOOR STAND
There are two boxes for the oor stand.
1. Polished stainless steel column 9 shown above wrapped.
a. With pre-drilled and tapped bolt holes top (#5) and bottom (#6).
2. Floor base with
a. 1x pack of screws with
• 6 x dome cross head bolts
• 5 x cross head countersunk bolts.
b. 1 x top plate mirror polished and pre-drilled and countersunk 5 holes.

7iR37 Build & Operations Manual• LIBERTY AV
3. The pole has a tube of bubble wrap on each end. Tube itself is cling lm wrapped.
a. Remove the bubble wrap; these slide o no need to cut.
b. Leave the cling lm wrap on the pole section.
c. Only remove the cling lm from the tube ends to expose the xing plate holes.
• Film should peel back.
4. Unwrap base plate and remove the protective lm around/ over the central hole.
a. Invert the base and place on the pole end with 6 pre-drilled and tapped holes, as shown in photograph. If
working in a “hard oor area” leave bubble wrap on other tube end to avoid marking mirror nish.
b. Insert the 6 bolts a couple of turns as shown.
c. Tighten with a cross head/ Phillips screwdriver, tighten opposites in order, so 1,4,2,5,3,6 – DO NOT over
tighten – hand tight is adequate.
5. If working alone, lay the pole down and thread the power cord from bottom to top.
a. Add in the contact closure extension cable and network cable if relevant for your use case.
b. Easiest achieved with two persons, one to thread and one to hold the pole steady in an inverted postion.

8 iR37 Build & Operations Manual • LIBERTY AV
6. Stand the pole up on its base.
Take the main device and unthread the black collar from the underside.
a. Remove the protective lm from the top plate.
b. Hold the plate the shiny side is upwards.
c. Thread the captive cable through the top plate central hole.
d. Thread the black screw collar over these cables.
e. Connect cables to power/contact closure/ network.
f. Place the assembly on top of the pillar.
g. Line up the holes in plate and column.
h. Make sure the screen is oriented correctly with the base.
1. Cables should exit the base to the rear.
2. Screen should face away from the cables on the opposite side.
3. If necessary, loosen and rotate upper assembly and top plate; retighten black collar.
4. Check and repeat until satised.
i. Now insert two of the screws – only a couple of turns.
j. Tighten one of the screws gently using a screwdriver.
1. This will ensure all holes now line up.
2. Insert remaining three screws.
k. Tighten all screws.
l. Remove remaining cling lm from pole.
1. AVOID using a knife or scalpel – the pillar will scratch and sadness, anger and four letter words will follow!!
2. Scissors are best; snip the roll of cling lm near the top of the pole. The cling lm should then unwind
from the pillar.
3. Clean the metal with a soft lint-free cloth.
m. Screen and pillar are now ready to be switched on and used.
j-1

9iR37 Build & Operations Manual• LIBERTY AV
4. INITIAL SCREEN
After connecting power, the iR37 will show this page.
Usage Statement
1. The working environment of the infrared thermal sensor is recommended to be used indoors. Optimum
room temperature is 59 to 86 deg F. Avoid facing high-temperature objects such as windows, air conditioners,
radiators and uorescent lamps. Outdoor use will be aected by many adverse environments, such as,
sunshine, rain, cold, hot air, snow, cold and heat source objects, etc.
2. The infrared thermal sensor works in a stable state after 5 minutes of start-up and operation.
3. The product is a non-medical device. The temperature measurement function of this equipment is only to assist
rapid self-help body screening. Once the abnormal body temperature shows, it is recommended to use medical
temperature measurement equipment to measure and conrm again.
4. T he circle button under the screen is the ultrasonic module, which is used to detect the most eective
temperature measurement distance of 50cm. When using, please make sure there is no obstruction object
within 1.5m in front of the screen. DO NOT touch or press with your hand or ngers.
5. Tap “conrm” if this is understood and accepted.
6. Wait 5 minutes for environment to stabilise.

10 iR37 Build & Operations Manual • LIBERTY AV
5. DEFAULT SCREEN
Standby screen shows:
1. Device name/company (user can set – see 11c viii)
2. Time
3. Day
4. Date
5. Welcome/Corporate message (user can set)
Tap date time bar at top of screen.
Menu access – via Password

11iR37 Build & Operations Manual• LIBERTY AV
6. TOP-LEVEL MENU
Facial Recognition
Device Management
Device Information
Enter password number – default is 6666.

12 iR37 Build & Operations Manual • LIBERTY AV
7. DEVICE INFORMATION
Items listed (cannot be changed on this screen) in order are:
a. Complete record of faces ( xx person).
b. Shows the number of proles on the device registered for facial recognition.
c. Not completed record of faces (xx person).
d. Records for facial recognition which are incomplete.
e. Local saved attendance (xxx).
f. Total number of temperature scans completed.
g. Not uploaded attendance (xxx).
h. Number of scans with no photo ID (i.e. generic anonymous visitors).
i. IP – allocated IP address or blank/”check network” if none – only required for networked deployment, NOT as a
standalone device.
j. Gateway – allocated gateway or blank/”check network” if none – only required for networked deployment, NOT as
a standalone device.
k. Version number – rmware version on device.
l. Device number – unique serial number of device.
• Write down the serial number of the device and keep it with product paperwork. For example, write it on the
cover page of this manual.
Tap back arrow top left
Tap Device Management
Tap Device Information

13iR37 Build & Operations Manual• LIBERTY AV
8. DEVICE MANAGEMENT
Each item listed is accessed by a single tap; exit by tapping anywhere else or back arrow (top left of screen).
Tap Facial Recognition

14 iR37 Build & Operations Manual • LIBERTY AV
9. FACIAL RECOGNITION
Precision mode (default)
a. This enables facial recognition.
b. Places a head outline on the screen.
c. User needs to be 300 to 600mm distant.
d. User positions their face image within the outline.
e. Screen prompts if too close or too far away.
f. Suitable use - to log individual employees from a known data set.
g. Still enables visitors to be scanned.
Fast mode
a. No facial recognition.
b. Suitable for fast scanning at a greater distance of individuals for temperature.
c. Enable “reminder without mask” if you wish to ensure all persons are wearing a mask. Device will not
allow a pass without a mask and issues verbal reminder to put on a face mask.
d. Social distancing between users is advised to ensure quick reading.
e. Users need to be 500 to 800mm from device.
f. Screen prompt if too close or too far away.
g. Suitable uses are for multi-tenanted oces, cinemas, restaurants, schools, where individual identity
is not of paramount importance.
Tap Measuring Mode

15iR37 Build & Operations Manual• LIBERTY AV
10. QUERY ATTENDANCE DATA
See
• Will list every person scanned with name (if facial recognition ON) and date, time and temperature.
• Tapping any entry on list will bring up further detail.
Export Table
Exports to USB the list without any images, but includes all other data.
Export Tables and Photos
Exports to USB the list of all scans and their photos (if enabled) at time of scan.
• The query can be narrowed by time – from and to.
• Temp range – so say over 37.3 deg C or 100.4 deg F.
• Department – if users on database.
• By name – search for an individual’s scans from the database.
NOTE – all of this data can be uploaded via the network if unit deployed in that environment by wireless
or wired – see separate manual (Server Software Ver 3).

16 iR37 Build & Operations Manual • LIBERTY AV
11. IMPORT FACIAL IMAGE
Via USB using a predened dataset and format for employee/sta records.
See (Server Software Ver 3) for details.

17iR37 Build & Operations Manual• LIBERTY AV
12. PRIVACY PROTECTION – GDPR/ DATA PROTECTION
Show Faces
When a registered user presents themselves to the device and is passed or failed, the device will show
their stored image; switch o to hide the image displaying.
Show Name
When a registered user presents themselves to the device and is passed or failed, the device will show
their stored name; switch o to hide the name displaying.
Capture Function
When a registered user presents themselves to the device and is passed or failed, the device will take a
picture at the time of scan; switch o to turn o picture-taking function.
With all the choices set to o (empty tick boxes) a scan still takes place and will say pass or fail but will only
show the individual as a “registered user”.
The scan is however recorded with whom and date/time/temp and device.

18 iR37 Build & Operations Manual • LIBERTY AV
13. VISITOR NOTIFICATION
a. On - will record every visitor.
b. O - will not record any visitor.
14. VISITOR IDENTIFICATION SWITCH
a. On – will take a picture of every visitor at time of scan.
b. O – does not take a picture of any visitor.

19iR37 Build & Operations Manual• LIBERTY AV
15. TEMP DISPLAY FORMAT SWITCH
a. Centigrade – default – displays in real time the temperature to individual being scanned.
b. Fahrenheit – displays in real time the temperature to the individual being scanned.
16. HIGH-TEMP ALARM SETTINGS
Default is set to 37.3 degrees C.
• Note – this allows for 0.3 degree potential error of a temperature scan.
• Temperature at which a “fail” is triggered can be set higher or lower.
• To set, tap gure area and enter desired value.
If using Fahrenheit - the current advice (July 2020) from CDC is 100.4 deg F.
• Temperature at which a “fail” is triggered can be set higher or lower.
• To set, tap gure area and enter desired value.

20 iR37 Build & Operations Manual • LIBERTY AV
17. TEMPERATURE DISPLAY SWITCH
On shows scanned temperature to user on screen.
O, no temperature is displayed.
Temperature is recorded whether on or o.
18. SYSTEM SETTINGS
System settings are where you customize the user experience and set certain parameters to enable control and
monitoring across your network, wired or wireless.
We will deal with each menu item in order as shown above.
Table of contents