Liberty Garden 871 User manual

VISIT OUR WEBSITE: WWW.LIBERTYGARDENPRODUCTS.COM
OR CALL US TOLL FREE AT 1-866-820-5805
IMPORTANT: READ THE OWNER’S MANUAL BEFORE ASSEMBLING
LIBERTY GARDEN PRODUCTS, INC.
1161 SOUTH PARK DRIVE, KERNERSVILLE NC 27284
Model 871 Four Wheel Hose Cart
Owner’s Manual
™

IMPORTANT: LAY OUT ALL PARTS AND FASTENERS. MAKE SURE ALL PARTS ARE
ACCOUNTED FOR. IF ANY PART IS MISSING PLEASE CONTACT LIBERTY GARDEN
PRODUCTS AT 1-866-820-5805. DO NOT CONTACT THE RETAILER. YOU CAN ALSO
VISIT OUR WEBSITE, WWW.LIBERTYGARDENPRODUCTS.COM, FOR MORE INSTRUCTIONS
PICTURES AND HELPFUL HINTS.
TOOLS REQUIRED: TWO ADJUSTABLE WRENCHES & HAND PUMP
PARTS LIST
Estimated Assembly time: 30 minutes
A. FRAME (1 UNIT)
B. SPOOL WITH CRANK HANDLE (1)
C. TIRES (4)
D. U-HANDLE (1)
E. LEADER HOSE (1)
F. BASKET (1)
G. BRASS SWIVEL (1)
H.
I.
J.
K.
L.
M.
N. AXLE BOLTS (4)
O. AXLE NUTS (8)
P.
Q. RUBBER HANDLE W/BOLT (1)
GHI
J
K
L
M
NOP
Q
A
B
C
D
E
F
U-BUSHING (1)
AXLE WASHERS (4)
WING NUTS (4)
1.44” BOLTS (4)
LOCK NUTS (4)
1.75” BOLTS (4)
GALVANIZED TEE (1)
2

FIGURE 2
FIGURE 3
FIGURE 4
FIGURE 5
FIGURE 1
1. Turn Frame (A) on it’s back. Insert Axle Bolt (N) thru the
axle bushing on the frame. Put axle nut (O) on the axle.
Hold the axle bolt with one wrench and tighten the nut on
the inside of the frame with another wrench. Tighten securely.
Repeat on all remaining axles. See Figure 1
2. Place the wheel over the axle with the air valve facing out.
Place the axle washer (P) over the thread and screw on
axle nut (O) and tighten securely. Repeat for each
remaining wheel. See Figures 2 & 3
4. Insert the Brass Swivel (G) through the U-bushing
(I) and screw the end of the swivel into the
galvanized tee (H). See Figure 4. Using a wrench,
tighten the swivel into the galvanized tee. Tighten
securely but do not over tighten. Over tightening
the swivel could cause leakage.
3. Set the cart upright on the wheels.
5. Screw the galvanized tee (H) onto the spool
end (B) Tighten with wrench. See Figure 5
3
I
G
H
FIGURE 4

3
6. Place the spool (B) on the frame so the
bushings are oriented over the holes on
the frame. You may have to compress the
spring to get the spool oriented properly.
See Figure 6
8. Attach basket (F) using 1.44” bolts, part
(L) and fasten with wing nuts, part (M) to
the U-Handle (D). Slide U-Handle (D) over
the frame extensions and align the holes.
Insert 1.44” Bolts (L) thru handle holes and
attach wing nuts.
See Figure 8
7. Using the 1.75” bolts ( J ), insert them
thru the bushing and thru the holes on the
frame. Attach lock nuts (K). Repeat for
other side of the spool. After the 4 bolts
and nuts are attached you may tighten the
nuts. See Figure 7
FIGURE 7
FIGURE 6
FIGURE 8
4

5
9. Attach rubber handle (Q) to crank handle
using handle bolt and nut. Tighten securely.
See Figure 9
10. Attach the Leader Hose (E) to the end
of swivel. DO NOT OVER TIGHTEN.
See Figure 10
12. Attaching Your Garden Hose:
The 871 is designed to hold up to 250’ of
5/8” garden hose. Attach your hose to the
brass adapter (on the galvanized tee).
Loop the hose over the spool end
(as shown) to avoid kinking.
See Figure 11
FILLING THE TIRES WITH AIR:
The recommended pressure for the tires
is 15 PSI.
WARNING! DO NOT OVERINFLATE!
Over inflation could cause the tires to
explode. A hand pump (bicycle pump)
is highly recommended when inflating the
tires. If a compressor is used, use with
extreme caution! These tires are small
and pressure can build quickly.
FIGURE 9
FIGURE 10
FIGURE 11
13. Your Model 871 host cart is now ready
to use. Attach the end of the leader hose
to your water supply.

6
CURING A LEAKING SWIVEL
Problem:
Your new Liberty® hose reel or hose reel cart is leaking at the swivel.
Solution:
It is normal for the swivel to leak slightly until the O-rings are wet and have seated. If the leaking
continues, you don’t need to take the cart back to the store. This is a simple problem and is
easily fixed by a simple procedure.
1. If the leader hose is attached to the swivel, unscrew the hose and look inside the swivel.
2. Using either a hex key or a large screw driver, insert the tool into the hex opening and gently
tighten the threaded insert. DO NOT OVER TIGHTEN!
3. This should stop the leaking.
4. If the unit still leaks, please check that the hose washer is inside the nut. You may contact
Liberty for a new hose washer or obtain one at any hardware store.
5. If your swivel is old, the O-rings may be worn, please contact us for a new set of O-rings.
6. If these steps do not solve your leaking problem, then contact Liberty Garden.
CALL US AT 1-866-820-5805 IF YOU HAVE ANY QUESTIONS
REGARDING TROUBLESHOOTING AND WARRANTY

7
CARE INSTRUCTIONS
Rust
Your hose reel will give you many seasons of reliable and functional hose storage. As with any steel
product, there is always the chance for rust developing over time. Your hose reel finish is designed for
industrial applications, but even the toughest of coatings can be compromised by scratches. Such minor
surface damage can occur in shipping despite our best efforts. We have found that most scratches
occur during assembly and/or installation. If the base metal is exposed to the elements long enough,
rust will develop. We recommend that you periodically inspect your reel for any surface damage.
Scratches can easily be repaired by using standard automotive touch-up body paint. Some of our most
loyal customers recommend that at the end of each season, the unit be cleaned and painted with a clear
acrylic paint. Two other sources of rust acceleration is exposing the reel to yard fertilizers or leaving your
hose reel standing in grass. Be sure to rinse off your hose reel after it comes in contact with freshly
fertilized grass. Also, try to park your hose reel on solid ground. Leaving it standing on top of vegetation
promotes condensation on the undercarriage of the unit.
Leaks
Your hose reel is manufactured with the finest quality components available. All components are
manufactured to rigorous quality standards not common in other consumer grade hose reels available
today. When you install your hose reel, be sure the hose washers are in place and all fittings are secure.
DO NOT OVER TIGHTEN as you might damage the components. If you live in more temperate
climates, be sure to drain the unit of any residual water before storing. DO NOT EXPOSE THE UNIT
TO FREEZING TEMPERATURES while water remains in the plumbing system.
Troubleshooting Guide
Problem: Swivel head is not rotating, causing the leader hose to kink up.
Solution: Remove leader hose and turn the square head of the swivel several times; apply
lubricant.
Problem: Leaking Fixtures (galvanized tee; brass coupling; swivel)
Solution: Apply Teflon/Plummer's Tape or/and make sure fixtures are tightened.
TIPS
• DO NOT use a compressor while inflating the tires; hand pump only. 15 PSI maximum.
•To help delay rust, check for any scratches on your hose cart. Apply clear acrylic/weatherproof paint
to avoid rusting.
• Drain water before storing.
• DO NOT drink water from the hose.
• DO NOT leave water running though the reel while not in-use or unsupervised.
•Turn off water after each use.

WARRANTY & CARE
Our guarantee is as functional and straight-forward as our products. Since we design and build our products
to provide you with many years of satisfaction, all Liberty™ products are guaranteed against defects in
materials and workmanship. In the unlikely event that a problem arises as a result of a defect in our materi-
als or workmanship, we will promptly repair or replace the item at our expense. All we require is that you
contact us first and we'll take it from there. It is important to note that our guarantee is not an unconditional
guarantee for the life of the product. Liberty™ hose stands and reels are made from the finest materials
available under our exacting manufacturing standards. But, like any other product, it is not indestructible.
Therefore, our guarantee does not cover:
• Product damage that is a result of abuse, misuse, or mishandling. (Exposing the unit to freezing tempera-
tures with water remaining in the reel plumbing system voids the unit warranty).
• Rust. Despite the industrial quality coating and our best efforts, steel will rust over time.
• Incidental damage or consequential damages or injury to persons or to other property not purchased from
us due to the use of our product.
• DO NOT consume water from garden hose; not fit for human consumption.
If there is damage to the product that occurred as a result of shipping, you should file a damage claim
with the carrier.
• DO NOT leave water running though the reel while not in-use or unsupervised.
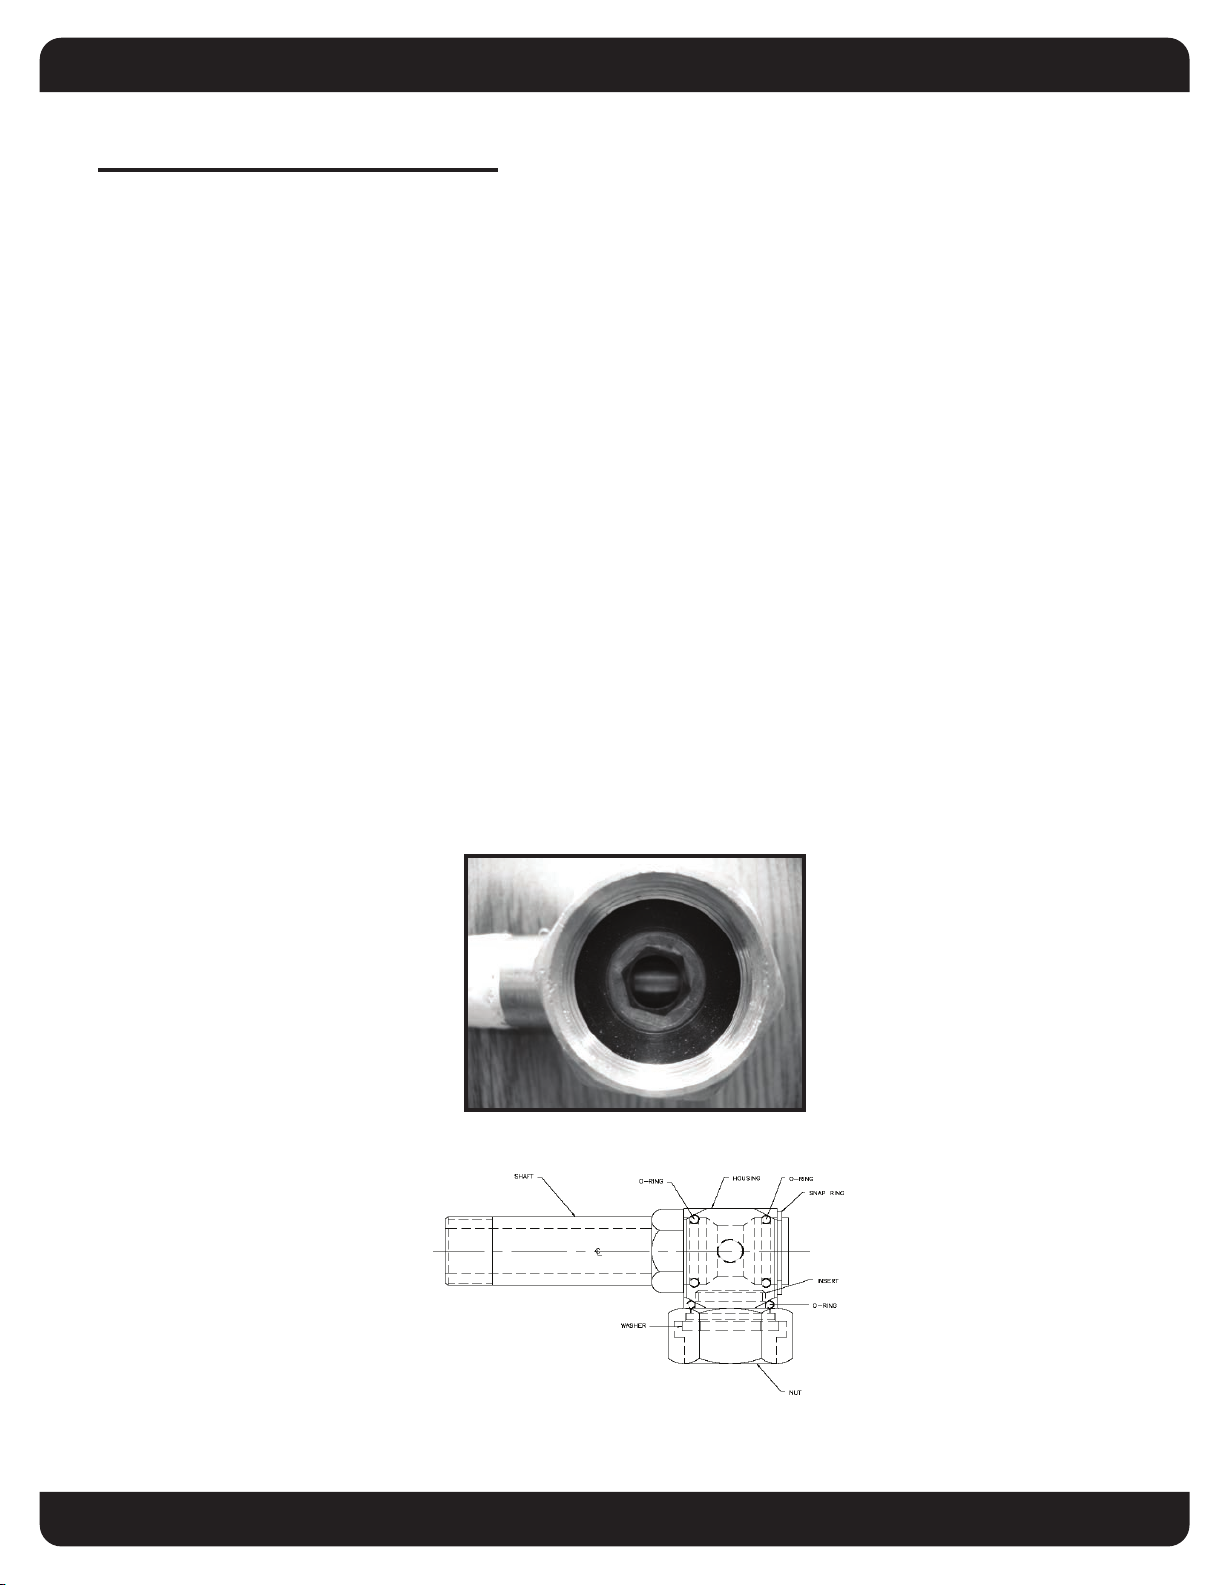
As with any product, it should be expected that component parts - particularly moving parts, seals, O-rings,
wheels, hose, and connectors will wear with use and over time, and eventually may need to be replaced or
refur-bished. This type of normal wear and tear is naturally not covered by our guarantee, but we will always
be happy to provide you with prompt, high quality service and replacement parts at a nominal cost.
This warranty gives you specific legal rights, and you may also have other rights which vary from state to
state. (Some states do not allow the exclusion or limitation of incidental or consequential damages, so the
above limitation may not apply to you).
You will find that we apply the same standard of excellence to our customer service as we do to our products.
Warning! This product contains one or more chemicals known to the state of California to cause cancer and
birth defects or other reproductive harm. Wash hands after handling.
Updated 10/16/2013
8
LIBERTY GARDEN PRODUCTS, INC.
1161 SOUTH PARK DRIVE, KERNERSVILLE NC 27284
™

Modelo 871 250’ de cuatro ruedas
Manual de instrucciones
VISITA NUESTRO SITIO WEB: WWW.LIBERTYGARDENPRODUCTS.COM
IMPORTANTE: LEA EL MANUAL DE INSTRUCCIONES ANTES DE ARMARLO. SI TIENE
ALGUNA PREGUNTA POR FAVOR LLAME AL 866-820-5805 DE LUNES A VIERNES de 9
AM a 5 PM HORA DEL ESTE, USA
™
9
LIBERTY GARDEN PRODUCTS, INC.
1161 SOUTH PARK DRIVE, KERNERSVILLE NC 27284

HERRAMIENTAS NECESARIAS: DOS LLAVES INGLESAS AJUSTABLES; BOMBA DE MANO
LISTA DE PARTES
Tiempo estimado para ensamblar: 30 minutos
A. ARMAZON (1 UNIDAD)
B. CARRETE CON MANIVELA (1)
C. LLANTAS (4)
D. AGARRADERA EN FORMA DE U (1)
E. AGARRADERA EN FORMA DE U (1)
F. CANASTA (1)
G. COBRE ( LATON ) GIRATORIO (1)
H.
I.
J.
K.
L.
M.
N. PERNOS DEL EJE (4)
O. TUERCAS DEL EJE (8)
P.
Q. MANIJA DE CAUCHO CON PERNO (1)
COJINETES -U (1)
ARANDELAS DEL EJE (4)
TUERCAS (4)
PERNOS 1,44” (4)
TUERCAS (4)
PERNOS 1,75” (4)
T GALVANIZADA (1)
10
IMPORTANTE:
Revise todas las partes y los sujetadores. Asegurese que todas las partes estan incluidas.
Si alguna parte no esta, favor de contactar a Liberty Garden Products al 1-866-820-5805.
No contacte al almacen donde compro el producto. Tambien puede visitar nuestro sitio web,
www.Libertygardenproducts.com para mas intrucciones, fotos y sugerencias utiles.
GHI
J
K
L
M
NOP
Q
A
B
C
D
E
F

1. De la vuelta al armazon (A) y coloquelo sobre su parte poste-
rior (A). Ingrese el perno (N) a travez del eje del armazon.
Ponga la tuerca (O) en el eje.Sostenga el eje con una llave y
aprete la tuerca en la parte interiordel armazon. Aprete con
firmeza. Repita esto en los otros ejes. Ver figura 1
2. Coloque la rueda sobre el eje con la valvula de aire hacia
afuera. Coloque la arandela de eje (P) sobre el hilo y atornille
la tuerca (O) y aprete firmemente. Repita para cada rueda
restante. Vea las Figuras 2 & 3.
4. Ingrese el eslabon giratorio (G) por el cojinete (I) y
atornille el final del este en la t galvanizada (H). Vea la
Figura 4. Utilizando una llave inglesa, apriete el esla-
bon giratorio en la t galvanizada. Apriete firmemente
pero no sobre apriete; apretar demasiado el eslabon
giratorio podría causar goteo.
3. Ponga el carrito vertical sobre sus
5. Enrosque la t galvanizada (H) en el carrete (B),
Apriete con la llave inglesa. Vea la Figura 5.
INSTRUCCIONES PARA ENSAMBLAR
11
FIGURA 2
FIGURA 3
FIGURA 1
I
G
H
FIGURA 4
FIGURA 5

12
6. Coloque el carrete (B) en el armazon de
modo que los cojinetes esten orientados sobre
los hoyos en el armazon. Usted puede neecesi-
tar comprimir el resorte para conseguir que el
carrete se oriente apropiadamente.
Vea la Figura 6.
8. Conecte la canasta (F) utilizando los
pernos 1,44” parte (L) y sujetelos con
tuercas (M) al soporte en forma de U (D)
Coloque el soporte (D) sobre las exten-
siones del armazon en linea con los hoyos.
Introduzca los pernos1,44” (L) en los
hoyos de asidero y conecte las tuercas (M).
Vea la Figura 8.
7. Utilize los pernos 1,75” (J), e ingreselos
en los cojinete y en los hoyos en el arma-
zon. Conecte la tuercas (K). Repita en el
otro lado del carrete. Después de que los
4 pernos y las tuercas esten conectados
usted puede apretar las tuercas.
Vea la Figura 7.
FIGURA 7
FIGURA 6
FIGURA 8

9. Conecte la manija de caucho a la
manivela (Q) usando el perno de la
agarradera y la tuerca. Aprete firmemente
Vea la Figura 9.
10. Conecte la manguera inicial (E) al final
del eslabon giratorio. No aprete demasiado
Vea la Figura 10.
Llenando las llantas con aire:
La presion recomendada para las llantas es
de 15 PSI ADVERTENCIA !, NO LAS
INFLE DEMASIADO !
Demasiado aire puede hacer explosionar a
las llantas. Usar una bomba de mano
para bicicletas es altamente recomendado
para inflar las llantas. Si se usa un
compressor de aire, uselo con extrema
precaucion. Estas llantas son pequen’as
y la presion puede aumentar rapidamente. FIGURA 10
11. El modelo 871 esta disen’ado para
usarse con una manguera de jardin de 5/8”
con una longitud maxima de 250’. Conecte
la manguera al adaptador de cobre
(laton). Enrolle la manguera sobre el carre-
te, como se muestra en la figura para evitar
que se enrede.
Vea la Figura 11
12. Su carrito Modelo 871 está ya listo para
ser utilizado. Conecte la manguera inicial
a su abastecimiento de agua.
13
FIGURA 11
FIGURA 9

14
COMO ARREGLAR UN ESLABON GIRATORIO O PIVOTE QUE GOTEA
El problema:
Si su Nuevo Carrete de manguera gotea en el pivote o eslabon giratorio.
Lo solucion:
Es normal para el eslabon giratorio gotear ligeramente hasta que los anillos esten mojados y se
han asentado. Si el goteo continua, usted no necesita devolver el carro a la tienda. Este es un
problema sencillo y facil de arreglar con un prodedimiento sencillo.
1. Si la manguera inicial esta conectada al eslabon giratorio, destornille la manguera y mire al
interior del eslabon. .
2. Utilizando una llave o un destornillador grande, inserte este en la abertura y aprete suave-
mente un poco la parte con rosca. NO APRETE DEMASIADO.
3. Esto debe detener la salida de agua.
4. Si la unidad todavia gotea, por favor verifique o chequee que la arandela de la manguera este
dentro de la tuerca. Usted debe contactar a lo compania para una nueva arandela de manguera
o la puede obtener in cualquer ferreteria.
5. Si su eslabon giratorio es viejo o los anillos estan gastados por favor contactenos para enviar-
te un nuevo conjunto de anillos.
6. Si estos pasos no resuelven su problema de goteo, entonces por favor contacte a Liberty
Garden Products.
LLAME EEUU EN 1-866-820-5805 SI USTED TIENE CUALQUIER PREGUNTA CON
RESPECTO A LOCALIZACION DE FALLAS Y GARANTIA I

INSTRUCCIONES PARA SU CUIDADO
Oxidación
Su carrete de manguera le dará muchas temporadas de almacenamiento seguro y functional. Como
cualquier otro producto de acero hay siempre la posibilidad que se desarrolle oxido al pasar el tiempo.
Su carrete de manguera esta disen’ado para aplicaciones industriales, pero aun la capa protectora
puede ser dan’ada por rasguños. Estos daños a la superficie pueden ocurrir durante el envío a pesar de
nuestros mejores esfuerzos. Hemos encontrado que la mayoría de los rasguños ocurren durante el
ensamblaje y/o la instalación (en el caso de carretes de manguera montados en la pared ). Si el metal
de la base es expuesto a los elementos, la oxidación se va a desarrollar. Ls piezas para instalar deben
poder aguantar un peso combinado de la unidad y del agua. Recomendamos que usted inspeccione
periódicamente su carrete por algún daño de superficie. Los rasguños pueden ser reparados fácilmente
utilizando pintura automotriz de retoque. Algunos de nuestros clientes mas leales recomiendan que a
finales de cada temporada, la unidad debe ser limpiada y pintada con pintura clara de acrílico.
Otras dos causas de aceleración de la oxidación son el exponer el carrete a fertilizantes de hierba o
dejar su manguera sobre el cesped. Asegurese de enjuagar su carrete luego de haber estado en
contacto con cesped recien fertilizado.También, trate de dejar su carrete de manguera en tierra firme.
El dejarlo encima de vegetación promueve condensación en la base de la unidad.
Filtraciones
Su carrete de manguera esta fabricado con los componentes más finos de calidad disponibles. Todos
sus componentes son fabricados bajo rigurosos estandares de calidad, no comúnes en otros carretes de
manguera disponibles hoy. Cuándo instale su carrete de manguera, debe estar seguro que las aran-
delas de manguera están en su lugar y todos los accesorios esten seguros. NO SOBRE APRIETE pues
quizás dañe los componentes. Si usted vive en climas más templados, esté seguro de secar la unidad
de residuos de agua, antes de guardarla. NO EXPONGA LA UNIDAD A TEMPERATURAS DE
CONGELACION mientras haya agua en el sistema de desague.
GUIA DE PROBLEMAS
Problema: La cabeza movediza no gira, causando que la manguera de inicio se enrosque
Solución: Mueva la manguera inicial y gire la cabeza algunas veces; aplique lubricante.
Problema: Partes que gotean agua t galvanizada, acoplamiento de cobre, parte giratoria.
Solucion: Aplique cinta de teflon usada por plomeros y asegurese que todo este apretado.
No utilize un compresor al inflar las llantas; use solamente bomba de mano con15 máximo de PSI .
Para demorar la formacion de oxido revise si hay rasgun’os en su carro de llevar la manguera.
Aplique pintura clara de acrílico/resistente a la intemperie, para evitar la oxidacion.
Asegurese que no hay agua antes de almacenarlo.
NO TOME agua de la manguera.
NO DEJE agua corriendo por el carrete mientras no se use o sin supervision.
15

GARANTIA & CUIDADO
Nuestra garantía es tan directa y funcional como nuestros productos. Ya que nosotros diseñamos y construimos
nuestros productos para proporcionarle con muchos años de
satisfacción, nuestros productos estan garantizados contra defectos de materials y mano de obra.
En el improbable evento que un problema surja como resultado de un defecto en nuestros materials o fabricacion,
nosotros repararemos o reemplazaremos el artículo por cuenta nuestra. Todo lo que requerimos es que usted nos
contacte primero y nosotros hacemos el resto.
Es importante notar que nuestra garantía no es una garantía incondicional ya que al igual que otro productos el nuestro
no es indestructible. Por lo tanto nuestra garantia no cubre un dan’o al producto que es el resultado de abuso, mal uso,
o manejo indebido.
• (El exponer la unidad a temperaturas de congelacion con agua que quedo en el carrete de desague del sistema anula
la garantia)
• Oxidación. A pesar de la calidad industrial de la capa que lo reviste y nuestros mejores esfuerzos el acero se oxidara
con el paso del tiempo.
• Dan’o incidental o dan’o a conseuencia o heridas a personas u otra propiedad no comprada de nosotros a causa del
uso de nuestro producto.
• No consuma agua de la manguera; no es apta para el consumo humano. Si hay un daño al producto que ocurrió a
consecuencia del envío, usted debe presentar un reclamo de daño con quien trasporto el articulo.
• No deje que corra agua a travez del carrete si no esta en uso o sin ser supervisado.
Como con cualquier producto, debe ser esperado que las partes que lo mueven y lo integran, los sellos, los anillos,
ruedas, mangueras se dan’an con el uso y el paso del tiempo y eventualmente tendran que ser reemplazadas o
remanufacturadas. Esta forma de uso y dan’o normal es natural y no esta cubierta por nuestra garantia, pero nosottos
estaremos siempre dispuestos a darle servicio de calidad y partes de repuesto, a un costo nominal.
Esta garantía le da derechos legales específicos, y usted también puede tener otros derechos que varían de estado a
estado. (Agunos estados no permiten la exclusion o limitacion de incidents o dan’os de consecuencia, por lo que la
limitacioin indicada arriba puede que no sea applicable a usted).
Usted encontrará que aplicamos el mismo estándar de excelencia a nuestro servicio de atención al cliente como lo
hacemos con nuesros productos.
Advertencia! Este producto contiene una o más sustancias químicas conocidas en el Estado de California por causar
cáncer y defectos de nacimiento u otro daño reproductivo. Lavase las manos luego de usar este equipo.
Updated 10/16/2013
LIBERTY GARDEN PRODUCTS, INC.
1161 SOUTH PARK DRIVE, KERNERSVILLE NC 27284
™
16

™
Modèle 871 Chariot à quatre roues pour
boyau d’arrosage - Manuel d’utilisation
CONSULTEZ NOTRE SITE WEB: WWW.LIBERTYGARDENPRODUCTS.COM
OU TÉLÉPHONEZ-NOUS AU NUMÉRO SANS FRAIS 1-866-820-5805
IMPORTANT: LISEZ LE MANUEL D’UTILISATION AVANT D’ENTREPRENDRE L’ASSEMBLAGE
LIBERTY GARDEN PRODUCTS, INC.
1161 SOUTH PARK DRIVE, KERNERSVILLE NC 27284
17

OUTILS REQUIS: DEUX CLÉS RÉGLABLES, POMPE À MAIN
LISTE DES PIÈCES
Durée estimative de l’assemblage: 30 minutes
A. CHÂSSIS (1 UNIT)
B. DÉVIDOIR AVEC MANIVELLE (1)
C. PNEUS (4)
D. POIGNÉE EN U (1)
E. TUYAU DU CHARIOT (1)
F. PANIER (1)
G. PIVOT EN LAITON (1)
H.
I.
J.
K.
L.
M.
N. BOULONS POUR LES ESSIEUX (4)
O. ÉCROU POUR LES ESSIEUX (8)
P.
Q. POIGNÉE EN CAOUTCHOUC
AVEC BOULON (1)
GHI
J
K
L
M
NOP
Q
A
B
C
D
E
F
MANCHON EN U (1)
RONDELLES POUR LES ESSIEUX (4)
ÉCROU À OREILLES(4)
BOULONS DE 1,44 PO (4)
CONTRE-ÉCROUS (4)
BOULONS DE 1,75 PO (4)
TÉ GALVANISÉ (1)
18
IMPORTANT: PRÉPAREZ TOUTES LES PIÈCES ET TOUTES LES ATTACHES.
ASSUREZ-VOUS QUE VOUS AVEZ TOUTES LES PIÈCES. S’IL VOUS MANQUE DES
PIÈCES, COMMUNIQUEZ AVEC LIBERTY GARDEN PRODUCTS AU 1-866-820-5805.
NE COMMUNIQUEZ PAS AVEC VOTRE DÉTAILLANT. VOUS POUVEZ ÉGALEMENT
CONSULTER NOTRE SITE WEB: WWW.LIBERTYGARDENPRODUCTS POUR AVOIR DE
PLUS AMPLES INSTRUCTIONS, DES ILLUSTRATIONS ET DES CONSEILS UTILES.

1. Placez le châssis (B) sur son dos. Insérez le boulon pour
l’essieu (F) dans le manchon de l’essieu sur le châssis.
Répéter. Voir la Figure 1
2. Placez la roue sur l’essieu et orientez la soupape d’air
vers l’extérieur. Placez une rondelle pour l’essieu (O) sur
le filet et installez l’écrou pour l’essieu (P) et serrez bien.
Répétez le processus pour chacune des autres roues.
Voir les Figures 2 et 3.
4. Insérez le pivot en laiton (G) dans le manchon en U
(I) et vissez l’extrémité du pivot dans le té galvanisé
(H). (Voir la Figure 4) À l’aide d’une clé, serrez le pivot
dans le té galvanisé. Serrez bien, mais sans exagérer.
Un serrage excessif pourrait causer des fuites.
cause leakage.
3. Placez le chariot sur ses roues.
5. Vissez le té galvanisé (L) sur l’extrémité du dévidoir
(A) (l’extrémité où le tuyau est le plus court). Serrez
l’assemblage à l’aide d’une clé. Voir la Figure 5.
I
G
H
FIGURE 2
FIGURE 3
FIGURE 5
FIGURE 1
FIGURE 5
FIGURE 4
19

3
6. Placez le dévidoir (B) sur le châssis et
orientez les manchons vers les orifices du
châssis. Vous devrez peut-être comprimer
le ressort pour que le dévidoir soit orienté
correctement. Voir la Figure 6
8. Installez le panier (F) à l’aide des
boulons de 1,44 po (L) et installez les
écrous à oreilles (M) sur la poignée en U
(D). Insérez la poignée en U (D) sur les
rallonges du châssis et alignez les orifices.
Insérez les boulons de 1,44 po (L) dans les
orifices de la poignée et installez les écrous
à oreilles (M). Serrez les écrous à la main.
Voir la Figure 8
7. Insérez les boulons de 1,75 po (J)
dans le manchon et les orifices pratiqués
dans le châssis. Installez les contre-écrous
(K). Répétez le processus de l’autre côté
du dévidoir. Lorsque les 4 boulons et les
écrous sont en place, serrez les écrous.
Voir la Figure 7
FIGURE 7
FIGURE 6
FIGURE 8
20
Other manuals for 871
1
Table of contents
Languages:
Popular Outdoor Cart manuals by other brands

Copernicus
Copernicus VRC301 Assembly guide

ABC WORLDWIDE
ABC WORLDWIDE 30-L Assembly instructions

Sunex Tools
Sunex Tools 8054 Assembly instructions

Gorilla Carts
Gorilla Carts GOR1000PS-C quick start guide

Hudora
Hudora Uberlander Comfort INSTRUCTIONS ON ASSEMBLY AND USE

Vestil
Vestil STRAP-FP instruction manual