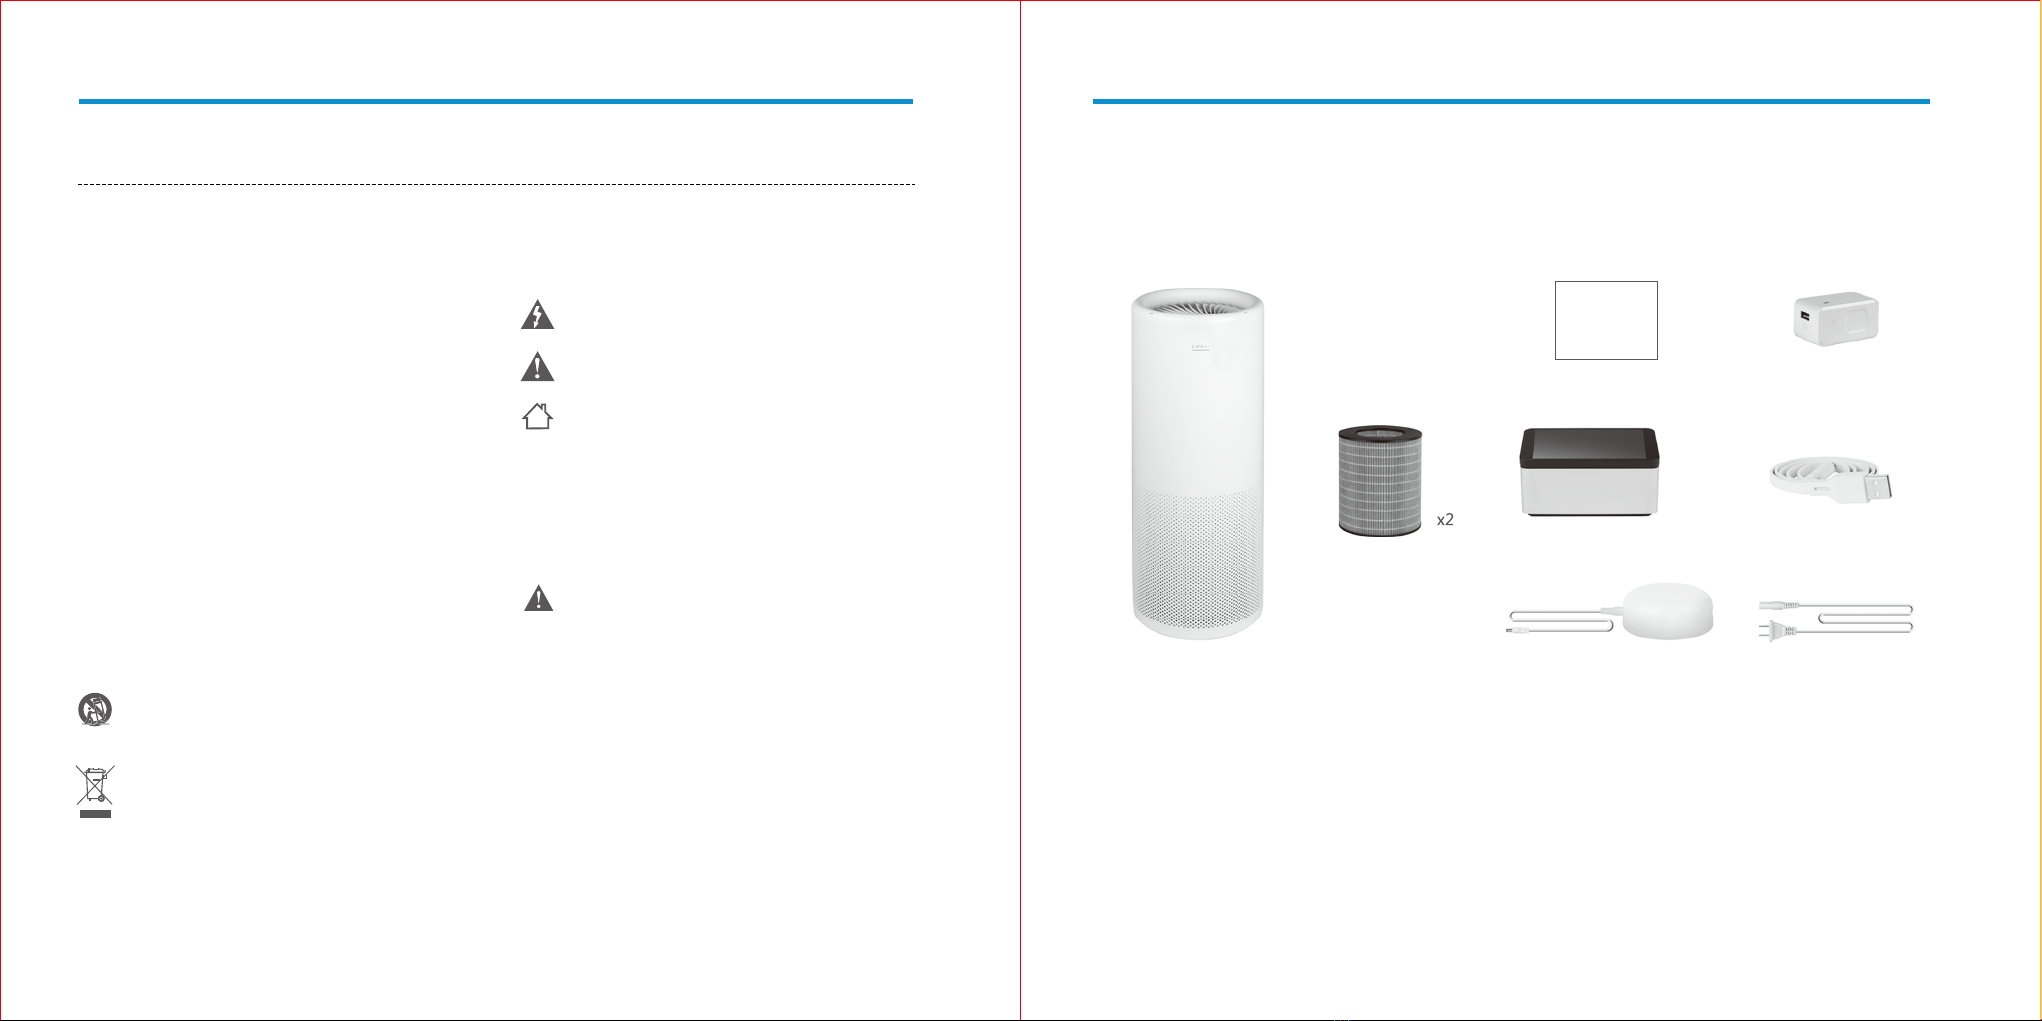
LIFAair Technology LA500V User manual

LA500V Smart Air Purifier
Please read this user manual carefully before using, and keep for future reference.
Warning: Before using the machine for the first time, you must remove the moisture proof protective bags.
IB-200-LA500V-03 V1.2
Designed in Finland
International Limited
Manufactured by Dongguan LIFAair Technology Ltd.
Address: No. 2, East Industry Road, Songshan Lake Science &
Technology Industrial Park, Dongguan, 523808, CHINA
www.lifaair.com Designed in Finland

Packing List
air purifier main unit
air purifier main unit x1
composite filter x2
monitoring controller x1
power cord x1
power adapter (for air purifier) x1
power adapter (for
the
monitoring controller) x1
monitoring controller charging cable x1
instructions manual / certificate x1
instructions manual /
certificate
power adapter (for the monitoring
controller)
composite filter
(used inside main unit)
monitoring controller monitoring controller charging cable
power adapter (for air purifier) power cord
English
2
For safety purpose, unplug the product during lightning storms or when
unused for extended periods of time.
Under normal conditions, the power supply may get hot. Please keep good
ventilation in the area and exercise caution.
Safety warning labels on the housing or bottom of the product or power
adaptor.
Power warning:
Place the product near the power outlet for easy use.
Before use, make sure that the operating voltage is the same as your local
power supply. Correct operating voltage can be found on the product plate.
1
EN · Preface
Thank you for choosing LIFAair! You are about to enjoy superior Finnish technology and innovation.
Important safety information
This symbol is to alert the user to the presence of un-insulated
dangerous voltage within the product's enclosure that may be of
sufficient magnitude to constitute a risk of electric shock to persons.
This symbol is to warn the user not to disassemble the enclosure of
the product and there is no user-replaceable part inside. Take the
product to an authorized service center for repair.
This symbol indicates that the product is for indoor use only.
WARNING!
Danger of explosion if the battery is incorrectly replaced. Replace only with
the same or equivalent type.
For products with removable battery, the battery must be properly recycled
or disposed. For products with built-in battery, disassembling is prohibited.
Never disassemble, hit with force, squeeze batteries or dispose of batteries
in fire. Do not expose batteries in conductive materials, liquid, fire or heat.
Do not let metal object contact two battery poles. If the battery looks
swollen, leaking, discolored, having odor or any abnormal appearance,
stop using it. Do not use the battery after immersed in water.
Improper use of battery may lead to explosion or leakage, causing skin
burn or other injuries; in the event of battery leakage, handle it with care
and immediately dispose of the battery in the manner in compliance with
applicable laws and regulations in your locality.
For wireless product:
1.
Wireless product may generate shortwave radio frequencies and interfere
with the normal use of other electronic devices or medical equipment.
2. Turn off the product when it’s disallowed. Do not use the product in
medical facilities, on airplane, at gas stations, near automatic gates,
automatic fire alarm system or other automated devices.
3. Do not use the product in the vicinity of a pacemaker within a 20cm range.
The radio waves may affect the normal operation of the pacemaker or
other medical devices.
Only use attachments/accessories provided by the manufacturer.
Keep the machine away from children to avoid accidents.
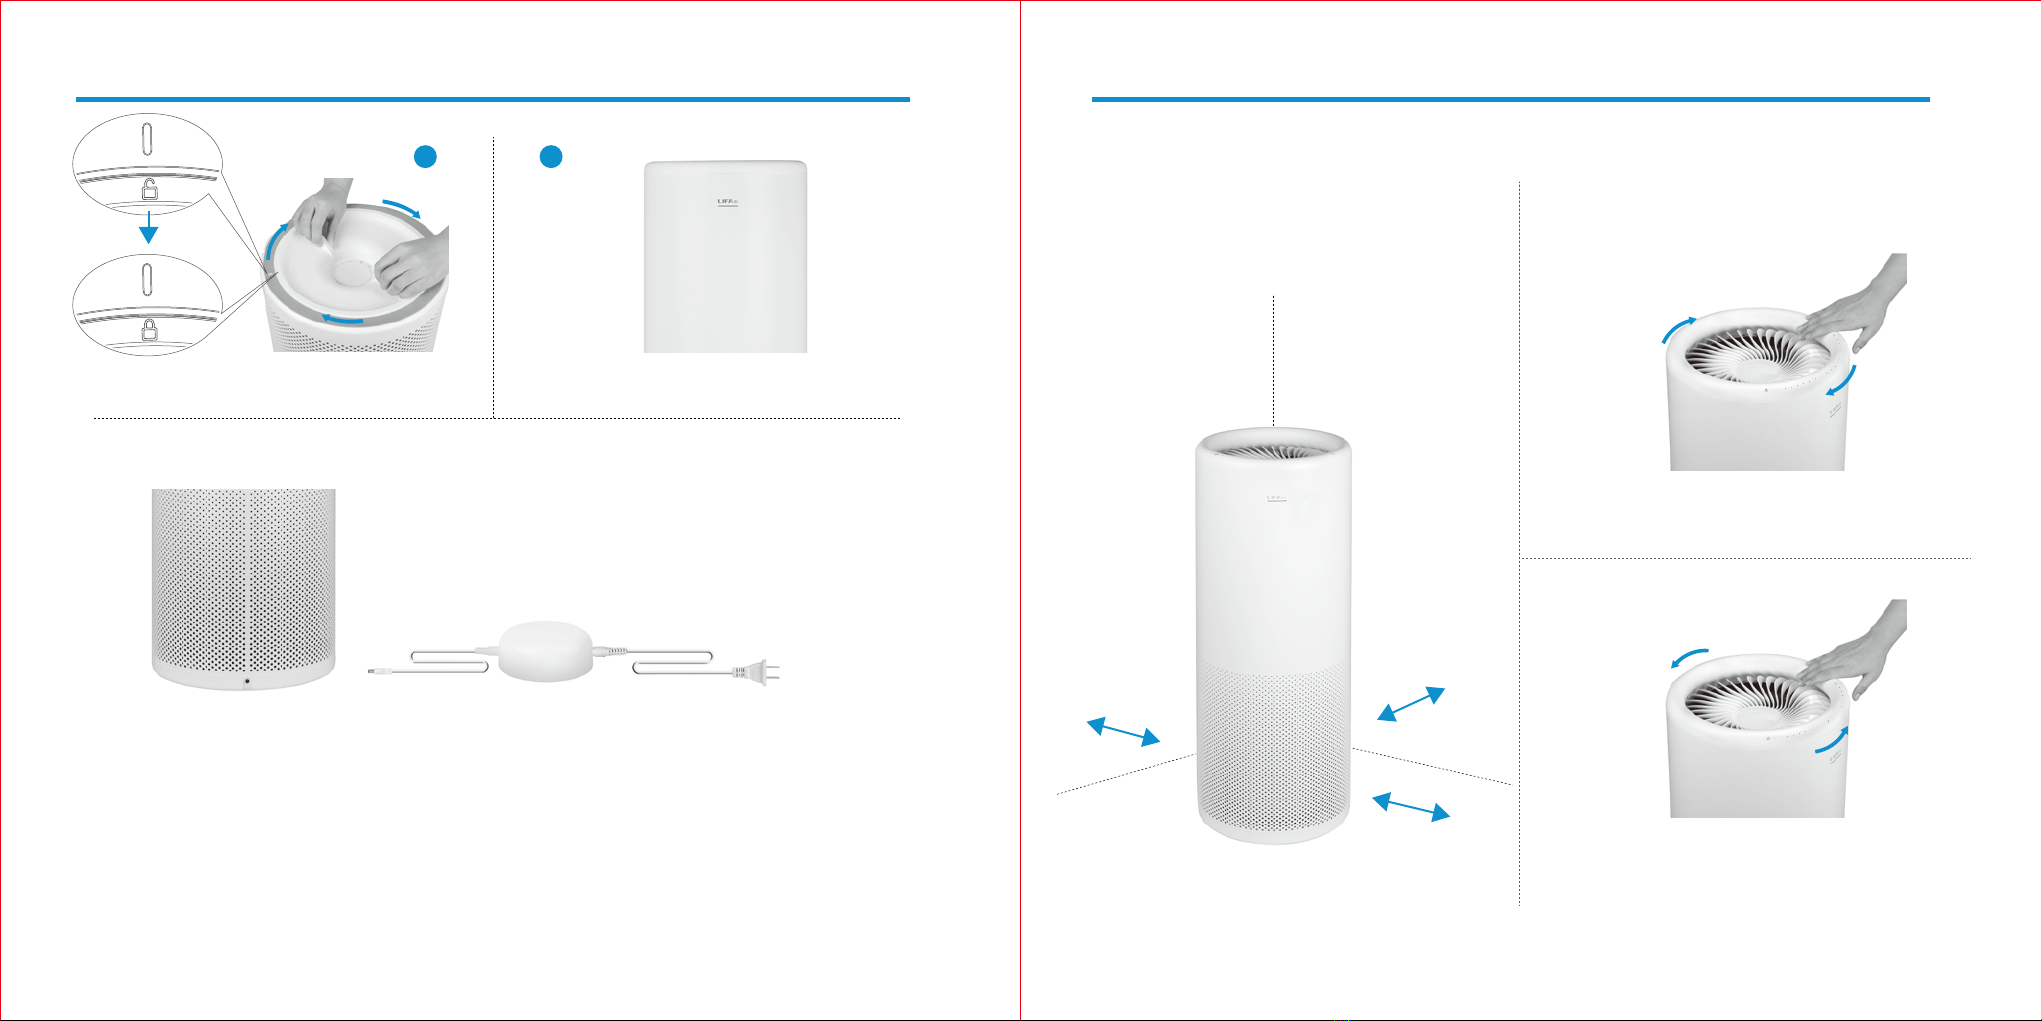
Do not block any ventilation openings. Install the machine in
accordance with the manufacturer’s instructions.
Make sure the machine stands in the upright position, never operate
the machine when in other orientations.
Unplug the machine when it will not be used for a long period of time.
Do not use this machine in rooms with large temperature differences
to avoid vapor condensation inside.
Protect the power cord from being walked on or pinched.
Please switch off and unplug the machine before moving it or cleaning
and/or replacing the filters.
Do not use this machine in high temperature and/or humidity
environments, such as bathrooms.
Never open the power adapter to avoid electric shock and affecting
the warranty.
For user safety and product protection, do not sit or lean on the machine.
Do not put any objects into the movable portion, the air inlet and/or outlet.
Do not place the product directly under air conditioning units to
prevent condensed water droplets.
Please do not attempt to disassemble and repair the product without
the presence of professionals to avoid fire, electric shock, and being
injured.
To prevent electric shocks, be sure to follow this manual carefully for
cleaning and maintaining. Please do not try to maintain the product
otherwise.
Please ensure to use the power supply unit provided with the appliance
only.
Correct disposal of this product. This marking indicates that this
product should not be disposed with other household wastes
throughout the EU. To prevent possible harm to the environment
or human health from uncontrolled waste disposal, recycle it
responsibly to promote the sustainable reuse of material
resources. To return your used device, please use the return
and collection systems or contact the retailer where the product
was purchased. They can take this product for environmental
safe recycling.
Use only with the cart, stand, tripod, bracket, or table specified
by the manufacturer, or sold with the apparatus. When a cart is
used, use caution when moving the cart/apparatus
combination to avoid injury from tip-over.
Safety marking label of main unit is on the bottom plate of the product.
This appliance can be used by children aged from 8 years and above and
persons with reduced physical, sensory or mental capabilities or lack of
experience and knowledge if they have been given supervision or instruction
concerning use of the appliance in a safe way and understand the hazards
involved.
Children being supervised not to play with the appliance.
The appliance is only to be used with the unit provided.
Cleaning and user maintenance shall not be made by children without supervision.
The appliance must only be supplied at safety extra low voltage corresponding
to the marking on the appliance.

Note: Do not block the intake and exhaust area, pad made by plush fabrics class will clog the exhaust area.
S/N:XXXXXXXXXXX CODE:XXXXXX
①Light sensor: brightness of display automatically adjusts
according to ambient brightness.
②On / off key: press and hold: switch on/off
press: display time, switch off / on the screen
③Air intake area
④PM2.5 sensor air inlet
⑤Power connecter: dedicated charging power cable
⑥ S/N code: serial number of the monitoring controller (need to fill in when for warranty)
CODE code: device identification code used to unlock APP remote control
function. After searching the monitoring controller with APP, click icon of controller and
input this code to open APP remote control function.
Note: 1. This code is not case-sensitive
2. this code is the last six digits of device MAC address).
⑦Exhaust air area
Function Description
Main unit
Pairing
Increase
Decrease
①Touch control circle: change wind speed
and enter into pairing mode.
②Working status / power indicator light
In the mode of the monitoring controller not connected
Green light slowly flash: standby mode
Green light flashing: response touch control
Green light rapidly flashing: pairing with controller
Green light remains steady: operating mode
In the mode of the monitoring controller is connected
White light slowly flash: standby mode
White light flashing: response touch control
White light is on steady: operating mode
③Air intake, 1
④DC power connector (connect to the power adapter)
⑤Bottom cover
Remove the bottom cover.
Open the protective bag to find the side handle of the filter and take
out the filter.
Repeat steps 3 and 4 for the second filter. Orderly put the two filters
into the main unit, gently shake them to the right place. Close the bottom cover.
Initial Installation
2
4
1
3
6
5
Remove the protective bag of the filter.
3 4
Cover the ground with a soft towel or a protective pad, flip the main
unit upside down and rotate the bottom cover to unlock position. Make
sure the DC power is cut off.
R
o
t
a
t
i
n
g
t
h
e
b
o
t
t
o
m
c
o
v
e
r
t
o
u
n
l
o
c
k
p
o
s
i
t
i
o
n
Monitoring Controller
English English

Remove the protective strip on the DC power connector, take out the power cord
and connect to the power adapter. Connect the adapter to the main unit and then
connect to the power source. The main unit will be in standby mode, LED lights will
be flashing slowly.
Use
Correct positioning
In order to achieve the best possible performance of the air purifier,
the air inlets should maintain a certain distance from the walls and
other obstructions when using the purifier.
Over 20cm
Over 20cm
Over 20cm
Manually control fan speed
The machine is designed with 121 wind speed and it can precisely control
the PM2.5 level.
Touch the top circle of the main unit and rotate clockwise to increase the
fan speed (Continuously rotate clockwise until the power light remains
constant indicating maximum fan speed.)
Touch the top circle of the main unit and rotate counter-clockwise to reduce
fan speed (Continuously rotate counter-clockwise until the power light blinks
slowly in a breathing pattern for zero fan speed and enter standby mode).
Note: Above diagrams are for reference only, please prevail in kind.
Initial Installation
Connect the power supply
Lock the bottom cover (be sure to rotate the bottom cover to
the lock position).
The installation is completed. Flip the main unit carefully back to
the upright position.
5 6
78
R
o
t
a
t
i
n
g
t
h
e
b
o
t
t
o
m
c
o
v
e
r
t
o
l
o
c
k
p
o
s
i
t
i
o
n
English
English

The Monitoring Controller Pairing with the Main Unit
Pairing
The monitoring controller can be connected to the main unit via Bluetooth. This machine has been paired at the factory, therefore you can directly plug
to use. if you require pairing, please follow the steps below.
2. Slide the touch circle counter-clockwise so that the green light blinks slowly, with
one finger press and hold on the " " position on the touch ring for more than
five seconds until the green light flashes rapidly. Now the main unit will be ready
for pairing for 30 seconds.
4. If the pairing is successful, the main unit power/status indicator turns white and
the monitor shows "Pairing Completed". If the pairing fails, please repeat all the
steps above.
NOTE: When pairing, the main unit must be in the standby mode (i.e. green light blinks
slowly in a breathing pattern).
Note: Due to product updates and software upgrades, the description here may not match the user interface, please prevail in hand.
is good
Testing Mode
Purifier Offline
Filter
Settings
TEMP
TEMP
US
Pair 3. Click settings on the screen→ → , the monitoring controller and the
main unit will start the pairing process.
Pair
12
Pairing Completed
DISCONNECT
& RE-CONFIG
Press and hold the“ ”icon on purifier top ring for pairing
7 8
The Monitoring Controller Testing Items
Your smart air purifier the monitoring controller can monitor carbon dioxide (CO2) concentration, PM10 concentration, PM2.5 concentration, and automatically
remote the purification to reduce the PM2.5 concentration in the healthy range.
After pairing with the main unit, it can also monitor the temperature and humidity.
The monitoring controller will monitor the air quality and classify it into six classes: Good, moderate, unhealthy for sensitive groups, unhealthy, very unhealthy
and hazardous.
Click "PM10" to display real-time measurements of PM10. It takes approximately
20 seconds to stabilize the measurement. 150µg/ or less is good
Click "PM2.5" to display real-time measurements of PM2.5.
It takes approximately 20 seconds to stabilize the measurement. China Standard
75µg/ or less is moderate; American standard is 35µg/ or less is moderate.
Click "CO2" to display the concentration of carbon dioxide. It takes approximately
40 seconds for the meter to stabilize. 1000 ppm or less is good. If 1100 ppm is
exceeded, it is recommended to open the window(s) for ventilation.
Note: PM2.5 sensor is at the top left corner behind the screen. For measuring the PM2.5 concentration of the airflow, this point should align
with the airflow direction.
ppm
CO ≤1000ppm is good
Testing Mode
Auto mode
Filter
Settings
US
TEMP
Testing Mode
Auto mode
Filter
Settings
TEMP
US
is good
12
Moderate
PM10
PM10
Testing Mode
Auto mode
Filter
Settings
US
TEMP
PM10<=150ug/m³is good
PM10
1. Press and hold on/off button on the monitoring controller to turn on the controller,
the main unit displays a green light.
m³
m³
m³
English
English

The Monitoring Controller Testing Items
Click "HUM" to show the relative humidity in the position of the purifier.
Click "TEMP" to the show the temperature in the position of the purifier.
Click "Testing Mode" and the monitoring controller will continuously monitor the air
quality for 5 minutes (otherwise the measurement takes place in regular cycles).
Clicking another part of the screen will result in monitor controller measuring the
air quality continuously for only one minute.
Continuous Short-term Monitoring of the Monitoring Controller
The monitoring controller is paired with the main unit (white light indicated) even if the screen only displays the time (plugged in) or black screen
(battery powered). The monitoring controller will automatically and regularly monitor the air quality and control the operation of the main unit according
to these measurements.
1. Control panel: Click to enter the mode selection interface
The main unit can be manually controlled by touching the control circle to change the wind speed when the light is white. However, after 5 minutes it will
return back to the default (AUTO) mode. "Auto" mode saves energy and prolongs the filter life. It is possible to permanently control the fan speed
manually by either turning the monitor controller into a manual mode or by disconnecting the monitoring controller with the main unit. After disconnection
you can control the fan speed from the main unit's touch circle permanently. This way the main unit's fan will not go back into the "Auto" mode. It is
recommended to use the "Auto" mode, since it saves money and energy and prolongs the filter life.
2. Click to enter to the System Configuration
Testing Mode
Auto mode
Filter
Settings
TEMP
US
TEMP
is good
Testing Mode
Auto mode
Filter
Settings
TEMP
US
TEMP
Testing Mode
Filter
US
TEMP
LA500V
Settings
Auto mode
Purifier power off
Auto mode: According to the real-time indoor air quality, smart auto-adjustment of the main
unit's fan speed (recommended mode)
Sleep mode: Ultra-low noise operation to create a comfortable sleeping environment
(non-smart mode, the main unit continues to run at this speed)
Turbo mode: Run at full speed, rapid purification (non-smart mode, fast run for 90 minutes
followed by automatic switching to the medium speed)
Manual mode: You can manually adjust the fan speed of the main unit
click to return to the mode selection interface
click to return to the homepage of the monitoring controller
12
Moderate
9 10
ON OFF
Backlight Brightness
Factory Settings Sensor Calibration
Eco Mode Purifier Touch ControlRemote Accessibility
Night Light
AQI Standard
Lauguage setting
Backlight Brightness: LOW →dark mode; high →bright mode. In both modes, light sensor
automatically adjusts the brightness according to the environment
AQI Standard : Select the air quality standards (CN or US standard) as the control
standard. By selecting the US standard, the purifier will work more
efficiently especially at night.
Night Light : Turn on or off nightlight function. When this function is turned on,
touching the screen will create high intensity illumination for 3 minutes
(can be used as a nightlight) between 22:00-6:00.
Remote Accessibility: Allow or disable the phone APP to operate the main unit. In the disabled
state the phone APP can only view the measurement data but not control
the main unit.
ECO mode : Turn on or off the smart ventilation detection function. After turning on,
the operating mode will be subject to status of window control, to achieve
energy-saving effects and reduce the use of filters (because when the
window opened, whether air quality meets standard or not, the running
of air purifier would be meaningless).
Purifier Touch Lock : Turn on or off the touch function to prevent the inadvertent touching
from others.
Language settings: →Chinese language; → Traditional Chinese;
→ English language
Factory settings :
Clicking "Confirm" will reset all monitor settings to factory defaults and the
Wi-Fi connection will be cut off. Connection to the main unit remains via
Bluetooth.
Sensor Calibration : Perform the calibration of the monitor controller's sensors according to
the instructions on the screen to ensure the accuracy of the sensors.
English
简体中文 繁体中文
English
English
How to Operate the Monitoring Controller To enable full autonomous operation, please ensure the monitoring
controller is connected to the main unit.

The main unit must not be tilted while it is operating. In case it is not standing in an upright position,
this text will be displayed on the screen.
3.Filter monitor
① In the case of an external power supply situation, having no operation for long time
(approximately 60 seconds) or pressing the on/off button of the monitoring controller, the screen
will automatically display the time (when using the battery power, the screen does not display the
time). If you turn on night light function during 22:00 - 06:00, the touch screen will display the
clock in white background and black numbers for three minutes.
②On clock display screen, click on the right side to manually set the time.
After completing the setup, click to save the current time settings.
Click Filter →enter the filter monitoring interface
Please replace the filters when the percentage is approaching 5%.
After replacing the filter, please click "Reset" and Confirm in order to restart the intelligent monitoring
of the new filter(s).
4.The clock display / adjustment
Note: The controller will automatically sync to local time zone once connected to Wi-Fi via cloud server. Please note this function may be not applicable in
certain areas, please set time manually if so.
Warning
Main unit's imbalance warnings:
Ventilation warning:
Note: The monitor controller will detect the "ventilation" status only when it runs on the "AUTO" mode.
The Monitoring Controller and Wi-Fi Internet Networks
Scan the above QR code using smart
phone to be re-directed.
The same QR code can also be found at
the bottom of the monitoring controller.
After successfully connecting the internet, click
the link to the monitors. Input the monitoring
controller password (last six digits of CODE,
showed below the DC interface in the rear of the
monitoring controller. It is not case sensitive)
After a successful connection, the phone can
control the main unit, and simultaneously
display the current data in the monitoring
controller
Open the LIFAair App, press the
"+" on the phone screen
Make sure your phone is connected to
the Wi-Fi network you would like your
monitoring controller to connect to.
Download and install the APP
Based on the prompt, click
CONNECT network Click on settings on the monitoring controller
Press "Done" on your
smartphone.
滤芯
HEPA Filter
91%80%
Pre Filter
I Understand
The purifier is not detected to be standing in upright position.
For your safety the motor is powered off automatically. If the
filter is replaced, please reset the filter life calculator.
I Understand
The purifier will detect if a window or door is opened for ventilation
or if you have left the house. Since there’s no need for purification
in such cases the machine will close down in order to prolong the
filter life and save energy. As soon as the ventilation stops or you
return to the house, the purifier will start operating automatically.
Manual override will also make the purifier operate again.
Select →Click CONFIG
11 12
The purifier will detect if a window or door is opened for ventilation of if you have left the apartment.
When such abnormality is detected, this screen will appear. The main unit will stop working when a
window is opened to save energy and prolong the filter life. After the ventilation is completed, the
doors and windows are closed or you have returned home, click (auto mode) → sleep
mode auto mode, to restore the smart operation. You can also directly touch and slide the main
unit's touch control panel to make it start purifying the air.
English
English
CONFIG
Testing Mode
Auto mode
Filter
Settings
US
TEMP
PM10<=150ug/m3 is moderate
PM10
How to Operate the Monitoring Controller To enable full autonomous operation, please ensure the monitoring
controller is connected to the main unit.
PM10
120
μg/m3
μg/m3

Maintenance
Filter Change (be sure the main unit is not operating, unplug the power cord and then proceed to clean/replace filters)
Refer to "First Installation"section, find
the filter handle after opening the
bottom cover, respectively take out
filters, replace the filters and then put
them into the main unit.
Replace the filters Filter Reset
Specifications
Troubleshooting
Purifier not working?
Please check whether the power cord is correctly connected.
Please check whether the purifier is in minimum wind speed.
Please check whether the bottom cover is in the lock position.
Running noise?
Please check whether the filter is installed.
Please check whether the protective bags of the filter have been removed.
Carbon dioxide has inaccurate readings?
Please use the following process:
Settings →sensor calibration, according to the standard method of reset in outdoors for 30 minutes, use the "Testing Mode" when turn on the
monitoring controller, and then perform reset for carbon dioxide sensor respectively.
13 14
Product Name: Smart Air Purifier
Model number: LA500V
Clean Air Delivery Rate for particle (CADR particulate matter): 600m³/h
Cumulate Clean Mass for particle (CCM particulate matter): P4 level
Particle Removal Efficiency: high efficient level
Clean Air Delivery Rate for formaldehyde (CADR formaldehyde): 190m³/h
Cumulate Clean Mass for formaldehyde (CCM formaldehyde): F4 level
Formaldehyde Removal Efficiency: high efficient level
Noise: ≤66dB (A)
Recommended application area: 42m2~ 72m2
PM2.5 sensor: Laser type
CO2sensor: Dual thermopile type
Temperature / Humidity Sensor: Semiconductor + Thermal Resistance type
滤芯
HEPA Filter
91%80%
Pre Filter
滤芯
Confirm
HEPA Filter
91%80%
Pre Filter
Note: for application area, it is in accordance with GB/T18801-2015 calculated based on the value of CADR for particle.Performance data above are in
accordance with GB/T18801-2015 tested by the third-party laboratories by using particular soot particles or gaseous pollutants as targeted pollutants.
When the filter detection value in the monitoring
controller is less than 5%, you need to clean or
replace the filter
Prefilter Cleaning
Prefilter Cleaning: take out the two filters from the main unit, clean it in outdoor using a dry cleaner equipped with brush. Clean the dust on the
outer surface of filters. Upon completion of cleaning, put filters back into the main unit, press the "Reset" button below the "Pre Filter" to confirm.
Note: Do not use a wet towel to clean the pre filter to avoid clogging the pre filter.
Frequency Band (Wi-Fi): 2.412GHz-2.484GHz
Frequency Band (Bluetooth): 2.402GHz-2.480GHz
RF Power output: ≤20 dBm (EIRP)
There is no restriction of use.
English
English
Customer Service – International
If you have any questions, please contact us at care@lifa-air.com or visit us at www.lifaair.com
Please note: All right to change or modify the product without prior notice are reserved.
Unable to connect the monitoring controller to the main unit?
Please follow the step-by-step instructions on page 7 "Pairing" to connect.
Table of contents
Other LIFAair Technology Air Cleaner manuals