Lifetime 91025 User manual

A MAJOR CAUSE OF FIRES IS FAILURE TO MAINTAIN REQUIRED CLEARANCES (AIR
SPACE) TO COMBUSTIBLE MATERIALS. IT IS OF UTMOST IMPORTANCE THAT THIS
PRODUCT BE INSTALLED ONLY IN ACCORDANCE WITH THESE INSTRUCTIONS.
IMPORTANT, RETAIN FOR FUTURE REFERENCE: READ CAREFULLY.
GAS GRILL &PELLET SMOKER
USER’S MANUAL
MODEL 91025
TABLE OF CONTENTS
Getting to KnowYour Lifetime®
Grill and Pellet Smoker 2
Gas Grill Operation 5
Getting Ready to Cook 9
Care & Maintenance 1 4
Troubleshooting Grill Problems 1 7
Troubleshooting Smoker Problems 1 8
Accessories & Replacement Parts 1 9
Recipes 2 4
Warranty 2 7

2
2
Your Lifetime®appliance is both a gas grill and pellet smoker, giving you the
best of both worlds: a smoker for low and slow cooking and a gas grill for
searing meats.
Enameled Cook Box, Grates and Burner Shields
Electric Ignition
Storage Box
Propane Compartment
Storage Cabinet
Hopper with Finger Guard
Lifetime®Controller and App
G
D
E
F
C
B
A
A
B
C
D
E
F
G
GETTING TO KNOW YOUR LIFETIME®GAS GRILL & PELLET SMOKER
1216446 C 3/19/2021

3
3
Removable Drip Tray
H
H
Your Lifetime®Fusion Fuel™Grill and Pellet Smoker sports a large enameled
cook box, top and bottom cooking racks and burner shields for longer life.
Convenient electric ignition for quick re-ups.The grill can also be lit with
the matchstick holder and match or a long-reach butane lighter.
AENAMELED COOK BOX, GRATE AND BURNER SHIELDS BELECTRIC IGNITION
GETTING TO KNOW YOUR LIFETIME®GAS GRILL & PELLET SMOKER

4
4
ESTORAGE CABINET
GLIFETIME®CONTROLLER AND APP HLARGE REMOVABLE DRIP TRAY
F—HOPPER WITH FINGER GUARD
Great for storing and keeping non-ammable and non-combustible
materials dry and easily accessible.
Holds up to 28 lb of premium hardwood pellets. Depending on the
temperature set and the type of pellet chosen, cooking time can last up to
a day on a single ll.The nger guard helps big and small hands stay safe
and away from moving parts.
Our Lifetime®Grill controller and app allow you to set the desired temperature
and view the current temperature at any given moment whether you’re in
front of the grill or accessing it through the app on your phone.To update the
controller program, simply click the menu on your phone and select
UPDATEVERSION from the drop-down menu.
The large, removable drip tray channels grease and drippings down to the
drip bucket located inside the storage cabinet.The drip tray slides out for
easy removal, cleaning and maintenance.
GETTING TO KNOW YOUR LIFETIME®GAS GRILL & PELLET SMOKER

5
5
Here are a few things you should know before ring up your grill for the rst time.
USING YOUR GRILL
When to Smoke
•Smoking provides a unique avor that can be customized from light and mild to deep and rich according to personal preferences.
•Smoking results in very tender meat by cooking more slowly at lower temperatures.
•Smoking provides the freedom to pair your favorite wood avors with your favorite cuts of meat.
When to Gas Grill
•Gas grilling provides direct heat for traditional texture, forming a avorful and appealing crust.
•Gas grilling is for cooking small cuts of meat directly over hot, dry heat.
•Gas grilling can reach higher temperatures for browning and searing meat.
•Gas grilling is faster than smoking.
COOKING BASICS
Safe Handling: Always handle raw meat seperately from other ingredients.When marinating meat for longer than 30 minutes use the refrigerator. Never put cooked meats back into the
same dish it was marinated in.
Using the Meat Probes:
You can use the meat probes to monitor the internal temperature of your meat.The MP-C (Meat Probe Control) will automatically set the smoker to LO when the SET temperature has been
reached. However, the MP-C Probe will not control the grill when using gas.
Preparing to use the Smoker:
1. Choose the cuts of meat best suited for smoking
2. Choose the wood avor that complements the meat cut you have selected; sometimes a mixed variety
of pellets work best.
3. Pellet management—Be sure you have enough pellets for your cooking time. Smoker will use
approximately 1 lb of pellets per hour for low and slow cooking, and 3 lb of pellets per hour for
hot and fast.
4. Smoking tools to have on-hand:
•Spice Rub: start small, salt and pepper work great.
•Aluminum foil or butcher’s paper
•Two sets of tongs or forks (for raw and cooked meat)
•Spray bottle or baster
•Dry cooler
Planning:
Smoking is cooking to temperature not to time.The weather, types of meat and temperature of the grill can all aect the cooking time. Remember to plan for three time periods for a
successful smoke:
•Prep Time—Triming the meat, seasoning the meat, etc.
•Cook Time—Can depend on outside temperature and its eect on the grill. Lower cooking temperatures for longer periods of time generally allow
for more avorful and tender meat.
•Rest Time—Letting your meat rest before cutting into it will allow the avor and juices to reabsorb deep into the meat.Try resting your meat in a
Lifetime®Cooler without ice; you can wrap the meat and add a towel in the cooler to keep it warm and rested.
GAS GRILL OPERATION

6
6
COOKING TIPS
•Don’t over-season your meat. Smoking adds a wonderful avor on its own. If you are new to smoking, start with just salt and pepper, then, with
experience, work your way up to more complicated seasonings.
•Resist the urge to constantly check the meat. Opening the lid frequently can result in heat-loss and not allow the cooking chamber to maintain a constant
temperature.
•Don’t over-load the cooking chamber. Leave room for smoke to envelope, and absorb into, the meat.
Hopper Clean-Out:
•It’s best not to store your pellets in the hopper for a long period of time.
If you aren’t going to be using the smoker portion of the grill for a while, empty the pellets from the hopper into a small, sealable, plastic bucket.This will keep the pellets dry and ready
for their next use.You can empty the pellets from the hopper by pulling the pellet dump. Place a bucket or bag underneath the hopper before pulling on the pellet dump.
Preparing to use the Gas Grill:
1. Preheat the gas grill on high for 10 minutes.
2.Try searing the meat over high direct heat to seal in juices.The sear uses a controlled are-up, which in turn creates a avorful crust.You can then turn
down the heat to complete the internal cooking.
Fusion Fuel™:
The Lifetime® grill is equipped with Fusion Fuel™, a patented design allowing the use of traditional gas grilling and smoking in one machine without compromising the functionality of
either.
Using Gas Grill and Smoker at the same time:
Temperature is key when smoking meats. Higher temperatures (approximately 250°F / 121°C and up) will produce less smoke than lower temperatures. For optimal smoke, it is best to
keep the temperatures below 250°F / 121°C.
The unique design of the Lifetime® Gas Grill and Pellet Smoker, allows the user to infuse smoke avor while gas grilling.
Here are some examples:
•Reverse Sear your Meat—Smoke the meat rst. Once the meat has taken on a good smoky avor, sear the meat using high temperature gas.
•Supplemental Heat—During cold weather, all smokers struggle to maintain temperatures. However, increasing your smoker temperature produces less
smoke.With the Lifetime® grill, you can supplement the temperature with gas without increasing your smoker temperature and reducing the smoke
output.
NOTE: if the gas grill is producing temperatures above 450°F / 232°C, then the smoker automatically goes into‘LO’(low mode). For safety reasons, if the grill reaches temperatures above
700°F / 371°C, the smoker function will automatically go into Shutdown mode.
GAS GRILL OPERATION
Pellet dump

7
7
GAS GRILL OPERATION
CONNECTING THE GAS CYLINDER
The LP gas supply cylinder used with this appliance must be constructed and marked in accordance with
the Specifications for LP Gas Cylinders of the U.S. Department ofTransportation (D.O.T.) or the National
Standard of Canada, CAN/CSA-B339, Cylinders, Spheres andTubes forTransportation of Dangerous Goods;
and Commission, as applicable; and provided with a listed overfilling prevention device. Use only 20-lb
cylinders (height: 18.11 inches, tank diameter: 9.84 inches, foot diameter: 8.03 inches) equipped with a
cylinder connection device (valve) compatible with the connection for outdoor cooking appliances.
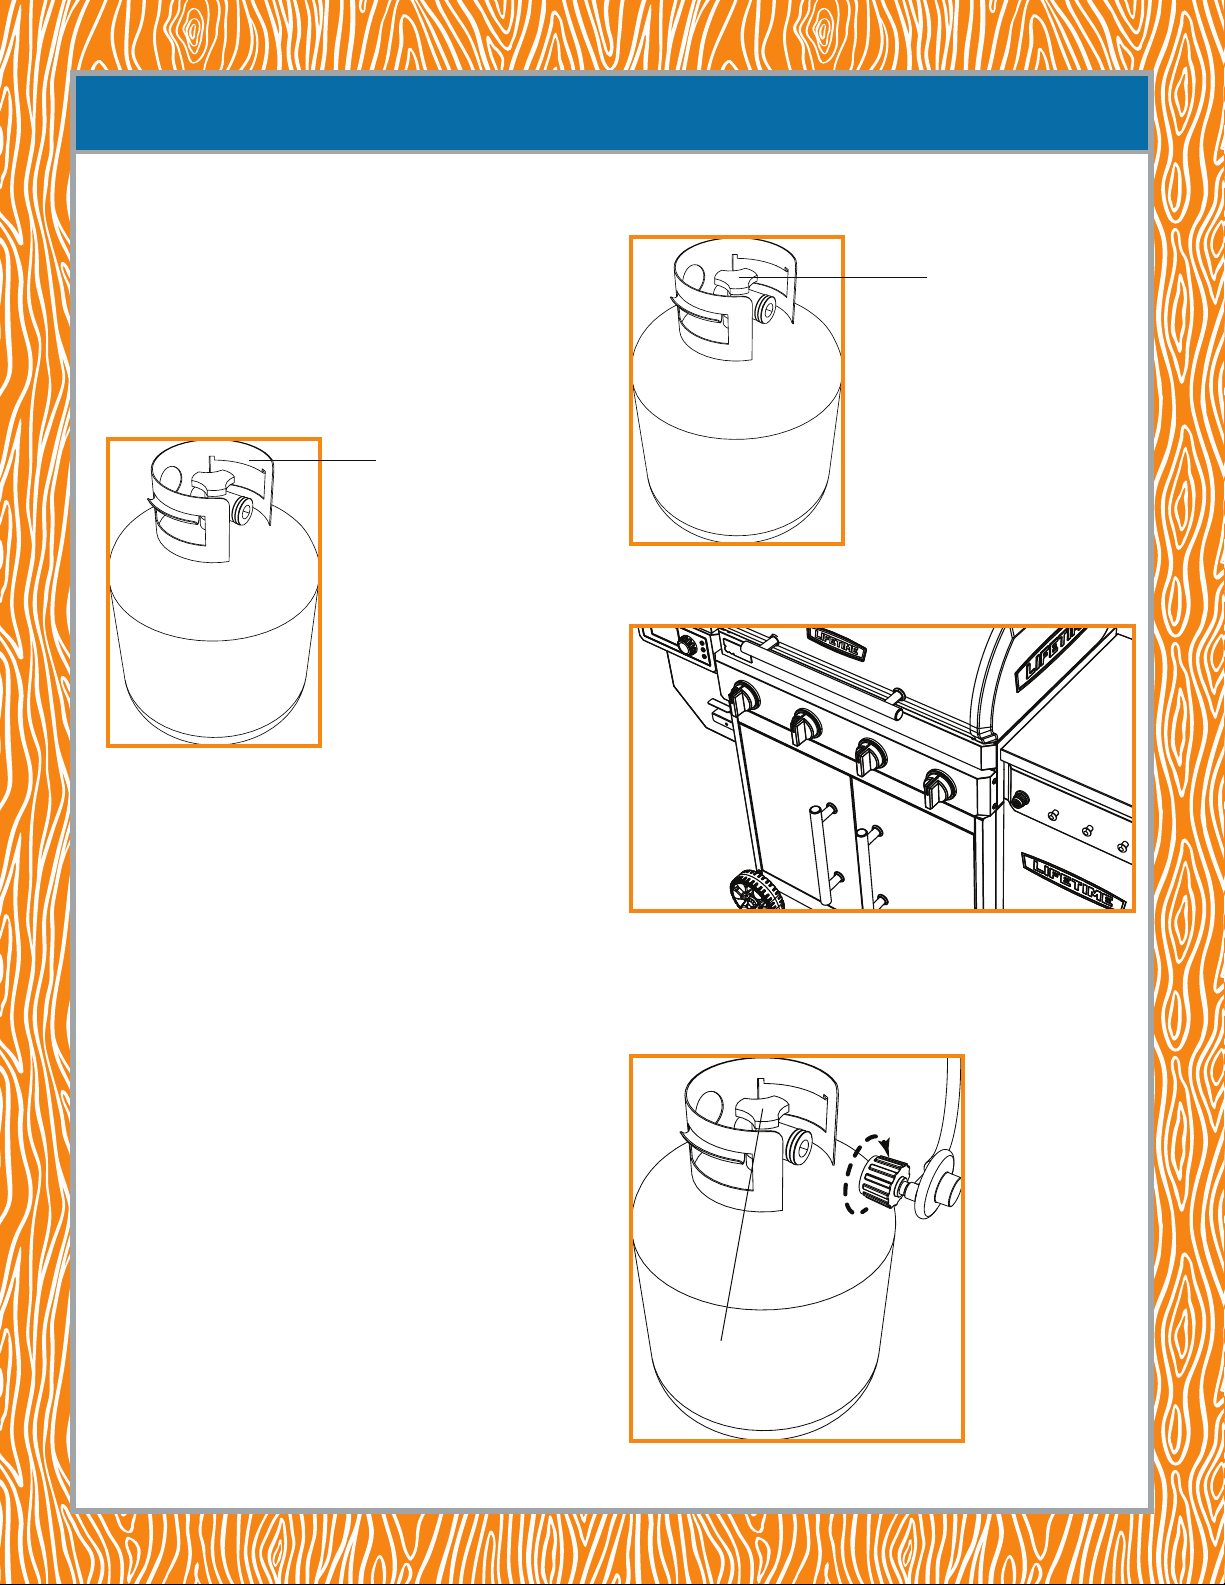
•The cylinder must include a collar to protect the cylinder valve. Do not handle the gas cylinder
roughly or drop it. Do not use rusty or dented LP cylinders. Rust and dents can cause gas leaks and
result in personal injury, property damage or death.
•During the off season, when this appliance is not in use, the propane cylinder MUST be
disconnected. Storing this appliance indoors is ONLY permissible if the cylinder is disconnected and
removed from the appliance. Propane cylinders, however, must be stored upright and outdoors out
of the reach of children and not in an enclosed area, e.g., a building, garage, shed, etc. Propane gas
cylinders must NEVER be stored where temperatures can reach over 125°F. Do not store cylinders in
the grill/smoker cabinet.
•ALWAYS place the dust cap provided with the propane cylinder on the propane cylinder valve
outlet whenever the cylinder is not in use. Only use the dust cap provided with the cylinder at the
time of purchase. All other types of caps or plugs may result in propane leakage.
•Before connecting the regulator valve coupling nut to the cylinder valve, ensure there is no debris
in the cylinder valve and coupling nut, outlet of the regulator valve or in the outlet of the burner and
burner ports. Connect regulator valve and hand-tighten firmly. ALWAYS keep the propane cylinder
valve closed and disconnected from the regulator valve during the off season and when the grill is
not in use.
•DO NOT obstruct the flow of combustion air and ventilation air to the grill.The propane cylinder
must be arranged for vapor withdrawal and equipped with a listed overfilling prevention device.
Please use the proper cylinder orientation to provide vapor withdrawal.
NOTE: the propane cylinder must be fully upright for the cylinder to have vapor withdrawal only.
1.The handwheel on the LP (liqueed petroleum) cylinder must be closed before
connecting. Ensure the handwheel is completely shut o by turning it clockwise to a full stop.
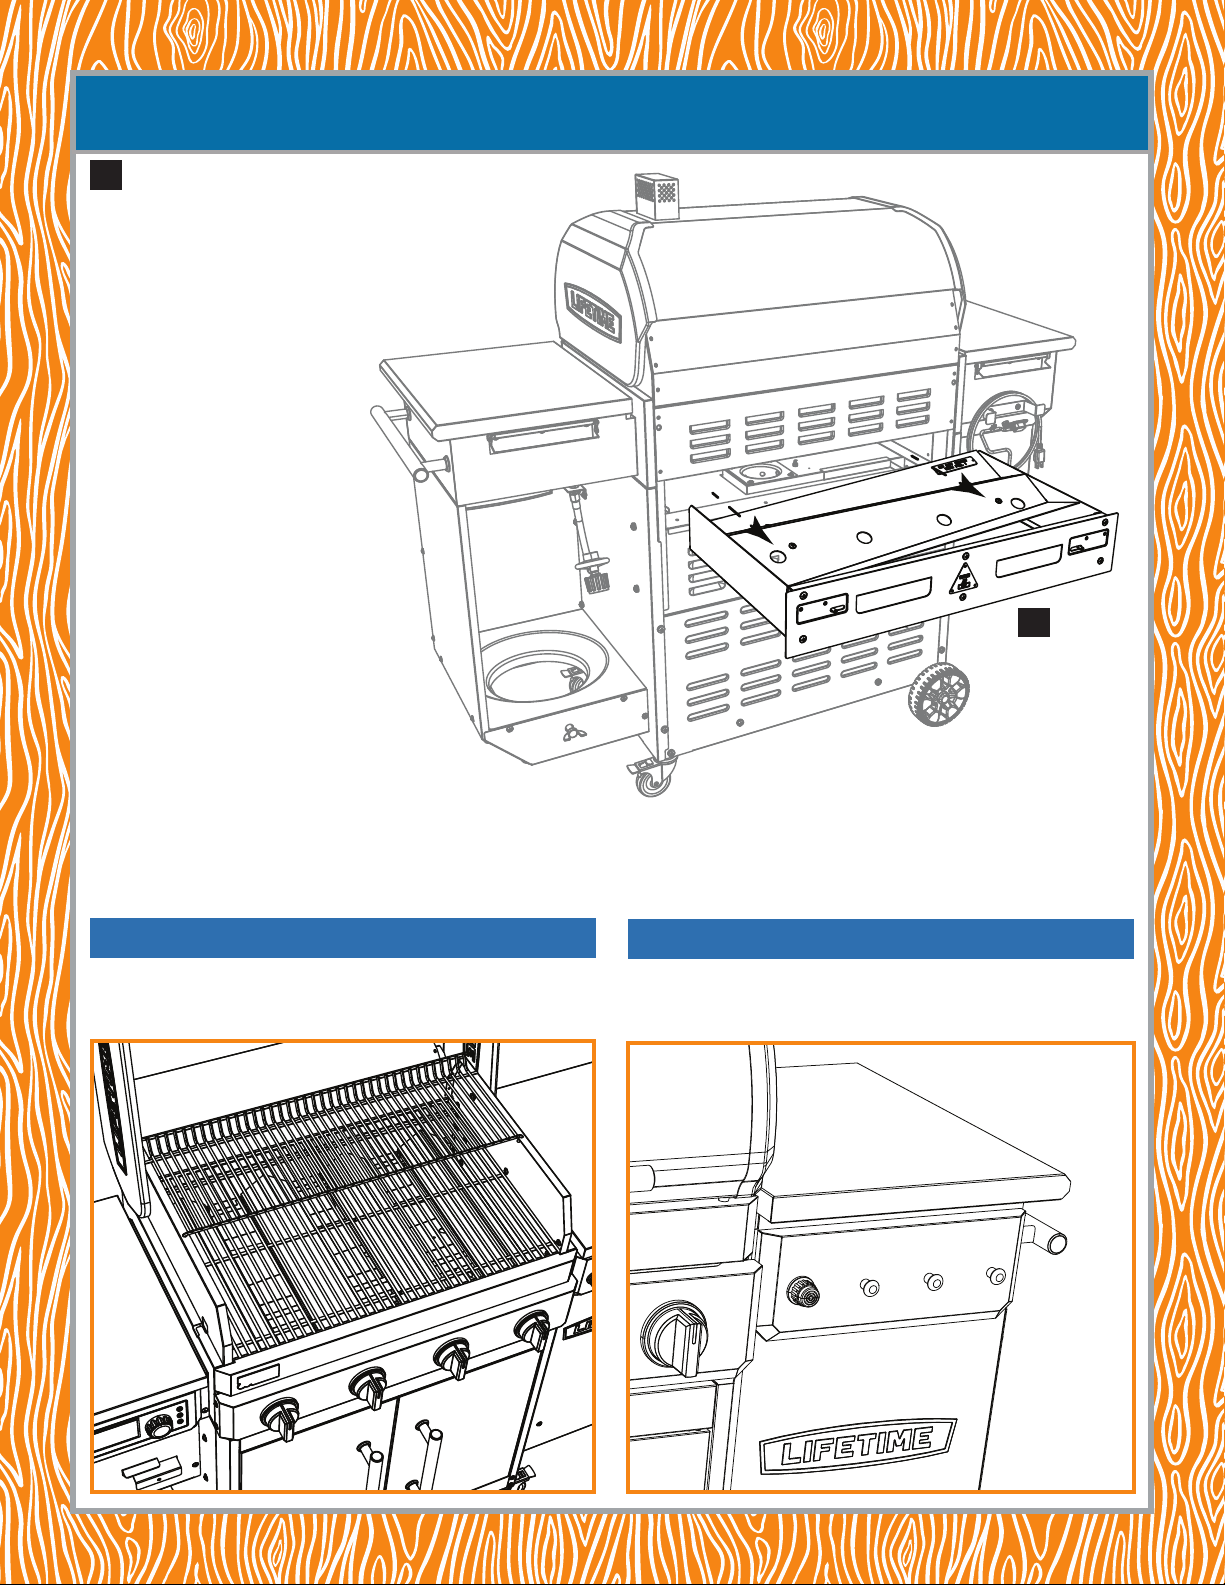
2.Verify the temperature-control knobs on the grill are turned to the OFF position (straight
up).
3. Remove the cap from the propane tank’s cylinder valve and secure the regulator hose to the
propane tank by screwing the coupling nut onto the cylinder valve.Tighten until it stops. If you smell
gas, check the connections for leaks. See the User’s Guide for leak-testing instructions.The cylinder
supply system must be arranged for vapor withdrawal, i.e., upright. Firmly tighten by hand only. DO
NOT use tools.
Collar
Handwheel
Handwheel

8
8
GAS GRILL OPERATION
DISCONNECTING THE LP TANK
1. Close the LP cylinder handwheel by turning clockwise to a full stop.
2.Turn the coupling nut counterclockwise until the regulator assembly detaches.
SHUTTING DOWN THE GRILL
1.Turn all grill control knobs clockwise to the OFF position.
2. Fully close tank cylinder handwheel by turning it clockwise to a full stop.
3. Close the grill lid.
NOTE: ALWAYS turn o the propane supply when this appliance is not in use by turning the
handwheel clockwise to a full stop.
CHECKING FOR PROPANE GAS LEAKS
Gas leak checks should ALWAYS be done before lighting the grill. After connecting the
regulator hose to the propane tank, check all connections and ttings on the propane tank
valve, gas hose and regulator for leaks with a water and soap solution.
To prevent re or explosion while testing for a leak:
•ALWAYS perform a leak test PRIOR to lighting the grill.
•DO NOT smoke while testing for leaks.
•ALWAYS perform leak tests outdoors in a well-ventilated area.
•DO NOT use any source of ame while testing for leaks.
•DO NOT use the grill until all leaks are corrected.
•If you are unable to correct a leak, disconnect the LP gas supply and call a gas appliance
service dealer.
PERFORMING LEAK TESTS
Propane is a naturally odorless gas. A chemical odorant, ethyl mercaptan (not so odorless),
is combined with the propane to help users detect leaks. If you smell rotten eggs, you likely
have a leak.Turn o the propane supply and perform a leak test.
•Leak tests indicate if the connections from the propane tank to the grill are secure.To
perform a leak test you’ll need the following:
•a small spray bottle
•1 part liquid dish soap to 3 parts water, enough solution for approximately 2–3 ounces
(70–90 ml). Mix well.
•Ensure all grill temperature control knobs are set to the OFF position (straight up).
•Open the propane tank cylinder valve by turning the handwheel counterclockwise to a
full stop.
•Spray the leak-test solution on all the gas-carrying connections and ttings, covering
them well. The presence of bubbles anywhere along the hose and connections indicates
a gas leak. If leaks are detected, or you smell or hear gas, shut o the gas supply valve
immediately.Then, repair or replace the defective part(s). DO NOT use the grill until all
leaks are corrected. Keep this solution on hand for future tests.
Handwheel
3 parts water
1 part liquid dish soap

9
9
GETTING READY TO COOK
4. Push and hold down the igniter button (you should hear clicking) while pushing in and turning
the right-most temperature control knob to HIGH.The burner should ignite.
NOTE: if ignition does not take place within 5 seconds, immediately turn the control knob to the OFF
position.Wait 5 minutes to give any released gas time to dissipate, then repeat the last step for this
burner.
5. Repeat the last step for the remaining three burners.
NOTE: if the rst burner lit, the remaining three should light automatically when the temperature-
control knobs are turned to HIGH.
NOTE: if the burner still does not light, verify there is gas in the propane tank. If you do not hear
clicking sounds when depressing the igniter, check to see if there is a battery. Replace if necessary.
6. Run the grill on HIGH for 15 minutes to ensure all factory residue has been burned o the grates,
burners, burner shields and cook box.
NOTE: subsequent heat cleanings kill bacteria and burn o food residue accumulated from the last
grilling.
1. Ensure all temperature knobs are in the OFF position (staight up).
2. Open the lid.
NOTE: ALWAYS keep the lid open while starting the grill or smoker.
3. Fully open the handwheel to the propane tank by turning the handwheel counter-clockwise until
it stops.
BEFORE USING YOUR NEW LIFETIME® FUSION FUEL™ GRILL & PELLET SMOKER FOR THE FIRST TIME
You should perform a rst-use heat cleaning before using your smoker/grill for the rst time. A rst-use heat cleaning sterilizes the interior surfaces of the cook box by burning o any
residue left behind from the manufacturing of the grill.The heat-cleaning process takes approximately 15 minutes. Ensure all packing materials have been removed from the smoker/pellet
grill before doing the following:
NOTE: this should be done whether you’re planning to grill or smoke your food.
Handwheel
Igniter button
Right-most temperature
control knob

10
10
GETTING READY TO COOK
CONTROLLER KEY
TRY THE LIFETIME®GRILL APP
MP-2
SET
SET
MP-1
MP-C
LOW
1
3 4 5
6
915
14
14
16
17
17
17
14
11
10
131212 12
7 8
2
205º--- ---
MP-C MP-1 MP-2
355º
205
355
F
37:05 TOTAL TIME
The purpose of the app is to allow you to monitor your cook without having to be next to the grill.
With the Lifetime® Grill app you can;
• Monitor the temperature of your grill
• Monitor the temperature of your food
• Be alerted to timers you have set
• Be alerted to any problems with the grill
• Set temperatures for the grill to reach
Note: for safety reasons, turning the grill on is not available on the app. Also, changing the
temperature while onWi-Fi outside of your homeWi-Fi is not allowed. However, you can still
monitor temperatures outside of your homeWi-Fi. It is not recommended that you leave your grill
cooking if traveling long distances from it.
POWER ON/OFF
PRIME BUTTON
START-UP INDICATOR
COOK INDICATOR
SHUTDOWN INDICATOR
CHAMBER TEMPERATURE
ERROR INDICATOR
SET CHAMBER TEMPERATURE
TEMPERATURE UNITS
FLAME GRAPHIC TEMPERATURE GAUGE
6
7
8
9
10
1
2
3
4
5
12
13
14
15
16
17
11
http://go.Lifetime.com/grill-app-help
For information on using and troubleshooting the Lifetime® Grill app, use your phone to follow the QR code, or enter the link
address in your browser. There you will nd instructions and videos for using and troubleshooting the app.
BLUETOOTH®& Wi-Fi INDICATOR
OPERATING INDICATORS
AUGER MOTOR
PELLET IGNITOR ROD
BLOWER FAN
LOW PELLET INDICATOR
MEAT PROBE TEMPERATURES
MP-C (MEAT PROBE CONTROL) TEMPERATURE SET
SET TEMPERATURE KNOB
MEAT TEMPERATURE PROBE SOCKETS

11
11
GETTING READY TO COOK
NOTE: for a quicker startup, push in and hold the primer button to prime the burn pot.
Priming the burn pot simply means using the auger to get the pellets to the burn pot.
Continue pushing the primer button until you hear pellets drop into burn pot.
6. If using a meat probe, do the following:
•Plug a meat probe into the MP-C jack and thread it through hole in the cook box wall and
into the meat. This should be done before turning on the smoker. The tip
of the probe should be in the thickest part of the meat.
•Set the meat on the grate and close the lid.
•Push the Smoke Mode button twice to activate the MP-C temperature.Turn the knob to
set the temperature and push it again to conrm.The temperature will ash for three
seconds before setting. Start smoking.
NOTE: when a meat probe is NOT inserted, the control panel will display“noP,”i.e.,“no Probe.”
NOTE: to shutdown the smoker when finished, push and hold the power button.The shutdown procedure
lasts about 15 minutes, keeps the fan blowing to cool down the auger system but turns off the auger
feeding the pellets to the burn pot. DO NOT unplug the smoker before the shutdown procedure ends.The
pellets remaining in the burn pot need to burn off.The surfaces will still be too hot to the touch.
SET
SET
MP-C
MP-1
MP-2
USING THE PELLET SMOKER FOR THE FIRST TIME USING THE SMOKER
CONTROL PANEL
You should perform a rst-use heat cleaning before using your smoker/grill for the rst
time. Refer to BEFORE USING YOUR NEW LIFETIME® GRILL & PELLET SMOKER
FOR THE FIRST TIME. ENSURE THE GRILL IS AT LEAST 4 FT 1.2 M AWAY
FROM ANY COMBUSTIBLE SURFACE.
1. Fill the hopper with pellets—up to 28 lb.
2. Open the grill lid and plug in the smoker.
NOTE: ALWAYS keep the lid open while starting the grill or smoker.
3. Push the ON/OFF button on the smoker control panel.
4. Push in the smoker temperature control knob to activate Smoke Mode.
5.Turn the knob to set the desired temperature and push the knob again to conrm the
desired temperature.
Desired temperature Actual temperature
P
U
S
H
F
O
R
S
M
O
K
E
M
O
D
E
Hole
SET
SET
MP-C
MP-1
MP-2
Desired temperature Actual temperature
PRIME
P
U
S
H
F
O
R
S
M
O
K
E
M
O
D
E

12
12
COOKING MODES
The smoker runs temperatures between 180°F (≈82°C) and 400°F (≈204°C).The auger
automatically feeds the burn pot with pellets, creating the smoke automatically.There are,
however, two specic modes:
1.Warming (LO) and
2. High Smoke (HS)
Warming Mode (Automatic):The smoker entersWarming Mode (LO) automatically when
the internal temperature of the meat detected by the MP-C (Meat Probe-Control) equals the
temperature entered by the cook for the MP-C.The letters“LO”appear on the display (shown),
indicating the smoker has entered, or is in,Warming Mode.The controller automtically begins to
lower the chamber temperature to 180°F (≈82°C), just keeping the meat warm.
High Smoke Mode (Manually Set): High Smoke Mode (HS) is a low-temperature mode
but with extra smoke. If you’d like to increase the mouth-watering smoke avor of your meat,
set the smoker to High Smoke Mode (HS) by turning the temperature control knob to one click
below 180°F (≈82°C). Do this by pressing the temperature control knob once and turning it one
click counterclockwise below 180°F (≈82°C).The letters“HS”will appear on the display (shown),
indicating the smoker has entered, or is in, High Smoke Mode.
NOTE: this smoke mode can be set by using the Control Panel on the smoker or by using the
Lifetime® Grill app on your phone.
GETTING READY TO COOK
SET
SET
MP-C
MP-1
MP-2
High Smoke Mode (HS)
Warming Mode (LO)
SET
SET
MP-C
MP-1
MP-2
USING THE PELLET SMOKER FOR THE FIRST TIME WITH THE LIFETIME® GRILL
APP
NOTE: you should perform a rst-use heat cleaning before using your grill and pellet
smoker for the rst time. Refer to BEFORE USING YOUR NEW LIFETIME® GAS GRILL
& PELLET SMOKER FOR THE FIRST TIME.
1. Fill the hopper with pellets—up to 28 lb. Open the grill lid and plug in the smoker.
NOTE: ALWAYS keep the lid open while starting the grill or smoker.
2. Connect your iPhone or Android device to your localWi-Fi and turn on Bluetooth®.
NOTE: you should connect to a 2.4 GHz bandwidth. Do not connect to a 5 GHz bandwidth.
3. Download the Lifetime® Grill app by going to the app store on your iPhone or Android
device and install the app.
4. Launch the Lifetime® Grill app, create an account and sign in.
5. Select“Yes”when asked to allow the app to use Bluetooth®.
6. Hold the phone near the grill until it connects to the smoker using Bluetooth®.
7. On the control panel, push the ON/OFF button on the smoker control panel.
NOTE: for safety reasons, the smoker cannot be started with the app.
8. On the control panel, push the smoker temperature control knob to enable Smoke Mode.
The auger will start turning, feeding the burn pot with pellets.
NOTE: for safety reasons, Smoke Mode cannot be started with the app.
NOTE: to move pellets more quickly to the burn pot, depress and hold the Primer button.
You should hear pellets drop into the burn pot.
P
U
S
H
F
O
R
S
M
O
K
E
M
O
D
E
GET
PRIME

13
13
9. Push SET on your phone and select the desired temperature from the menu.
NOTE: when setting the temperature, the ame gauge lights up, indicating the temperature
range chosen. After conrming the temperature, the ame gauge light turns o but then
changes color to match the rising temperature range in the cook box.The ame gauge
functionality is for the cook box temperature only.
Grilling Zones: these two zones are used for grilling and searing meats with temperatures
ranging from 251°F–700°F, cooking your meats faster. For safety reasons, the internal
temperatures of your meats should reach these minimum amounts:
•beef, sh and pork—145°F
•poultry—165°F
You can let them get hotter by leaving them on longer. But, don’t leave them on too long—
the longer the grilling time, the dryer the foods.
Smoking Zones: these two zones are used for slower cooking with temperatures ranging
from 171°F–250°F.The temperatures are lower so it takes longer for the internal temperatures
of the meats to reach the minimum safe levels:
•beef, sh and pork—145°F
But, for that fall-o-the-bone goodness, the temperature should be around 190°F for
beef and 215°F for pork throughout the smoking.
•poultry—165°F
Warming Zone: this zone keeps your food warm until everything is ready to be set on the
table.
USING THE MEAT PROBES TO WATCH THE INTERNAL TEMPERATURE OF MEATS
NOTE: this can be done for all three meat probes: MP-C, MP-1 and MP-2.The meat probes must be
inserted to use this feature. See step 6 on the previous page.
NOTE: when the MP-C temperature reaches the set temperature, the smoker will automatically change
to a LO setting to keep your meat warm.When MP-1 and MP-2 temperatures reach their respective set
temperatures, a notification will be sent to your phone.
NOTE: when a meat probe is not inserted into the control panel, the panel will display“noP,”
i.e.,“no Probe.”
10.Waitfor theactual temperaturetoreachthe desiredtemperature and startsmoking.
GETTING READY TO COOK
SET
SET
MP-C
MP-1
MP-2
Desired temperature Actual temperature
SETF
Desired
temperature
Flame gauge
Actual
temperature Grilling Zones
Smoking Zones
Warming Zone
351°F–700°F
251°F–300°F
201°F–250°F
171°F–200°F
NOTE:toshutdownthe smokerwhen finished,push andhold the powerbutton.Theshutdownprocedure
lastsabout 15 minutes,keepsthe fan blowingtocooldownthe augersystembut turns offthe auger feeding
thepellets to the burnpot.DONOTunplug thesmokerbeforetheshutdownprocedureends.Thepellets
remainingin theburnpot needtoburn off.Thesurfaceswill stillbe too hot tothetouch.
COOKING MODES
The smoker runs temperatures between 180°F (≈82°C) and 400°F (≈204°C).The auger
automatically feeds the burn pot with pellets, creating the smoke automatically.There are,
however, two specic modes:
1.Warming (LO) and
2. High Smoke (HS)
Warming Mode (Automatic):The smoker entersWarming Mode (LO) automatically when
the internal temperature of the meat detected by the MP-C (Meat Probe-Control) equals the
temperature entered by the cook for the MP-C.The letters“LO”appear on the display (shown),
indicating the smoker has entered, or is in,Warming Mode.The controller automtically begins to
lower the chamber temperature to 180°F (≈82°C), just keeping the meat warm.
High Smoke Mode (Manually Set): High Smoke Mode (HS) is a low-temperature mode
but with extra smoke. If you’d like to increase the mouth-watering smoke avor of your meat,
set the smoker to High Smoke Mode (HS) by turning the temperature control knob to one click
below 180°F (≈82°C). Do this by pressing the temperature control knob once and turning it one
click counterclockwise below 180°F (≈82°C).The letters“HS”will appear on the display (shown),
indicating the smoker has entered, or is in, High Smoke Mode.
NOTE: this smoke mode can be set by using the Control Panel on the smoker or by using the
Lifetime® Grill app on your phone.
SET
SET
MP-C
MP-1
MP-2
High Smoke Mode (HS)
Warming Mode (LO)
SET
SET
MP-C
MP-1
MP-2

14
14
WARNING:DO NOT cover the drip tray with aluminum foil. Failure to heed this warning will result
in extremely high temperatures in the cook box.There’s no need for foil; our proprietary drip tray design
makes the tray easy to remove and clean. When inserting the drip tray, the straight edges of the handles
should be on top.The top point of the warning triangle should be on top.
Cooking grates, warming rack, cook box, upper and lower burner shields
Burning off (heat cleaning) the cooking grates is an important part of the care and maintenance of
the grill.The best time for burn-off is immediately after each use and should last for approximately 15
minutes.
To‘burn off’the grill, leave the lid closed and run the burners at their highest position for 15 minutes. After
burning, turn off all burners and shut off the gas. Use a soft-bristled brush to clean excess food residue
from the grates.
The cooking grates, warming rack, cook box and upper and lower burner shields are coated with enamel.
Use a soft-bristled brush, a mild dish soap and warm water for cleaning residue. Rinse with clean warm
water. Allow to dry thoroughly before replacing.
Grease bucket
Empty the grease bucket and clean it regularly with a mild dish soap and warm water ONLY. Rinse with
clean warm water. Periodic maintenance helps the grease bucket looking like new.To help preserve the
life of the grease bucket, grease bucket liners may be used with the grease bucket.
EACH OFTHESE ITEMS SHOULD BE CLEANED BEFORE OR AFTER EACH COOK:
RECOMMENDED CLEANING SUPPLIES
•Mild liquid dish soap
•Clean, warm water
•Nylon cleaning pad
•Soft-bristled brush
DO NOT use acidic cleaners, mineral spirits or any abrasive substance.
Some of the components are made of the following:
Enamel—grill grates, warming rack, cook box, upper and lower burner shields, drip tray
Stainless Steel—hopper and storage box lids
Powder Coating—grill lid, cabinet, storage box and propane tank compartment
FOR INTERIOR SURFACES
For interior surfaces, we recommend the following:
Drip tray and grease channels
Lifetime’s proprietary drip tray design makes it easy to remove and clean. Regular cleaning of the drip tray
helps prevent grease fires, i.e., flare-ups. Use a soft-bristled brush or nylon cleaning pads, a mild dish soap
and warm water to remove any residue. Finally, rinse with clean warm water. Allow to dry thoroughly
before reinserting. Both the drip tray and drip channel, including the tube, should be cleaned after each
use.
•To remove the drip tray, slide the locking pins inward and pull the drip tray out.
CARE & MAINTENANCE
Cleaning the Gas Burners
1. Ensure the grill is cool.
2. Unplug the appliance.
3.Turn all control knobs to the OFF position (straight up).
4.Turn off the propane tank cylinder handwheel by turning it clockwise to a full stop.
5. Disconnect the propane tank from the regulator hose.
6. Remove the cooking grates and warming rack.
!
Handwheel
Coupling nut
Locking pins
Drip channel

15
15
7. Remove the four upper burner shields.
8. Remove the gas crossover channel from the burners by removing the four screws connecting it to the
burners.
9. Clear any debris, e.g., food, ashes, spider webs, insects, dirt, dried leaves, etc., from the holes along
the sides of all four gas burners with a pin, skewer or any other object capable of fitting through the
holes. Clogged burners affect performance.You may even vacuum out the ashes from the burners
and lower burner shields. Scrub with a plastic scouring pad to remove baked-on ashes.
10.Verify the gas burners are in good-working condition, free of any damage.. Replace if necessary.
Replacing the gas crossover channel, burner shields and cooking grates
1. Place the gas crossover channel onto the burners by reinserting each screw connecting it
to each burner.
2. Replace the four upper burner shields.
3. Replace the cooking grates and warming rack.
4. Reconnect the regulator hose to the propane tank cylinder valve.
FOR EXTERIOR SURFACES
EACH OFTHESE ITEMS SHOULD BE CLEANED BEFORE OR AFTER EACH COOK:
Your grill & smoker exterior has been manufactured using enamel, powder-coating, plastic and
stainless-steel. All of these surfaces should be cleaned and maintained using only a mild dish soap and
hot water. DO NOT use harsh cleaning solutions. Rinse with clean warm water. Allow to dry thoroughly.
Meat probes
•Clean meat probes with a mild dish soap and a damp cloth. DO NOT submerge meat probes in water
to wash or clean them.
•Clean the burn pot periodically by vacuuming out the ash. Remove the grates, burner shields and
drip tray to access the burn pot from above.This should be done after every 24 hours of use.To help you
remember, the main SET temperature on the smoker control panel will display “CLn,”i.e.,“Clean.”
OTHER PERIODIC CARE AND MAINTENANCE
•We highly recommended an annual inspection and service on this appliance by a qualified
service technician.
•Regularly verify the flow of combustion and ventilation air is not obstructed.
•Ensure the area surrounding the grill is free of flammable and combustible materials, e.g., plywood,
fiberboard, wood, paper, gasoline, mineral spirits, etc.
•Regularly verify that the ventilation of the grill cabinet is free of debris.
•Regularly clean the gas burners and check the gas valves are free of any debris. Clogged burners affect
performance and can lead to flare-ups.
• Whenfinished cooking,pushand holdthe ON/OFF buttontorunthe shutdownprocedure.The
shutdownprocedurelasts about15minutes,keepsthefan blowing tocooldowntheauger systembut
turnsoffthe augerfeeding the pelletstothe burnpot.DONOTunplug thesmokerbeforethe shutdown
procedureends.Thepellets remainingin theburn pot needtoburn off.Thesurfaceswill stillbe toohotto
thetouch.
CARE & MAINTENANCE
SET

16
16
Electric Ignition
The electric ignition requires 1“AA”alkaline battery. If the electric ignition is not lighting the burners, this could very well be the culprit.
•Remove the igniter button from the igniter panel.
•Insert the battery, negative end first.
•Replace the igniter button.
CARE & MAINTENANCE
1
2
3

17
17
Gas burners will not light using electric igniter (weak or no
spark generated)
1. Igniter(s) may be covered in grease or residue
2. Disconnected igniter cables
3. Cracked or broken igniter
4. Clogged gas burner(s)
5. Dead battery or no battery
6. Low or no propane
1.Cleanigniter(s)of any residueand debris,e.g.,spiderwebs,dried leaves,
etc.
2.Reconnect anylooseor disconnectedcables totheigniterbox
3.Replaceigniter(see ReplacementParts list)
4.Cleangas burner(s)
5.Replacebatteryorinsertbattery
6.FullyopenLPhandwheel orfilltank
Low heat 1. Insucient gas pressure to the burners
2. Kinked or pinched regulator hose
1.Verifythe LPgascylinderhandwheelis fullyopen
Contact aqualifiedservicetechniciantocheck the
gassupplypressureand correct thepressure
2.Checkfor kinksorpinches inthe regulatorhose,replaceifnecessary
(seeReplacementPartslist)
Excessive are-ups (grease res) 1. Grease and residue buildup on drip tray, burner shields
2. Excessively fatty meat, dripping of fat or marinade onto the
burner shields and drip tray
1.Cleanthe grillcomponents
2.Trim thefatfrommeat
Usenonoil-based marinades
Burners will not light with a match 1. Matchstick not reaching burners
(when holding matchstick with hand)
2. Empty or closed LP tank
3. Poor connection between valve regulator and LP cylinder
nut coupling
4. Gas burners and/or venturi blocked
5.Temperature control knob not turned on
1.Usematchstickholderfound inthestorageboxtomoreeasilyreachthe
gasburners
2.Checkfuel level.Refill tank, if necessary.Fullyopenthe handwheel on
theLP tank
3.Turn temperaturecontrolknobstoOFF. Fullyclose theLPcylinder
handwheel.Check the connectionbetweenthe regulatorvalveandthe
nutcoupling.Disconnect andreconnect,if necessary.Clear any debris
4.Cleangas burnersandventuri(seeas Care& Maintenance)
5.Turn thetemperaturecontrolknob to HIGH
No gas ow or an obstructed gas ow 1. LP tank handwheel not fully opened
2. Empty LP tank
3. Poor connection between valve regulator and LP cylinder
nut coupling
4. Gas burners and/or venturi blocked
5.Temperature control knob(s) turned too low
6. Kinked or pinched regulator hose
1.FullyopenLPtank handwheelbyturning counterclockwiseto a fullstop
2.Checkfuel level.Replace fuel,if necessary. If thetank feels light,it’s
probably empty
3.Turn offtemperaturecontrolknobs,close the LPcylinderhandwheel.
Checktheconnection betweenthe regulatorvalveand the nut
coupling
4.Cleangas burner(s)andventuri(seeas Care& Maintenance)
5.Turn thetemperaturecontrolknob(s) to ahighertemperature
6.Checkfor kinksorpinches inthe regulatorhose,replaceifnecessary
(seeReplacementPartslist)
GRILL PROBLEM POSSIBLE CAUSE(S) ACTION(S) TO TAKE
If you have any questions regarding this appliance, please call customer service at 1-800-225-3865,
7:00 a.m.–5:00 p.m. Monday–Friday (MST) and 9:00 a.m.–1:00 p.m. Saturday (MST).
TROUBLESHOOTING GAS GRILL PROBLEMS

18
18
IF YOU GET AN ERROR,
1. Note the error code number
2. Unplug the grill
3.Take the action indicated below
4. Plug in grill to reset
5. Restart the grill
6. Ensure the controller rmware is up to date.To update the controller rmware, simply click the menu icon in the phone app and select UPDATE VERSION from the drop-down menu.
This will update the controller on the smoker—not the phone app.
Er1 ChamberTemperature Sensor Checkwireconnectiontothechamber temperaturesensor. It’slocatedinsidethe smoker
controlpanel
Ifnecessary, contactcustomerservice
Er2 Pellet Igniter Checkwireconnectiontothepellet igniter. It’slocatedinsidethesmokercontrolpanel
Ifnecessary, contactcustomerservice
Er3 Blower Fan Checkwireconnectiontotheblowerfan.It’s locatedinside thesmokercontrolpanel
Ifnecessary, contactcustomerservice
Er4 Auger Motor Checkforblockage intheauger
Checkwireconnectiontotheauger motor
Ifnecessary, contactcustomerservice
Er5 Start-Up Process Unsuccessful Vacuum andcleanout theburnpot
Checkthehopper andconfirmithas pellets
Checktheburn pot toconfirmpelletsarebeingsent
Ifnecessary, useprimebuttontoadvancepelletstothe burnpotif empty
Finally,begin start-up cycleagain
Er6 Pellet Flame Out Checkthehopper andconfirmithas pellets
Checktheburn pot toconfirmpelletsarebeingsent
Ifnecessary, useprimebuttontoadvancepelletstothe burnpotif empty
Finally,begin start-up cycleagain
Er7 Burn PotTemperature Sensor Check wireconnection tosensorinside the smokercontrolpanel
Ifnecessary, contactcustomerservice
Er8 Startup Not Allowed Reducepropaneburnbyturningdown thetemperaturecontrolknob(s)
Wait forthechamber temperaturetodropbelow 350°F
Finally,begin start-up cycleagain
2Hi Auto Shutdown HighTemperature Reducepropaneburnbyturningdown thetemperaturecontrolknob(s)
Wait forthechamber temperaturetodropbelow 350°F
Finally,begin start-up cycleagain
2Lo Auto Shutdown LowTemperature Vacuum and clean out the burn pot
Check the hopper and conrm it has pellets
Check the burn pot to conrm pellets are being sent
If necessary, use prime button to advance pellets to the burn pot if empty
Finally, begin start-up cycle again
Lifetime® Logo on the smoker control panel won’t light up Verify electric cord is plugged into a working receptacle
Check fuse behind hopper, replace if necessary (seeReplacementPartslist)
ERROR CODE DESCRIPTION ACTION TO TAKE
If you have any questions regarding this appliance, please call customer service at 1-800-225-3865,
7:00 a.m.–5:00 p.m. Monday–Friday (MST) and 9:00 a.m.–1:00 p.m. Saturday (MST).
TROUBLESHOOTING PELLET SMOKER ERROR CODES
http://go.Lifetime.com/grill-app-help
For information on troubleshooting the Lifetime® Grill app, use your phone to
follow the QR code, or enter the link address in your browser. There you will
nd instructions and videos for using and troubleshooting the app.

19
19
1
2
3
4
5
6
7
8
9
10
11
12 23
24
25
26
27
28
29
30
31
32
33
13
14
15
16
17
18
19
20
21
22
REPLACEMENT PARTS

20
20
34
46
47
48
49
50
51
52
53
54
55
56
35
36
37
38
39
40
41
42
43
44 57
58
59
60
61
62
63
64
65
66
67
68
45
REPLACEMENT PARTS
Other manuals for 91025
1
Table of contents
Other Lifetime Grill manuals