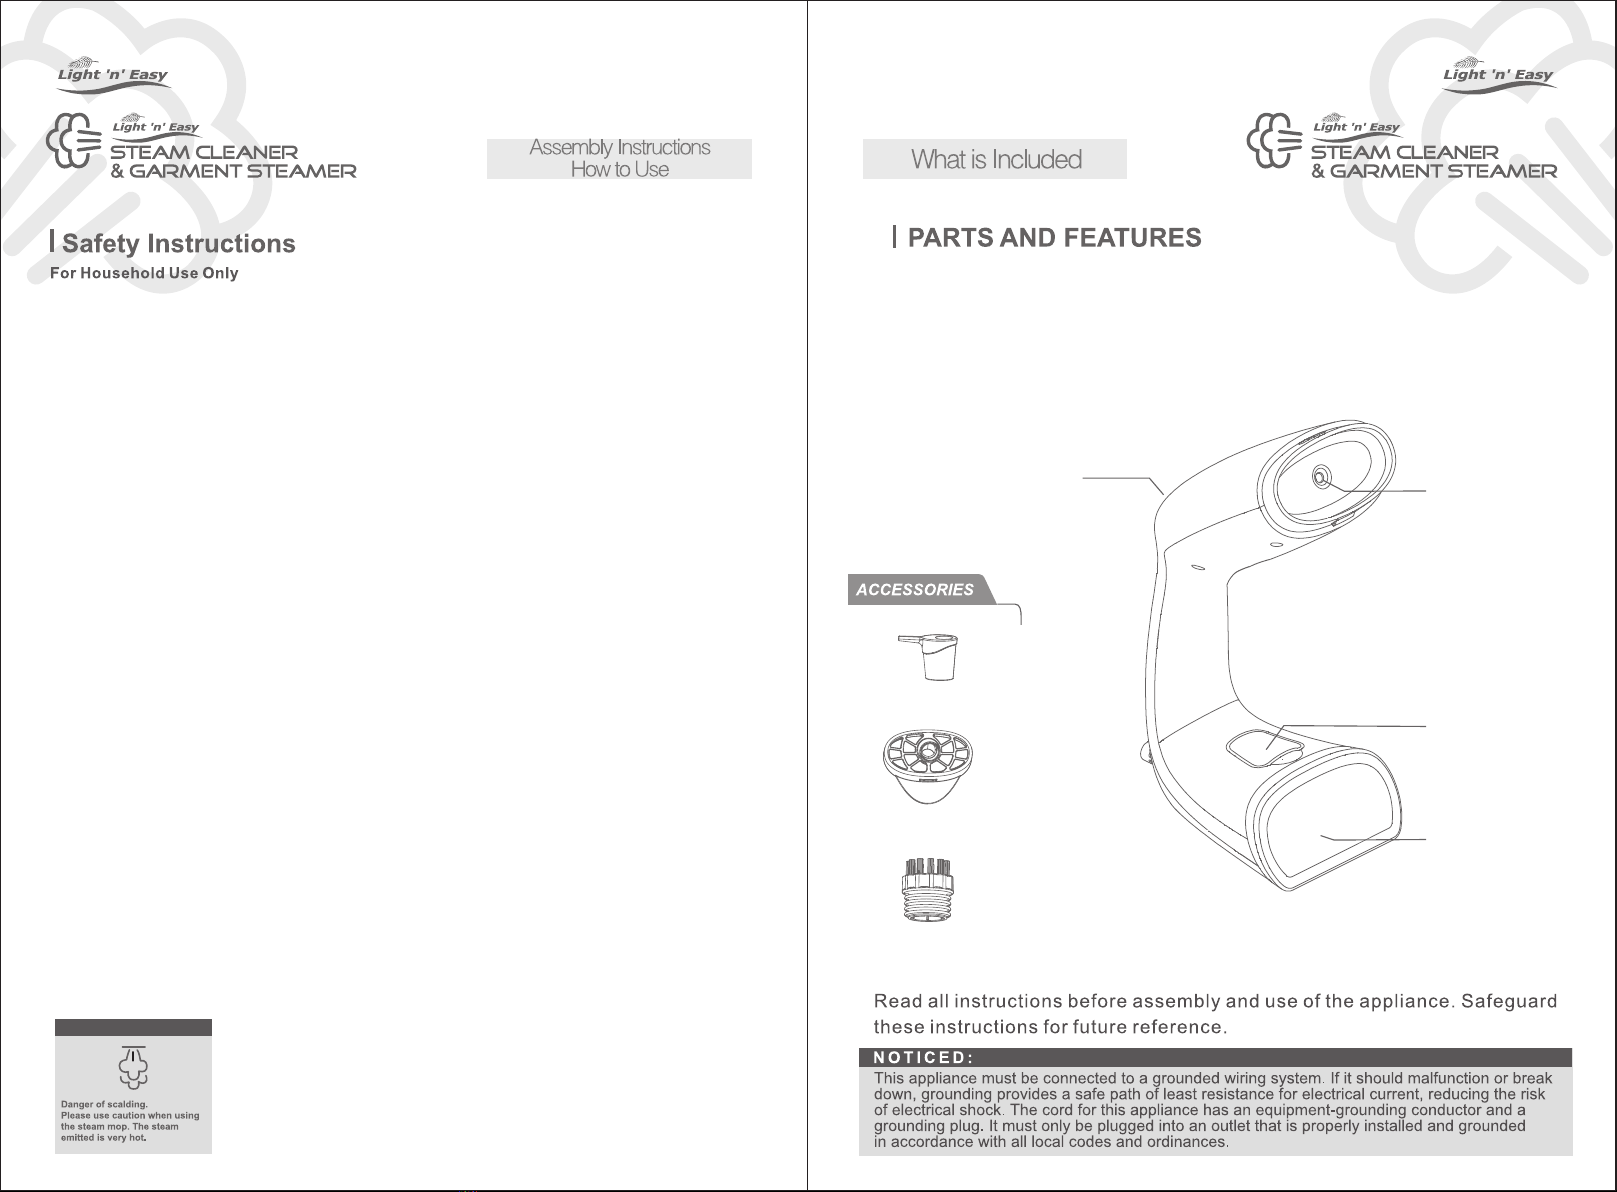
Light 'n' Easy GS700 User manual

XIAO TIAN (ZHONGSHAN)INDUSTRIAL CO., LTD.
MADE IN CHINA Thank you very much for purchasing your new steam mop, please be sure to read the instructions carefully before using.
Please keep this manual for easy reference. Any questions call customer service 1-844-798-2632
13

Steam Nozzle
Water Tank Cap
Water Tank
Steam Control Silver
Brush Connection
Round Brush
Filling Flask
BASIC SAFETY PRECUATIONS SHOULD ALWAYS BE FOLLOWED WHEN USING THE
STEAM CLEANER & GARMENT STEAMER READ ALL INSTRUCTIONS BEFORE USAGE.
1. Do not use outdoors.
2. Do not leave the appliance unattended when plugged in. Always unplug the power cord from
the electrical outlet when not in use and before servicing.
3. Do not allow the appliance to be used as a toy. Close attention is necessary when used by or
near children, pets or plants.
4. Use only manufacturer’s recommended accessories.
5. Do not operate the appliance with a damaged plug or cord, or if the unit has been dropped or
damaged. Return it to the manufacturer or the relating maintenance department for
examination and repair.
6. Do not immerse the appliance into water or any other liquids.
7. Do not handle plug or operate appliance with wet hands.
8. Do not pull or carry by power cord, use power cord as handle, close a door on the power cod,
or pull the power cord around sharp edges or corners. Keep power cord away from heated
surfaces.
9. Do not put any objects into nozzle or operate with any nozzle blocked.
10. This appliance and the accessories become hot during use. Exercise care when changing
accessories and follow removal and changing instructions as outlined in the manual. Do
not change the frames while the unit is turned on. Turn off the unit off, wait for the appliance
to cool, and then change frames.
11. To avoid circuit overload, DO NOT operate another appliance on the same socket (circuit ) as
the handheld steamer steamer.
12. The handheld steamer steamer can be used in a vertical or horizontal motion. Never hold the
steam head down while at rest or tilt it in a backward position as this may result in discharge.
13. Do no use on leather, suede, vinyl, plastic or other delicate steam sensitive materials.
14. Do Not add cleaning solutions, scented perfumes, oils or any other chemicals to the water
used int this appliance as this may damage the unit or make it unsafe for use.
15. Never aim or direct steam towards people, animals, or plants.
16. Never attempt to steam clothing while it is being worn.
17. Always disconnect system from electrical outlet when filling the water tank or emptying and
when not in use.
18. Never attempt to fill this unit under a water faucet. Always use the filling flask that is provided.
19. When cleaning the garment steamer, unplug the power cord and clean with a dry or damp cloth.
Do not pour water on the unit or use alcohol, benzene or paint thinner on the unit.
20. Do not operate the product while under the influence of drugs, alcohol or medications.
21. Do not operate in the presence of explosive and /or flammable fumes.
22. Store your appliance indoors in a cool, dry area out of the reach of children.
23.Let the system cool completely before putting away. Loop cord loosely around the appliance
when storing.

1. First remove all the parts from the package. Verify all the listed parts
are included.
2. Safety remove contents of the Steam Cleaner system and lay them out on
a flat surface to see that you have all the components to complete the
assembly.
Attachments
3. Attach the top of the brush connection to the unit into the notch.
4. Next, secure the pointed end of the brush connection around the bottom
of the unit and snap into place ( Fig. 1)
5. To remove the brush connection, gently pull on the pointed end and lift the
brush connection off the unit. ( Fig. 2)
6. Attach the top of the brush connection to the unit into the notch. Next,
secure the pointed end of the brush connection around the bottom of the
unit and snap into place.
7. Push round brush into brush connection. (Fig. 3)
There may be a little water in or around the water tank assembling your
steam cleaner, because we have tested all of our steam cleaner before
packing to provide the best quality of our products.
Caution
The seam on the brush connection must line up with the seam on the unit
proper use and safety.
The brush connection will snap into place, double check to make sure seams
are aligned.
For safety, please remove the brush connection after unit cool down for
10 minutes.
Make sure you only add water to the tank. Chemicals or cleaning solution
may damage the appliance and could be unsafe for you and your family.

Filling the water tank
8. Disconnect the power cord before filling the water tank.
9. Fill the water tank to the Max line. Be careful not to overfill. Push the cap
back into place, make sure it closes firmly. (Fig. 4)
10. Plug into the electrical outlet. The light flashes red.
Caution
Make sure you only add water to the tank. Chemicals or cleaning solution
may damage the appliance and could be unsafe for you and your family.
Warning!
The frames are designed with a steam guard around the bottom to provide
protection from heat when placing or removing the frames.
Use caution when changing the frames when the unit is hot.
Please do not remove the accessories from the frame during operation.
The accessories only be removed for washing by hand.
1.Connect to the power, the indicator light is on, flashing in red.
2.Wait 20 seconds to heat, press the button, the red indicator light is
on, stops flashing, it stands for “LOW steam”.
3.Press the button again, the indicator light is on in blue, it stands
for “HI steam”.
4.Press the button one more time, the indicator light is on, flashing
in red, it is in standby mode.
Tips
The brush connection is ergonomic designed for cleaning a variety of surface
and is exceptional on those that are large and flat including table top,
stove, range hood, toilet and other similar surface.
Warning!
Never turn the unit over during operation.

3oz
1.Unplug the appliance from the electrical outlet.
2.Let the appliance cool completely for approximately 30 minutes.
3.Empty the water from the water tank.
4.Wipe the exterior of the garment steamer with a damp cloth and wipe
dry if needed.
5.Bundle up the power cord and secure it with the Velcro strap that is
attached to the power cord.
800W
GS700 120V 60Hz

One Year Limited Warranty
WARRANTY:
Enjoy awarranty for the steam cleaner for 1 year.
REPLACEMENT POLICY:
Replacements are based on a manufacturing defect and
not replaced for abuse, misuse or other non intended usage
of the steam mop. For shipping back of the product, the
shipping cost back is $14.95. We reserve the right to repair
or replace based on receipt of the sample back.
MONEY BACK GUARANTEE:
Enjoy a 1-year money back guarantee from the day
you purchase.
EXCELLENT CUSTOMER SERVICE:
Need any help? please feel free to Contact us,
Service Number: 1-844-798-2632
Service mailbox: support@lightneasy.cc
Do you like your new steam cleaner? You can share it with
your friends and please review the product on Amazon!
Thank you for your purchase!
The steamer is
not turned on.
Verify that the light on the unit is lit. If not,
check that the unit is plugged in. There is not
enough water in the unit.
There is not enough
water in the unit. Verify that the water tank is at least half way full.
The accessories
leaves water drops.
Let the unit cool for 30 minutes, remove the
accessories and let it dry out before using
again or replace with a new accessories.
Let the appliance cool and wipe the frame off.
Table of contents