Coopers of Stortford 9283 User manual

1
4 Bar Steam Cleaner 9283
Steam Cleaner & Accessories:
1. Funnel
2. Measuring Jug
3. Steam Gun with Hose Connector
4. Accessory Adaptor
5. Detail Nozzle
6. Jet Nozzle
7. Small Nylon Brush
8. Nylon Brush
9. Part 1 of 2 in 1 Window Attachment- Right
angled steam attachment
10. Cotton Cover for 2 in 1 Window Attachment
11. Part 2 of 2 in 1 Window Attachment
12. Large Cleaning Cloth for Floor Nozzle
13. Floor Nozzle
14. 3 x Extension Tubes
15. Steam Cleaner & Mains Plug

2
1. Remove all items from packaging and verify
that all parts are included as per list. The Steam
Cleaner has an accessory compartment that
houses all accessories which is located under
the main cover. You open this by pressing the
yellow button on the back of the Steam Cleaner
just above the wheels, lifting the unit handle upwards and then separating the top and bottom of the
unit.
2. Connect the Steam Hose to the steam
cleaner as pictured. Pull down the yellow
cover that is over the nozzle hole on the
steamer and insert the steam hose using
the connector nozzle located on the end of
the steam hose. This should be securely in
place and you should hear a click. To remove the steam hose, press in both release buttons on either
side of the steam connector and pull from the socket. Do NOT remove steam hose whilst the
product is in use, allow to cool first
3. Select the desired accessories based on the area you wish to steam clean and connect to the
steam cleaner. Each accessory can be used as follows;
Extension Tubes: Assemble the extension
tubes if the steam cleaner is to be used to
clean floors or difficult to reach areas. You
can extend the steam hose by adding up to
all 3 of the extension tubes if required. To
attach the tubes, push the open end of the
tube into the steam gun until the release button, pictured above, clicks into place.
To remove the tubes, press in the release button and pull the tube downwards.
Assembly and Use:

3
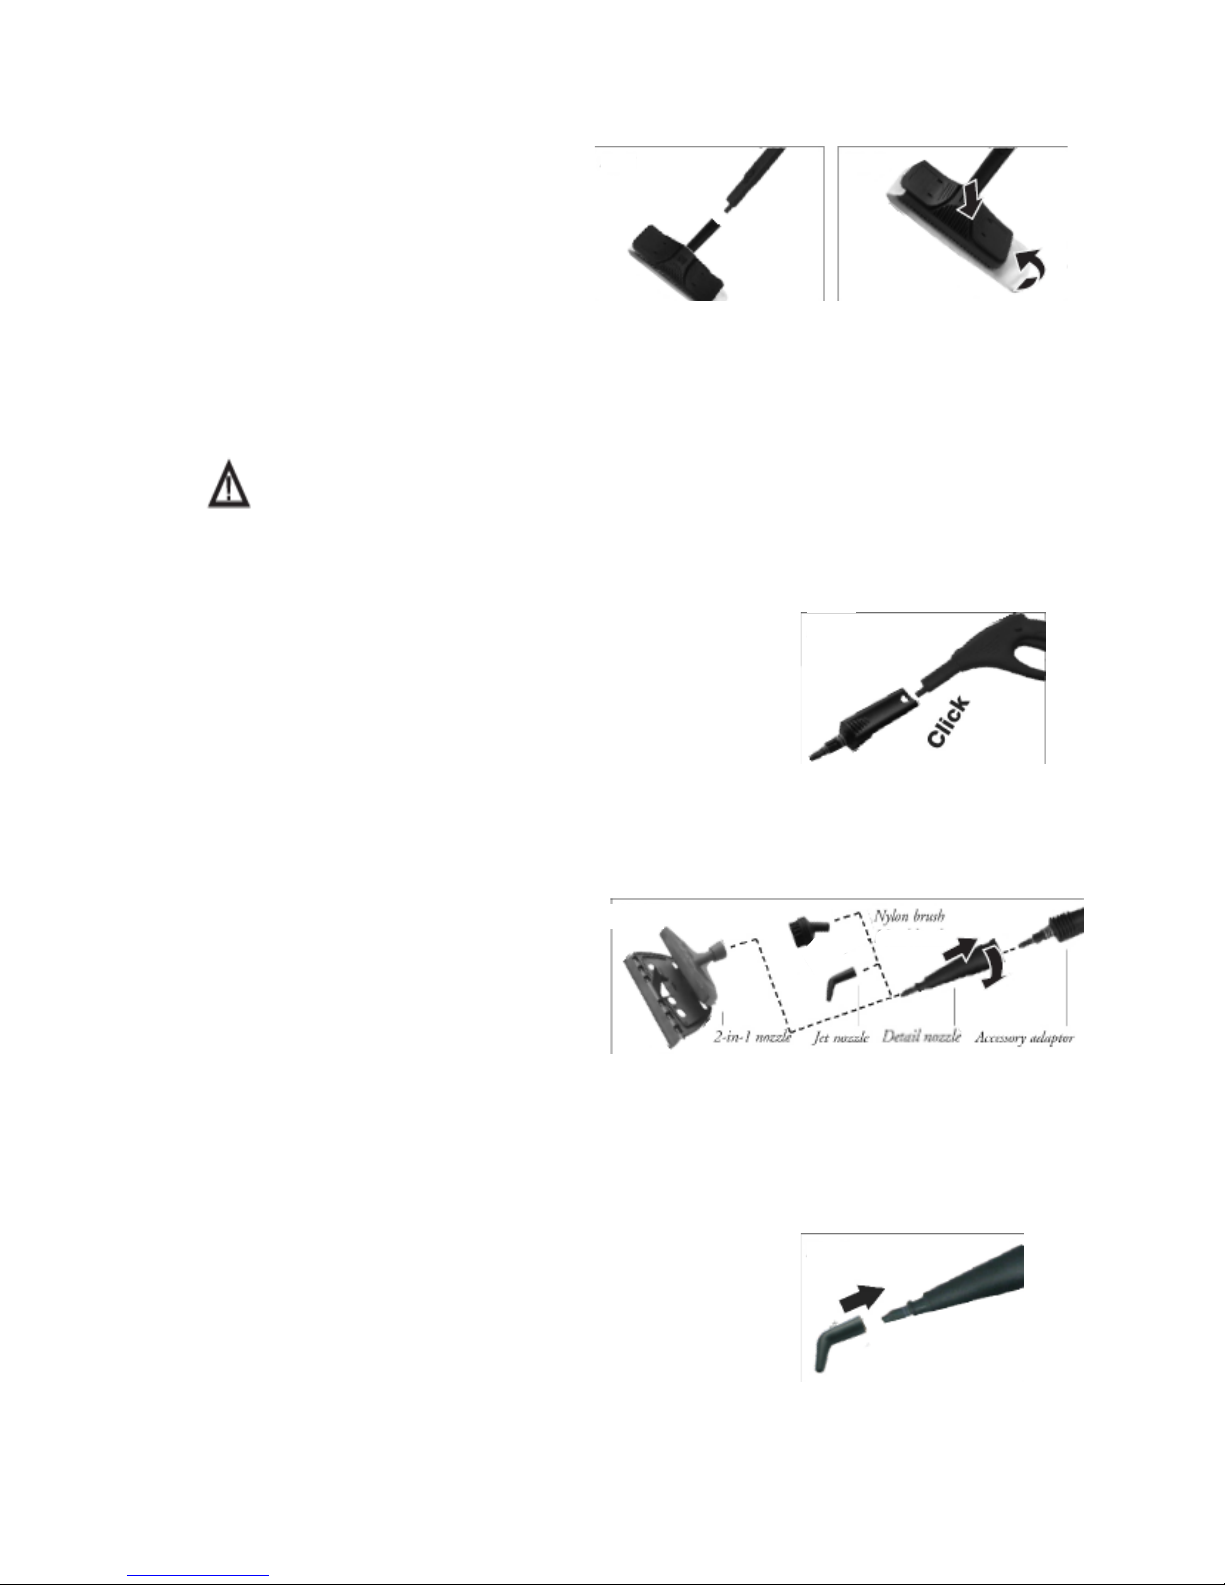
Floor Nozzle: Assemble floor nozzle when
cleaning the required floor area, the nozzle
should be used with the extension tubes as
above. Attach the floor nozzle to the end of
the extension tube; ensure that the nozzle
clicks into place. The floor nozzle is ideal for
cleaning washable floor coverings and also has its own cleaning cloth cover which is included in the
accessories. The floor nozzle can be used with or without the cleaning cloth, however, the cleaning
cloth is recommended to protect sensitive surfaces such as wood or linoleum.
To remove the floor nozzle, press in the release button and pull nozzle off in downward movement.
WARNING: You MUST patch test an area of any flooring to make sure it is safe to use the
steam cleaner on. Some material may be heat sensitive. Refer to flooring manufacturer’s
instructions or material guidance.
Accessory Adaptor: The accessory adaptor is for use with the steam
cleaner’s variety of accessories; this allows effective and thorough
cleaning of many different surfaces. The adaptor can be attached
directly to the steam gun on the end of the steam hose or to the
extension tubes. It is fitted by pushing onto the end of the steam gun
or the extension hose and should click into place. To remove, press in
the release button and pull of in a downward motion.
Detail Nozzle: The detail nozzle is ideal for
cleaning smaller or more specific areas. The
detail nozzle can be used on its own for
cleaning or fitted with one of the brush nozzles,
the jet nozzle or the 2 in 1 window attachment.
The detail nozzle attaches to the accessory
adaptor; this is done by pushing the nozzle onto the adaptor and turning a quarter turns in the
direction indicated on the nozzle. To remove the detail nozzle the sequence is reversed by turning
the nozzle a quarter turn in the opposite direction and then pulling off in a downward movement.
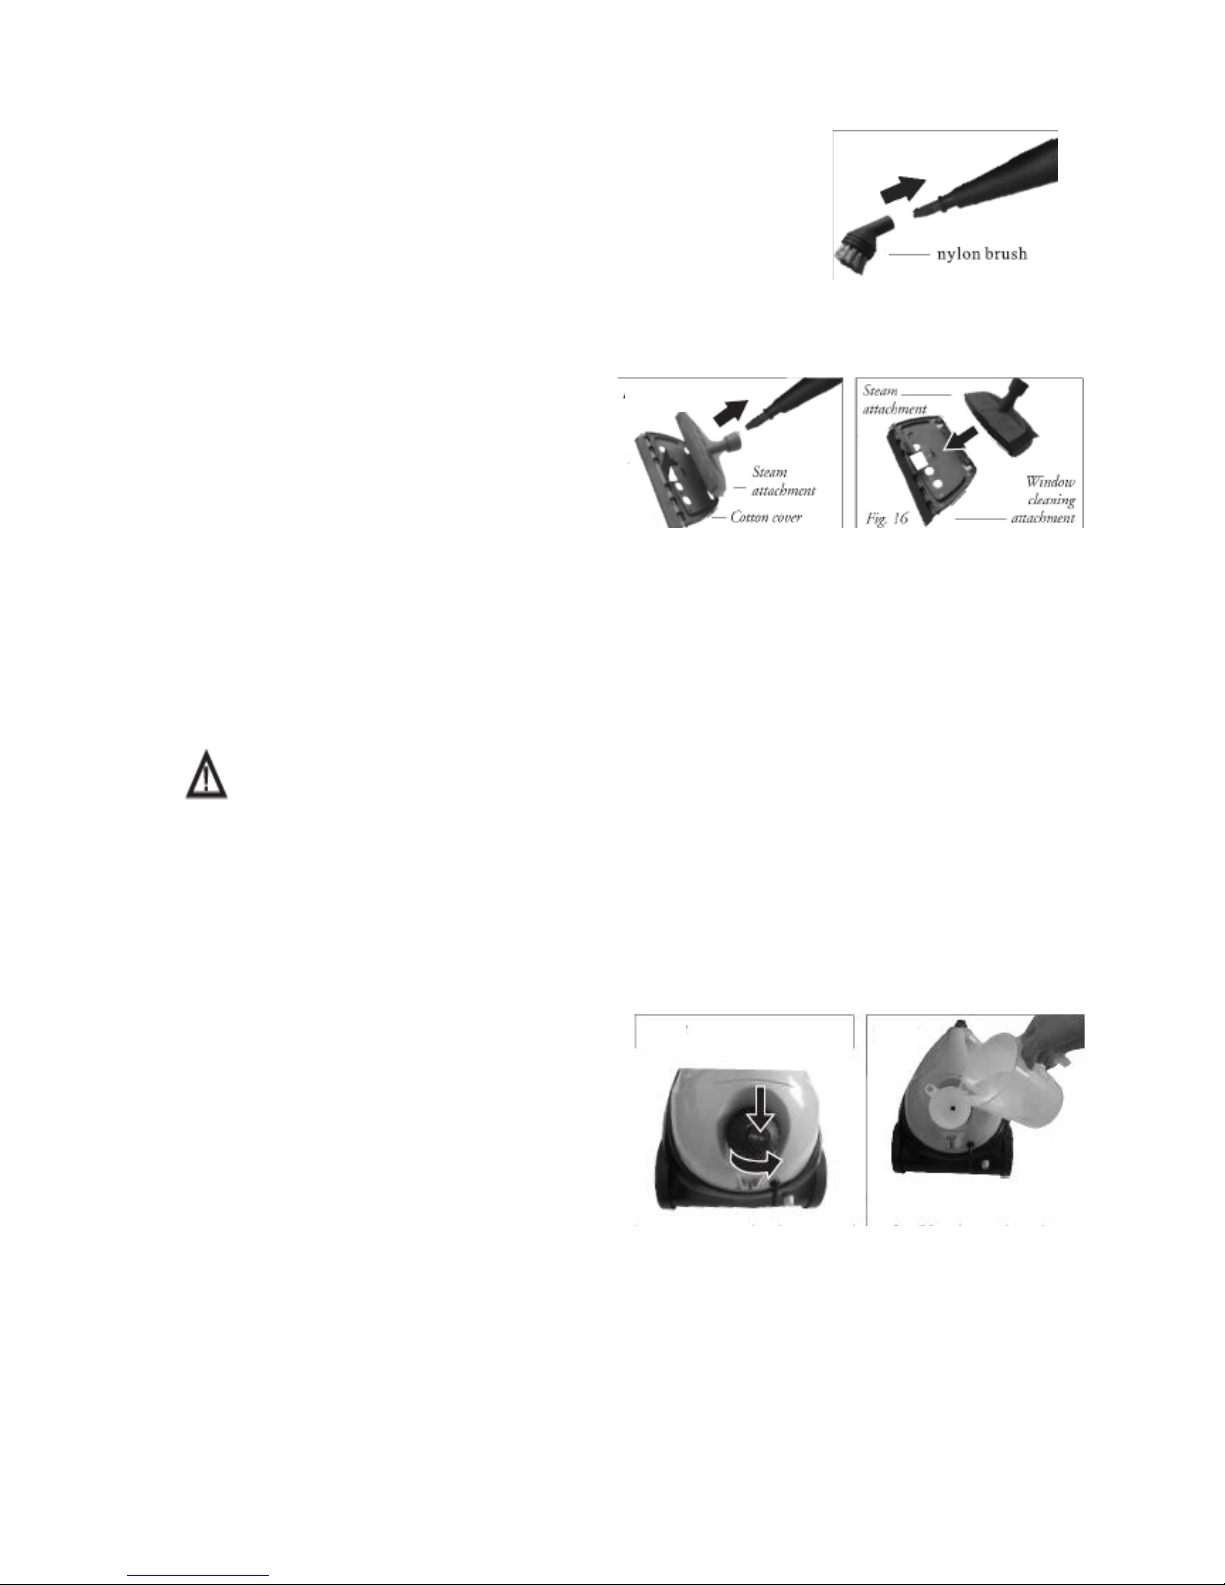
Jet Nozzle: The jet nozzle makes it possible to clean hard to reach
places throughout the home. To use the jet nozzle the detail nozzle
should first be fitted (as above) and the jet nozzle firmly pushed onto
the detail nozzle to attach it. To remove it, pull off in a downward
movement

4
Brush Nozzles: The brush nozzles offer different levels of cleaning for
different materials and can be great for those heavier stains. To use the
brush nozzles the detail nozzle should first be fitted (as above) and then
the brush nozzles to be firmly pushed onto the detail nozzle. To remove,
pull off in a downward movement.
2 in 1 Nozzle: The 2 in 1 nozzle consists of a
right angled steam attachment which the
window cleaning attachment can then be fitted
onto. The right angled steam attachment can be
used for smaller surface areas. It also has a
cotton cleaning cloth that comes with the
accessories for a more thorough clean and to protect the work surface; this is elasticated and is
simply pulled over the right angled steam attachment. This is then attached to the detail nozzle by
simply pushing on. The window cleaning attachment can be added to the steam attachment, this is
ideal for use on windows, mirrors or tiles as it has a rubber blade to wipe away any vapour residue.
Caution: Glass may crack if subjected to thermal shock.
Pre-heat areas of glass prior to steam cleaning by spraying steam onto the surface from a
distance of 20-25cm. Slowly reduce the distance so that the temperature of the glass has
adjusted.
4. Once you have chosen the required accessory, you must now fill the water tank. The Steam
Cleaner has a built in water tank with a capacity of 1.4 Litres. The steam cleaner MUST be
disconnected from the mains when filling or topping up with water. To fill, unscrew the tank cap
(pictured right) by pressing the cap down and
simultaneously turning it anti-clockwise. Use the
measuring jug and funnel supplied to fill with
required amount of water. Do NOT exceed the
maximum capacity of 1.4 Litres. Replace the cap by
pushing down and turning clockwise
simultaneously. Do NOT refill whilst still hot, allow
to cool first and then follow the filling instructions.
NOTE: One full tank of water at 1.4 Litres is enough for approx. 40 minutes use. Do NOT exceed
this without checking the water levels in the tank

5
5. Plug the steam cleaner into the mains socket
and switch appliance on. The ON/OFF switch is
located on the front of the carry handle. Once
on, the Green Operating Light and the Red
Heating light should both come on, these are
also located on the front of the carry handle.
The green operating light is there to indicate to you when the steam cleaner is switched on. The red
heating light indicates that the steam cleaner is heating up; it will take approximately 10 minutes for
the Steam cleaner to reach its optimum temperature. When this happens the red heating light will
go out. The appliance is now ready for use
6. You are now ready to use your Steam Cleaner!
Caution: Patch testing must be done on a small area of any material before use of the
Steam Cleaner. Not suitable for some materials
7. The flow rate of steam emitted can be
regulated by turning the steam controller
(pictured far right) it may need to be adjusted
depending on the heaviness of the stains and
dirt. Turn clockwise for less steam and anti-
clockwise for more steam. To release the
steam from the steam gun, press on the trigger as pictured above, do this as often as steam is
needed, you then loosen the area of stain or dirt by moving the steam jet backwards and forwards
over it. As pictured, there is also a triangular shaped child lock button on the steam gun located on
the left hand side. Simply push through to right hand side to lock the steam gun trigger. To release,
push back through to left hand side.
1. Switch off appliance using ON/OFF button. Once appliance is switched off the green operating
light should go out
2. Press steam trigger on steam gun to release any remaining pressure. Secure the steam gun the
locking pin located on the left hand side of the handle.
3. Remove the plug from the mains and allow the appliance to cool down.
4. Empty the water tank so that no deposits can settle.
5. Do not close water tank until it has dried out
6. Before storing the steam cleaner must have completely cooled down
7. Store appliance out of reach of children
After use & Storage:

6
8. The water tank should be treated with lime scale remover approx. every 6 months to prolong the
steam cleaners’ life. Place a maximum of 2 lime scale removal stick into 1 Litre of warm water and fill
water tank. Allow the solution to work for approximately 30 minutes and then pour away. Repeat
the process if necessary.
Safety Instructions:
This appliance can be used by children aged
from 8 years and above and persons with
reduced physical, sensory or mental
capabilities or lack of experience and
knowledge if they have been given
supervision or instruction concerning use of
the appliance. Cleaning and user
maintenance shall not be made by children
unless they are older than 8 and supervised.
Always disconnect the appliance from the
mains when not in use
Cable can be a trip hazard, please be
cautious
Do NOT leave the steam cleaner unattended
Check the appliance and any of its
components regularly for damage
NEVER aim the steam cleaner directly at
people or animals as this will scald.
NEVER aim the steam cleaner directly at
electrical systems or wires
Accessories become hot during use, allow
them to cool down before changing over
NEVER unscrew the tank cap during use, the
tank is under pressure
The appliance may NOT be tilted more than
45° during operation
Never Immerse the appliance in water or
other liquids
Not Suitable for outdoor use
NEVER let the water run out. Check at
regular intervals during use
Do NOT overfill the tank. Max capacity is 1.4
Litres
Always carry appliance by the handle
For use with Original accessories only
NEVER attempt to repair the machine
yourself
Always switch off the appliance, remove
from the mains and allow to cool before
cleaning or maintaining it
Keep packaging away from Children
This appliance is fitted with an over heating cut
out. The appliance will switch off automatically to
prevent overheating. Should this occur, disconnect
from the mains immediately. The appliance maybe
operated again after a 30 minute cooling period.
One full tank of 1.4 litres of water is enough for a
maximum operating time of 50 minutes. Do not
exceed this without re-filling the steam cleaner with
water.
CAUTION when opening the tank cap as steam may
escape and cause scalding.
Do NOT operate with wet hands
Do NOT turn ON or OFF at mains with wet hands

7
Caution: Always patch tests the surfaces that you wish to use the
steam clean on. It may have an adverse effect on materials
sensitive to heat.
Warning: Risk of scalding or burn if safety instructions are not
followed correctly
Fault
Possible Cause
Remedy
The operating
pilot light fails to
light up
The appliance is neither plugged into a socket nor
switched on.
The socket is faulty.
The power cable is damaged
Insert the mains plug into a
socket or switch the
appliance on.
Check the socket by
unplugging the steam
cleaner and plugging in a
different appliance.
No Steam is
emitted when
the steam trigger
is operated
The childproof lock is preventing the release of
the steam button.
The water tank is empty
Push the triangular shaped
button on the right hand
side of the steam gun to the
left.
Top up with water (see
point 4)
Only a small
amount of steam
is coming out
The steam controller is on minimum
Turn the steam controller
anti-clockwise until
sufficient steam is emitted.
The appliance
takes a very long
time to heat up
The water tank has furred up.
De-scale the water tank
(refer to After Use &
Storage point 8)
Troubleshooting:

8
Technical Specification:
Type of Appliance: Steam Cleaner
Model: VSC28
Voltage: 220~240V~, 50HZ
Power Consumption: 1500w Nominal
Steam Pressure: Max. 4 Bar
Volume of Water Tank: 1.4Lt Max.
Steam Availability: Max. 40 minutes /Tank
Heating Time: 10 Minutes
Steam Flow Rate: Max. 40g/ Min
Dimension: Appliance 360x240x250mm (LxWxH)
G.W:6.5kg N.W: 5.7kg
Washing Instructions:
Cotton Cover for 2 in 1 Window Attachment and Large Cleaning Cloth for Floor Nozzle can
both be washed at 60°. Do NOT Iron or Tumble-dry. Wash label included on each item.
Packaging:
Dispose of packaging at your local recycling centre.
Dispose of paper and box separately from plastic bags at your local recycling centre.
Dispose of the item at the end of its lifespan at your local authorised household waste
recycling centre.

9
This manual suits for next models
1
Table of contents
Other Coopers of Stortford Steam Cleaner manuals