Light O Rama DC-MP3 User manual

DC-MP3
Show Director with MP3 Player
User Manual
September 27, 2007
V1.05
Copyright © Light O Rama, Inc. 2006, 2007

Table of Contents
Introduction.............................................................. 4
What’s in the Box..................................................... 5
DC-MP3 Firmware Versions.................................... 6
Hardware Utility Version .......................................... 7
Important Considerations ........................................ 7
Component Locations.............................................. 9
Power Input.......................................................... 9
Audio Output ...................................................... 10
Jumper............................................................... 10
Reset Button ...................................................... 10
SD Card Slot...................................................... 10
Status LEDs ....................................................... 11
Selector Switch .................................................. 12
Interactive Inputs................................................ 13
RJ45 Network Connections................................ 14
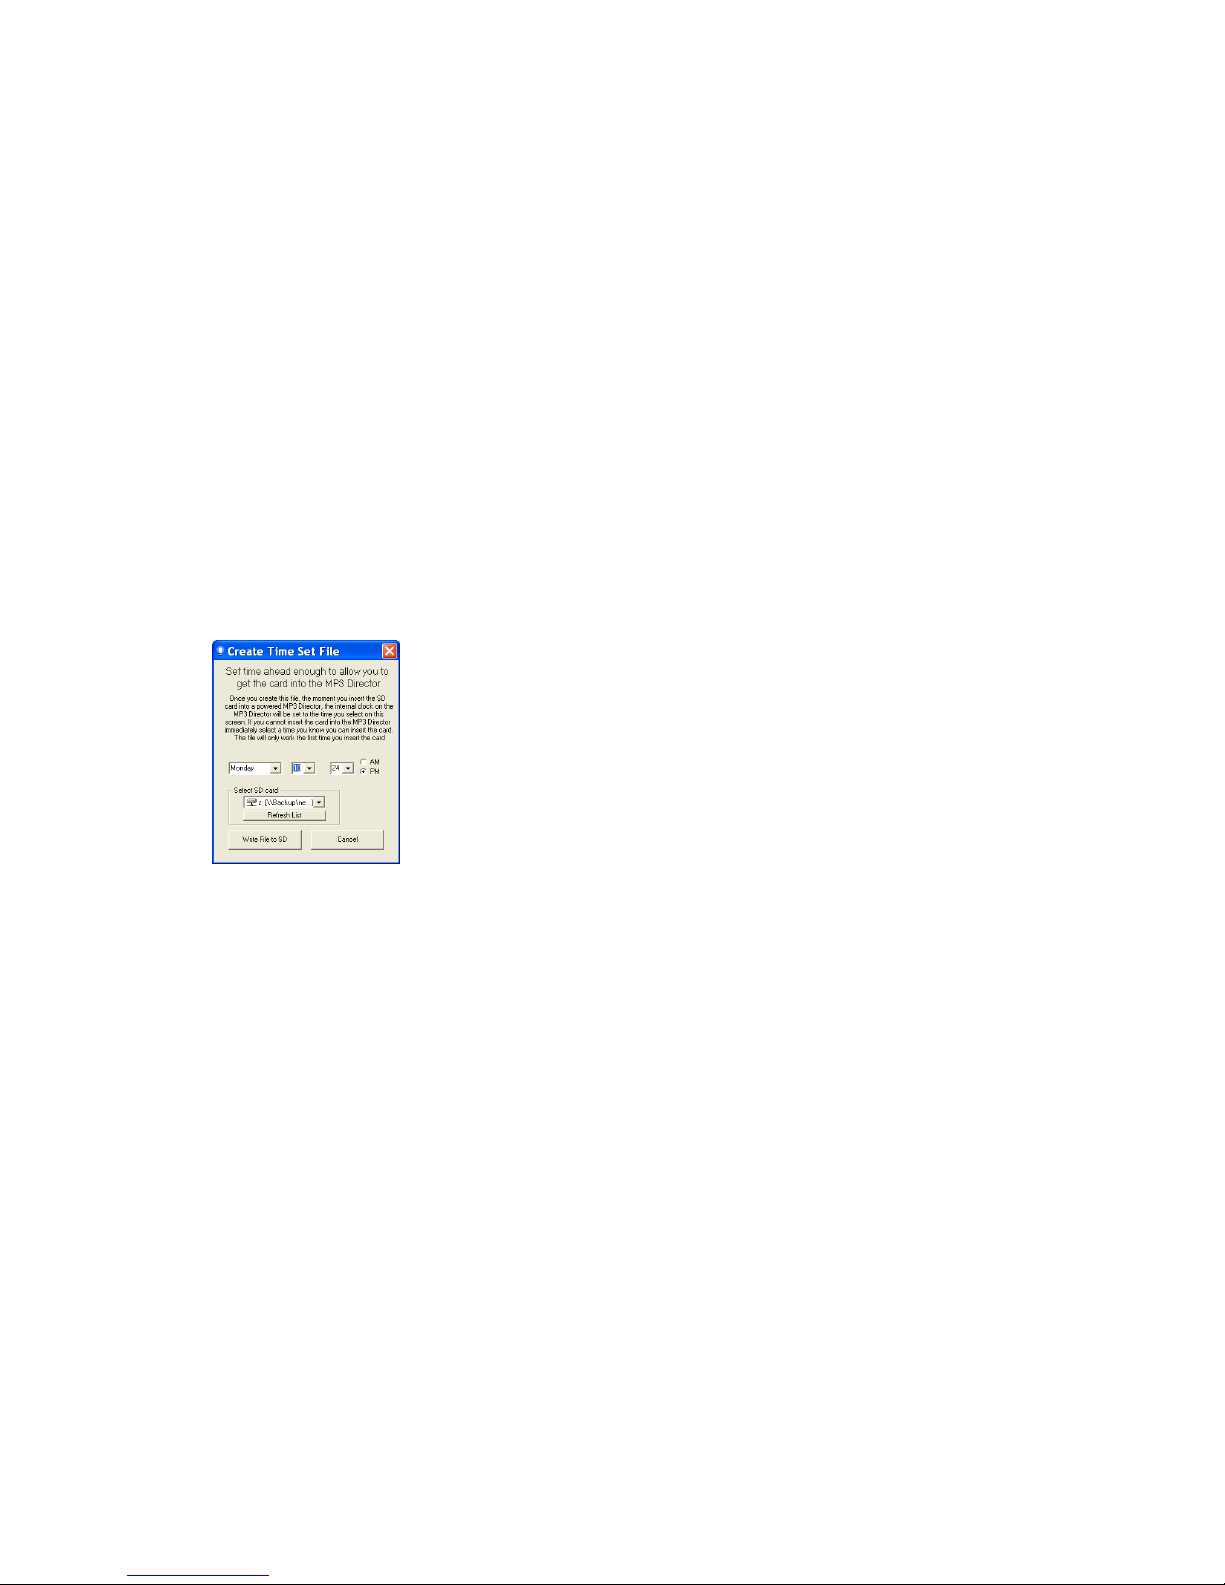
Setting the DC-MP3’s Clock .................................. 15
Clock Set with Hardware Utility .......................... 15
Clock Set via SD Card ....................................... 16
Clock Set Manually ............................................ 18
Show Programming Overview ............................... 20
Show Programming (SimpleShowBuilder) ......... 20
Show Programming (Hardware Utility >1.6.4).... 21
Plays Anytime Show....................................... 24
Scheduled Show ............................................ 24
Triggered Show .............................................. 26
Adding Sequences to the Show ..................... 64H28
26HShow Programming (Hardware Utility <1.6.4).... 65H32
27HShow Programming (DC-MP3 firmware 1.0)...... 66H40
28HInteractive Trigger Connections............................. 67H45
29HUpdating the DC-MP3 Firmware............................ 68H46
30HTroubleshooting..................................................... 69H50
31HRun-time error ‘68’: ............................................ 70H50
32HCan’t Use COMnn Port ...................................... 71H50
33HSpecifications ........................................................ 72H51
DC-MP3
Page 4
Introduction
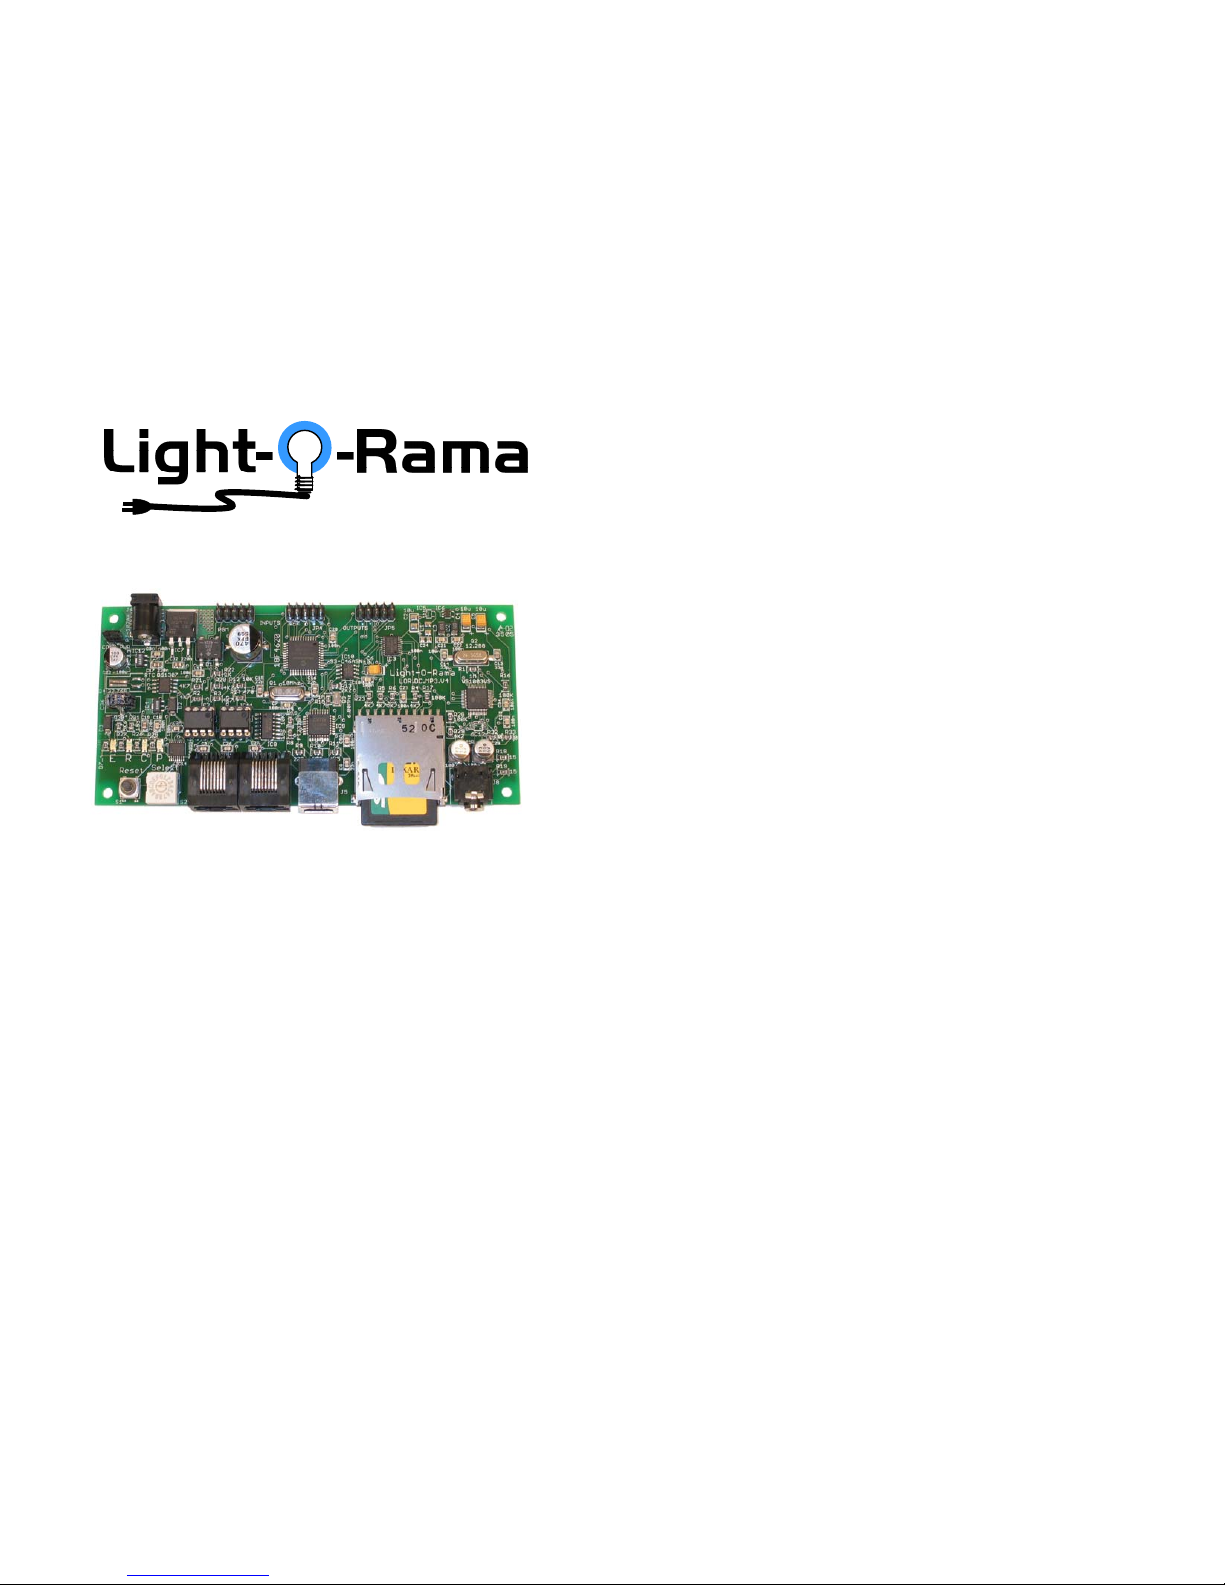
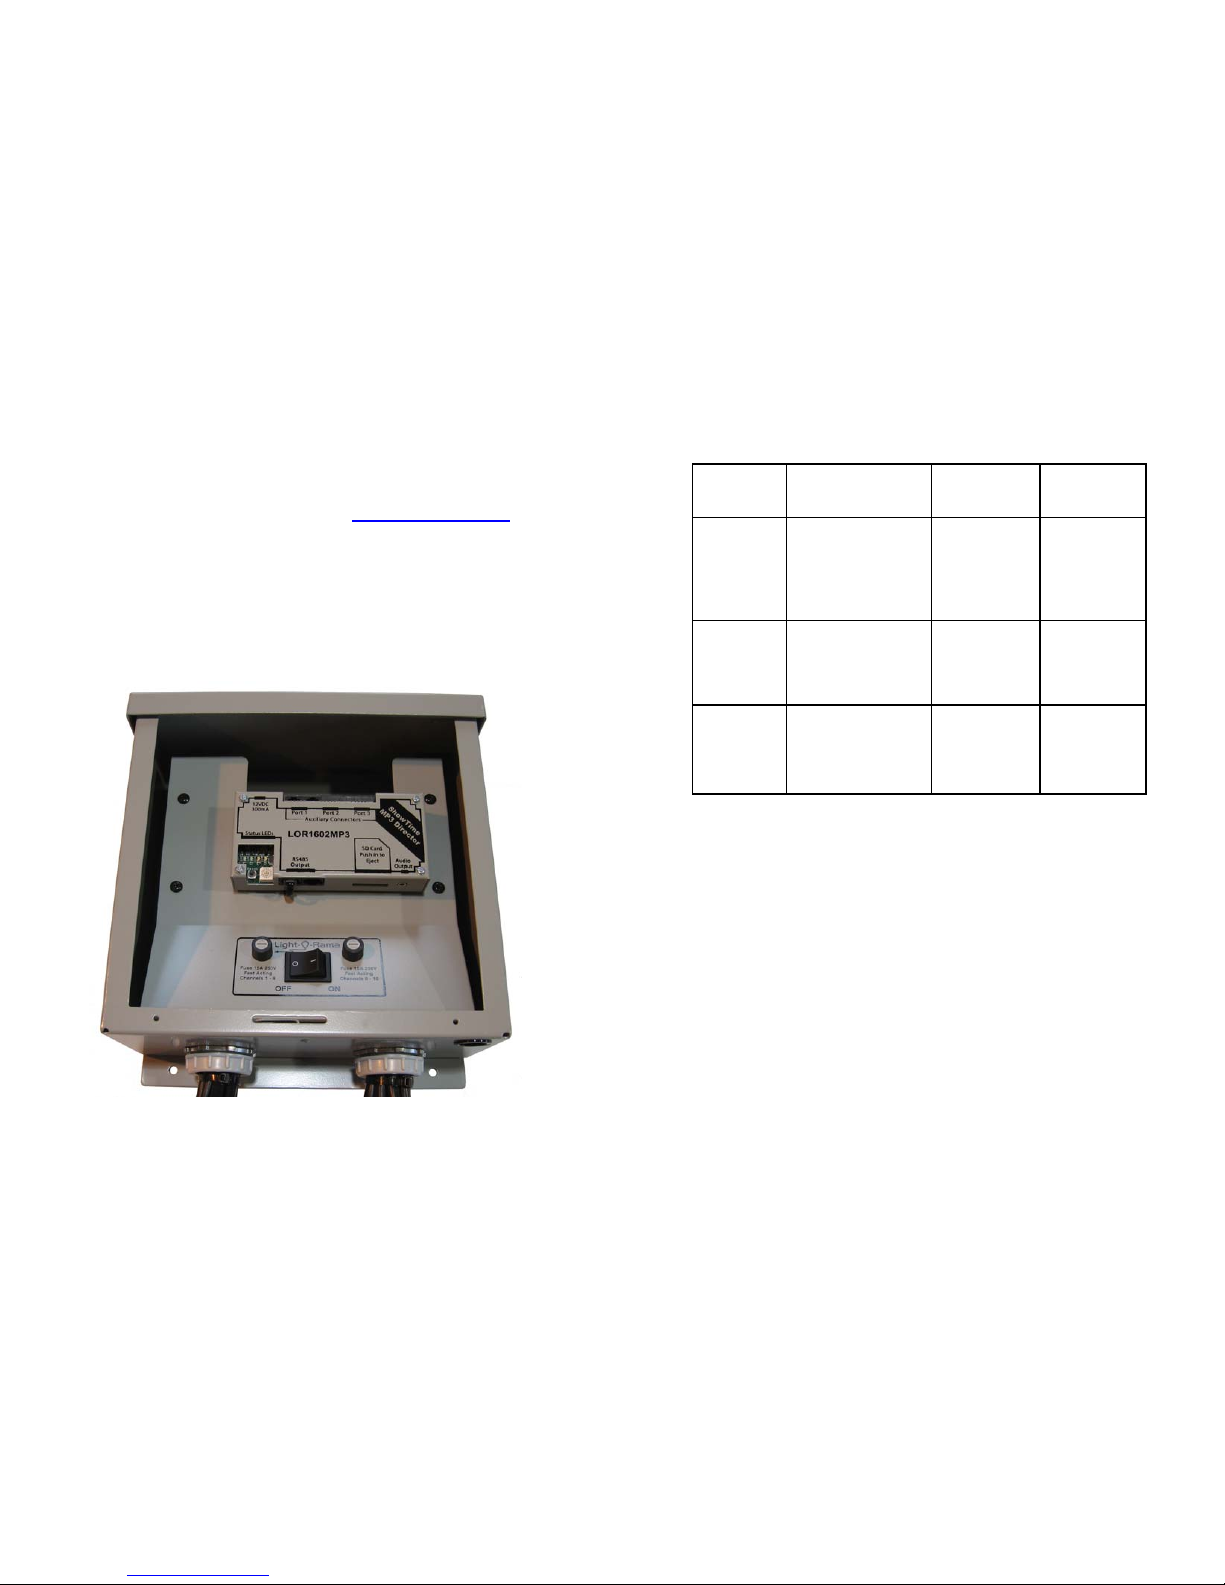
The Light-O-Rama Director Card with MP3 Player
(LOR DC-MP3) is a compact, powerful show director
designed to take the place of your PC. It directs a
network of LOR controllers while simultaneously
playing MP3 files. The on-board real time clock with
power-fail backup can be used to schedule your
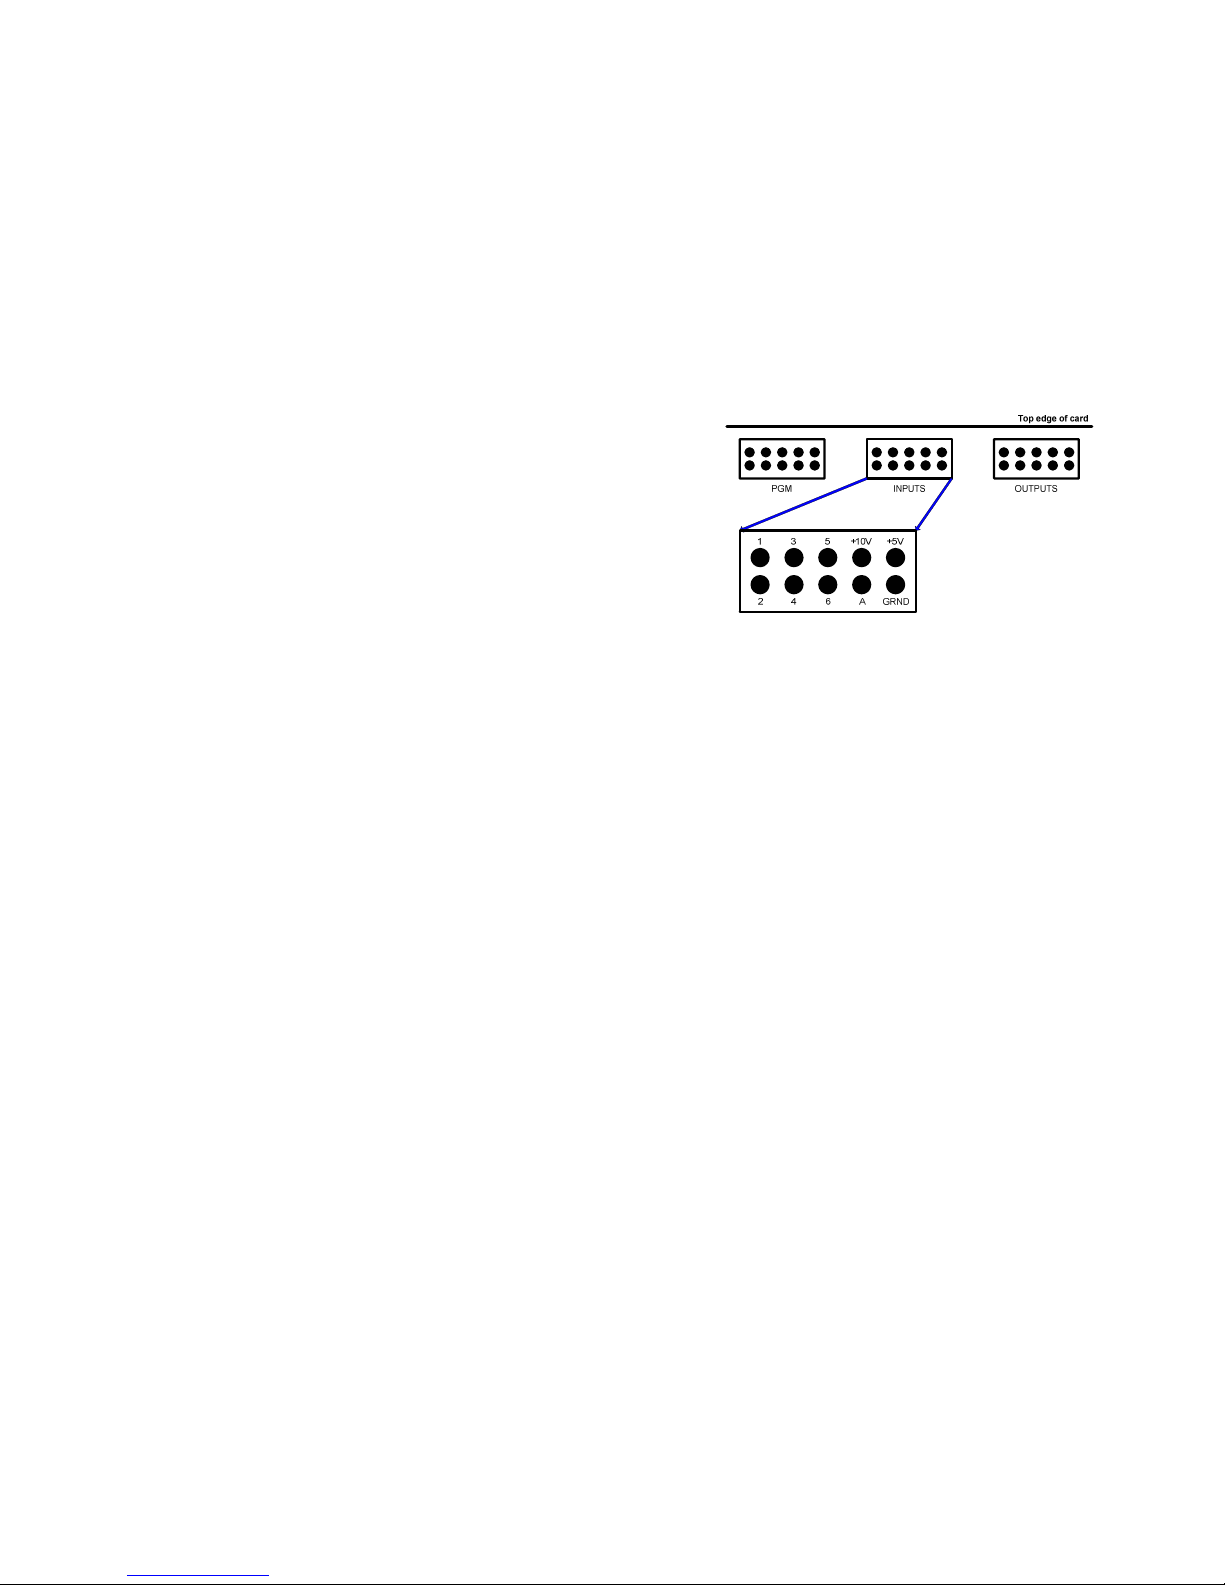
shows. Six trigger inputs allow shows to be started
by external events.
The Windows Showtime software is used to design
and build Sequences (light controller commands that
may be choreographed to music.) These user
created sequences and/or pre-programmed musical
sequences available from LOR are then arranged
into Shows. These Shows are transferred to an SD
card, along with the scheduling and trigger
information. The SD card is inserted into the DC-
MP3, which then directs the LOR controllers in your
display and plays any associated music.
Note
To obtain the full functionality of the DC-MP3 you
must have firmware version 3.00 and Light O Rama
Hardware Utility version 1.6.4 or later. See the
sections DC-MP3 Firmware Versions and Hardware
Utility Version for more information.

DC-MP3
Page 5
What’s in the Box
Your DC-MP3 includes a USB SD card reader/writer,
a 128 MB (or larger) SD card and a user’s manual.
This manual is also available at www.lightorama.com
►Support ►DC-MP3 User’s Manual.
If you purchased an LOR1602MP3, which is a 16
channel lighting controller with an internal DC-MP3.
The DC-MP3 is mounted on a plate inside the
controller. Remove the bottom two screws from the
front cover and lift off the cover to expose the DC-
MP3. See the following picture:
DC-MP3
Page 6
DC-MP3 Firmware Versions
Firmware
Version
Determining
Version
Scheduling
Supported
Interactive
Supported
1.0
E, R & C LEDs do
not chase when
the DC-MP3 is
powered up, the
LEDs just flash
No No
2.0
E, R & C LEDs
chase three times
when the DC-MP3
is powered up
Yes No
3.0
E, R & C LEDs
chase four times
when the DC-MP3
is powered up
Yes Yes
If the firmware version in your DC-MP3 does not
support show scheduling, you will have to check the
Old Firmware box on the LOR MP3 tab when using
the Hardware Utility to build your shows. You will not
be able to use the DC-MP3’s real time clock to
schedule shows. If you want to use the scheduling
features, you must update the firmware in your DC-
MP3 to at least 2.0. See the Updating DC-MP3
Firmware section for instructions.
If the firmware version in your DC-MP3 does not
support trigger inputs, and you want to use the
interactive features, you must update the firmware in
your DC-MP3 to 3.0. See the section Updating DC-
MP3 Firmware for instructions.
I

DC-MP3
Page 7
Hardware Utility Version
If your Hardware Utility has an LOR MP3 tab on the
upper left of the LOR Control window (initial window)
you will be able to put a show on an SD card for
your DC-MP3. If you want to use the show
scheduling features, you must have Hardware Utility
version 1.5.8 or later. If you want to use interactive
trigger inputs in your show, you must have Hardware
Utility version 1.6.4 or later. The version of the
Hardware Utility appears in the title bar to the right of
“Light-O-Rama Hardware.” If the version you have
does not support the features you want to use or
there is no version number at all, then you need a
new Hardware Utility.
The latest version is available for download at
www.lightorama.com ►Support ►Software
Downloads. Click the Download button to the left of
the Hardware Utility and run the installer.
Important Considerations
The DC-MP3 is normally powered by the nearest
Light O Rama controller or a USB485B PC adapter.
Use a 50’ or less CAT5e LAN cable to connect the
DC-MP3 to either of these devices. Longer cables
may have an unacceptable voltage drop that may
cause erratic operation of the DC-MP3.
SD cards must be formatted FAT16 (or just FAT)
SD cards supplied by LOR will already be formatted
FAT16 and ready for use.
Not all brands of SD cards will work with the DC-
MP3. Lexar Media and SimpleTech are known to
work.
DC-MP3
Page 8
Individual MP3 songs are limited to 10 minutes. After
10 minutes the song will continue to play, but control
of the lights will not continue. This does not mean
that the DC-MP3 can only control a 10 minute show,
only that no song(MP3 file) in your show can be
longer than 10 minutes.
A 128 MB SD card can hold approximately one hour
of MP3 audio and controller commands.
Songs (audio files) for use with the DC-MP3 must be
encoded as MP3 files. Constant Bit Rate (CBR) at
128K bits/second is best. See www.lightorama.com
►Support ►“How to and considerations: Ripping
CDs to MP3s”
The backup power for the DC-MP3’s real time clock
will keep the clock going for at least three days. The
DC-MP3 must be powered for 15 minutes to fully
charge the backup capacitor. The real time clock is
needed only for scheduled shows. In this case, the
DC-MP3 is always powered, so the backup power
capacitor is only needed to survive power failures.

DC-MP3
Page 9
Component Locations
Power Input
Normally, power is supplied by the attached
controller via the RJ45 jack(s.) This barrel connector
can be used to supply power if
•the DC-MP3 is more than 50’ from the
nearest controller or the controller is an older
model that cannot supply enough power
•the DC-MP3 is to be connected to a PC
without using a USB485B powered adapter or
an attached lighting controller (I.e. using a
USB485 or SC485 adapter)
•the DC-MP3 is to be put on a timer or switch
to control it (See the Jumper section below in
this case)
Use a 12 VDC power brick to supply external power
to DC-MP3 if needed.
DC-MP3
Page 10
Audio Output
This is a standard 1/8” stereo mini-jack. It supplies
line-level output. You can directly plug headphones
or FM transmitter into this jack. Use an amplifier to
drive speakers.
Jumper
This jumper is put in place for two reasons
1. The DC-MP3 is connected to a PC via an
SC485 adapter and therefore needs to supply
power to SC485
2. The DC-MP3 is to be powered by the nearest
controller, the normal case
This jumper is removed when the DC-MP3 is to be
controlled by an external timer or switch and is
therefore powered through the power barrel.
Reset Button
Press the Reset button to reset the DC-MP3 or
whenever you change the Selector Switch to have
the change take effect.
SD Card Slot
The SD card is inserted into the SD card slot with
the gold connectors facing down. Press the card into
the slot until it “clicks” into place. To remove the
card, press the card into the slot and it will spring
eject.

DC-MP3
Page 11
Status LEDs
There are four LEDs on the left side of the card
above the Reset Button and Selector Switch. These
LEDs are used as follows:
E Steady blink if there is no SD card inserted
into the DC-MP3.
Steady ON if the Hardware Utility is attached
to the DC-MP3 – no SD card may be inserted
while communicating with the Hardware
Utility.
Blink twice, pause, blink twice, pause, … if
the show selected by the Selector Switch
does not exist.
Fast blink if the selected show is not present
on the SD card or the SD card is invalid
Random blink during a show (SD card
inserted) if the DC-MP3 falls more than a
tenth of second behind in getting lighting
controller commands out on the RS485
network link.
R Steady blink if the DC-MP3 is waiting for a
scheduled show to start.
Blink twice, pause, blink twice, pause, … if
waiting for an input trigger to start a show
and/or waiting for a scheduled show.
C Not currently used except during startup to
indicate the firmware version present in DC-
MP3.
P This green LED is lit when the DC-MP3 is
powered.
DC-MP3
Page 12
See the DC-MP3 Firmware Versions section for an
explanation of how these LEDs are used to indicate
the firmware version.
Selector Switch
[Remember to press the Reset button after moving
the Selector Switch to notify the microprocessor]
With firmware version 1.0 or later firmware and an
old firmware format SD card, this switch controls the
RS485 communications data rate.
0 19,200 bits/second
1 57,600 bits/second
2 115,200 bits/second
Use the slowest speed that successfully runs your
show. If the speed you select is not fast enough to
run your show, the red ELED will blink during the
show. This indicates that the DC-MP3 has fallen at
least one tenth of second behind in getting controller
commands out on the RS485 network link.
Version 2.0 and later firmware sets the
communications rate via the Hardware Utility when
creating the SD card to run your show(s.) The
Selector Switch is not used.
Version 3.0 firmware uses the Selector Switch in the
following manner:
Positions ‘1’ through ‘9’ select that particular show.
Only the selected show will run. If the selected show
has a scheduled time, it will only run during that time
period. If the selected show is set to run anytime, it
will start as soon as the DC-MP3 has initialized
(about 5 seconds.)

DC-MP3
Page 13
Position ‘A’ allows all shows to run as per their
schedules.
While interactive is active, any show not associated
with a trigger will run as scheduled, these may be
interrupted by shows 1-6 being triggered.
Triggered shows do not follow scheduled times.
They run when triggered. A triggered show does
follow the rules for run once or run continuously. If
you set a triggered show to run continuously, then
you will not be able to stop it without resetting the
DC-MP3 once it has been triggered.
Position ‘F’ is used to manually set the clock. See
the section Setting the DC-MP3’s Clock.
Positions ‘0,’ ‘B, ‘ ‘C,’ ‘D’ and ‘E’ are not currently
used and are treated the same as position ‘A.’
Interactive Inputs
The ‘INPUTS’ header at the top center of the circuit
board can be used to trigger shows with momentary
contact switches or motion detectors. Both +10 volts
DC and +5 volts DC are provided at this connector
to power external sensors (like motion detectors.)
The following diagram shows the input header pin
assignments:
DC-MP3
Page 14
To use these pins to trigger show(s), the selector
switch must be set to ‘B.’ See the Selector Switch
section for more information on how triggered shows
behave.
The input pins (‘1’ through ‘6’) are pulled to +5v with
a on-board resistor. One or more of these input pins
is connected to the GRND pin through your trigger
switches.
These inputs can be configured by the Hardware
Utility for normally open switches (NO,) meaning that
the switch closes the circuit when activated or
normally closed switches (NC,) meaning the switch
opens the circuit when activated. Most motion
detectors contain NC switches.
Pin ‘A’ is for future use and should not be connected
to anything.
RJ45 Network Connections
Use either of these connectors to connect to your
controllers and/or a Windows PC through an RS485
adapter.

DC-MP3
Page 15
Setting the DC-MP3’s Clock
Clock Set with Hardware Utility
This section describes how to use the Hardware
Utility to set the DC-MP3’s real time clock via the
RS485 adapter. You must have the following:
•At least version 2 of the DC-MP3 firmware,
see the section DC-MP3 Firmware Versions
•Hardware Utility version 1.5.10 or later, see
the section Hardware Utility Version
•No SD card in the DC-MP3
•The DC-MP3 powered (see the Power Input
section) and connected to the PC via one of
the RS485 adapters
Start the LightORama Control Panel if it is not
running by clicking start ►All Programs ►
LightORama ►Light-O-Rama Control Panel. The
Light-O-Rama light bulb icon will appear in the
system tray on the lower right of your screen.
Start the Hardware Utility by right-clicking the Light-
O-Rama Control Panel light bulb and selecting
Hardware Utility from the menu.
Click the LOR MP3 tab. You will see the following
window:
DC-MP3
Page 16
The section at the lower left of the window will say
“MP3 Connected” and display the MP3 player’s
current time in the Remote Time box. Click the Set
button to set the MP3 Player’s time to the PC’s time.
Clock Set via SD Card
This section describes how to use the Hardware
Utility to set the DC-MP3’s real time clock via the
SD Card. You must have:
•At least version 2 of the DC-MP3 firmware,
see the section DC-MP3 Firmware Versions
•Hardware Utility version 1.5.10 or later, see
the section Hardware Utility Version
•The USB SD card reader/writer plugged into a
USB port on your PC with the SD card in it, or
have the SD card in your machine’s built in
reader/writer
Start the LightORama Control Panel if it is not
running by clicking start ►All Programs ►

DC-MP3
Page 17
LightORama ►Light-O-Rama Control Panel. The
Light-O-Rama light bulb icon will appear in the
system tray on the lower right of your screen.
Start the Hardware Utility by right-clicking the Light-
O-Rama Control Panel light bulb and selecting
Hardware Utility from the menu.
Click the LOR MP3 tab.
Click the Only place SET TIME file on the SD Card
button. You will see the following window:
Set the time you want to put on the SD card and
select the SD card drive from the Select SD card
drop-down menu. Click the Write File to SD button.
Put this card in the DC-MP3 to set its real time clock.
When the SD card is placed in the DC-MP3, the E, R
& C LEDs will chase for about 10 seconds while the
time is being set. The time is only set the first time
the SD card is inserted into the DC-MP3.
Note that the DC-MP3 should be powered up for at
least 15 minutes to insure that the backup capacitor
for the real time clock is fully charged.
DC-MP3
Page 18
Clock Set Manually
This section describes how to set the DC-MP3’s real
time clock manually. You must have:
•At least version 2 of the DC-MP3 firmware,
see the section DC-MP3 Firmware Versions
•No SD card in the DC-MP3
Note the current position of the Selector Switch so
you can put it back after setting the time.
Set the Selector Switch to ‘F’ and briefly press the
Reset button
The red ELED will come on steady to indicate Time
Set Mode.
The yellow RLED will blink a number of times that
corresponds to the time field being set.
Set Day of Week: yellow RLED blink pattern is 1
blink, pause, repeat. Use the Selector Switch to set
the day of the week. Sun=1, Mon=2, Tue=3, Wed=4,
Thu=5, Fri=6, Sat=7. Briefly press Reset Button.
Set First Digit of Hour: yellow RLED blink pattern
is 2 blinks, pause, repeat. This is a 24 hour time so
the hour will be a number between 00 and 23.
Midnight is 00, 1 AM is 01, noon is 12, 4 PM is 16.
Use the Selector Switch to set the first digit of the
hour and briefly press the reset button.
Set Second Digit of Hour: yellow RLED blink
pattern is 3 blinks, pause, repeat. Set the Selector
Switch to the second digit of the hour and briefly
press the reset button.
Set First Digit of Minute: yellow RLED blink
pattern is 4 blinks, pause, repeat. Minutes range

DC-MP3
Page 19
from 00 to 59. Set the Selector Switch to the first
digit of the minute and briefly press the reset button.
Set Second Digit of Minute: yellow RLED blink
pattern is 5 blinks, pause, repeat. Set the Selector
Switch to the second digit of the minute and briefly
press the reset button.
The E, R and C LEDs will chase a number of times
to indicate that the time has been successfully set.
Place the Selector Switch back in its original position
and press the Reset button.
DC-MP3
Page 20
Show Programming Overview
There are two ways to create an SD card for the DC-
MP3.
1. Simple Show Builder – this application
creates a single, scheduled, non-interactive
show. It is simple and intuitive to use.
2. Hardware Utility – this application allows
access to the full capabilities of the DC-MP3.
Multiple shows with scheduling and
interaction are possible.
The next four sections explain how to use these
tools to create show(s) on the SD card.
There are three Hardware Utility version sections.
The first one describes programming the DC-MP3
where scheduling and interactive trigger inputs are
supported. The second one is for older versions of
the Hardware Utility and/or DC-MP3 firmware where
trigger inputs are not supported, but scheduling is.
The final Hardware Utility section describes
programming the initially released DC-MP3 whose
firmware only supported one unscheduled show.
Show Programming (SimpleShowBuilder)
Simple Show Builder is a Light O Rama application
that greatly simplifies the creation of a show on the
SD card for the DC-MP3. It allows you to create one
scheduled show consisting of a list of musical and
non-musical sequences without using the Hardware
Utility. This show can not use interactive triggers.
Your DC-MP3 must have firmware version 2.0 or
later. See the DC-MP3 Firmware Versions section

DC-MP3
Page 21
for information on determining and upgrading your
firmware.
The Simple Show Builder process takes only a few
minutes in a small number of self-explanatory
screens. Simple Show Builder is available for
download at www.lightorama.com ►Support ►
Software Downloads. Click the Download button to
the left of Simple Show Builder and run the installer.
Use Windows Explorer to run the Simple Show
Builder by double clicking it. The path to it is usually:
C:\Program Files\Light-O-Rama\LORSimpleShowBuilder.exe
Show Programming (Hardware Utility >1.6.4)
This section describes how to use Hardware Utility
versions 1.6.4 and later to set up, schedule and
configure the input triggers for shows on the DC-
MP3. You must have:
•At least version 3 of the DC-MP3 firmware,
see the DC-MP3 Firmware Versions section.
•Hardware Utility version 1.6.4 or later, see the
Hardware Utility Versions section.
•The USB SD card reader/writer plugged into a
USB port on your PC with the SD card in it, or
have the SD card in your machine’s built in
reader/writer
•It is not necessary to have the DC-MP3
connected to your PC to transfer a set of
shows to the SD card
Start the LightORama Control Panel if it is not
running by clicking start ►All Programs ►
LightORama ►Light-O-Rama Control Panel. The
DC-MP3
Page 22
Light-O-Rama light bulb icon will appear in the
system tray on the lower right of your screen.
Start the Hardware Utility by right-clicking the Light-
O-Rama Control Panel light bulb and then selecting
Hardware Utility from the menu. You will see the
following window:
Click the LOR MP3 tab on the upper left and you will
see this window:

DC-MP3
Page 23
Make sure the Old Firmware box in the Scheduling
/ Show Options section is NOT checked.
You can build up to nine (9) shows, their names are
Show01, Show02, … Show09. Use this window to
set up a single show.
In the Select When Show Plays section, check
“Show cannot be interrupted by input triggers” if you
don’t want other trigger activated shows to be able
to interrupt this show. A triggered show can not be
interrupted by its own trigger.
Under the Select When Show Plays section choose
one of the following options:
•Plays anytime powered – This show will be
one in possibly a list of shows that will play
when the DC-MP3 is powered. No trigger or
schedule is needed to start this show.
•Plays During Scheduled Time – This show
will play using a schedule you will set. When
you select this radio button, a “Set Show
DC-MP3
Page 24
Options” window will pop up to allow you to
set the schedule for this show.
•Plays When Triggered – This show will play
when its trigger input is activated. You have a
choice of six trigger inputs to assign to the
show and a choice of whether the trigger
switch is normally open or normally closed.
When you select one of the trigger inputs (1,
2, 3, 4, 5 or 6) the Show number is forced to
that switch number. I.e. Show03 will be used
for trigger input 3.
Plays Anytime Show
If you select this option, you will not be using either
scheduling or triggering for this show. Skip to the
Adding Sequences to the Show section.
Scheduled Show
If you select “Plays During Scheduled Time,” you will
see this window:

DC-MP3
Page 25
These are the default scheduling parameters. Click
the boxes next to any days for which you wish to
change the start/end times. Use the Start Hour/Min
and End Hour/Min sections to select the times you
want. Click the Change Selected Days button to
change the start/end times for the selected days.
To prevent the show from running on a particular
day set the Start Hour/Min and the End Hour/Min to
the same value.
To have shows run back to back, set the start time of
the second show to the end time of the first show.
Only one show can play at a time. If you schedule
two or more shows during the same time period,
precedence is given to the lowest numbered show.
When you are satisfied with your schedule, click the
OK button,
Use the Select How Show Plays section to choose
how the show will play during the scheduled time
periods. If you select…
•Loop though Showlist continuously –
Sequences in the show play in order and
repeat continuously from the start time until
the end time.
•Play through Showlist one time only –
Sequences in the show play in order one time
unless the time period is less than the show’s
length.
•Play show once per hour or ½ hour –
Sequences in the show play once per hour or
half-hour.
DC-MP3
Page 26
If you select either of Play through Showlist one time
only or Play show once per hour or ½ hour, then
you must choose what to do while the Showlist is not
playing during the scheduled time period. Use the
Action to take between shows section to select one
of:
•Lights On – all lights will be on between
shows
•Lights Off – all lights will be off between
shows
•Filler Seq – runs this sequence between
shows. This can only be an animation
sequence. Click the Select Filler Sequence
button to pick an animation sequence to use
between playing the Showlist sequences.
Note that if you have more than one unscheduled,
untriggered show and you want them to play in order
when no scheduled or triggered show is playing,
don’t use “Play through Showlist one time only.” If
you use this option, you will have specified what to
do when the show ends (Lights on, Lights Off or
Filler Sequence.) These options will prevent the
next unscheduled, untriggered show from starting.
Skip down to Adding Sequences to the Show.
Triggered Show
If you select “Plays when triggered,” you will see this
window:

DC-MP3
Page 27
Notice that two new option sections have appeared,
Select Switch Number and Trigger Switch Type.
Select one of the six radio buttons under “Select
Switch Number” to assign an input trigger to this
show. Select the radio button under “Trigger Switch
Type” for the switch type that you will be using to
start this show, either a normally open switch or a
normally closed switch. See the Interactive Inputs
and Interactive Trigger Connections sections for
more information on input triggers.
Triggered shows do not obey schedules. They run
when triggered.
Use the Select How Show Plays section to choose
how the show will play when triggered. If you
select…
•Loop though Showlist continuously –
Sequences in the show play in order and
repeat continuously.
DC-MP3
Page 28
•Play through Showlist one time only –
Sequences in the show play in order one
time.
•Play show once per hour or ½ hour – This is
ignored for triggered shows.
Adding Sequences to the Show
Use the MP3 Player Showlist section to add
sequences to the show.
•Add Sequence button to select a sequence
to add to this Showlist
•Remove Sequence button to delete the
selected sequence from the Showlist
•Move Up button to move a selected
sequence up in the Showlist
•Move Down button to move the select
sequence down in the Showlist
For example, click the Add Sequence button and
you will see a Open file box listing the sequences
loaded on you PC. The sequence file Open window
follows:

DC-MP3
Page 29
Choose a sequence from this list and click the Open
button. The sequence will be added to your show.
Repeat this process until all the sequences you want
in your show have been added. In the following
example, five sequences (and any associated music
files) have been added to the show:
DC-MP3
Page 30
When the Showlist has been constructed, you may
use the Optional Start Sequence section to select a
sequence that will start this show. This can be an
animation only or musical sequence. This sequence
runs at the start of the show. For Loop Continuously
and Play Showlist Once, this sequence plays once.
For scheduled shows, Play show once per… this
sequence plays at the start of each hourly/half-
hourly show.
Now that this show has been setup, you must select
some final options and transfer this show to the SD
memory card. Click the Create Show button and
you will see the following window:
If this show is started by a trigger input, the show
number will be grayed out and assigned by the
trigger input number. For “plays anytime” and
scheduled shows, you can pick a show number from
the Assign this show a number drop-down menu.
Use the Final Options section to select the following:

DC-MP3
Page 31
•Lock Step – This option causes the DC-MP3
to send all controller commands ahead of
time for the next time slice and then give a
global “everybody do their commands”
command. This has the effect of eliminating
the communication line delays when you
have a large number of controller/channels.
This is a recommended setting. This option is
not supported by CTB08 and MC-P cards and
requires firmware version 3.0 or above for 16
channel controller cards.
•Add file to SD card to set the MP3 player’s
internal clock – This option puts a file with the
current time on the SD card. The MP3 player
will set its real time clock to this time when the
SD card is inserted into the player for the first
time. Don’t take too long to transfer the card!
The MP3 player should be powered up for at
least 15 minutes before using this option so
that the backup capacitor will be fully charged
and can keep the real time clock going when
power is removed from the MP3 player.
•Comm Speed – Use these radio buttons to
select the RS485 communications line speed.
Use the slowest speed that successfully runs
your show. If the speed you select is not fast
enough to run your show, the red ELED will
light. This indicates that the DC-MP3 has
fallen at least one tenth of second behind in
getting controller commands out on the
RS485 network link.
Use the Select Drive with the SD card section to
choose the SD card. The drop-down menu will
default to the first removable drive on your system. If
DC-MP3
Page 32
you forgot to plug the SD card/SD card writer into
the PC, do it now and click the Refresh Drive List
button.
Finally, click the Place Show on the SD Card
button to write the current Show, Schedule and
possibly current time to the SD card. You will see
this window when it is done:
Repeat the above process for each show to be
transferred to the SD card.
Show Programming (Hardware Utility <1.6.4)
This section describes how to use older Hardware
Utility versions (1.5.8 to 1.6.3) to set up and
schedule show(s) for the DC-MP3. These Hardware
Utility versions do not support the trigger inputs. You
must have:
•At least version 2 of the DC-MP3 firmware,
see the section DC-MP3 Firmware Versions.
•Hardware Utility version 1.5.8 or later, see the
Hardware Utility Version section.
•The USB SD card reader/writer plugged into a
USB port on your PC with the SD card in it, or
have the SD card in your machine’s built in
reader/writer.
•It is not necessary to have the DC-MP3
connected to your PC to transfer a set of
scheduled shows to the SD card.

DC-MP3
Page 33
Start the LightORama Control Panel if it is not
running by clicking start ►All Programs ►
LightORama ►Light-O-Rama Control Panel. The
Light-O-Rama light bulb icon will appear in the
system tray on the lower right of your screen.
Start the Hardware Utility by right-clicking the Light-
O-Rama Control Panel light bulb and then selecting
Hardware Utility from the menu. You will see the
following window:
Click the LOR MP3 tab, you will see this window:
DC-MP3
Page 34
Make sure the Old Firmware box in the Scheduling
/ Show Options section is NOT checked.
You can build and schedule up to nine (9) shows,
their names are Show01, Show02, … Show09. Use
this window to set up and schedule a single show.
When you click the Create Show button later, a new
window will pop up allowing you to name this show
and set some other options.
Only one show can play at a time. If you schedule
two or more shows during the same time period,
precedence is given to the lowest numbered show.
The Select When Show Plays section provides two
options:
1. Play anytime powered – you will have to
provide a timer or switch to control power to
the DC-MP3
2. Play During Scheduled Time – you select the
days of the week and time period during
those days that the show plays

DC-MP3
Page 35
If you select Play During Scheduled Time then the
Set Show Options window will pop up. You can get
this window back later to make additional changes
by clicking the Schedule button. The Set Show
Options window follows:
These are the default scheduling parameters. Click
the boxes next to any days for which you wish to
change the start/end times. Use the Start Hour/Min
and End Hour/Min sections to select the times you
want. Click the Change Selected Days button to
change the start/end times for the selected days.
To prevent the show from running on a particular
day set the Start Hour/Min and the End Hour/Min to
the same value.
To have shows run back to back, set the start time of
the second show to the end time of the first show.
When you are satisfied with your schedule, click the
OK button,
DC-MP3
Page 36
Use the Select How Show Plays section to choose
how the show will play during the scheduled time
periods. If you select…
•Loop though Showlist continuously –
Sequences in the Showlist play in order and
repeat continuously from the start time until
the end time.
•Play through Showlist one time only –
Sequences in the Showlist play in order one
time unless the time period is less than the
Showlist length.
•Play show once per hour or ½ hour –
Sequences in the Showlist play once per hour
or half-hour.
If you select either of Play through Showlist one time
only or Play show once per hour or ½ hour, then
you must choose what to do while the Showlist is not
playing during the scheduled time period. Use the
Action to take between shows section to select one
of:
•Lights On – all lights will be on between
shows
•Lights Off – all lights will be off between
shows
•Filler Seq – runs this sequence between
shows. This can only be an animation
sequence. Click the Select Filler Sequence
button to pick an animation sequence to use
between playing the Showlist sequences.
Use the MP3 Player Showlist section to add
sequences to the show:

DC-MP3
Page 37
•Add Sequence button to select a sequence
to add to this Showlist
•Remove Sequence button to delete the
selected sequence from the Showlist
•Move Up button to move a selected
sequence up in the Showlist
•Move Down button to move the select
sequence down in the Showlist
For example, click the Add Sequence button and
you will see a Open file box listing the sequences
loaded on you PC. The sequence file Open window
follows:
Choose a sequence from this list and click the Open
button. The sequence will be added to your show.
Repeat this process until all the sequences you want
in your show have been added. In the following
example, five sequences (and any associated music
files) have been added to the show:
DC-MP3
Page 38
When the Showlist has been constructed, you may
use the Optional Start Sequence section to select a
sequence that will start this show. This can be an
animation only or musical sequence. This sequence
runs at the start of the show. For Loop Continuously
and Play Showlist Once, this sequence plays once.
For Play show once per… this sequence plays at the
start of each hourly/half-hourly show.
Now that this show has been setup and scheduled,
you must select some final options and transfer this
show to the SD memory card. Click the Create
Show button and you will see the following window:

DC-MP3
Page 39
Pick a Show number from the Assign this show a
number drop-down menu.
Use the Final Options section to select the following:
•Lock Step – This option causes the DC-MP3
to send all controller commands ahead of
time for the next time slice and then give a
global “everybody do their commands”
command. This has the effect of eliminating
the communication line delays when you
have a large number of controller/channels.
This is a recommended setting. This option is
not supported by CTB08 and MC-P cards and
requires firmware version 3.0 or above for 16
channel controller cards.
•Add file to SD card to set the MP3 player’s
internal clock – This option puts a file with the
current time on the SD card. The MP3 player
will set its real time clock to this time when the
SD card is inserted into the player for the first
time. Don’t take too long to transfer the card!
The MP3 player should be powered up for at
DC-MP3
Page 40
least 15 minutes before using this option so
that the backup capacitor will be fully charged
and can keep the real time clock going when
power is removed from the MP3 player.
•Comm Speed – Use these radio buttons to
select the RS485 communications line speed.
Use the slowest speed that successfully runs
your show. If the speed you select is not fast
enough to run your show, the red ELED will
light. This indicates that the DC-MP3 has
fallen at least one tenth of second behind in
getting controller commands out on the
RS485 network link.
Use the Select Drive with the SD card section to
choose the SD card. The drop-down menu will
default to the first removable drive on your system. If
you forgot to plug the SD card/SD card writer into
the PC, do it now and click the Refresh Drive List
button.
Finally, click the Place Show on the SD Card
button to write the current Show, Schedule and
possibly current time to the SD card. You will see
this window when it is done:
Repeat the above process for each show to be
transferred to the SD card.
Show Programming (DC-MP3 firmware 1.0)
This section describes how to transfer your show to
the DC-MP3 for the older firmware that does not
Table of contents