manuals.online logo
Brands
  1. Home
  2. •
  3. Brands
  4. •
  5. Lightspeed
  6. •
  7. Stereo System
  8. •
  9. Lightspeed TOPCAT User manual

Lightspeed TOPCAT User manual

Quick Start Guide
Remove microphone
from charger. Press
the mute button to
unmute, hold near
your mouth and
begin speaking.
Remove microphone
from charger and press
the mute button to
begin speaking.
USING THE FLEXMIKE
PAIRING MICROPHONES TO TOPCAT
CHARGE MICROPHONES NIGHTLY
USING THE SHAREMIKE
ALIGN WITH
COLLARBONE
TALK (BLUE)
MUTE (WHITE)
TALK (BLUE)
MUTE (WHITE)
POWER/MUTE BUTTON
ADJUST
VOLUME NORMAL OPERATION
CHARGING IN PROGRESS
CHARGING COMPLETE
POWER/MUTE
BUTTON
ADJUST
VOLUME
FIRST, ENSURE THE SYSTEM IS POWERED ON
When powered on, the white LED on the Topcat speaker panel will glow.
STATUS LIGHT
STATUS LIGHT
POWER STATUS
LIGHT
Place the microphones
into the cradle charger. The
power status light will glow
red when it is charging.
When charging is complete,
the power status light will
glow green.
It takes about 5-6 hours to
fully charge the microphone
battery.
Your system is shipped with microphones and base units pre-paired for quick and easy use.
If you ever need to pair new components, follow this pairing process:
FLEXMIKE
SHAREMIKE
IR TRANSMITTER
BACK FRONT
MIC 2
POWER
MIC 1
MIC 2
MIC 1
POWER
From a powered o state, point the IR
transmitter lens toward the base unit
(for Sharemike, the transmitter lens is
located on the back of the microphone).
POINT MICROPHONES AT TOPCAT
1
Press and hold the power button for
5 seconds until the Mic 1 and Mic 2 lights
start flashing, then release the button
and let the pairing process finish.
PRESS AND HOLD POWER BUTTON
2
The status light on Topcat will light
up indicating the pairing process is
complete. The Mic 1 or Mic 2 light on
the microphone will stay illuminated.
CONFIRM STATUS
3
Instructional Audio System
For complete operating instructions, go to www.lightspeed-tek.com/TCN-usermanual (or scan the 2D barcode). QSUS-
Audio can be connected using either a digital 2-way USB audio
or analog audio.
USB Audio
If locating and connecting to computer USB, Media Connector
will default to digital USB audio (3.5mm analog audio ports will
be disabled). USB audio enbles a 2-way audio link to:
Send audio from the computer to Topcat to ensure all audio
can be played through the Topcat speaker.
Send audio to the computer from Topcat to ensure the
teacher’s Flexmike and any student microphones are clearly
picked up by a video conferencing solution.
Adjust the volume as needed by pressing the
Audio Input selector and adjusting the level
knob as needed.
Analog Audio
Plug your external audio equipment (e.g., video
display) into one of the Audio input jacks.
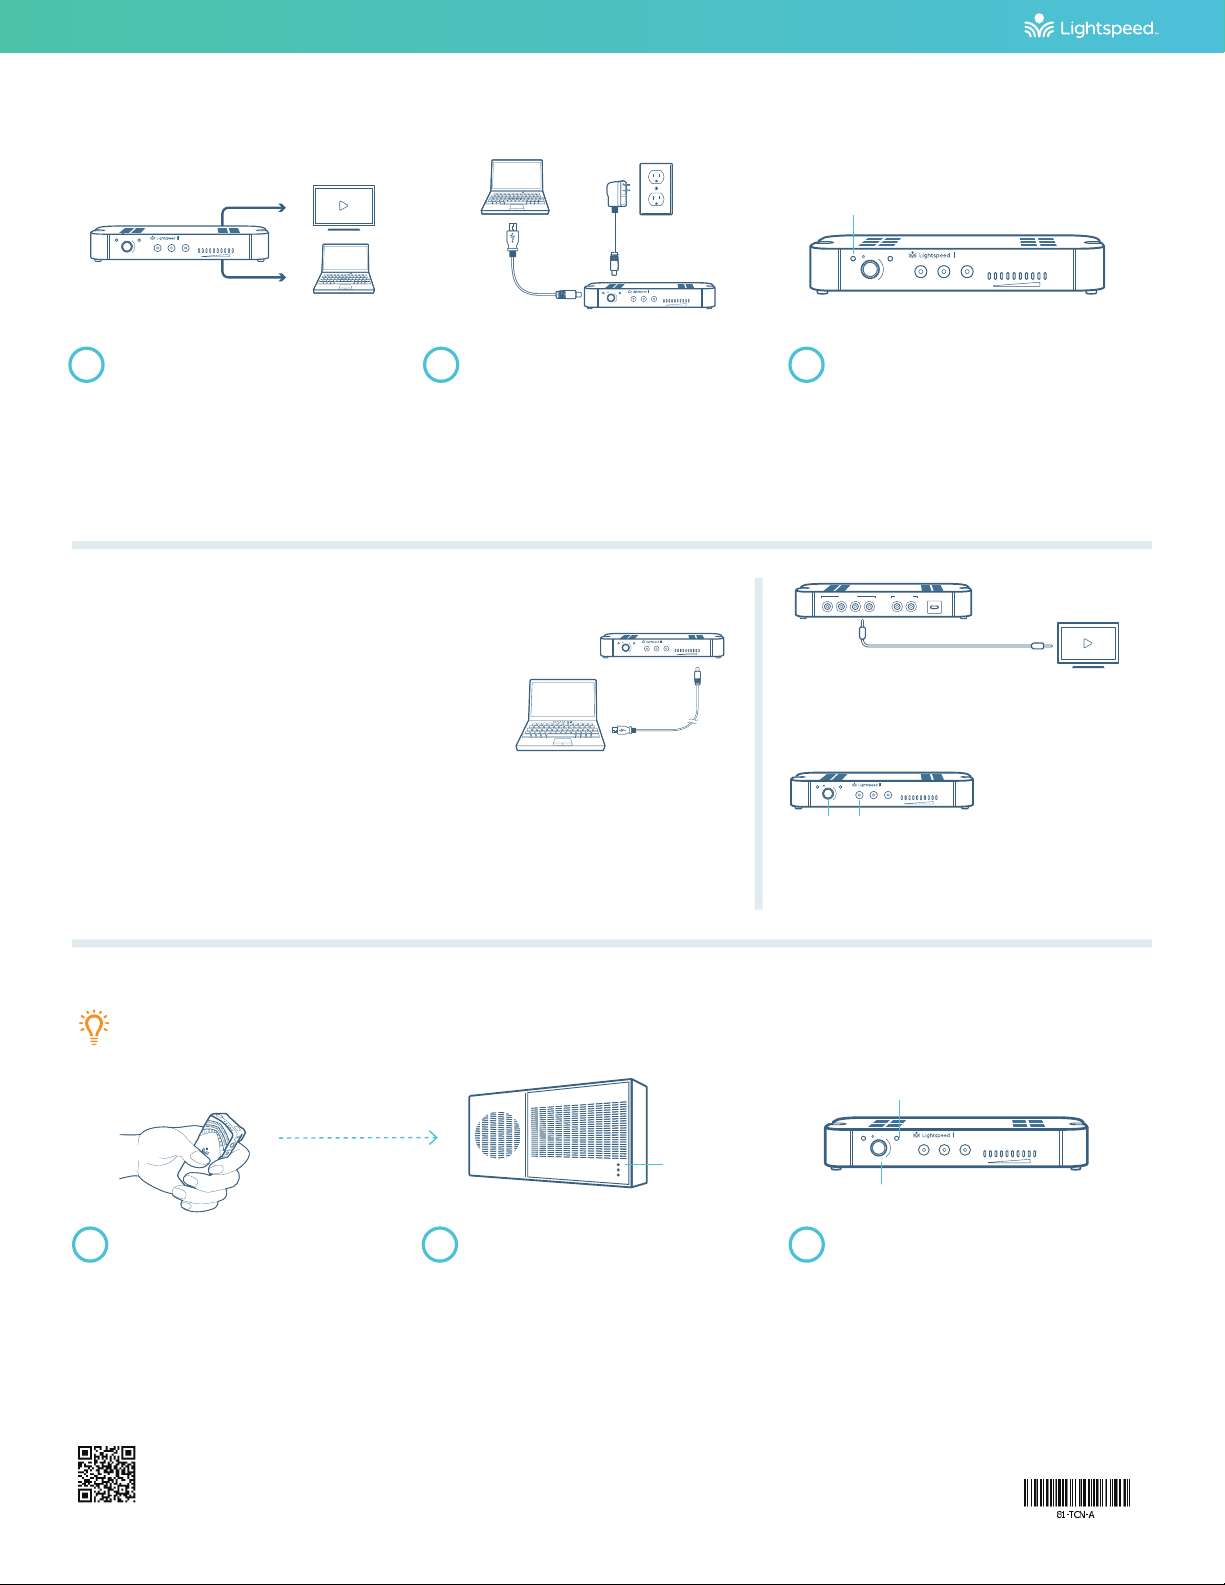
CONNECTING MEDIA CONNECTOR TO AUDIO
Quick Start Guide
DETERMINE LOCATION CONNECT TO POWER POWER ON
Connect the USB cable power cord
to a computer, or use the USB power
adapter to plug into wall outlet.
Plug the USB cable into the USB input
on the back of the Media Connector.
Media Connector is designed to be
connected to the primary media
source in the classroom, usually the
computer or display panel.
When powered on, the white LED on the front
panel will glow.
Topcat does not need to be powered o at the
end of day, but if desired, you may power down
Topcat by powering down the Media Connector.
Audio
InputAudio
OutputTone
Level
Push
StatusPower
Media
Media
Connector
Connector
Audio
InputAudio
OutputTone
Level
Push
StatusPower
Media
Media
Connector
Connector
POWER LIGHT
OR
PAIRING TOPCAT TO MEDIA CONNECTOR
Audio
InputAudio
OutputTone
Level
Push
StatusPower
Media
Media
Connector
Connector
AUDIO INPUT SELECTORLEVEL
COMPUTER SETTINGS
Once connected, open
computer sound setting to
select “Lightspeed Audio” as
the microphone and speaker.
Your system is shipped with microphones and base units pre-paired for quick and easy use.
If you ever need to pair new components, follow this pairing process:
FLEXMIKE PAIRING MODE TOPCAT STATUS MEDIA CONNECTOR PAIRING MODE
From a powered o state, point the IR
transmitter lens toward the base unit.
Press and hold the Flexmike
power button for 5 seconds until the
Mic 1 and Mic 2 lights start flashing,
then release the button.
1
At this point, the status light on
Topcat will blink for 30 seconds.
If aer 30 seconds the status light
blinks rapidly, you will need to start
the pairing process again.
2
With the Media Connector powered o,
press and hold the power button to put it
into pairing mode.
When the status lights are solid on both
Topcat and Media Connector, pairing is
successful.
3
USB
5V/ 0. 2A
Audio Inputs
432
1
Audio Outputs
2
1
.MM CABLE
USB-C
Audio
InputAudio
OutputTone
Level
Push
StatusPower
Media
Media
Connector
Connector
1 2 3
Topcat with optional Media Connector
Audio
Input Audio
Output Tone
Level
Push
StatusPower
Media
Media
Connector
Connector
MM eeddiiaa CCoonnnneecc ttoorr
FLEXMIKE
Audio
InputAudio
OutputTone
Level
Push
StatusPower
Media
Media
Connector
Connector
STATUS LIGHT
POWER BUTTON
STATUS LIGHT
Audio
Input Audio
Output Tone
Level
Push
StatusPower
Media
Media
Connector
Connector

Other manuals for TOPCAT

7

This manual suits for next models

1

Other Lightspeed Stereo System manuals

Lightspeed Mobile PA User manual

Lightspeed

Lightspeed Mobile PA User manual

Lightspeed Lightspeed User manual

Lightspeed

Lightspeed Lightspeed User manual

Lightspeed Redcat media User manual

Lightspeed

Lightspeed Redcat media User manual

Lightspeed TOPCAT User manual

Lightspeed

Lightspeed TOPCAT User manual

Lightspeed Redcat media User manual

Lightspeed

Lightspeed Redcat media User manual

Lightspeed 850iR User manual

Lightspeed

Lightspeed 850iR User manual

Lightspeed Redcat media User manual

Lightspeed

Lightspeed Redcat media User manual

Lightspeed 955Access User manual

Lightspeed

Lightspeed 955Access User manual

Lightspeed 820iR User manual

Lightspeed

Lightspeed 820iR User manual

Lightspeed Active User manual

Lightspeed

Lightspeed Active User manual

Lightspeed CAT 860 User manual

Lightspeed

Lightspeed CAT 860 User manual

Lightspeed Redcat media User manual

Lightspeed

Lightspeed Redcat media User manual

Lightspeed Topcat LSRCNG User manual

Lightspeed

Lightspeed Topcat LSRCNG User manual

Lightspeed RedcatAccess User manual

Lightspeed

Lightspeed RedcatAccess User manual

Lightspeed 880iR User manual

Lightspeed

Lightspeed 880iR User manual

Lightspeed Redcat media User manual

Lightspeed

Lightspeed Redcat media User manual

Lightspeed CAT 860 User manual

Lightspeed

Lightspeed CAT 860 User manual

Lightspeed flexcat User manual

Lightspeed

Lightspeed flexcat User manual

Lightspeed 975 User manual

Lightspeed

Lightspeed 975 User manual

Lightspeed TOPCAT User manual

Lightspeed

Lightspeed TOPCAT User manual

Lightspeed 975 User manual

Lightspeed

Lightspeed 975 User manual

Lightspeed Redcat Access LSRCA 1881 User manual

Lightspeed

Lightspeed Redcat Access LSRCA 1881 User manual

Lightspeed 955 Access User manual

Lightspeed

Lightspeed 955 Access User manual

Lightspeed flexcat User manual

Lightspeed

Lightspeed flexcat User manual

Popular Stereo System manuals by other brands

LG MCV1306 owner's manual

LG

LG MCV1306 owner's manual

Sony DHC-MD313 - System Rack operating instructions

Sony

Sony DHC-MD313 - System Rack operating instructions

AEG MC 4469 DAB+ instruction manual

AEG

AEG MC 4469 DAB+ instruction manual

auna Stereo Sonic DAB+ manual

auna

auna Stereo Sonic DAB+ manual

Sony GTK-X1BT operating instructions

Sony

Sony GTK-X1BT operating instructions

Philips NTX800 user manual

Philips

Philips NTX800 user manual

Kicker QSS65 owner's manual

Kicker

Kicker QSS65 owner's manual

Roland TD-7K Setting up

Roland

Roland TD-7K Setting up

RCA RS2693 user manual

RCA

RCA RS2693 user manual

Sanyo DXT 5004 Service manual

Sanyo

Sanyo DXT 5004 Service manual

Aiwa XR-C303RW operating instructions

Aiwa

Aiwa XR-C303RW operating instructions

Sony HCD-MC1 Service manual

Sony

Sony HCD-MC1 Service manual

Yamaha TSX-10 owner's manual

Yamaha

Yamaha TSX-10 owner's manual

Samsung Shape WAM-750 Getting started

Samsung

Samsung Shape WAM-750 Getting started

TeachLogic Maxim IRM-6650 installation manual

TeachLogic

TeachLogic Maxim IRM-6650 installation manual

Sharp XL-DV75HMKII Operation manual

Sharp

Sharp XL-DV75HMKII Operation manual

Philips DS9800W/93 Service manual

Philips

Philips DS9800W/93 Service manual

Aiwa NSX-V900 Service manual

Aiwa

Aiwa NSX-V900 Service manual

manuals.online logo
manuals.online logoBrands
  • About & Mission
  • Contact us
  • Privacy Policy
  • Terms and Conditions

Copyright 2025 Manuals.Online. All Rights Reserved.