Installing the Sensor
Carefully follow the instrucons in this secon in order
to install the Sensor. For other advice, please contact our
dedicated technical support team at www.lightwaverf.
com.
The easiest way to learn how to install the Lightwave
Smart Sensor is to watch our short installaon video
which is accessible at
www.lightwaverf.com/product-manuals
Creang Automaons
This PIR can be added to the Link Plus app as a Smart
Device. Once added you can then create an IF - DO or
a moon automaon to dene which devices within
your Lightwave system you want to trigger. Within this
automaon you can adjust the LUX (light) level and also
set a delay between your acons. (Please refer to the app
guide under Help & Support on the website for further
informaon: www.lightwaverf.com)
LITHIUM BATTERY CAUTION
Lithium ion baeries may explode or burn due to
improper use. Using these baeries for purposes not
intended by the manufacturer, may cause severe injury
and damage. Keep away from Children and animals.
Lightwave are not responsible for any damage or injuries
caused by baeries - use at your own risk. Please check
with your local authority on how to recycle baeries
responsibly.
23
Linking the Sensor & other funcons
Unlinking the Sensor (clear memory)
To unlink the Sm
art Sensor, delete any automaons you
have set-up and delete the device from the app under
the device sengs in the Lightwave app. Remove the
back cover of the device, press the ‘Learn’ buon once
and let go, then press and hold the ‘Learn’ buon again
unl the LED on the front of the device ashes red
rapidly. The memory of the device is cleared.
Firmware updates
Firmware updates are over-the-air soware
improvements that keep your device up to date as well
as providing new features. Updates can be approved
from the App before being implemented, and generally
take 2-5 minutes. The LED will ash cyan in colour to
indicate the update has been iniated but will remain o
for the remainder of the process. Please do not interrupt
the process during this me, it can take up to an hour.
Support
If any issues are encountered once set-up and installa-
on is completed, please contact Lightwave support via
www.lightwaverf.com/support.
Follow the in-app instrucons which
will explain how to link devices.
Remove the back cover of the Smart
Sensor using a screwdriver. Open the
Lightwave app on your smart device
and select ‘+’ to add a new device and
follow the instrucons.
Press the ‘Learn’ buon on the Smart
Sensor unl the LED ashes blue then
red on the front of the product. Then
press the green ‘Link’ buon on the app
screen. The LED will then rapidly ash
blue to indicate successful linking.
Linking
To be able to command the Sensor, you will need to link it
to the Link Plus.
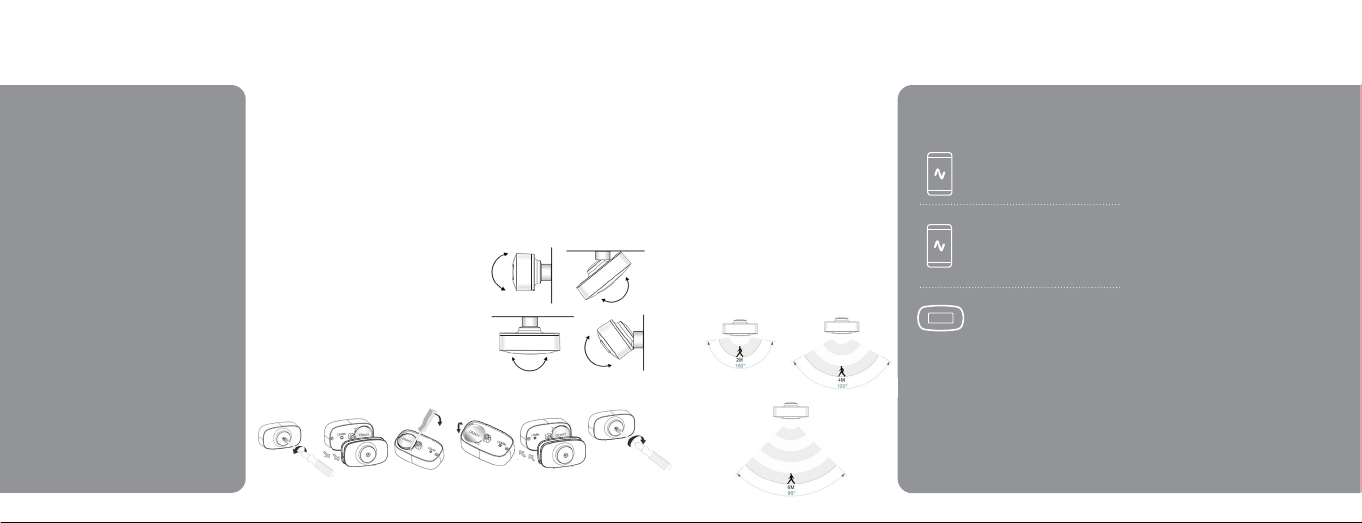
Inserng the baery
To insert the CR2477 coin cell into your device, rst
undo the screw by turning counter clockwise to remove
the back cover using a at head screwdriver (1). Then
remove the rear plasc and the spacer to reveal the
baery compartment. If replacing a baery (2&3), rst
remove the exisng baery before inserng the new
one, use a screw driver to li the old baery out if
necessary (4). To insert the baery, gently lt at an angle
towards the metal contact at the edge of the baery slot.
Ensuring the posive symbol (+) is facing upwards, with
very light pressure, push the baery down (5). Once the
baery is inserted correctly, the LED will ash green. If
installing this device for the rst me, complete linking
the Sensor now. Then, replace the spacer, followed
by the rear plasc (6) and ax by turning the screw
clockwise using a at head screwdriver (7).
When the Smart Sensor starts for the rst me, please
allow at least 15 seconds to allow the Sensor run it’s
inial set up to allow for moon detecon.
Inserng the baery and mounng
Follow the instrucons bel
ow to insert the CR2477 coin cell into the device. Then follow the linking instrucons to pair your device to your Link Plus. Ensure you mount the Sensor
following the guidelines for opmum performance.
1 5
Mounng on a vercal surface
Using a cross head screw driver, mount the magnec
base on a at surface. Gently aach the Sensor to
the magnec mount ensuring the Fresnel lens is
not upside down. (Looking closely at the Fresnel
lens, the larger rectangular boxes are at the top,
orientaon indicated on previous image). Adjust the
viewing angle to suit the environment you wish to
detect movement within.
476
Detecng Range and Viewing Angle
Recommendaon for opmum performance at 6
meters with a 90 degree viewing angle is for the
Sensor to be mounted at 1.5 meter height.
The sensivity of the Sensor can be adjusted in
the Lightwave app. Please be aware that when
you ‘save’ your sengs, the device will then be
updated with the new sensivity seng when
next triggered.
The Lightwave app now has a moon automaon
to allow for easier set-up. The ‘IF - DO’
automaon can also sll be used.
2 & 3