Back box
This Smart Socket requires a back box 35mm or more deep
in which to mount it. If you have a back box that is shallower
than 35mm, then the Lightwave spacer included can be
used to provide 7mm of extra clearance from the wall.
Help video & further guidance
For additional guidance, and to watch a video that will
help guide you through the installation process, please
visit the support section on www.lightwaverf.com.
Range
Lightwave Sockets should have an excellent
communication range within a typical home, however,
if you encounter any range issues, try to ensure that
large metal objects or bodies of water (e.g. radiator) are
not positioned in front of the Socket or in between the
Socket and the Lightwave Link Plus.
Locking Sockets
Lightwave Smart Sockets can be locked from the
Lightwave App so that they cannot be operated
manually. This is a great way help with family safety by
ensuring that dangerous appliances cannot be turned
on or off by small children.
Automations
Using the Link Plus and Lightwave App, you can
create custom automations for Lightwave devices.
Automations provide a whole host of clever features,
including timers, group actions, triggers and wireless
2-way switching. Find out more by exploring the
Lightwave App.
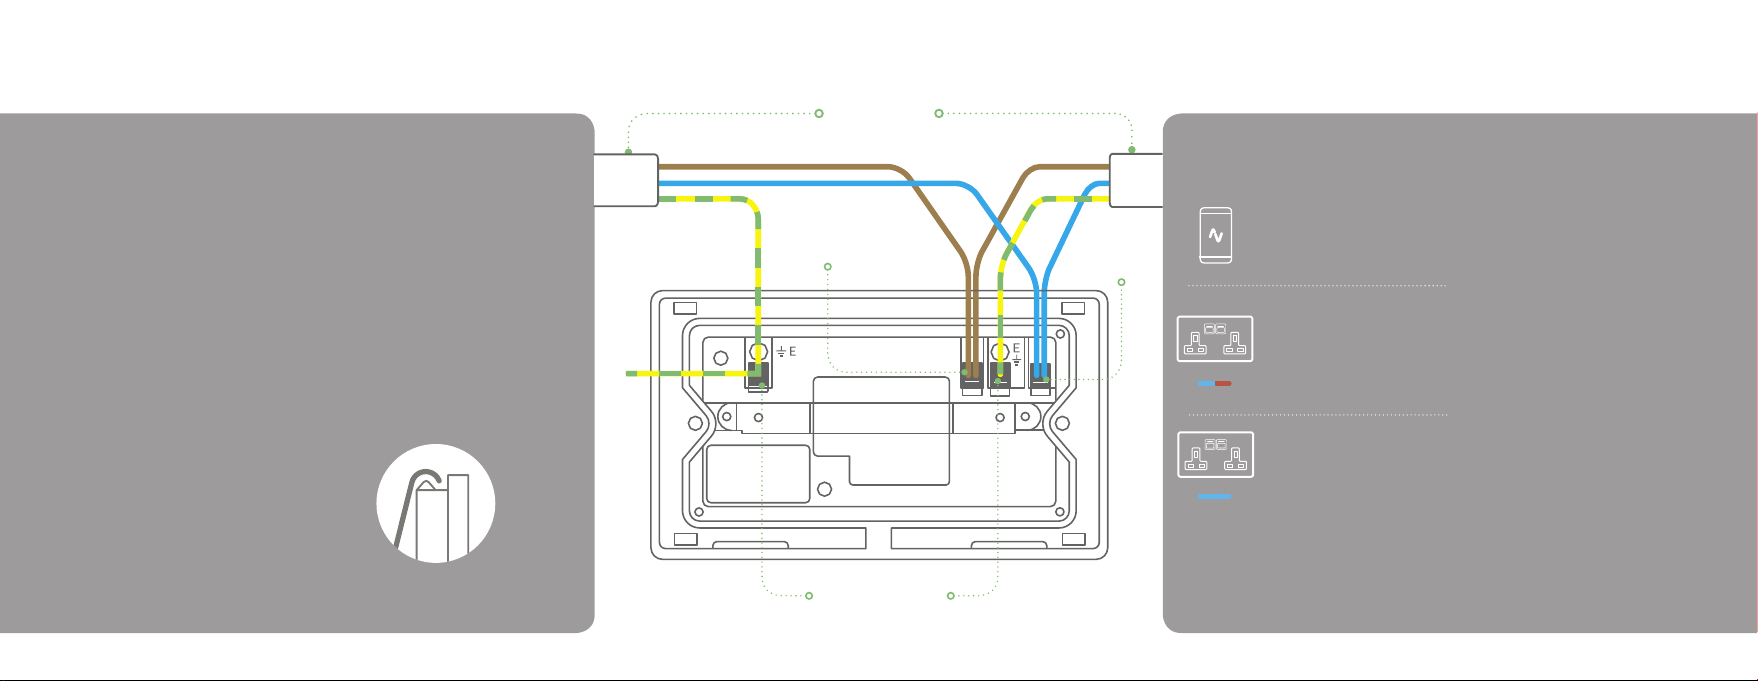
Installation
If you plan to install this product yourself, please follow
the electrical wiring instructions carefully to ensure the
product is installed safely, if in any doubt please consult a
qualied electrician.
It is important to install this product in accordance with
these instructions. Failure to do so may risk personal
safety, create a re hazard, violate the law and will also
void your warranty. LightwaveRF Technology Ltd will not
be held responsible for any loss or damage resulting from
not correctly following the instruction manual.
IMPORTANT: Any electrical installation must comply
with Building Regulations, BS 7671 (IET Wiring
Regulations) or local equivalent.
IMPORTANT: If conducting an insulation resistance test,
any hard-wired Lightwave devices must be disconnected
from the mains, or damage to the unit may occur.
Preparation
A back-box with a minimum depth of 35mm
Suitable electrical screwdrivers
Knowledge of how to safely turn off/on mains
electricity
Your Link Plus, smartphone and smart socket
You will need Faceplate Screwdriver slot
To remove the cover plate
RF frequency:
868 MHz
Input rating:
230V~ 50Hz
Back Box Depth:
35mm min
Warranty:
2 year standard warranty
Output rating:
3000W (13A)
Standby energy use:
Less than 1W
EU Declaration of Conformity
Product: Mains Socket
Model/Type: L42 / L42WH
Manufacturer: LightwaveRF
Address: Innovation Campus Birmingham, Faraday Wharf, Holt
Street, Birmingham, B7 4BB
This declaration is issued under the sole responsibility of
LightwaveRF. The object of the declaration described above is
in conformity with the relevant union harmonisation legislation.
Directive 2011/65/EU ROHS,
Directive 2014/53/EU:
(The Radio Equipment Directive)
Conformity is shown by compliance with the applicable
requirements of the following documents:
Reference and date:
EN301489-3 V1.6.1: (EMC), EN300220-2 V3.1.1 (RF),
EN62479:2010 (RF Exposure), EN60669-2-5:2013 (Safety),
BS1363-2:1995 (UK Safety)
Signed for and on behalf of:
Place of Issue: Birmingham
Date of Issue: 20th August 2017
Name: John Shermer
Position: CTO
Environmentally friendly disposal
Old electrical appliances must not be disposed of
together with residual waste, but have to be disposed
of separately. The disposal at the communal collecting
point via private persons is for free. The owner of old
appliances is responsible to bring the appliances to these
collecting points or to similar collection points. With this
little personal effort, you contribute to recycle valuable
raw materials and the treatment of toxic substances.
UK
1
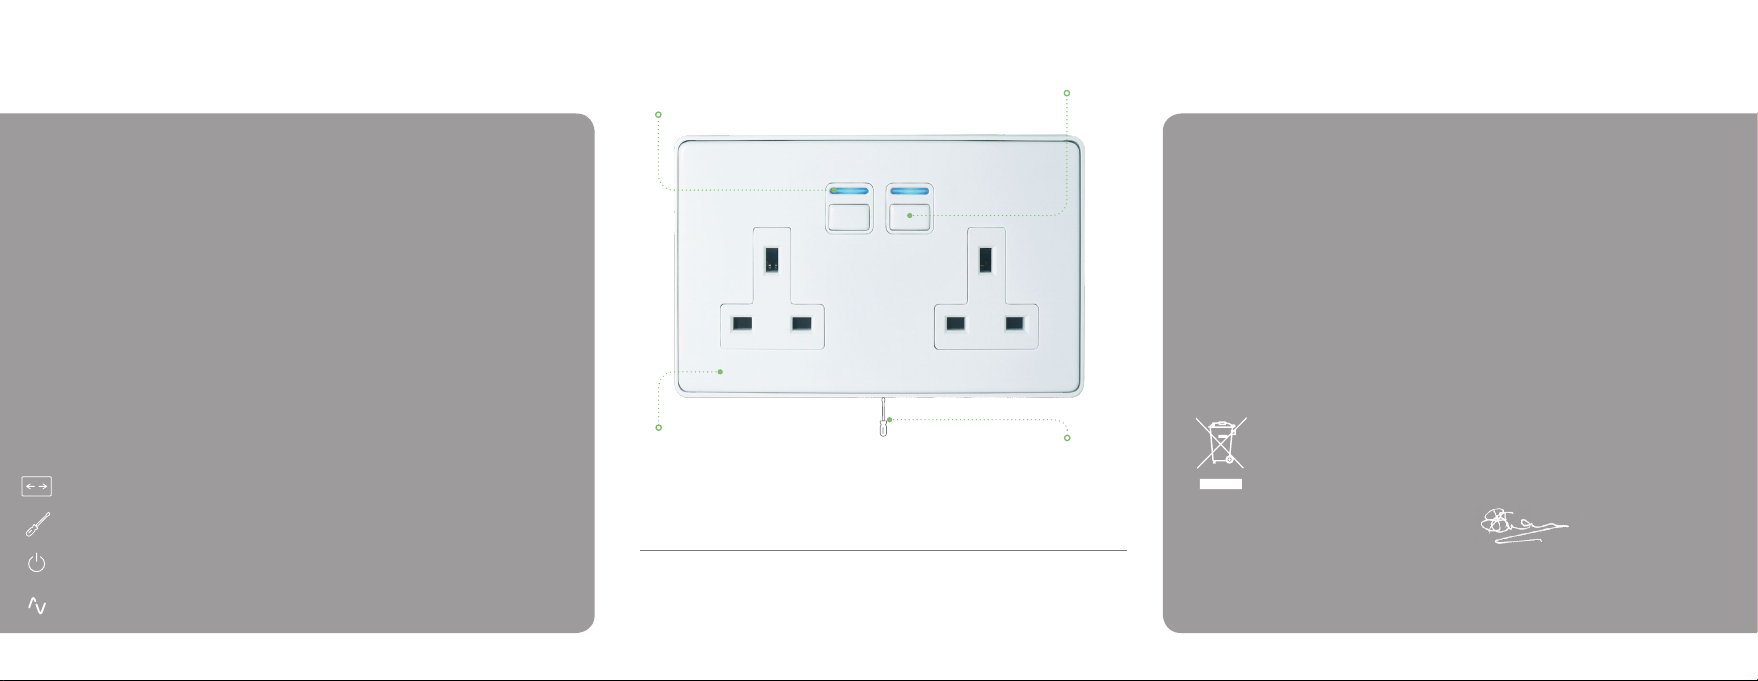
Specication
On/off buttonLED Indicator
Indicator light changes colour
to show the status of the socket
Note:The Socket LED will ash on
detecting the insertion or removal of
a mains plug