Lil' Rider 80-KB901 User manual


1.Step on the pedal and the motorcycle will move. And it will stop when you
release the pedal.
2.Front/back moving control: Push the forward switch, the motorcycle will
move forward.Push the backward switch, the motorcycle will move
backward. When the motorcycle moves, the front and back lights will
shine.
3.The car has 3.5mm input port for MP3 and other music sources.
LIST OF PARTS PACKED
TROUBLE SHOOTING:
Malfunction Check and Eliminate
Vehicle won’t move
Vehicle moves slowly
Vehicle can not be charged
Unusual sound
1.Take off the seat and check whether the fuse is damaged, if so, change
it. Fuse is installed in the fuse box outside of battery.
2.Check whether the battery wires are securely connected?
3.Check whether the motor or gearbox is damaged?
4.Check whether the car has a short circuit or the cable is disconnected.
1.Check whether the battery is fully charged?
2.Check whether the gearbox is damaged?
1.Check whether the fuse is damaged?
2.Check whether the charger or battery is damaged?
1.Gearbox may be damaged
FUNCTION AND OPERATION:
SPECIFICATIONS:
Battery:
Suitable age:
Maximum Weight:
Speed:
Dimension:
Charger:
Battery duration time:
6V, 4.5AH
3-8 years old
30KGS
3.5-4KM/HR
88 39 CM
Input 110V/220V 50-60HZ Output: DC 6V/500MA
× ×58
1-2 hours if fully charged (charges in 8-12 hours)
Charger
Sticker
(If necessary)
Manual
-1- -2-
FUSE REPLACEMENT:
OK Damaged
Only use 15A fuse to replace the damaged one.
Fire hazard! The fuse can not be reused.
Top cover
of tool box
Bottom cover
of tool box
Thin axle connecting
tool box cover
Seat
Tool box support Rear wheel cover
-2pcs
Rear wheel
-2pcs
Plastic sleeve pipe
Motor Rear shaft Bodywork Panel board
Windshield Mirror
-2pcs
Car head Front fork
Front fender Iron buckle Front wheel Front wheel shaft
M3*10:10pcs
M4*14:11pcs
Pin :2pcs
Washer:10pcs
Hardware List

1
23
4
5
7
9
11
12
14 15
16
17
18
19
20
13
6
8
10
21
22
-3- -4-
1
5
2
3
4
6
8
9
10
11
12
13
15
14
17
16
18
19
20
21
22
Top cover of tool box
Bottom cover of tool box
Thin axle connecting
tool box cover
Seat
Tool box support
Rear wheel cover -2
Rear wheel -2
Motor
Rear shaft
Bodywork
Panel board
Windshield
Mirror -2
Car head
Front fork
Front fender
Front wheel
Plastic sleeve pipe
Iron buckle
Front wheel shaft
Iron pin -2
Iron washer-10
7
PARTS PICTURE INSTALLATION
1.Insert the rear shaft into bodywork. On the left, connect one wheel to the
rear shaft. Pay attention to use iron washer in order to ll the gap. Then use
the iron pin to fasten it. Affix wheel cover to wheel. On the right, first connect
the electric plug. Then connect motor, plastic sleeve pipe, and wheel to the
rear shaft. Make sure the inside of wheel fits into the plastic sleeve pipe. Then
use the iron pin to fix it and put the wheel cover on the wheel. Pay attention
to use the iron washer in order to fill the gap.
2. Fix the tool box support to the body
with two screws (M4*14). Then use the
thin axle to connect the top cover and
the bottom cover to create the tool box.
Finally, use four screws (M4*14) to
attach the box on the support.

POINTS OF ATTENTION FOR CHARGING:
-5- -6-
3.Connect the battery wires , pay
attention to connect red to red, black
to black.
4.Fix windshield to car head with
five screws(M3*10).Fix mirrors to
car head with four screws(
M3*10).
5.Fix front fork with front fender and
front wheel. Then use the Iron
buckles fasten it.
6.Fasten the car head to the front
fork group with four screws
(M4*14).
7.Connect the panel board to the
head with bodywork. Fasten the
seat on bodywork with screw.
WARNING
INSTALLATION
1. When operating for the first time please open the seat and connect the
power wires with the battery, red to red and black to black, then cover them
with the seat. Incorrect connection will cause short circuit or malfunction.
2. Charging socket is in the front body. Continuous charging time shouldn’t
exceed 15 hours.
3. Please charge the car when its speed becomes slow. Battery will be dam-
aged if fully discharged.
4.If out of use for a long period of time, please charge fully before use. Charge
at least every 2 months to ensure the full service life of the battery.
5.It is normal for the charger and battery to heat up during charging.
6. Battery disposal should be handled by an adult. Don’t burn or disassemble
the battery. Please contact local waste removal for proper disposal.
7. Only use manufacturer approved charger and battery.

POINTS OF ATTENTION:
-7-
WARNING
01.This car must be installed and checked by an adult before use.
02.This car should be used under the supervision of an adult. This car is
not a traffic vehicle. It is strictly forbidden to be operated on streets,
roads, steps, slopes or near vehicles. The driver should wear shoes. The
number of drivers should not exceed one.
03.Please don't let children less than 3 years old operate.
04.Please check the car before using it every time in order to avoid injury.
05.Please teach the child how to operate the car before first use.
06. Please teach the child how to use the pedal and switches and how to
deal with the car when the car is stopped by an obstacle.
07.Please make sure the driver sits in the car comfortably before driving.
08.Please don't let other children near the car when the car is
moving. It is dangerous!
09. Do not use non-rechargeable batteries.
10. Please don't mix old and new batteries.
11. Battery should be put in the battery box in the correct position.
12. Please don’t mix alkaline, standard(carbon-zinc) and re-chargeable
batteries.
13.Please don't operate this car outside in inclimate weather.
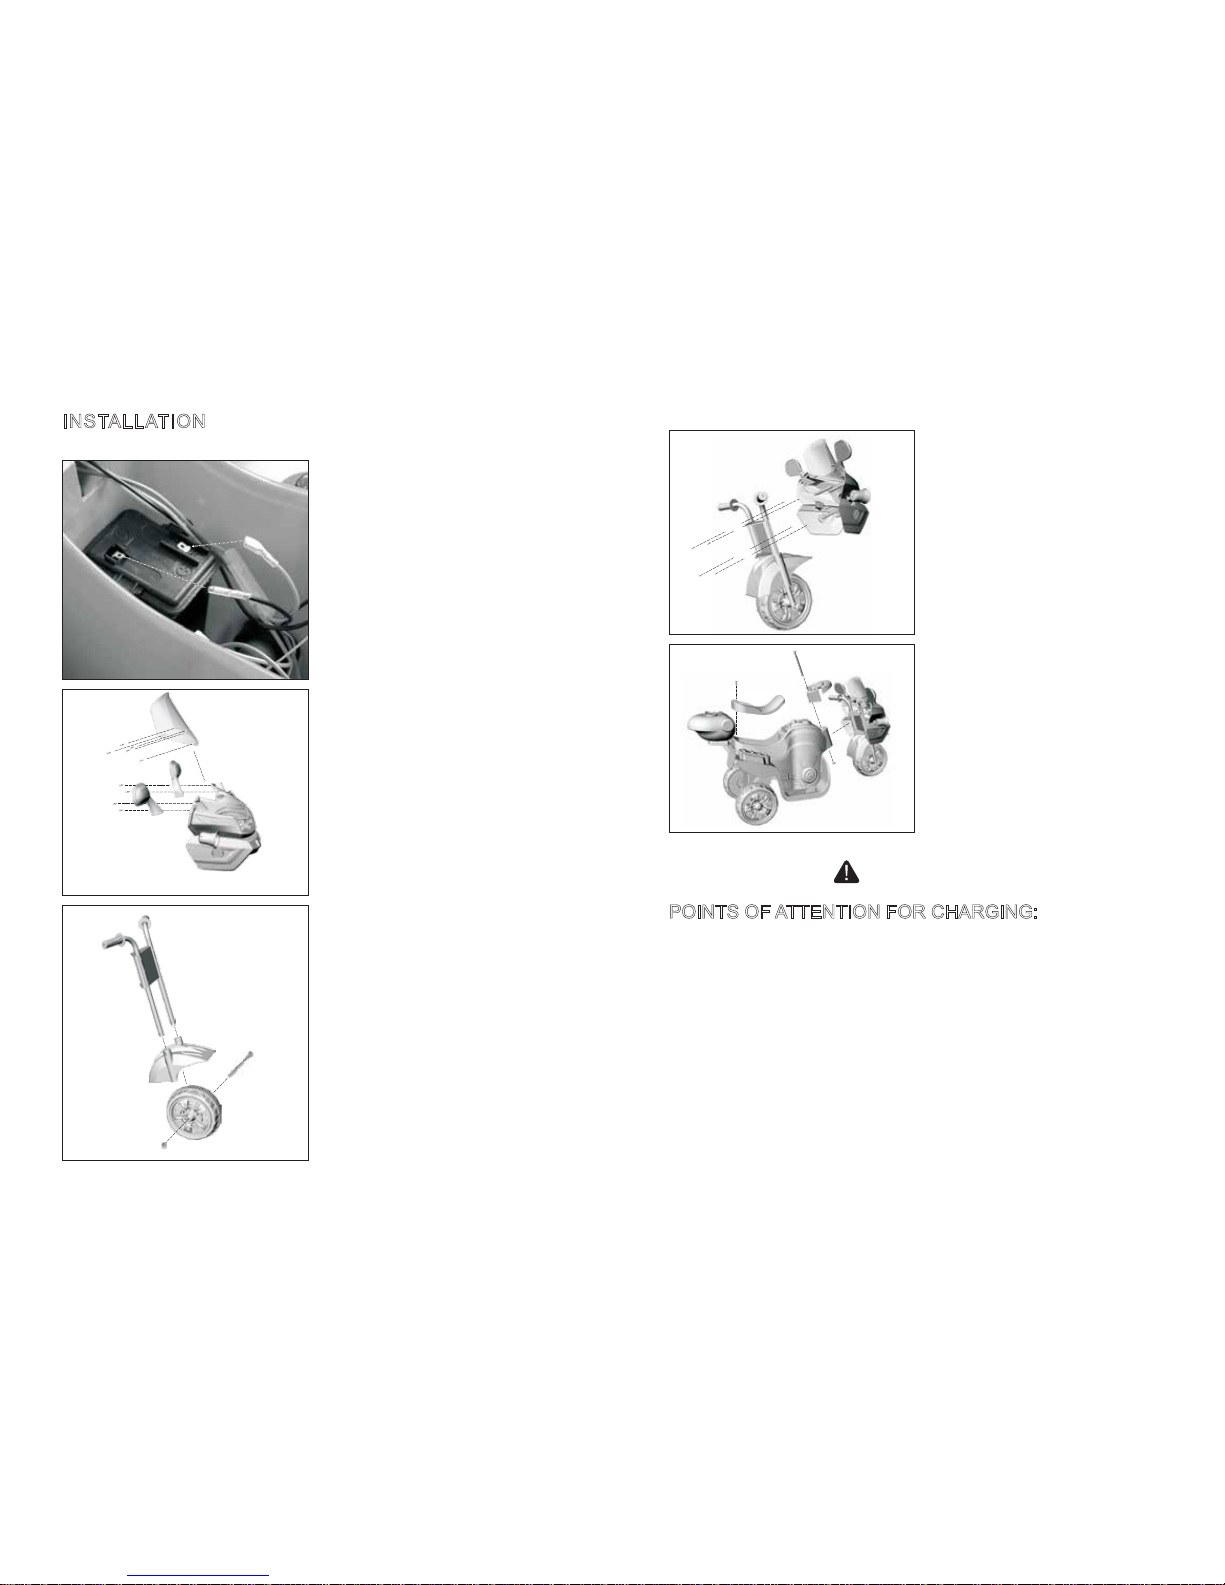
14.Please turn off the power switch when the car is not in use or being
charged.
15.Please clean this car with dry cloths, not water.
16.The electric cable, plug and other parts of charger should be checked
frequently. If anything is damaged please repair it before using.
17.The charger is not a toy; please don't let children play with it.
18.The battery should be charged by an adult.
19.Please don't change the forward and backward switch while moving.
The forward and backward should be changed when stopped.
Otherwise the gear-box and motor will be damaged.
20.Please put the car in a well ventilated place when the car is charging.
21.Short circuiting the battery creates a fire hazard!
22.Dispose of plastic bags to avoid choking hazard.
Table of contents
Popular Toy manuals by other brands

BARCLONE
BARCLONE Antares instruction manual

Mega Bloks
Mega Bloks minions Vampire Surprise manual

Eduard
Eduard U-boat VIIC/41 quick start guide

J-Power Group
J-Power Group Eurofighter Assembly and operating instructions

Flowtoys
Flowtoys Composite System manual

Playskool
Playskool Sit `n Spin 34891/34890 user manual

Hangar 9
Hangar 9 Pulse XT 60 ARF Assembly manual

Playskool
Playskool Bob the Builder 6809 instructions

Beyblade
Beyblade Driger S instructions

Century Helicopter Products
Century Helicopter Products Raven 30 V2 instruction manual

Kadee
Kadee The Coupler People Cushion 50 Foot PS-1 Box... Assembly instructions

Eduard
Eduard F-100C quick start guide