manuals.online logo
Brands
  1. Home
  2. •
  3. Brands
  4. •
  5. LIMAL
  6. •
  7. Indoor Furnishing
  8. •
  9. LIMAL VTS-CNLIC1231 User manual

LIMAL VTS-CNLIC1231 User manual

A3
420 x 297 mm
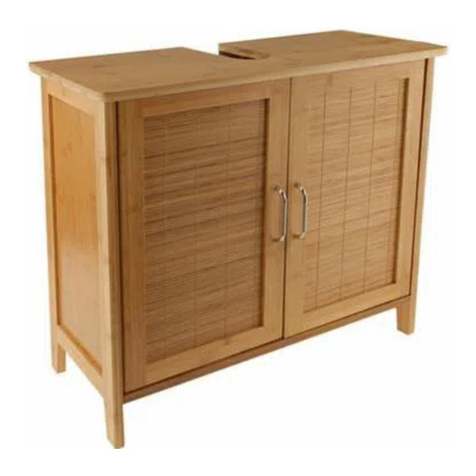
Schrank
Cabinet
VTS-CNLIC1231
[01] x 1 [02] x 1 [03] x 1
[04] x 1 [05] x 2 [06] x 1
[07] x 2 [08] x 1
[A] x 4 [B] x 12 [C] x 1
[D] x 4 [E] x 4 [F] x 4
[G] x 2 [H] x 8 [I] x 8
[J] x 4 [K] x 4 [L] x 20
[M] x 1 set [N] x 2 [O] x 1
DE
WICHTIG — HEBEN SIE DIESE INFORMATIONEN
FÜR EINE SPÄTERE VERWENDUNG AUF:
SORGFÄLTIG LESEN
EN
IMPORTANT — RETAIN THIS INFORMATION FOR
FUTURE REFERENCE: READ CAREFULLY
DE
Lieferumfang: Vergewissern Sie sich, dass in der Verpackung folgende Teile enthalten sind.
EN
Contents: Make sure that the package contains the following parts.
DE
Sie benötigen:
EN
You will need:
DE
DE
EN
EN
Reinigung und Wartung
• Reinigen Sie das Produkt mit einem leicht angefeuchteten Tuch und mit etwas
Reinigungsmittel. Lassen Sie es gut trocknen.
• Vermeiden Sie den Kontakt mit ätzenden Substanzen, wie Säuren, Laugen oder Ähnlichem.
Cleaning and Maintenance
• Clean the product with a slightly damp cloth and a little detergent. Let it dry thoroughly.
• Avoid contact with corrosive substances like acids, alkaline or similar.
Sicherheit und Konformität
• Warnung: Lassen Sie niemals Kinder auf das Produkt klettern oder mit ihm spielen.
• Kinder und Haustiere während der Montage des Produkts fernhalten.
• Das Gerät an einem trockenen, vor Feuchtigkeit geschützten und für Kinder
unzugänglichen Ort aufbewahren.
• Gehen Sie vorsichtig mit dem Produkt um.
• Für einen einfachen Zusammenbau sind zwei Erwachsene empfohlen.
• Kontrollieren Sie regelmäßig, ob alle Schraubverbindungen festgezogen sind und ob alle
Teile stabil montiert wurden.
• Schrauben und Scharniere müssen regelmäßig erneut festgezogen werden.
• Um Kratzer auf dem Fußboden zu vermeiden, bauen Sie das Produkt auf einer weichen
OberächewiezumBeispieleinemTeppichzusammen.
• Stellen Sie keine heißen Gegenstände auf dem Produkt ab.
• Legen Sie keine schweren Gegenstände auf dem Produkt ab.
• Verwenden Sie nur Reinigungsmittel, die für die Anwendung auf Holz geeignet sind.
• Überprüfen und vergewissern Sie sich vor dem Zusammenbau, dass die Teile richtig und
vollständig sind.
• Das Produkt muss auf einem ebenen und waagerechten Untergrund aufgestellt werden.
• Entzünden Sie unterhalb oder in der Nähe des Produkts kein Feuer!
• Nicht auf dem Produkt stehen oder sitzen.
• Kinder dürfen das Produkt nur unter Aufsicht von Erwachsenen verwenden.
Safety and Compliance
•  Warning: Do not let children climb on or play with the product.
• Keep children and pets away while setting up the product.
• Please store the product in a dry and clean area and out of reach of children.
• Handle with care.
• Two adults are recommended for ease of assembly.
• Regularly check if all screw connections are tight and if all parts are attached in a stable
way.
• Screws and joints should be re-tightened regularly.
• Toavoidscratchingtheoor,assembletheunitonasoftsurfacesuchasacarpet.
• Do not place extremely hot items on the product.
• Do not place extremely heavy items on the product.
• Clean only with detergents that are safe to use on wood.
• Check and make sure that the parts are correct and complete before assembly.
• Productshouldbeplacedonaathorizontalground.
• Donotlightanyresonorneartheproduct!
• Do not stand or sit on the product.
• Children should use the product under adult supervision only.
VTS-CNLIC1231-Limal-IM-V04.indd 1 30/3/2016 5:07 PM
[J]
[05]
[03]
[02]
[H]
[01]
[C]
[L]
[E]
[04]
[I] [H]
[L]
[K
01
02 04
03
DE
>Verwenden Sie 4 Schrauben [L], um den Magnetverschluss [C] an der oberen Verkleidung [01] zu befestigen.
>Ziehen Sie die 4 Befestigungsschrauben [E] an der oberen Verkleidung [01] fest.
EN
>Use4screws[L]toxthemagneticcatch[C]tothetoppanel[01].
>Screw down the 4 fastening screws [E] to the top panel [01].
DE
>Installieren Sie die Grundplatte [04] an der Baueinheit aus Schritt 2. Befestigen Sie die Grundplatte [04] unter Verwendung von
4 Dübeln [I] und 4 Schrauben [H].
EN
>Assemble the base board [04] to the body from step 2. Fix the base board [04] using 4 wood dowels [I] and 4 screws [H].
DE
>Bauen Sie die 2 Seitenverkleidungen [02, 03] und die rückseitige Montageplatte [05] zusammen. Sichern Sie diese Baueinheit
mit 4 Schrauben [H]. Befestigen Sie die dekorativen Platten [J] zum Abdecken der Schrauben [H]
EN
>Assemblethe2sidepanels[02,03]andthebackxingplate[05]together.Securethemwith4screws[H].Attachthedecorativediscs
[J] to cover the screws [H].
DE
>Verwenden Sie die Schrauben [L], um die Füße [K] an der Grundplatte [04] zu befestigen.
EN
>Usethescrews[L]toxthefeet[K]tothebaseboard[04].
[01] x 1
[C] x 1
[E] x 4
[L] x 4
[02] x 1
[03] x 1
[05] x 1
[H] x 4
[J] x 4
[04] x 1
[H] x 4
[I] x 4
[K] x 4
[L] x 16
VTS-CNLIC1231-Limal-IM-V04.indd 2 30/3/2016 5:07 PM
[M]
[M][08]
[N]
[D]
[D]
[O]
[01]
[G]
[08]
[I]
[F]
[A][06]
[B]
07]
05
06 08
07
DE
>Befestigen Sie die Scharniere [M] unter Verwendung der Schrauben [D] an der Tür [08]. Befestigen Sie die dekorativen Bleche [N] auf den
Scharnieren [M].
>Drücken Sie das Eckstück [O] auf die Tür [08].
EN
>Fix the hinges [M] to the door [08] using the screws [D]. Attach the decorative sheets [N] to the hinges [M].
>Press the corner attachment [O] to the door [08].
DE
>Befestigen Sie die 4 Stützbolzen [A] in den seitlichen Verkleidungen [02, 03]. Stecken Sie die Bolzen für einen sicheren Halt vollständig
hinein.
>Installieren Sie das Regal [06] auf den Stützbolzen im Schrank.
EN
>Attach the 4 props [A] to the side panels [02, 03]. Fully insert the props to secure them in place.
>Put the shelf [06] in. The props will sustain it.
DE
>Bauen Sie die Tür [08], die obere Verkleidung [01] und die Baueinheit aus Schritt 5 zusammen. Verwenden Sie die Gelenkkopplungen
[G] für die Türscharniere. Sichern Sie die obere Verkleidung [01] mit Dübeln [I], Halterungen [F] und Schrauben [E] (bereits an der oberen
Verkleidung montiert).
EN
>Assemble the door [08], top panel [01] and the body from step 5 together. Use the hinge couplings [G] for door hinges. Secure the top
panel[01with]dowels[I],fasteners[F]andscrews[E](alreadyxedonthetoppanel).
DE
>Verwenden Sie die Schrauben [B] zur Befestigung der 2 hinteren Platten [07]. Der Schrank ist nun vollständig installiert.
EN
>Usethescrews[B]toxthe2backboards[07].Thecabinetisassembled.
[08] x 1
[D] x 4
[M] x 1
[N] x 2
[O] x 1
[F] x 4
[G] x 2
[I] x 4
[06] x 1
[A] x 4
[07] x 2
[B] x 12
VTS-CNLIC1231-Limal-IM-V04.indd 3 30/3/2016 5:07 PM

Other LIMAL Indoor Furnishing manuals

LIMAL VTS-CNLI507 User manual

LIMAL

LIMAL VTS-CNLI507 User manual

LIMAL VTS-485E User manual

LIMAL

LIMAL VTS-485E User manual

LIMAL VTS-FB1979 User manual

LIMAL

LIMAL VTS-FB1979 User manual

Popular Indoor Furnishing manuals by other brands

impekk Manual II Assembly And Instructions

impekk

impekk Manual II Assembly And Instructions

Bolton Furniture AVAN24WHCC Assembly instructions

Bolton Furniture

Bolton Furniture AVAN24WHCC Assembly instructions

OOGarden.com 0195-0186 quick start guide

OOGarden.com

OOGarden.com 0195-0186 quick start guide

Tenzo 2763 Assembly instructions

Tenzo

Tenzo 2763 Assembly instructions

deVRIES Dasra Assembly instructions

deVRIES

deVRIES Dasra Assembly instructions

IKEA FORNBRO PEDESTAL TABLE 18" instructions

IKEA

IKEA FORNBRO PEDESTAL TABLE 18" instructions

Home affaire Hugo 669501 Assembly instructions

Home affaire

Home affaire Hugo 669501 Assembly instructions

AHB Home Furniture Series Assembly instructions

AHB

AHB Home Furniture Series Assembly instructions

Kaboodle W-51613 Accessories assembly instructions

Kaboodle

Kaboodle W-51613 Accessories assembly instructions

Wilhelm Schildmeyer 627150 Assembly instructions

Wilhelm Schildmeyer

Wilhelm Schildmeyer 627150 Assembly instructions

Made OSKAR Assembly manual

Made

Made OSKAR Assembly manual

GFW STOCKHOLM 3 DRAWER SLIM CHEST Assembly instructions

GFW

GFW STOCKHOLM 3 DRAWER SLIM CHEST Assembly instructions

DREAMS San Diego TV Bedstead Assembly instruction

DREAMS

DREAMS San Diego TV Bedstead Assembly instruction

College Bed Lofts Storage Drawers Assembly guide

College Bed Lofts

College Bed Lofts Storage Drawers Assembly guide

Artesano 24801 Assembling instructions

Artesano

Artesano 24801 Assembling instructions

IKEA SMAGORA 904.608.94 manual

IKEA

IKEA SMAGORA 904.608.94 manual

Costway HU10107 user manual

Costway

Costway HU10107 user manual

Safco MÜV Assembly instructions

Safco

Safco MÜV Assembly instructions

manuals.online logo
manuals.online logoBrands
  • About & Mission
  • Contact us
  • Privacy Policy
  • Terms and Conditions

Copyright 2025 Manuals.Online. All Rights Reserved.