LIMAL VTS-FB1979 User manual

A3
420 x 297 mm
DE
Lieferumfang: Vergewissern Sie sich, dass in der Verpackung folgende Teile enthalten sind.
EN
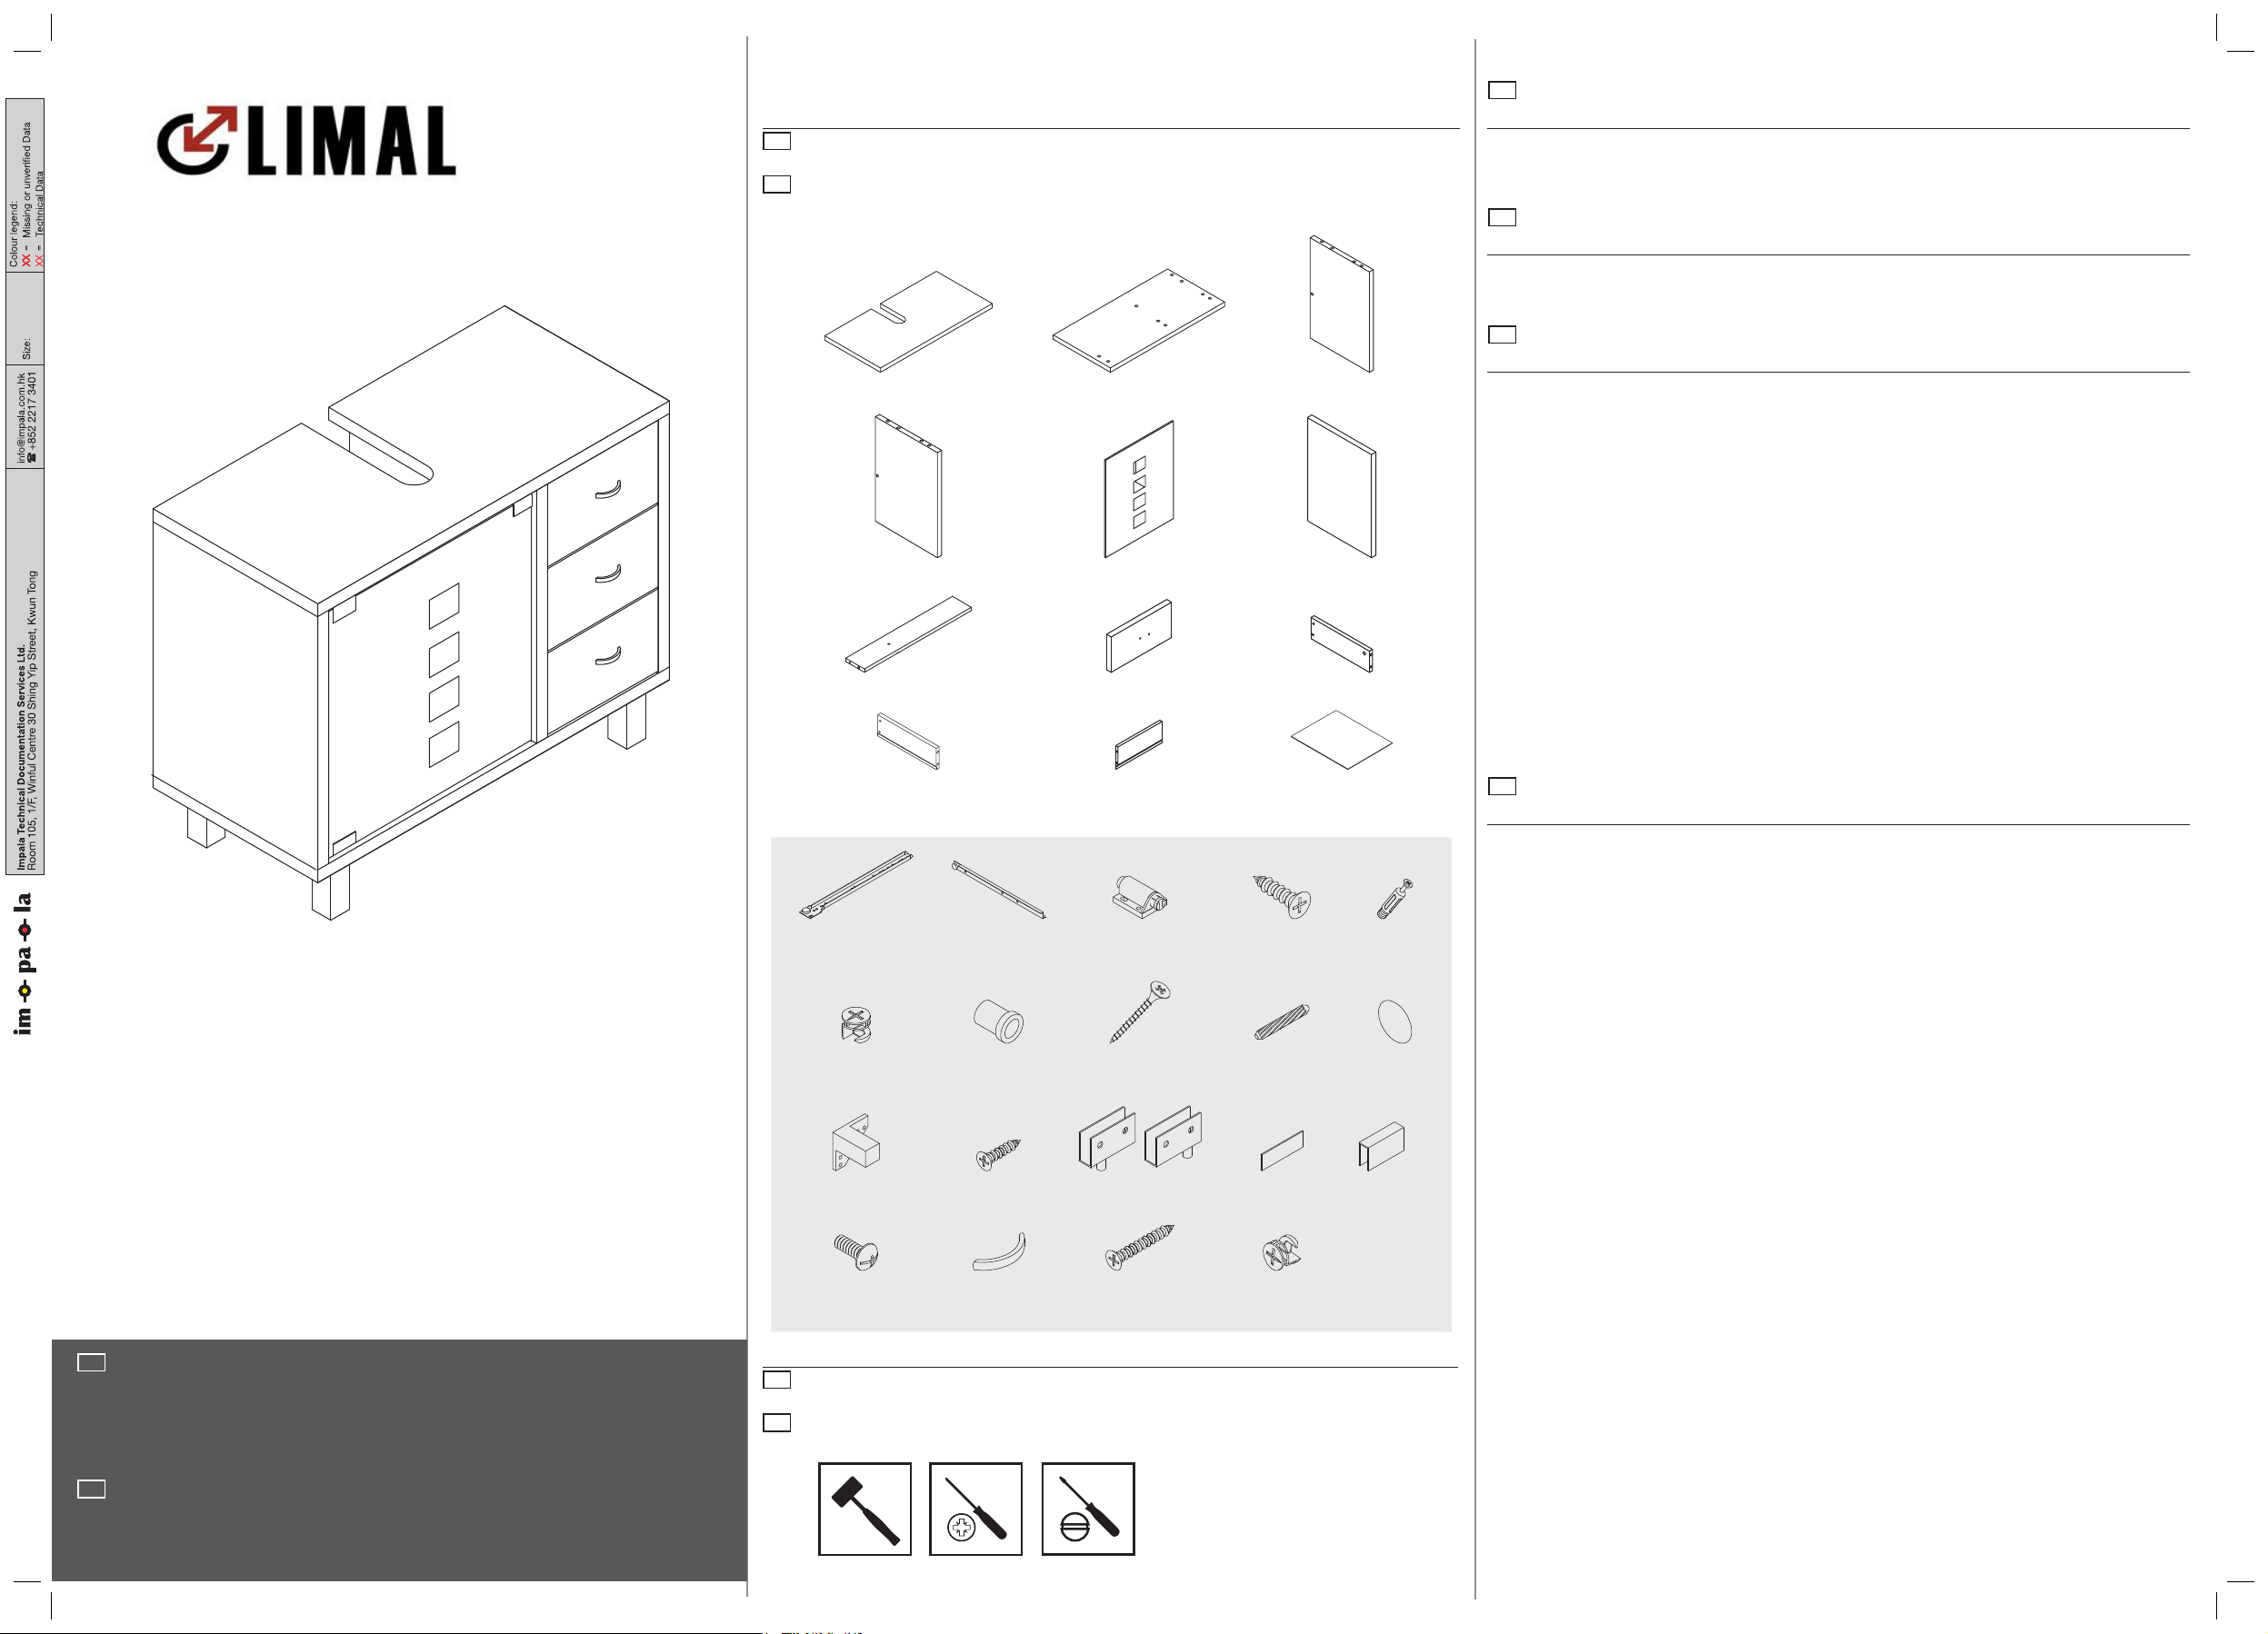
Contents: Make sure that the package contains the following parts.
VTS-FB1979
[01] x 1 [02] x 1 [03] x 1
[04] x 1 [05] x 1 [06] x 1
[07] x 1 [08] x 3 [09] x 3
[10] x 3 [11] x 3 [12] x 3
[A] x 6 [B] x 6 [C] x 1 [D] x 24
(12mm)
[E] x 12
[F] x 6
(Ø15mm)
[G] x 2 [H] x 21 [I] x 20 [J] x 2
[K] x 4 [L] x 20
(14mm)
[M] x 1 set [N] x 2 [O] x 1
[P] x 4 [Q] x 3 [R] x 6
(20mm)
[S] x 6
(Ø12mm)
Schrank
Cabinet
DE
Sie benötigen:
EN
You will need:
Reinigung und Wartung
• Reinigen Sie das Produkt mit einem leicht angefeuchteten Tuch und mit etwas
Reinigungsmittel. Lassen Sie es gut trocknen.
• Vermeiden Sie den Kontakt mit ätzenden Substanzen, wie Säuren, Laugen oder Ähnlichem.
Cleaning and Maintenance
• Clean the product with a slightly damp cloth and a little detergent. Let it dry thoroughly.
• Avoid contact with corrosive substances like acids, alkaline or similar.
Sicherheit und Konformität
• Warnung: Lassen Sie niemals Kinder auf das Produkt klettern oder mit ihm spielen.
• Kinder und Haustiere während der Montage des Produkts fernhalten.
• Das Gerät an einem trockenen und vor Feuchtigkeit geschützten Ort aufbewahren.
• Gehen Sie vorsichtig mit dem Produkt um.
• Für einen einfachen Zusammenbau sind zwei Erwachsene empfohlen.
• Kontrollieren Sie regelmäßig, ob alle Schraubverbindungen festgezogen sind und ob alle
Teile stabil montiert wurden.
• Schrauben und Scharniere müssen regelmäßig erneut festgezogen werden.
• Um Kratzer auf dem Fußboden zu vermeiden, bauen Sie das Produkt auf einer weichen
OberächewiezumBeispieleinemTeppichzusammen.
• Stellen Sie keine heißen Gegenstände auf dem Produkt ab.
• Legen Sie keine schweren Gegenstände auf dem Produkt ab.
• Verwenden Sie nur Reinigungsmittel, die für die Anwendung auf Holz geeignet sind.
• Überprüfen und vergewissern Sie sich vor dem Zusammenbau, dass die Teile richtig und
vollständig sind.
• Das Produkt muss auf einem ebenen und waagerechten Untergrund aufgestellt werden.
• Entzünden Sie unterhalb oder in der Nähe des Produkts kein Feuer!
• Nicht auf dem Produkt stehen oder sitzen.
• Kinder dürfen das Produkt nur unter Aufsicht von Erwachsenen verwenden.
Safety and Compliance
• Warning: Do not let children climb on or play with the product.
• Keep children and pets away while setting up the product.
• Please store the product in a dry and clean area.
• Handle with care.
• Two adults are recommended for ease of assembly.
• Regularly check if all screw connections are tight and if all parts are attached in a stable
way.
• Screws and joints should be re-tightened regularly.
• Toavoidscratchingtheoor,assembletheunitonasoftsurfacesuchasacarpet.
• Do not place extremely hot items on the product.
• Do not place extremely heavy items on the product.
• Clean only with detergents that are safe to use on wood.
• Check and make sure that the parts are correct and complete before assembly.
• Productshouldbeplacedonaathorizontalground.
• Donotlightanyresonorneartheproduct!
• Do not stand or sit on the product.
• Children should use the product under adult supervision only.
DE
DE
EN
EN
DE
WICHTIG — HEBEN SIE DIESE INFORMATIONEN
FÜR EINE SPÄTERE VERWENDUNG AUF:
SORGFÄLTIG LESEN
EN
IMPORTANT — RETAIN THIS INFORMATION FOR
FUTURE REFERENCE: READ CAREFULLY
VTS-FB1979-Limal-IM-V03.indd 1 22/3/2016 11:30 AM

[01]
[E]
[L]
[C]
[04]
[D]
[J]
[H]
[I][07]
[06] [03]
[04]
[02]
[I]
[H]
[A]
[06]
01
03
02
DE
>Bauen Sie die Platten [03, 04, 06, 07] zusammen. Sichern Sie sie mit 2 Holzdübeln [I] und 3 Schrauben [H].
>Decken Sie die Schrauben [H] mit den Dekokappen [J] ab.
EN
>Assemble the boards [03, 04, 06, 07] together. Secure them using 2 wood dowels [I] and 3 screws [H].
>Attach the decorative discs [J] to cover the screws [H].
DE
>Montieren Sie die 3 Führungsschienen [A] mit den Schrauben [D] an den Platten [04] und [06].
>Montieren Sie den Magnetschließer [C] mit den Schrauben [L] an der Abdeckplatte [01]. Schrauben Sie 6 Einschraubdübel [E] in die
Abdeckplatte [01].
EN
>Usescrews[D]tox3guideways[A]tothepanels[04]and[06]respectively.
>Usescrews[L]toxthemagneticcatch[C]totoppanel[01].Get6fasteningscrews[E]intothetoppanel[01].
DE
>Montieren Sie die Bodenplatte [02] an der Baugruppe aus Schritt 2. Sichern Sie die Bodenplatte mit 6 Dübeln [I] und 6 Schrauben [H].
EN
>Assemble the base board [02] to the body from step 2. Secure the base board with 6 dowels [I] and 6 screws [H].
[01] x 1
[04] x 1
[06] x 1
[A] x 6
[C] x 1
[E] x 6
[D] x 12
[L] x 4
[07] x 1
[03] x 1
[I] x 2
[H] x 3
[J] x 2
[H] x 6
[I] x 6
VTS-FB1979-Limal-IM-V03.indd 2 22/3/2016 11:30 AM
[02] x 1

[K]
[G]
[G] [01]
[O]
[05][M] [P]
[N]
[L]
[I]
04
05 07
06
DE
>Montieren Sie die 4 Füße [K] mit den Schrauben [L] an der Bodenplatte [02].
EN
>Fix the 4 feet [K] to the base board [02] with the screws [L].
DE
>Montieren Sie eine Scharnierhülse [G] an der Boden- [02] und Abdeckplatte [01].
EN
>Attach one hinge coupling [G] to the base board [02] and one to the top panel [01].
DE
>Stecken Sie jeweils 2 Dübel [I] in die Platten [03, 04, 06].
EN
>Insert 2 dowels [I] to the boards [03, 04, 06] respectively.
DE
>Montieren Sie die Scharniere [M] mit den Schrauben [P] an der Tür [05]. Bringen Sie die Dekoabdeckungen [N] an den Scharnieren [M]
an.
>Schieben Sie den Kantenaufsatz [O] auf die Tür [05].
EN
>Fix the hinges [M] to the door [05] using screws [P]. Attach the decorative sheets [N] to the hinges [M].
>Press the corner attachment [O] to the door [05].
[L] x 16
[K] x 4
[I] x 6
[G] x 2
[M] x 1 set
[O] x 1
[N] x 2
[05] x 1
[P] x 4
VTS-FB1979-Limal-IM-V03.indd 3 22/3/2016 11:30 AM

[F]
[01]
[05]
[H]
[S]
[E]
[11] [12]
[Q][I]
[R]
[10]
[09]
[08]
[D]
[B]
08
09
10
DE
>Bauen Sie die Tür [05], Abdeckplatte [01] und die Baugruppe aus Schritt 6 zusammen. Verwenden Sie 6 Exzenterverbindungen [F], um
die Abdeckplatte [01] zu sichern.
EN
>Assemble the door [05], top panel [01] and the body from step 6 together. Use the 6 fasteners [F] to secure the top panel [01].
DE
>Bauen Sie die Platten [09, 10, 11] mit den Schrauben [H] zusammen. Montieren Sie die Führungsschienen [B] mit den Schrauben [D] an den Platten
[09,10].MontierenSiedieGrie[Q]mitdenSchrauben[R]andenPlatten[08].SchiebenSiedieBodenplatte[12]indieNutenderPlatten[09,10].
>Montieren Sie die Platte [08] mit den Dübeln [I], den Einschraubdübel [E] und den Exzenterverbindungen [S].
EN
>Assemble boards [09, 10, 11] together using screws [H]. Fix guideways [B] to boards [09, 10] using screws [D]. Fix handles [Q] to boards
[08] using screws [R]. Slide the bottom board [12] in the grooves of boards [09, 10].
>Assemble the board [08] using the dowels [I], fastening screws [E] and fasteners [S].
DE
>Schieben Sie die drei montierten Schubladen in den Schrank. Der Schrank ist fertig zusammengebaut.
EN
>Slide the 3 assembled drawers in. The cabinet is assembled.
[F] x 6
[09] x 3
[11] x 3
[B] x 6
[D] x 12
[H] x 12
[R] x 6
[S] x 6
[Q] x 3
[E] x 6
[I] x 6
[10] x 3
[12] x 3
[08] x 3
VTS-FB1979-Limal-IM-V03.indd 4 22/3/2016 11:30 AM
Table of contents
Other LIMAL Indoor Furnishing manuals
Popular Indoor Furnishing manuals by other brands

Furniture of America
Furniture of America YNJ-15410C5 Assembly instructions

Vladon
Vladon Nandini 0184-01 user manual

emob
emob TOULON 01 Assembly instructions

GoodHome
GoodHome atomia 5059340009247 installation instructions

Klaxon
Klaxon G0223IT0175 installation guide

Otto
Otto Flip Shelves Narrow 40923 Assembly instructions