Limbic Media Aurora SE User manual

1
NOV 2019 v3
USER MANUAL
For Software Version 1.9.0

2

3
Introduction 4
Guide Overview 5
About Aurora SE 6
Features 5
LED Fixture Types Supported 6
Maximum Lights Supported 6
Aurora SE Connector Interface 7
Prepare for an Installation 8
Power Aurora SE ON/OFF 8
NDB Basics 8
LED Pixel Constraints 9
NDB Data Limitations 9
NDB Port Limits 9
Voltage Drop 9
Power Supply 10
Reset and NDB 10
Installing Aurora SE 11
Install Aurora SE with a Single NDB 11
Install Aurora SE with Multiple NDBs 12
Install Aurora SE with NDBs and Power Top-Ups 13
Connect and Calibrate Audio Inputs 14
Connect Aurora SE to a Consumer Audio Device 14
Using DMX 512 With Aurora 16
Set Up DMX IN 16
Set Up DMX OUT 17
Upgrade Aurora SE software 18
Appendices 19
Troubleshooting 20
Aurora DXM 512 Specification 21
Extended Modes of Interaction 22
Aurora SE Specifications 23
Outdoor Enclosure Measurements 24
SE Measuremnts 25
Aurora SE Power Best Practices 26
Electrical Safety 29
TABLE OF CONTENTS

4
INTRODUCTION
Aurora SE is a plug-and-play sound reactive lighting controller. Aurora analyzes
audio in real-time to generate dynamic lighting designs.
Innovate in your industry. Public spaces are seeking new ways to connect people
in an increasingly digital world. Choose sophisticated interactive lighting that
engages audiences and positions you as an innovator.
Connect people. Spark deeper connections with a “heads-up” social platform.
Encourage audiences to create lasting memories with their voices, motions, and
social media interactions. Increase visitor turnout and keep audiences coming back
for more.
Avoid unnecessary costs and steep learning curves. Nobody should have to hire
programming experts to create memorable experiences. Aurora creates interactive
lighting out-of-the-box. Easily customize lighting eects using the Aurora Mobile
App. Reconfigure the platform to reinvent displays year after year.
The Aurora SE Manual is designed for non-technical users installing interactive
lighting for the first time, as well as experienced technicians integrating Aurora SE
with protocols like DMX 512, KiNET or Art-Net.

5
GUIDE OVERVIEW
The Aurora SE Manual describes:
• How to navigate the Aurora SE connector interface
• Basic installation preparations
• How to set up typical Aurora SE lighting configurations
• How to upgrade Aurora SE software
• Aurora SE Specifications, best practices, and troubleshooting
Pro-Tip:
Reading the Aurora SE Quick Start Guide is highly recommended before
reading this manual.
Questions?
Additional support for Aurora SE is available at support.limbicmedia.ca
View other documents at support.limbicmedia.ca/guidesmanuals/

6
ABOUT AURORA SE
Features
• Portable lighting controller
• Uses patented sound-responsive algorithms
• Creates 2D and 3D-mapped patterns
• Oers easy pattern and palette based customization from the free Aurora
Mobile App or using DMX control
• Available line-in and mic level audio input devices
• Controls up to 25,000 LED pixels
LED Fixture Types Supported
Aurora SE primarily uses NDBs (Network Distribution Boxes) to control LED pixel
strands. Installers can take advantage of our extensive catalog of LED fixtures and
accessories to scale up installation. Refer to the Aurora Product Guide for a detailed
list.
Aurora SE supports other lighting equipment using industry standard protocols such
as DMX512, ArtNet1 , sACN1 , or KiNet1 LED fixtures. These can be used alone or in
conjunction with natively supported LED fixtures.
Maximum Lights Supported
Control up to 25,000 LED pixels using NDBs and natively supported LED fixtures.
Refer to Aurora SE Power Best Practices Appendix to troubleshoot LED pixel
constraints.
1 Contact Limbic Media for details.

7
AURORA SE CONNECTOR INTERFACE
The Aurora SE connector interface allows for the connection of power, sound
interfaces, and lighting control interfaces.
1. Power connector
The Power Connector is used to connect Aurora SE to its 19V power supply.
2. USB Connectors
Aurora SE has four USB Ports, two on the back and two on the front. The USB ports
are used to connect Aurora SE to external sound interfaces, and external lighting
interfaces. They can also be used to charge a mobile device in a pinch.
3. Ethernet Connector
The Ethernet Connector is used to connect Aurora SE to NDBs in order to control
LED pixels.
4. Unused
2 THRU is labeled OUT on older models of Aurora
19V
1 2 34

8
PREPARE FOR AN INSTALLATION
It is important to plan your lighting configuration before installing Aurora
SE. Ensure all fixtures are accounted for prior to installing. Connecting and
testing configurations in an accessible area prior to final installation is highly
recommended.
Included Components
• Aurora SE
• 120VAC to 19VDC Power adapter
• Aurora SE Quick Start Guide
Power Aurora SE ON/OFF
Required Components
• Aurora SE
• 120 VAC to 19 VDC Power adapter
Method
1. Connect the included 19 VDC power supply to Aurora SE’s Power Connector
2. Plug the 19 VDC power supply into a 120 VAC power source
3. Wait 60s for Aurora SE to power ON
4. Disconnect the 19 VDC power supply from AC power to power Aurora SE OFF
NDB Basics
NDBs (Network Distribution Boxes) allow Aurora SE to control LED pixels. Most
Aurora SE Installations will primarily use NDBs to drive their LED pixels, so
understanding how they work is an important first step to setting up your Aurora SE
installation.
NDBs accept lighting data from Aurora, and power from a 12VDC or 24VDC power
supply. They distribute power and data across their 16 ports in order to provide
power and a control signal to each LED pixel strand. NDBs can be used with or
without power top ups or smart Ts to achieve a variety of configurations that can be
tailored to any environment.
Caution:
Do not connect LED pixels while the NDB is connected to power.

9
LED Pixel Constraints
NDBs can drive a limited number of LED pixels. This limitation depends on a
number of factors. Be aware of your system’s limitations while you install.
NDB Data Limitations
Due to data limitations, NDBs can control an absolute maximum of 1000 LED pixels.
NDB Port Limits
NDP Ports have a maximum number of lights that they can support. If your NDB is in
16-Port mode, as it comes from the factory, it can support a maximum of 230 pixels
per port. If it is in 8-port mode, it can support a maximum of 460 LED pixels per port.
Voltage Drop
Due to the voltage drop along a strand of LED pixels, the maximum length of a run
of LED pixels is governed by its length, or by its number of LED pixels, whichever
comes first. The maximum number of LED pixels is 80 pixels / 80ft for Triklit style
fixtures, or 100 pixels / 100ft for all other fixtures. These runs can be extended
using Power Top-Ups to achieve the maximum lights per port specified under the
previous heading. Keep in mind that if you are installing a leader cable run longer
than 15’, you will need to make use of a send/receive pair and a 4-pin leader cable
to avoid data degradation.
Caution:
Make sure your power supply output voltage matches the voltage required by
your LED pixels.
1. Ethernet Port
2. Power supply terminals
3. LED Ports
4. Reset button
3
1
4
2
2

10
Power Supply
When installed correctly, each NDB is paired with a power supply and a set of LED
pixels. The Power Supply should always be able to supply more power than the
LED pixels draw. For most 12 V systems, each LED pixel will draw 30 mA or 0.03 A.
Here’s an example calculation that shows how many LED pixels you can run using a
16 A Power Supply.
So, for this example, our 16 A Power Supply can drive up to 533 pixels, however,
it’s important to leave yourself some wiggle room to account for unforeseen
circumstances. We suggest leaving a 25% safety margin, therefore, we would
suggest loading your 16A power supply with no more than 400 LED pixels. Refer to
the Aurora SE Power Best Practices section of this manual for more information.
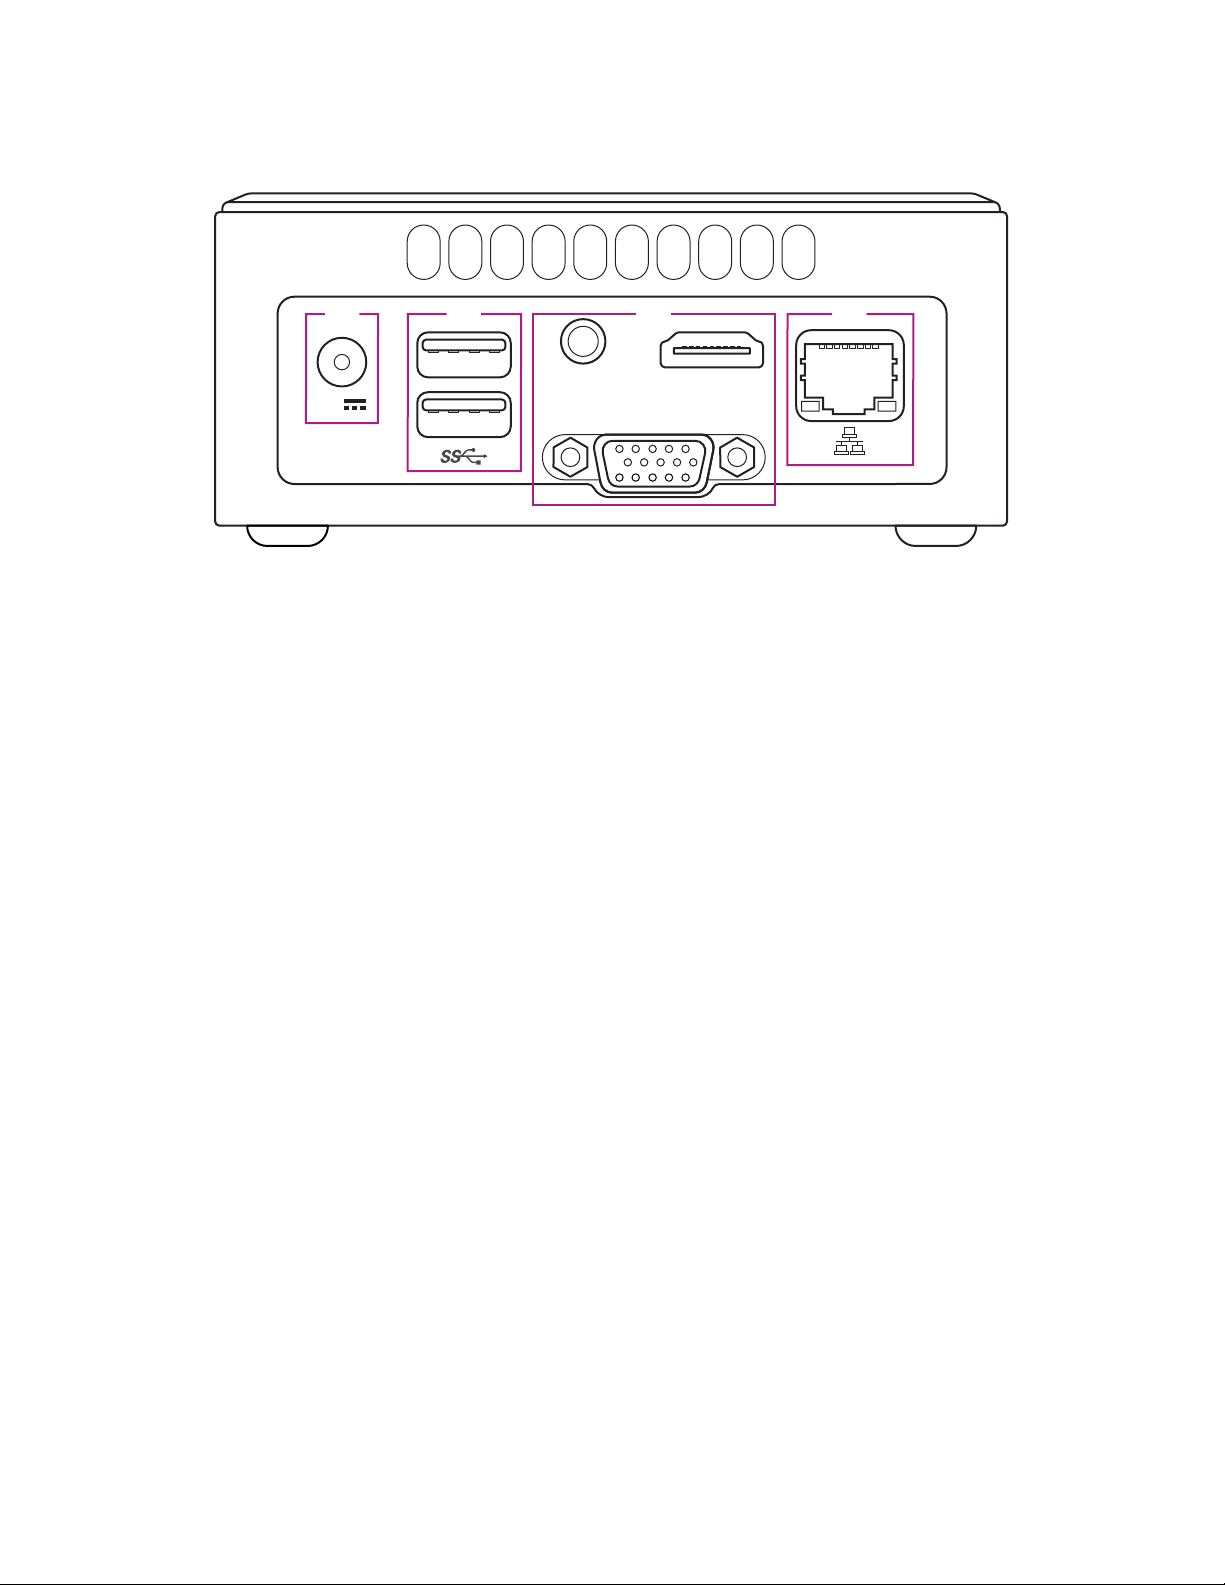
Reset an NDB
NDBs have a reset button which is accessible using a paperclip or other thin
cylindrical tool. It is located in the center of the face opposite to the 16 RGB
connectors. Pressing this button for dierent amounts of time will have dierent
eects.
• Reboot:
0 - 1 second. This may be required to make NDBs discoverable on a network, or
to lock in configuration changes.
• Network configuration reset:
1 - 5 seconds. This resets the NDB’s network settings, including the IP address
which gets reset to 10.0.0.100.
• Network and lighting config reset:
5+ seconds. The network settings are reset as in the last point, and the lights
per node and number of smart-Ts are reset to factory settings.
Convert amps to milliamps >
Calculate max pixel count >
Calculate safety margin >
16 A = 16000 mA
16000 mA / 30 mA/pixel = 533.3
533 pixels - 25% = 400 pixels

11
INSTALLING AURORA SE
Aurora SE can be installed in a variety of configurations depending on the number
and arrangement of LED pixels. It is highly recommended to test your Aurora
system in an accessible area before performing the final installation.
Install Aurora SE with a Single NDB
Required Components
• Aurora SE
• Mobile Device
• Leader Cables (Optional)
• LED Pixels Strands
• Ethernet Cable
• NDB
• 12V or 24V Power Supply
Method
1. Connect the NDB to an NDB power supply.
2. Connect the NDB to Aurora SE using an Ethernet Cable
3. Connect leader cables to each NDB port (optional).
4. Connect LED pixel strands to each leader cable (or to each NDB port if leader
cables are not used).
5. In the Aurora Mobile App, navigate to device settings > protocols > NDB and
refresh the NDB list to gain access to your NDBs configuration settings.
6. Configure the NDB, Audio Settings, and customize your light show using the
Aurora Mobile App. Refer to the Aurora Mobile App Manual for more details.

12
Install Aurora SE with Multiple NDBs
Required Components
• Aurora SE
• Mobile Device
• Leader Cables (optional)
• LED Pixel Strands
• Network Switch
• Ethernet cable
• NDBs
• NDB Power Supply
Method
1. Connect each NDB to an NDB power supply.
2. Connect Aurora SE to an Ethernet Switch using an Ethernet Cable
3. Connect leader cables to each NDB port (optional).
4. Connect LED pixel strands to each leader cable (or to each NDB port if leader
cables are not used).
5. Power ON your system.
6. Reset your NDBs’ network settings. This will change its IP address to the factory
setting, 10.0.0.100. Refer to Reset an NDB for more details.
7. On your mobile device, connect the Aurora mobile App to your Aurora and
enable Auto IP Configuration in the NDB protocol menu. Refer to the Aurora
Mobile App Manual for more details.
8. Connect one NDB to the Network Switch using an Ethernet Cable
9. Wait until the Aurora Mobile App displays an IP address not equal to 10.0.0.100
for the NDB you just plugged in.
10. Repeat steps 8 and 9 until all of your NDB are plugged in and have unique IP
addresses.
11. Configure NDBs, Audio Settings, and customize your light show using the
Aurora Mobile App. Refer to the Aurora Mobile App Manual for more details.

13
Install Aurora SE with NDBs and Power Top-Ups
Required Components
• Aurora SE with NDB(s)
• LED Pixel Strands
• Power T(s)
• 5 A Power Top-Ups
Method
1. Install Aurora SE with NDB(s) using the instructions in the previous sections
2. Power Aurora and all power supplies o.
3. Connect each Power T to a Power Top-Up
4. Connect the Power Ts and Power Top-Up(s) to the end of each LED pixel strand
installed in step 1.
5. Connect additional LED pixel strands to the Power Ts installed in the last step.
6. Connect additional Power Ts, Power Top-Ups, and LED pixel strands as
required. Make sure not to exceed 80-100 LED pixels per Power Top-Up.
7. Power Aurora SE and all Power Supplies ON.
8. Configure NDBs, audio settings, and customize your light show using the
Aurora Mobile App. Refer to the Aurora Mobile App Manual for more details.

14
CONNECT AND CALIBRATE AUDIO INPUTS
Connect Aurora SE to a Consumer Audio Device
Required Components
• Aurora SE
• External Line-in Audio Device
• ⅛” to RCA Adapter
• ⅛” Audio Cable
Method
1. Connect the External Line-in Audio Device to one of Aurora SE’s USB Ports.
2. Connect the ⅛” to RCA Adapter to the External Line-in Device’s RCA input
ports.
3. Connect your Audio device to the ⅛” to RCA Adapter using an ⅛” Audio Cable.
4. Calibrate audio settings using the Aurora Mobile App. Refer to the Aurora
Mobile App Manual for more details.

15
Connect Aurora SE to a Microphone
Required Components
• Aurora SE
• External Mic Audio Interface
• Indoor or Outdoor Mic
Method
1. Connect the External Mic Audio Device to one of Aurora SE’s USB Ports. For
use in tight spaces, make use of the External Mic Audio Device’s included USB
extender to place the mic in a more convenient location.
2. Connect the Indoor or Outdoor Mic to the External Mic Audio Device.
3. Calibrate audio settings using the Aurora Mobile App. Refer to the Aurora
Mobile App Manual for more details.

16
USING DMX 512 WITH AURORA
Aurora SE is compatible with DMX 512, both to be used as a fixture (DMX IN), and to
control other fixtures (DMX OUT).
Set Up DMX IN
Aurora SE’s DMX IN function allows Aurora to act as a DMX fixture. Aurora SE has
9 DMX IN channels. Refer to the Aurora DMX Specification Appendix for more
details on each channel’s control parameter.
Required Components
• Aurora SE
• EntTec Device: DMX USB Pro Mk 2
• DMX Controller
• 5-pin XLR Cable
• USB A to USB Micro-B Cable
Method
1. Connect the EntTec Device to Aurora SE using the USB A to USB Micro-B Cable.
2. Connect the DMX Controller to the EntTec Device (DMX 1) using the 5-pin XLR
Cable. If your DMX Controller only has a three pin XLR output, you will need to
use a 3-pin to 5-pin adapter to make this connection.
3. Use the Aurora Mobile App to enable DMX IN and to set Aurora’s base address.
Refer to the Aurora Mobile App Manual for more details.
4. Use the DMX Controller to control Aurora’s library of lighting parameters. Refer
to the Aurora DMX Specification Appendix for more details.

17
Set Up DMX OUT
Aurora SE’s DMX OUT function allows it to control up to one universe of DMX
fixtures that have independent dimming channels for each colour Red, Green and
Blue (an RGB fixture). That way, it harnesses the power of DMX controllable light
fixtures to create more powerful RGB pixels. Aurora can also control RGBW, RGBA,
and RGBAW fixtures, as well as other fixtures, including panning and tilting fixtures,
however, Aurora deals with these fixtures by setting all channels except for the Red
Green and Blue channels to a static value. Only the Red Green and Blue channels
are dynamically controlled.
Required Components
• Aurora SE
• EntTec Device: DMX USB Mk 2
• DMX Fixtures with RGB Addresses
• 5-pin XLR Cable
• USB A to USB Micro-B Cable
Method
1. Connect the EntTec Device to Aurora SE using the USB A to USB Micro-B cable.
2. Configure your DMX fixtures so they have sequential addresses that don’t
overlap. For example, if you have generic RGB fixtures (3 addresses per fixture),
set the first fixture to address 1, set the second fixture to address 4, and so on.
3. Connect your DMX fixtures to the EntTec Device (DMX 2) using the 5-pin XLR
Cable. If your fixtures only have 3-pin XLR ports, you will have to use a 3-pin to
5-pin adapter to make this connection.
4. Use the Aurora Mobile App to configure Aurora SE to control your fixtures. Refer
to the Aurora Mobile App Manual for more details.

18
UPGRADE AURORA SE SOFTWARE
Update Aurora SE’s software with an Aurora Package to Unlock new patterns,
palettes, and other functionality. Check your current software version in the Mobile
App’s Device Information page to see if it is up to date.
Required Components
• Aurora SE
• Computer
• USB drive
• Aurora Package file
Method
1. Ensure your USB Drive is formatted Fat32
2. Go to support.limbicmedia.ca and navigate to Software Updates SE.
3. Select Aurora Package to download the update
4. Put the .aur2 file on the USB drive.
5. Power Aurora SE OFF.
6. Insert the USB Drive into any of Aurora SE’s USB Ports.
7. Power Aurora SE ON.
8. Wait until Aurora resumes normal operation. This can take up to two minutes.
9. Remove the USB Drive.

19
APPENDICES
Aurora Terminology
Cues
Cues are specific configurations of a pattern, palette, and parameters that can be
saved and played in a Show.
LED Pixels
LED pixels refer to the RGB LED fixtures used in Aurora installations.
Mobile App Connection Modes
AP Mode
AP Mode establishes a one-to-one Wi-Fi connection between Aurora SE and a
mobile device.
Station Mode12
Station Mode establishes a Wi-Fi connection between Aurora SE and an
existing external Wi-Fi network that a mobile device is connected to.
Palette
Palettes are the color schemes Aurora uses in its Patterns.
Parameter
Parameters control features of each pattern and palette such as speed, energy,
variance, and decay. Parameters aect each pattern dierently.
Pattern
Patterns are the foundation of Aurora lighting design. Patterns uniquely analyze
incoming audio data and map the data into specific lighting behavior. Each pattern
also reacts dierently to lighting parameters. Playing with parameters for each
palette is recommended to optimize light shows.
Performance Modes
Performance Modes determine how Aurora lighting data is controlled: in real-time
(Live Control Mode), through predefined cue lists (Show Mode), or through third-
party lighting protocols, such as DMX 512.
Live Control Mode
Live Control Mode allows users to change patterns, palettes, and parameters in
real-time using the Aurora Mobile App.
Show Mode
Show Mode allows users to create and schedule a set of cues.
DMX IN Mode
DMX IN Mode allows users to access the functionality of Live Control Mode via
a DMX 512 controller or console. Refer to the Aurora DMX 512 Specification
Appendix for information.
Shows
A Show is a set of cues played in succession for specific time durations, set to run
indefinitely or until an event is registered e.g. silence detection.
12 Contact Limbic Media for details.

20
TROUBLESHOOTING
Issue
Issue
Issue
Cause(s)
Cause(s)
Cause(s)
Solution
Solution
Solution
All lights on a single port turn
OFF
Aurora SE is not audio reactive
with Auto Gain
Aurora SE not appearing on mo-
bile device’s Wi-Fi settings
Aurora SE not appearing on
the Aurora Mobile App’s list of
devices
Connecting to Android devices
Live Control Mode/Show Mode
not working
LEDs flickering
LEDs stuck on one color
Odd colors appearing on LEDs
Tripped fuse—too much current
being pulled
Wrong mode/Wrong connection
Loud audio causes Auto Gain
to decrease automatically and
requires time to reset to ambient
sound levels
--
--
Android-specific connection
issues
Wrong mode
Not enough power
Broken LED
Not enough power
Not enough power
Turn Aurora SE ON/OFF.
Check if audio reactive mode is
ON/OFF on Aurora Mobile App
or DMX 512 console/controller.
Check if audio is connected to IN
1 or IN 2.
Check audio input level on the
Audio Control page
Give Aurora SE ~15 seconds of
silence to calibrate the Auto-Gain
algorithm.
Turn Wi-Fi network ON/OFF on
the mobile device
Close and reopen the Aurora
Mobile App.
Forget the Aurora network in
the mobile device settings and
re-find it.
Turn mobile data ON/OFF. Turn
Bluetooth ON/OFF
Ensure that Aurora SE is not in
DMX 512 mode (next mode/pat-
tern status LED is yellow in DMX
512 Mode).
Check power requirements or do
end of line voltage testing.
Refer to the Aurora SE Power
Best Practices Appendix for
details.
Check for broken LEDs.
Check power requirements. Re-
fer to the Aurora SE Power Best
Practices Appendix for details.
Check power requirements. Re-
fer to the Aurora SE Power Best
Practices Appendix for details.
Aurora Mobile App
Aurora SE
Lighting
Table of contents
Other Limbic Media Controllers manuals