Lindner NORTEC User manual
User guideline NORTEC sonic
NRSB-09
Issued by: PM Floor Division 10.6.09 Page 1 of 6 Rev.00
NRBS-09
Dear Sir or Madam,
You have decided on purchasing a raised floor of the Lindner AG. We ask you to observe the
following instructions in order to guarantee an acceptable functioning of this system floor for the
long term after its installation in a professional fashion. This user guideline refers to raised floor
panels type NORTEC sonic.
1 Climatic conditions
The room temperature should range between 15 oC and 25 oC at most. The relative
air humidity should range between 40 und 65 %.
Any change in the climate beyond the specified tolerances will cause a swelling or
shrinking of the floor system according to the material used.
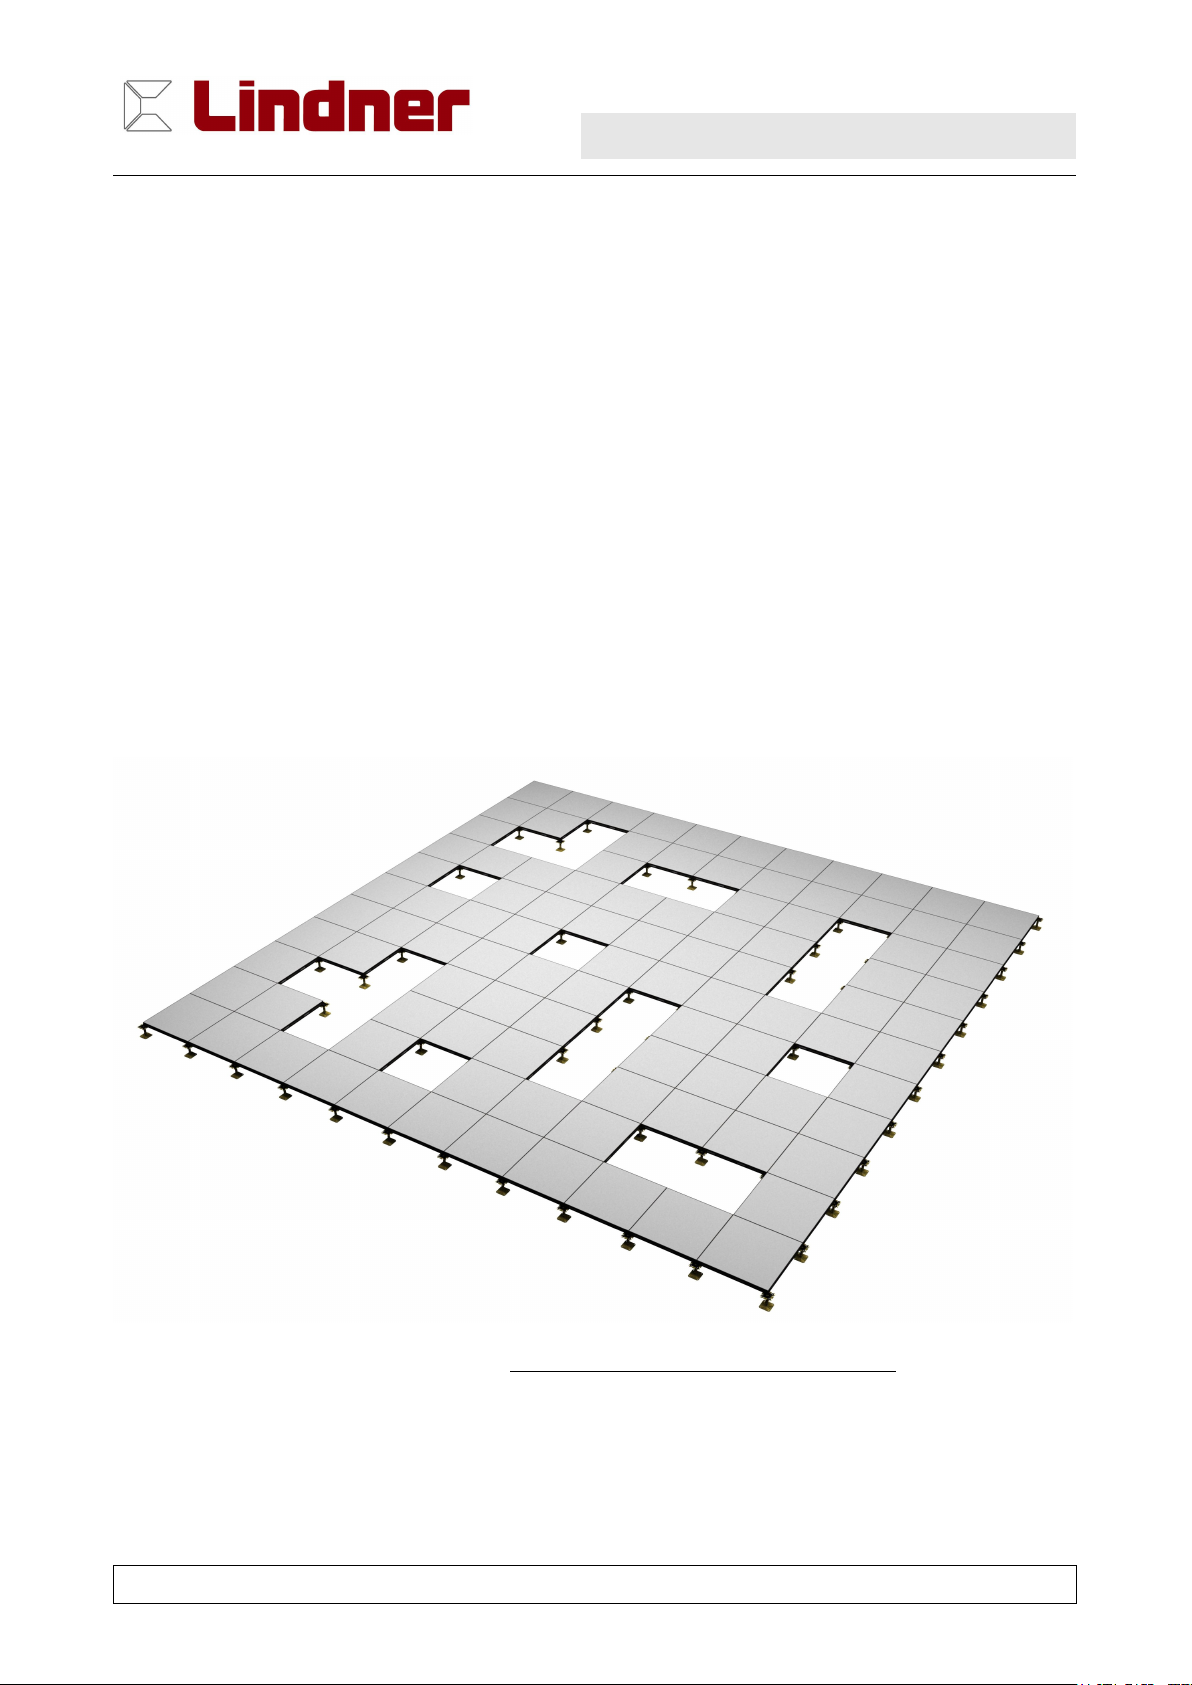
2 Opening and closing of the floor system
If panels are taken out of the floor area or channels for later installation works or similar, it
has to be paid attention to that this is done like it is shown in the following illustration.
Free-standing pedestals which are not supporting at least one panel have to be avoided.
Exemplary proposal for opening the raised floor:
The forming of islands has to be avoided. Do not take out more than 3 panels
out of one row.
Taken out panels shall be stacked in a way that visible side is applied to visible side and
reverse side to reverse side so as to avoid any eventual smearing of the batch identification
on the covering side.
User guideline NORTEC sonic
NRSB-09
Issued by: PM Floor Division 10.6.09 Page 2 of 6 Rev.00
NRBS-09
Horizontal forces are only permissible as partial forces of the loading allowed. The loading
specifications refer to the closed raised floor. So do not carry out any transports towards an
open row of panels.
The raised floor panels may only be lifted with a suited lifting device.
The system may only be opened or closed by qualified personnel.
Illustration A
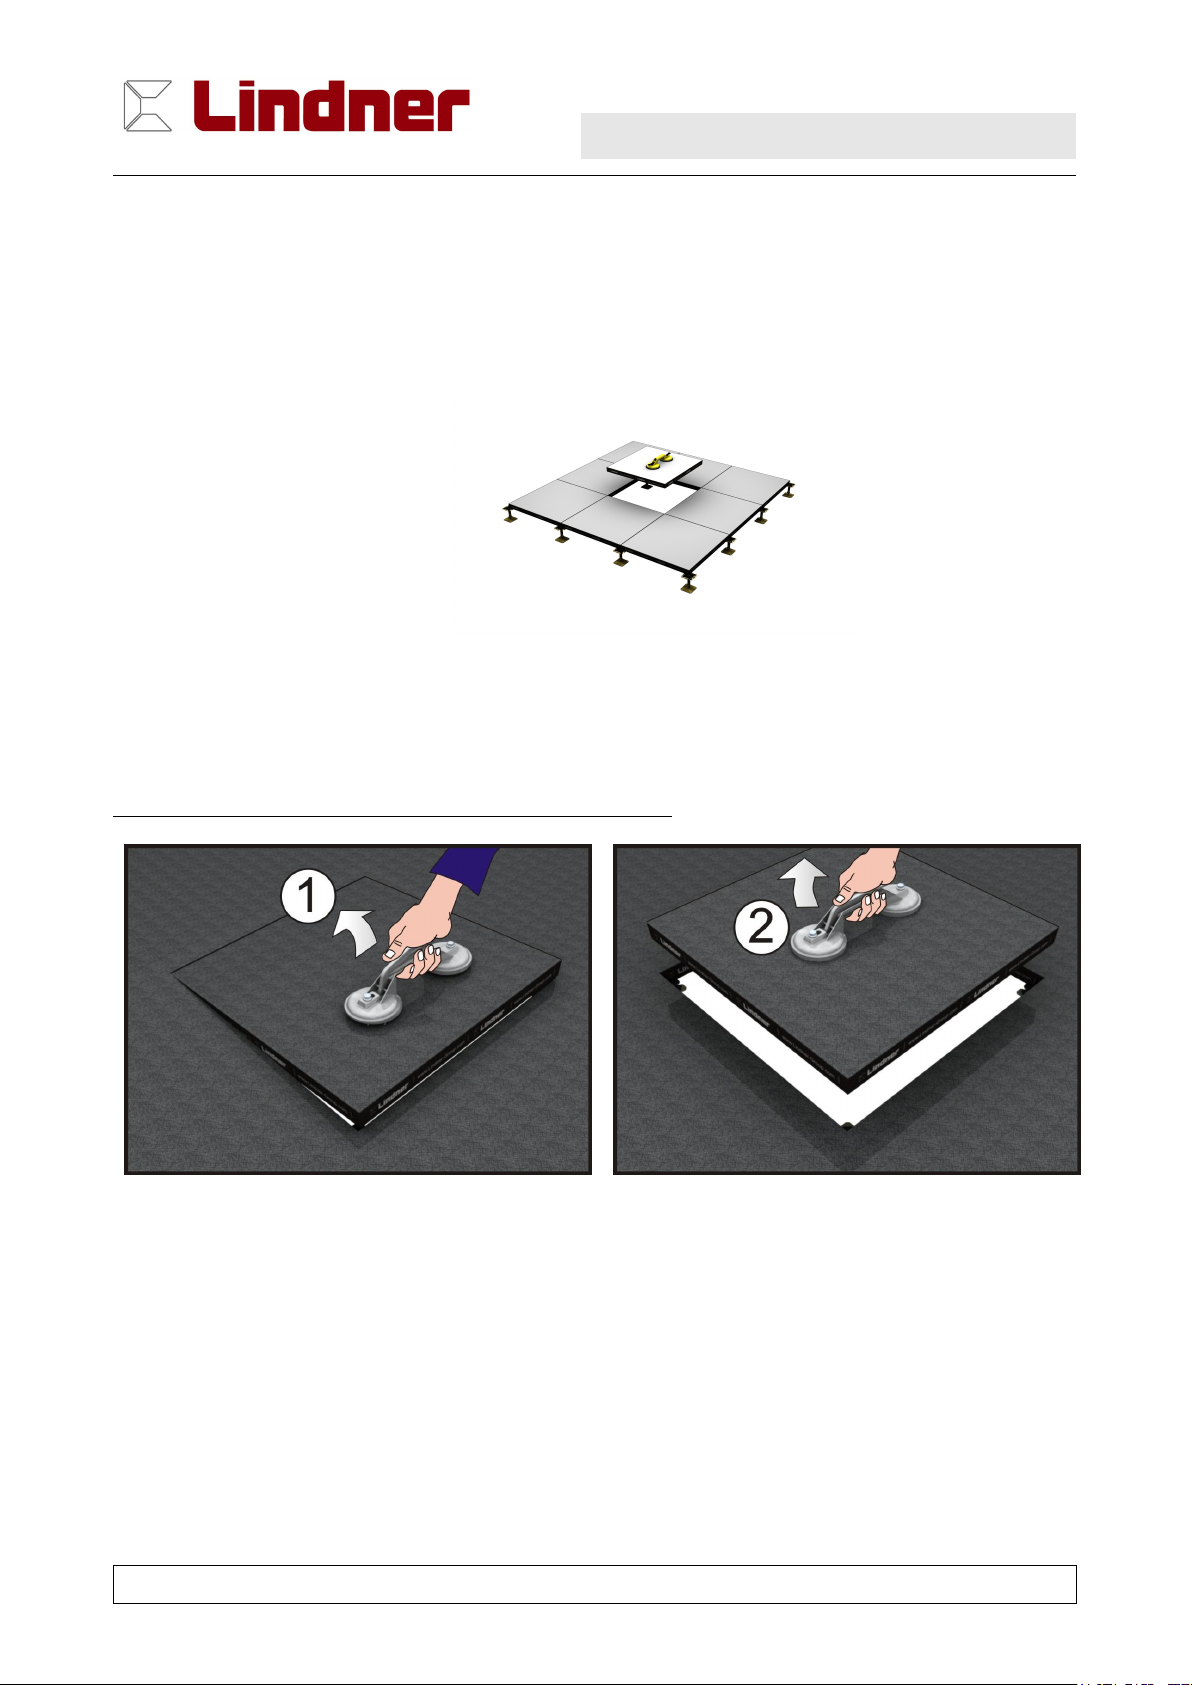
2.1 Taking out of a panel
NORTEC sonic with covered perforation (textile covering)
Place the spike lifter in the centre of the panel
edge with a short distance to the edge of
approximately 5 cm and lift the panel slightly to
loosen it and then remove the lifting device
again.
Then place the spike lifter in the middle of the
panel and lift it vertically.
User guideline NORTEC sonic
NRSB-09
Issued by: PM Floor Division 10.6.09 Page 3 of 6 Rev.00
NRBS-09
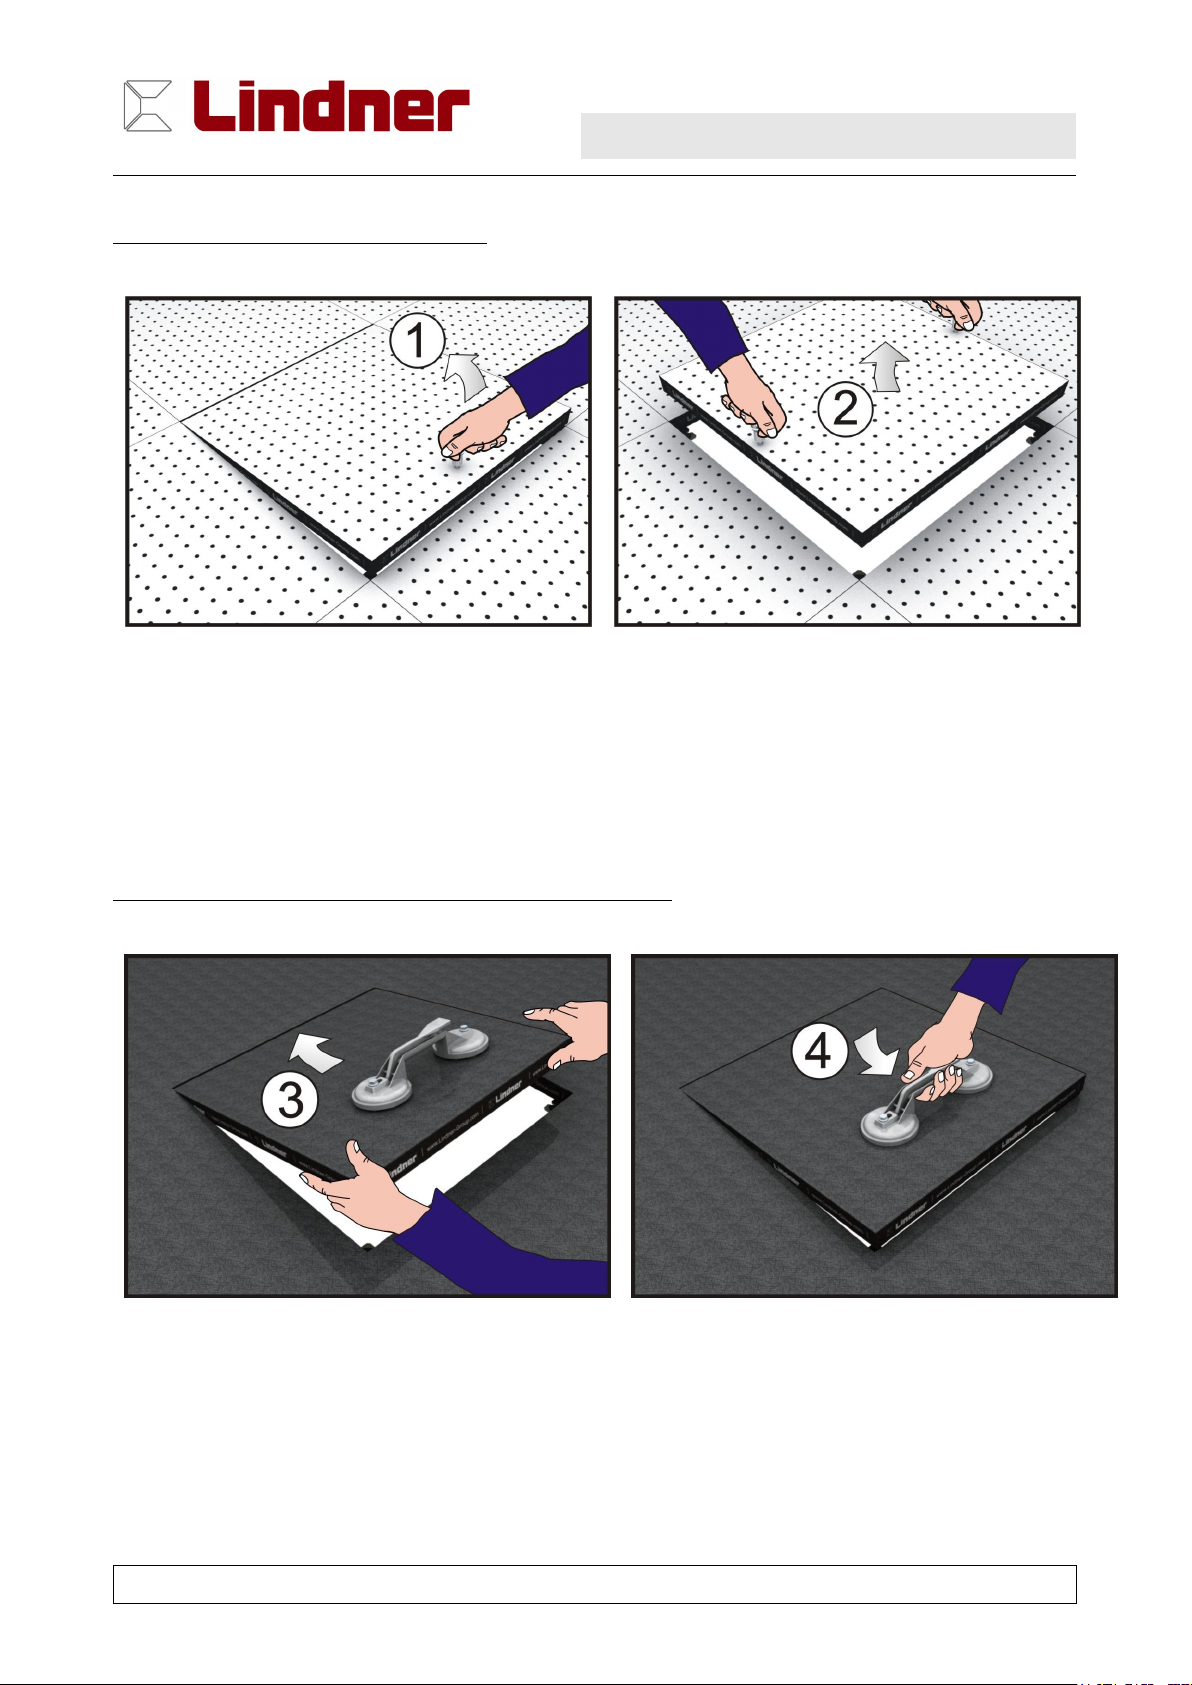
NORTEC sonic with visible perforation
Place the lifting device in a ventilation hole in
the centre of the panel edge and lift the panel
slightly to loosen it and then remove the lifting
device again.
Then place the lifting device in a ventilation
hole at the middle of the outer edge on the left
and right side of the panel and lift it vertically.
2.2 Inserting of panel
NORTEC sonic with covered perforation (textile covering)
Place the lifting device on one side, hold the
panel with your hands, lay it with one side on two
pedestals and push it to the neighbouring panel.
Lower the panel with the lifting device. If with the
use of a velour covering, the first row of the piles
of the adjacent panel is pinched in, the proper,
original state can be restored by “lifting” the
inserted panel a bit.

User guideline NORTEC sonic
NRSB-09
Issued by: PM Floor Division 10.6.09 Page 4 of 6 Rev.00
NRBS-09
NORTEC sonic with visible perforation
Place the lifting device on one side in one of the
ventilation holes in the middle of the outer edge
of the panel, hold the panel with your hands, lay it
with one side on two pedestals and push it to the
neighbouring panel.
Lower the panel with the lifting device.
Attention
Never put your fingers in the gap between the panels with the opening and closing of the
system – danger of injury! (Illustration B)
Do never try to take up panels with unsuited tools like a screwdriver or a chisel (Illustration
C), as the panel edges can be damaged irreparably by this.
Detach the lifting device immediately after the use.
Do not put taken out panels down on the panel edge.
Illustration B Illustration C
Basically: - Remove dirt of pedestal head.
- Test if the gasket and eventually the stringers rest on the pedestal
head properly.
- Check the installation direction of the covering.
Taken out panels shall be put back in their original positions and shall not be turned around
into a different position. Special attention has to be paid to the covering direction with

User guideline NORTEC sonic
NRSB-09
Issued by: PM Floor Division 10.6.09 Page 5 of 6 Rev.00
NRBS-09
textile coverings. The panels are therefore labelled with an arrow. In addition, it has to be
checked whether they fit well and only then the next panel can be inserted.
3 Substructure
No pedestals, stringers, bridgings or other substructures may be altered. If in exceptional
circumstances, such as for subsequent installations, it becomes necessary to dismantle
any components, then the raised floor system may not be loaded. Non-compliance might
result in the danger of a collapse of the system! System components which have been
dismantled have to be remounted when the work is completed so that the vertical load
removal and the horizontal rigidity are again assured.
4 Cable installation
Do not draw in cables over the edge of the floor system or a panel. Do not pull off or
damage pedestals through overstraining with the installation of cables in the cavity. Good
idea: Lay cables in from the roll.
5 Protective measures
5.1 Extraordinary loading
The floor has to be covered with planks, chipboards or steel plates with the transport of
heavy loads. The floor covering and the gluing is protected this way and the loads are
distributed to a larger area on the floor system.
Dynamic loads from lifting carts, forklifts etc. may not be included in calculations by simply
transferring the wheel loads to static loads. In such cases the DIN 1055 as well as the
maximum permissible loads of our raised flooring systems have to be observed.
The tests and the classification are made according to current standards. The permissible
load indention points are defined in the application guideline to the DIN EN 12 825.

User guideline NORTEC sonic
NRSB-09
Issued by: PM Floor Division 10.6.09 Page 6 of 6 Rev.00
NRBS-09
5.2 Continuous contact with water
Continuous contact with water has to be avoided absolutely as this leads inevitably to a
damaging of the floor system.
Water-tight saucers have to be used with plant tops and trays.
6 Cleaning and maintenance instructions
Basic principles conditional to the system have to be considered for the cleaning and
maintenance of the floor coverings on system floors. A soaking of the floor is generally to
be avoided as with moisture-intense cleaning, there is the danger of swelling, corrosion,
delamination of coverings and the damaging of sensitive installations (e.g. smoke
detector). Spilled water has to be taken up immediately with a cloth. Also with spilled liquids
are the contaminated resp. concerned panels to be taken out and cleaned.
Cleaning of textile coverings:
Dusting by vacuuming or vacuum brushes.
Cleaning of hard / elastic coverings – visible perforation
The floor system should only be cleaned and maintained slightly damp. The
cleaning devices like a mop or similar may not release mopping water resp. care
emulsion into the perforation holes.
The cleaning water can penetrate into the perforation with the use of wet cleaning
machines. This has to be avoided absolutely.
Generally, an overwatering, too much spraying with cleaning agents as well as
the brushing with the cleaning and care agent is to be avoided. The superfluous
water will be taken up by the panel with the penetration of humidity into the
perforation and therefore we can not guarantee the assured static values
anymore. The humidity can as well saponify the covering glue which leads to a
detachment of the covering.
Residues of the dirty water can also form up on the underside of the panel with
overwatering which can lead to the formation of mould fungus.
You find further information in the cleaning and maintenance instructions of the
manufacturer of the covering.
Should you have any further questions, however, we are gladly available to provide you with any information.
Telephone +49 (0) 87 23 / 20-26 51 Product Management Flooring Systems
This manual suits for next models
1
Table of contents
Popular Household Appliance manuals by other brands


MediaShop
MediaShop Renovator Paint Runner Pro Instructions for use

Yaheetech
Yaheetech 610616 Assembly instructions

Velleman
Velleman OCH01 Assembly instructions

Clas Ohlson
Clas Ohlson 44-3793 Instructions for use

ROBINHOOD
ROBINHOOD IC 300 Deluxe Installation and operating instructions

AEG
AEG A4WMSTPN1 manual