Lindy 20770 User manual

© LINDY ELECTRONICS LIMITED & LINDY-ELEKTRONIK GMBH - FIRST EDITION (August 2015)
2D & 1D Barcode Scanner, USB
User Manual English
Benutzerhandbuch Deutsch
Manuel utilisateur Français
Manuale Italiano
No. 20770
www.lindy.com
Tested to Comply with
FCC Standards
For Home and Office Use!


User Manual English
Introduction
Thank you for buying the LINDY 2D & 1D Barcode Scanner, USB. As well as decoding 2D and 1D
barcodes, this Scanner is capable of omni-directional reading. This allows for fast reading of barcodes at
any angle, making it a perfect solution for POS installations.
Package Contents
•2D & 1D Barcode Scanner, USB
•USB cable
•Stand
•CD with software and manual
•This Quick Guide
Features
•Auto scan function
•Reads 2D and 1D barcodes
•CMOS sensor, 1280 x 960 pixels
•LED light source
•Decoding rate: 100 times per second (+/- 10)
•Precision > 3mil
•Depth of field: 3.5mil Code 128: 15-35mm, 5mil Code 39: 8-55mm, 13mil UPC: 7-165mm, 20mil
Code 39: 35-210mm, 6.7mil PDF417: 0-75mm, 10mil DM: 0-115mm, 20mil QR: 0-195mm
•Indicators: Beeper, LED
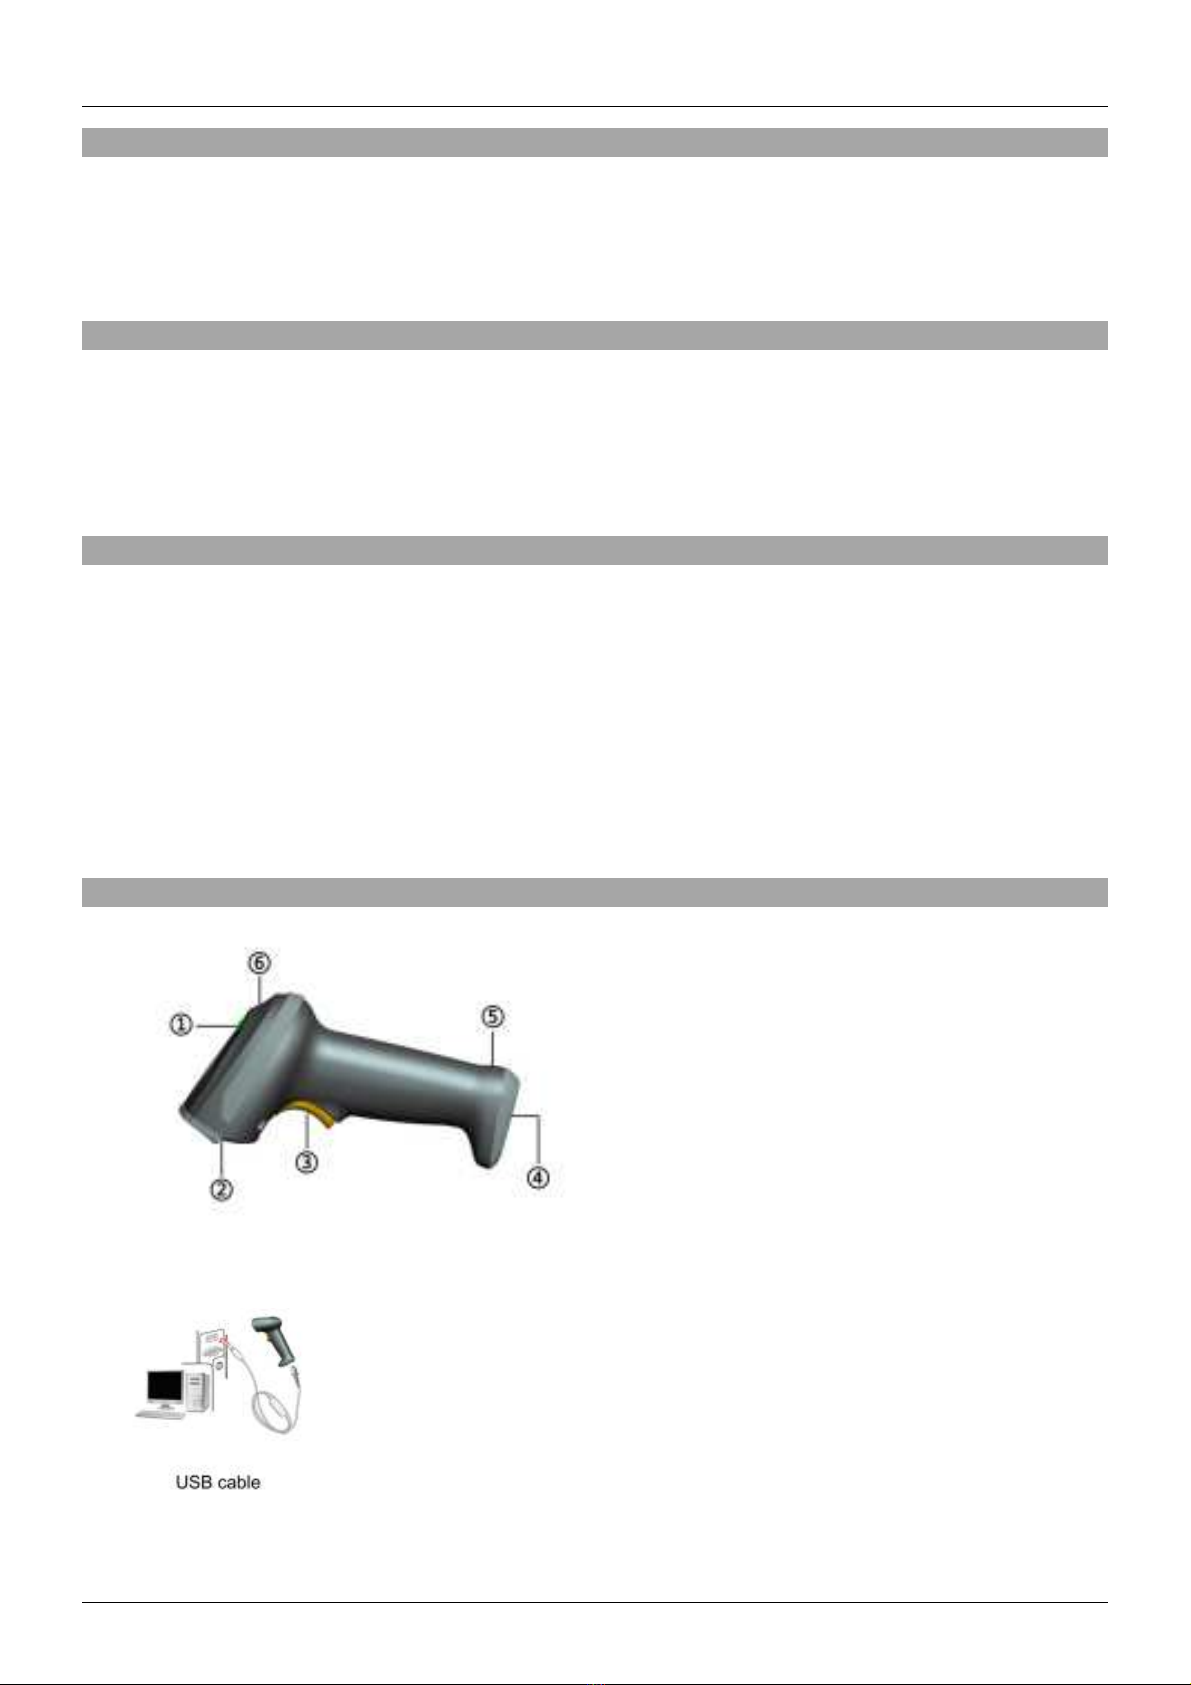
Installation & Operation.
Switch off the host, then connect the host with the Scanner (see below).
To remove the cable, insert a thin object into the cable release-hole and press down. Gently pull the
cable away from the base of the scanner handle.
1. LED
2. Emitter Window
3. Trigger
4. Cable interface port
5. Cable release-hole
6. Beeper
User Manual English
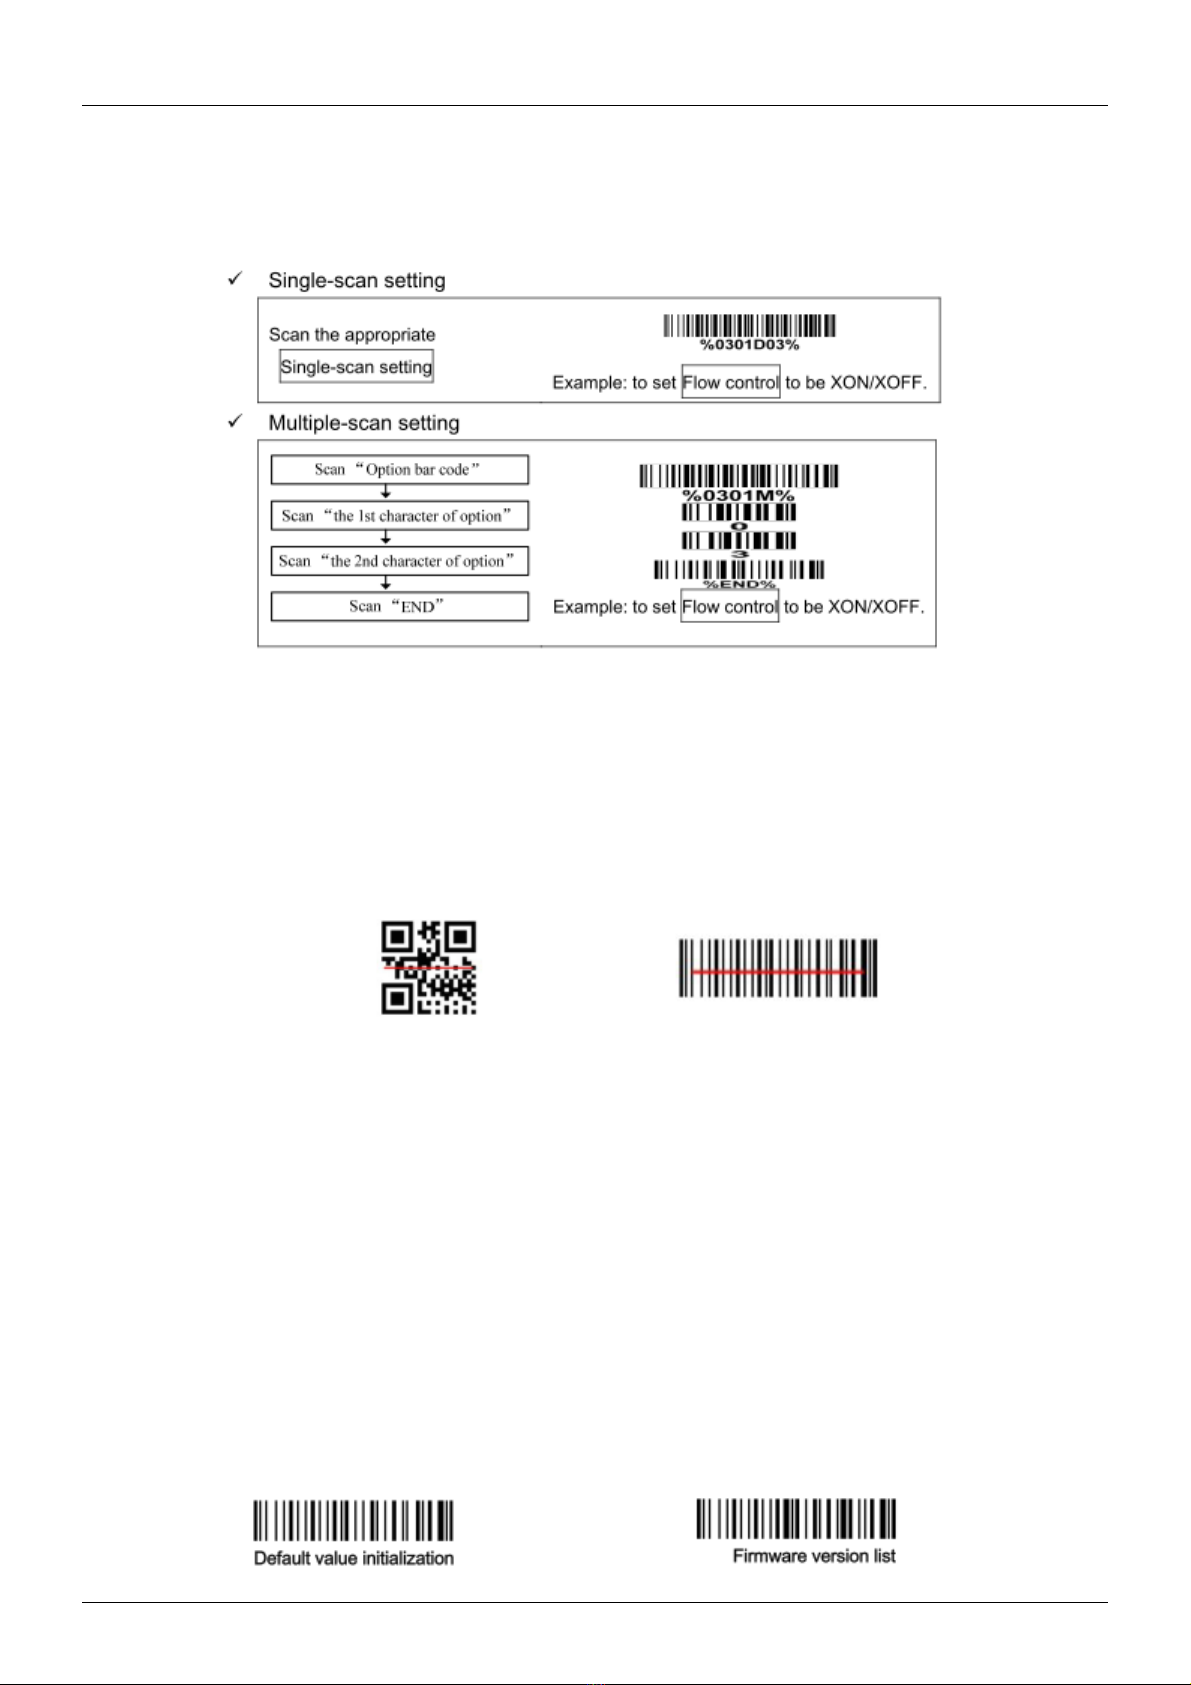
Programming instruction
Use the Single-scan setting for quick and easy settings.
Multiple-scan setting allows more detailed settings.
Reading techniques
In handheld mode, pressing and holding the trigger projects an aiming beam onto the object to
Align this with the centre of the barcode.
On a successful scan, the Scanner will beep. The illumination and aiming patterns will fade out.
The optimal reading range is limited to 5-7cm regardless of the size of the minimal element of the
barcode.
Auto-detection scanning mode
The Auto-detection scanning mode has two operating modes: In-stand and Always-On.
The following is an introduction to In-stand Auto-detection mode.
1. When in the stand, the Scanner operates inAuto-detection mode.
2. To scan a barcode, present the barcode in front of the Scanner, ensuring the aiming pattern
covers the barcode.
3. The Scanner will beep and the indicator LED will light up, after a successful scan.
4. Moving the barcode away for the Scanner will activate the next scan.
For further details, please refer to the manual on the enclosed CD.
To return default parameters and version information for the Scanner, scan the barcodes below.

Benutzerhandbuch Deutsch
Einführung
Vielen Dank für den Kauf des LINDY 2D & 1D BarcodeScanners, USB. Dieser Area Imager erfasst
sowohl 2D als auch 1D Barcodes omnidirektional.
Lieferumfang
•2D & 1D Barcode Scanner, USB
•Ständer
•USB Kabel
•CD mit Software und Handbuch
•Diese Kurzanleitung
Eigenschaften
•Erfasst 2D und 1D Barcodes
•CMOS Sensor, 1280 x 960 Pixel
•LED Lichtquelle
•Autoscan-Funktion
•Decodiergeschwindigkeit: 100 Scans pro Sekunde (+/- 10)
•Auflösung > 3mil (0,08mm)
•Schärfentiefe: 3.5mil Code 128: 15-35mm, 5mil Code 39: 8-55mm, 13mil UPC: 7-165mm, 20mil
Code 39: 35-210mm, 6.7mil PDF417: 0-75mm, 10mil DM: 0-115mm, 20mil QR: 0-195mm
•Indikatoren: akustisch, LED
Installation & Betrieb
(1) LED
(2) Austrittsfenster
(3) Trigger/Auslöser
(4) Port für Kabelanschluss
(5) Öffnung zum Lösen des Kabels
(6) Piepser
Schalten Sie zunächst den Hostcomputer aus, dann schließen Sie den Barcodescanner mit dem USB-
Kabel am Computer an:
USB-Kabel
Sie können das Kabel wieder vom BarcodeScanner entfernen, indem Sie einen Draht in die Öffnung
zum Lösen des Kabels (5) stecken.

Benutzerhandbuch Deutsch
Programmieranleitung:
Das Single-scan setting ermöglicht ein schnelles und einfaches Einrichten des Barcodescanners, das
Multiple-scan setting erlaubt genauere Einstellungen.
Lesetechnik:
1. Drücken und halten Sie den Auslöser, der Scannerstrahl soll mittig über den Barcode gehalten
werden.
2. Generell liegt die optimale Lesereichweite bei 5-7cm, unabhängig von der Größe des kleinsten
Elements des Barcodes.
3. Wenn der Barcode gelesen wurde, piepst der Scanner in der Standardeinstellung und die Licht- und
Zielmuster verschwinden. Dann überträgt der Scanner den Barcode an den Hostcomputer.
Automatische Erkennung:
Die automatische Barcodeerkennung kann im Handbetrieb entsprechend eingestellt werden. Befindet
sich der Barcodescanner im Standfuß, so arbeitet er automatisch im Auto-Modus. Wird der Scanner
wieder aus dem Standfuß entnommen, dann arbeitet er wieder im Modus des Handbetriebs.
1. Im Standfuß scannen Sie den Barcode indem Sie ihn so vor das Austrittsfenster halten, dass der
ganze Barcode erfasst werden kann.
2. Wenn der Barcode gelesen wurde, ertönt ein Piepston und die LED leuchtet.
3. Wenn die LED nicht mehr leuchtet, entfernen Sie den aktuellen Barcode um einen neuen
Scanvorgang starten zu können.
Zurücksetzen auf Standardeinstellungen und Versionsinformation:
Weitere Details entnehmen Sie bitte dem Handbuch auf beiliegender CD.
Manuel Utilisateur Français
Introduction
Merci d’avoir choisi le lecteur de code à barres LINDY 2D & 1D Barcode Scanner, USB. En plus de la
lecture de code à barres 2D et 1D, ce scanner à une capacité de lecture omnidirectionnelle. Ceci
permettant une lecture rapide de code à barres, quel que ce soit l’angle, ce qui en fait une solution
parfaite pour équiper les points de vente.
Contenu de l’emballage
•Lecteur de code à barres 2D & 1D Barcode Scanner, USB
•Câble USB
•Support
•CD avec logiciel et manuel
•Ce guide rapide
Caractéristiques
•Fonction auto scan
•Lit les codes à barres 2D et 1D
•Capteur CMOS, 1280 x 960 pixels
•Source lumineuse à LED
•Capacité de décodage/vitesse de lecture: 100 lectures par seconde (+/- 10)
•Précision > 3mil
•Dimensions du champ: 3.5mil Code 128: 15-35mm, 5mil Code 39: 8-55mm, 13mil UPC: 7-
165mm, 20mil Code 39: 35-210mm, 6.7mil PDF417: 0-75mm, 10mil DM: 0-115mm, 20mil QR: 0-
195mm
•Indicateurs: bip sonore, LED
Installation & Opération.
Mettez l’appareil hôte hors tension, connectez ensuite le scanner à l’hôte (voir ci-dessous).
Pour retirez le câble, insérez un objet fin (trombone) dans l’orifice de libération du câble et appuyez.
Tirez doucement sur le câble pour le retirez de la base de la poignée du scanner à code à barres.
1. LED
2. Fenêtre d’émission du faisceau
3. Gâchette
4. Port d’interface câble
5. Orifice de libération du câble
6.
Emplacement du bip sonore

Manuel Utilisateur Français
Instruction de programmation
Utilisez les réglages Single-scan pour des réglages rapides et faciles.
Les réglages Multiple-scan permettent des réglages plus détaillés.
Techniques de lecture
En mode portable, appuyez sur la gâchette en maintenant pour projeter un faisceau de visée sur
l’objet en l’alignant sur le centre du code à barres.
Le scanner émet un bip lors d’une lecture valide. L’éclairage et le faisceau de lecture disparaitra.
La zone de lecture optimale est limitée à 5-7cm, quelle que soit la taille du plus petit élément du code
à barres.
Mode de scan Auto-detection
Le mode de scan auto-detection a deux mode de fonctionnement: In-stand et Always-On.
Les instructions suivantes sont une introduction au mode auto-detection In-stand.
1. Posé sur le support, le scanner fonctionne en mode Auto-detection.
2. Pour scanner un code à barres, présentez le code à barres à l’avant du scanner, en vous
assurant que le faisceau de lecture couvre le code à barres.
3. Le scanner émet un bip et la LED indicatrices s’allume, après un scan valide.
4. En éloignant le code à barres du scanner celui-ci est prêt pour le scan suivant.
Pour plus de détails, merci de vous référer au manuel présent sur le CD fourni.
Pour retourner aux paramètres par défaut et afficher la version de firmware du Scanner, scannez les
codes à barres ci-dessous.

Manuale Italiano
Introduzione
Vi ringraziamo per aver acquistato il Barcode Scanner USB LINDY 2D & 1D. Questo prodotto è in grado
di decodificare codici a barre 2D e 1D ed è anche in grado di effetturare letture omnidirezionali
permettendo la scansione dei codici da qualsiasi angolo e rendendolo la soluzione ideale per qualsiasi
installazione POS.
Contenuto della confezione
•Barcode Scanner USB 2D & 1D
•Cavo USB
•Supporto
•CD con software e manuale
•Questa guida rapida
Caratteristiche
•Funzione Auto Scan
•Lettura di codici a barre 2D e 1D
•Sensore CMOS, 1280 x 960 pixels
•Sorgente luminosa: LED
•Frequenza di Decodifica: 100 al secondo (+/- 10)
•Precisione > 3mil
•Profondità di campo: 3.5mil Code 128: 15-35mm, 5mil Code 39: 8-55mm, 13mil UPC: 7-165mm,
20mil Code 39: 35-210mm, 6.7mil PDF417: 0-75mm, 10mil DM: 0-115mm, 20mil QR: 0-195mm
•Indicatori: Beeper, LED
Installazione & Utilizzo
Spegnete il computer e poi connettete lo scanner ad una porta USB libera (Vedi figura seguente).
Per rimuovere il cavo dallo scanner inserite un oggetto sottile nel foro di rilascio e premete fino a quando
non sentirete la clip sbloccarsi. Infine tirate con delicatezza il cavo fuori dalla base del lettore.
1.
LED
2. Finestra Emissione
3. Attivatore
4. Porta connessione cavo
5. Foro per rilascio cavo
6. Beeper

Manuale Italiano
Istruzioni di programmazione
Utilizzate le impostazioni di lettura singole (Single-scan) per una configurazione rapida e semplice.
La modalità a scansione multipla (Multiple-scan) permette configurazioni più dettagliate.
Tecniche di lettura
In modalità lettura manuale premendo il pulsante il lettore proietta un fascio di luce a forma di linea
che una volta posizionato sul codice consente un più rapido allineamento e decodifica di
quest’ultimo. Tutte le volte che si effettua una lettura con successo il dispositivo emetterà un beep di
conferma. Il raggio di scansione ottimale è limitato a 5-7cm di distanza indipendentemente dalle
dimensioni del codice da leggere.
Modalità di scansione con Auto- Rilevamento (Auto Detection)
Questa modalità di funzionamento prevede due possibili configurazioni: In-stand e Always-On.
La seguente è un introduzione alla modalità Auto-Rilevamento:
1. Quando è sul supporto lo Scanner funzione in modalità Auto-Rilevamento (Auto-detection).
2. Per leggere un codice a barre posizionate il codice di fronte alla finestra di scansione
assicurandovi che la linea di puntamento lo copra tutto.
3. Lo Scanner emetterà un bip e il LED si accenderà al termine di una lettura eseguita
correttamente.
4. Rimuovendo il codice lo scanner si preparerà per effettuare una nuova lettura. .
Per ulteriori dettagli fate riferimento al manuale incluso nel CD. Per visualizzare tutti i parametri impostati
sullo scanner e le informazioni sulle versione del firmware leggete i codici riportati di seguito:
Table of contents
Languages:
Other Lindy Barcode Reader manuals


