Lindy 32898 User manual

© LINDY ELECTRONICS LIMITED & LINDY-ELEKTRONIK GMBH - FIRST EDITION (July 2004)
USB 2.0 TV Tuner
& Video Capture Box
User Manual English
Benutzerhandbuch Deutsch
Manuel Francaise
LINDY No. 32898
www.lindy.com

English Manual
Deutsches Benutzerhandbuch
Kapitel 1 Einleitung
Kapitel 2 Hardware-Konfiguration
Kapitel 3 Installation von Treiber und Anwendung
Kapitel 4 WinDVR 3 Software
Kapitel 5 Kanalvorschau
Kapitel 6 Problembeseitigung
Manuel de l’utilisateur francaise
Veuillez trouver la version française de ce manuel en
téléchargement sur notre site Internet www.lindy.fr

Table of Contents
Introduction........................................................................................................... 1
Features................................................................................................................. 1
Technical Specifications...................................................................................... 2
System Requirements.......................................................................................... 2
Package Checklist ................................................................................................ 3
Installation and Connections............................................................................... 4
Remote Control Handset...................................................................................... 6
Driver and Application Installation ..................................................................... 7
Windows 2000.........................................................................................................................7
Windows XP..........................................................................................................................12
WinDVR 3 Software ............................................................................................ 17
Features ................................................................................................................................17
Control Panel ........................................................................................................................18
Display Screen......................................................................................................................18
Sub-Control Panels ..............................................................................................................19
TV Panel...........................................................................................................................................19
General Panel...................................................................................................................................19
Right-Click Menu ................................................................................................ 20
Channel Preview................................................................................................. 21
Troubleshooting ................................................................................................. 22

Instruction Manual
1
Introduction
The LINDY USB 2.0 TV Tuner & Video Capture Box is a compact, external TV Box, which features a built-in TV
Tuner and video decoder. It turns your computer into an all-in-one TV reception and video capture device, allowing
you to watch and record TV, and capture still and full motion video.
In addition to the advanced hardware features, the powerful, included software supports TV and digital video
recording, pre-scheduled TV recording, time-shifting playback, DVD video file recording, video cut and merge, and
many other advanced functions. The hardware and software work in partnership to implement the recording, editing,
and DVD/VCD making process.
Features
Full-Screen Video Resolution Input: Supports full-screen video resolution up to 720
x 480 30 fps for NTSC and 720 x 576 25fps for PAL
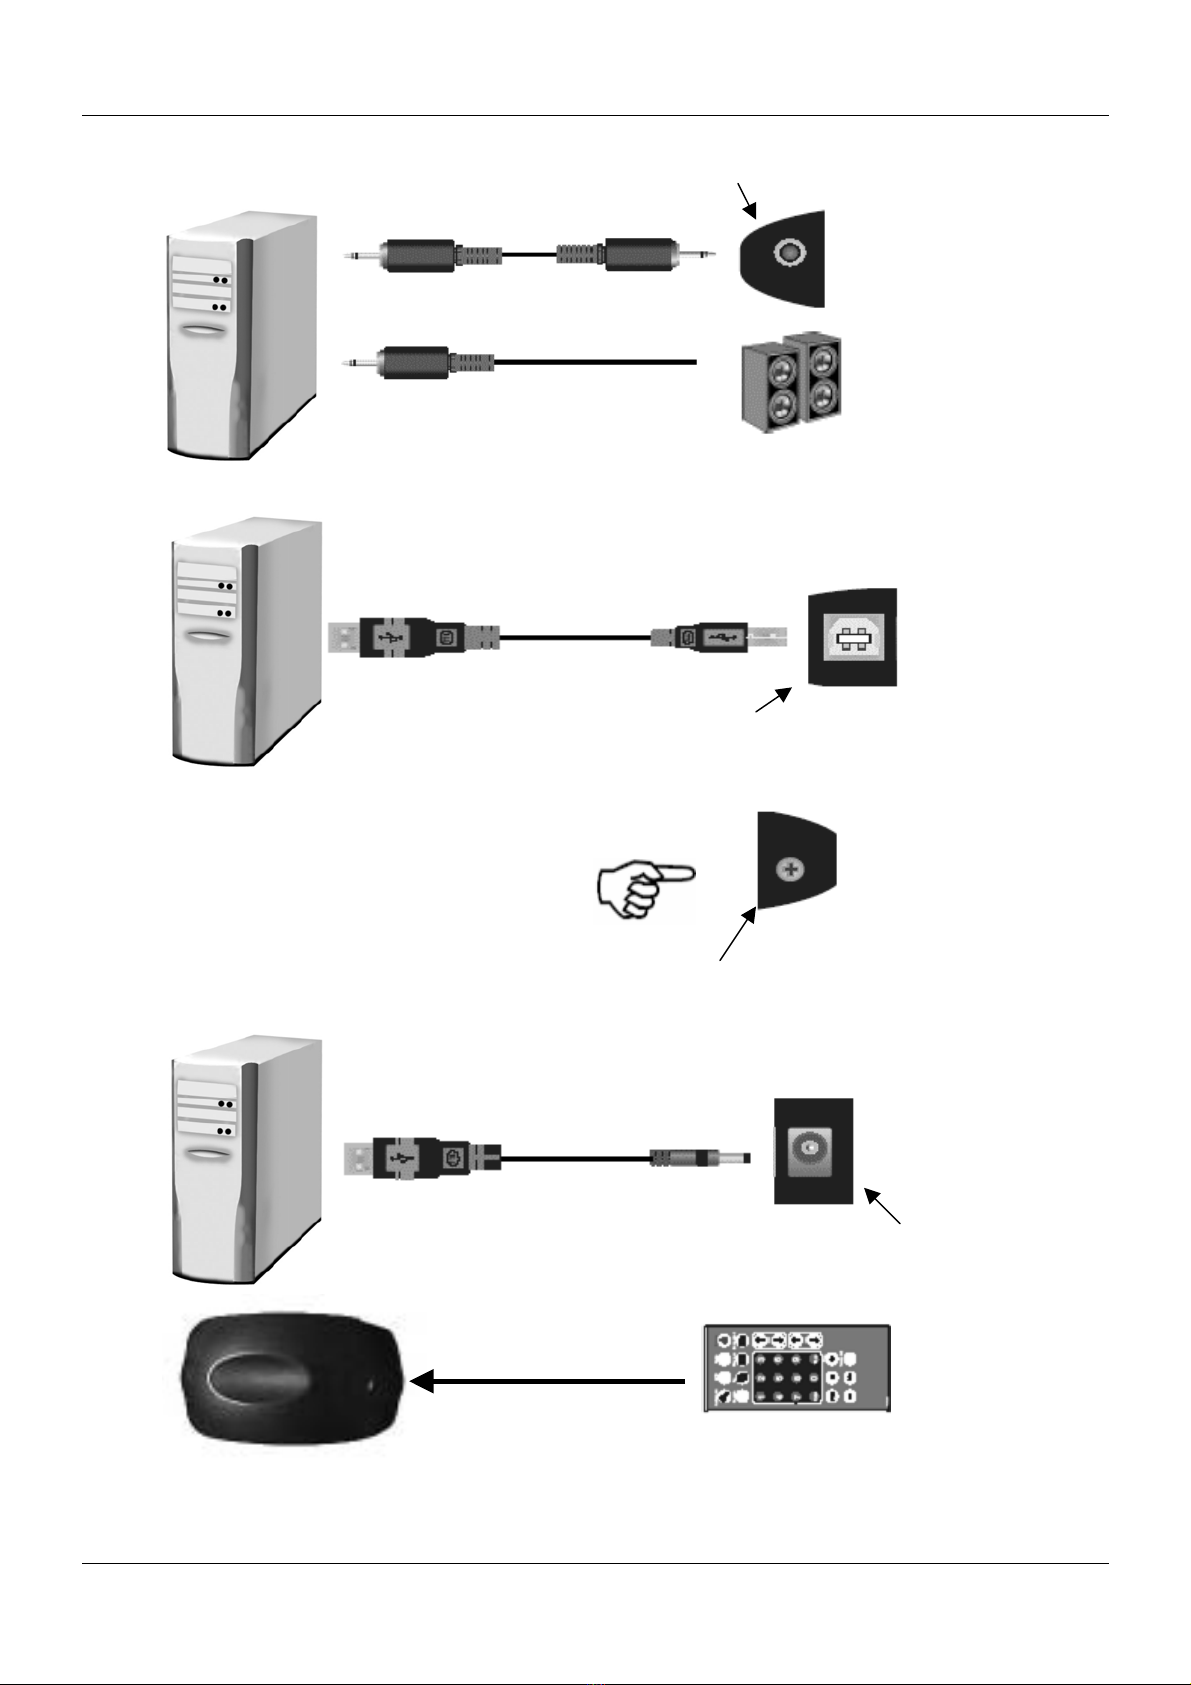
Full TV Channels: The built-in TV tuner, allows you to watch full screen TV on your
desktop or laptop computer
USB 2.0 Support: Allows you to hot-swap the device and provides DVD quality video
resolution
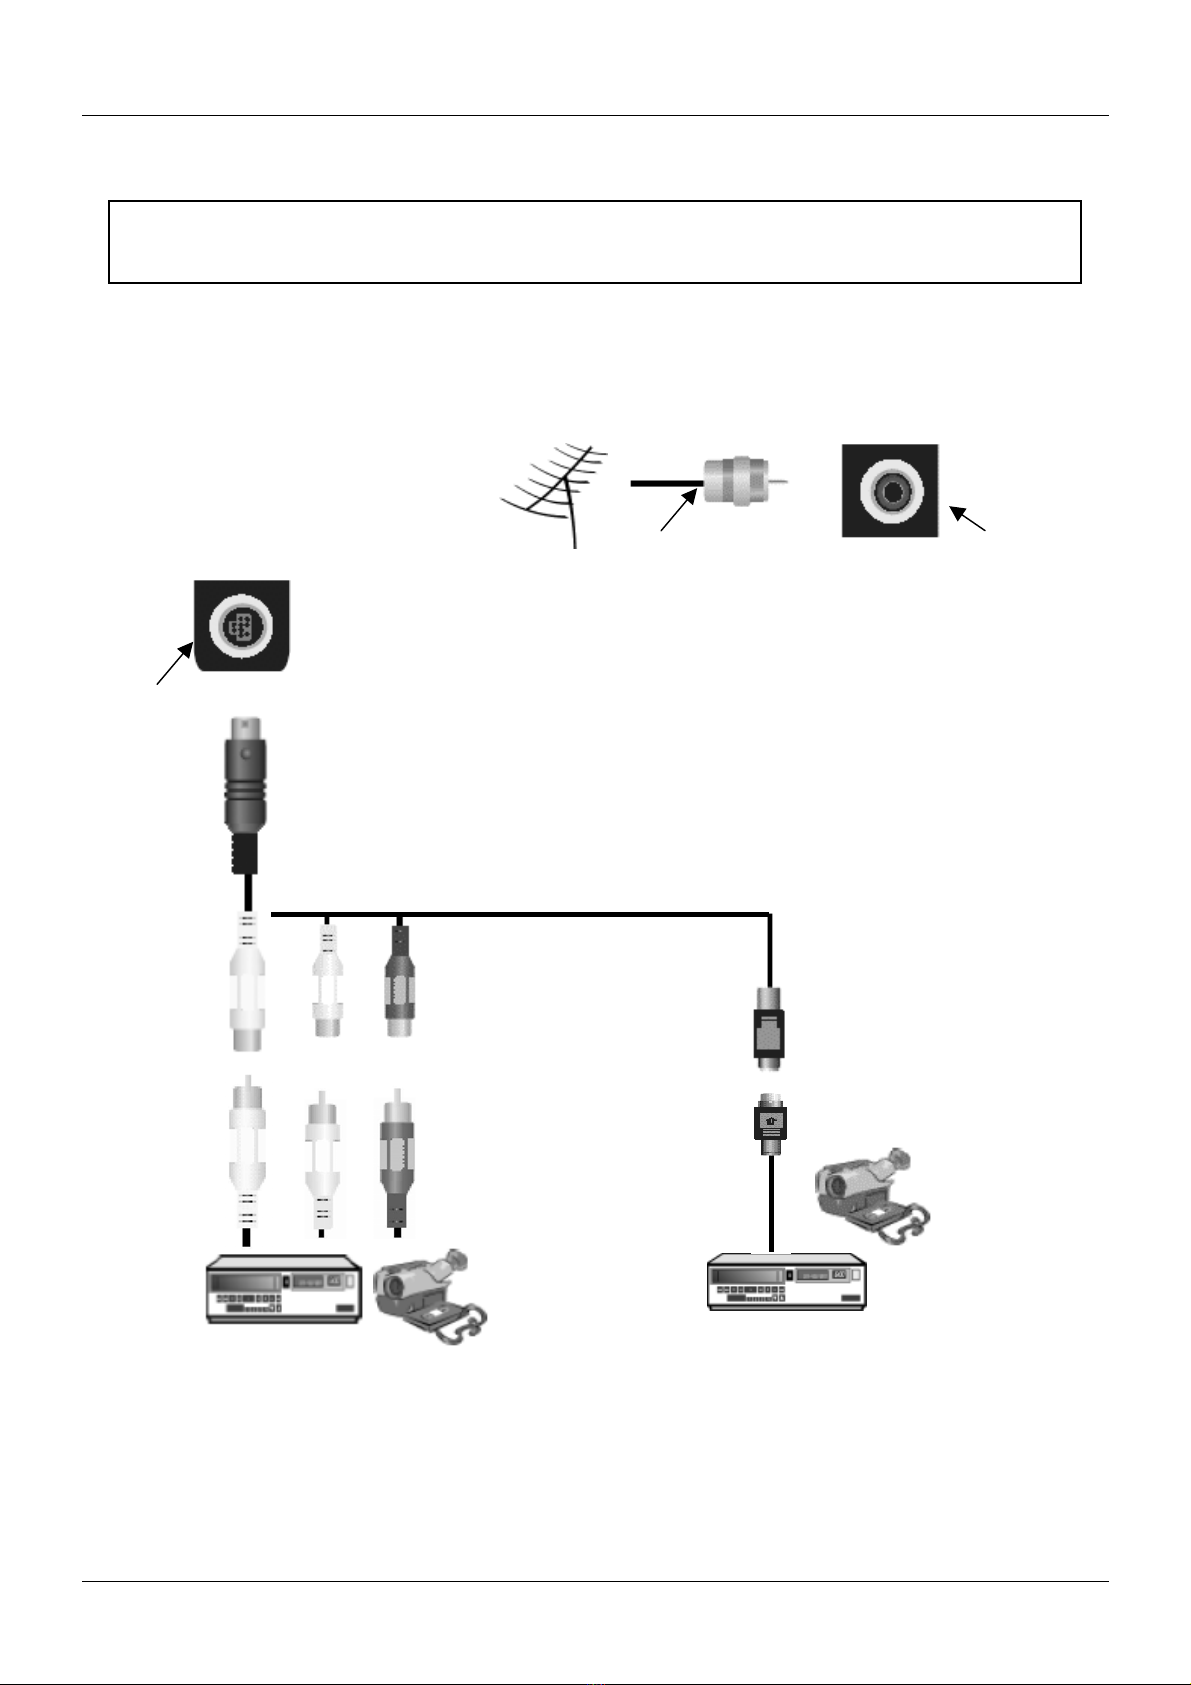
Multi-Input Connections: An S-Video input, Composite Video input, stereo audio
line-in and TV RF input means you can do more than just watch TV; you can record
full motion video and still frame images from your DV Camcorder, VCR or DVD player
etc
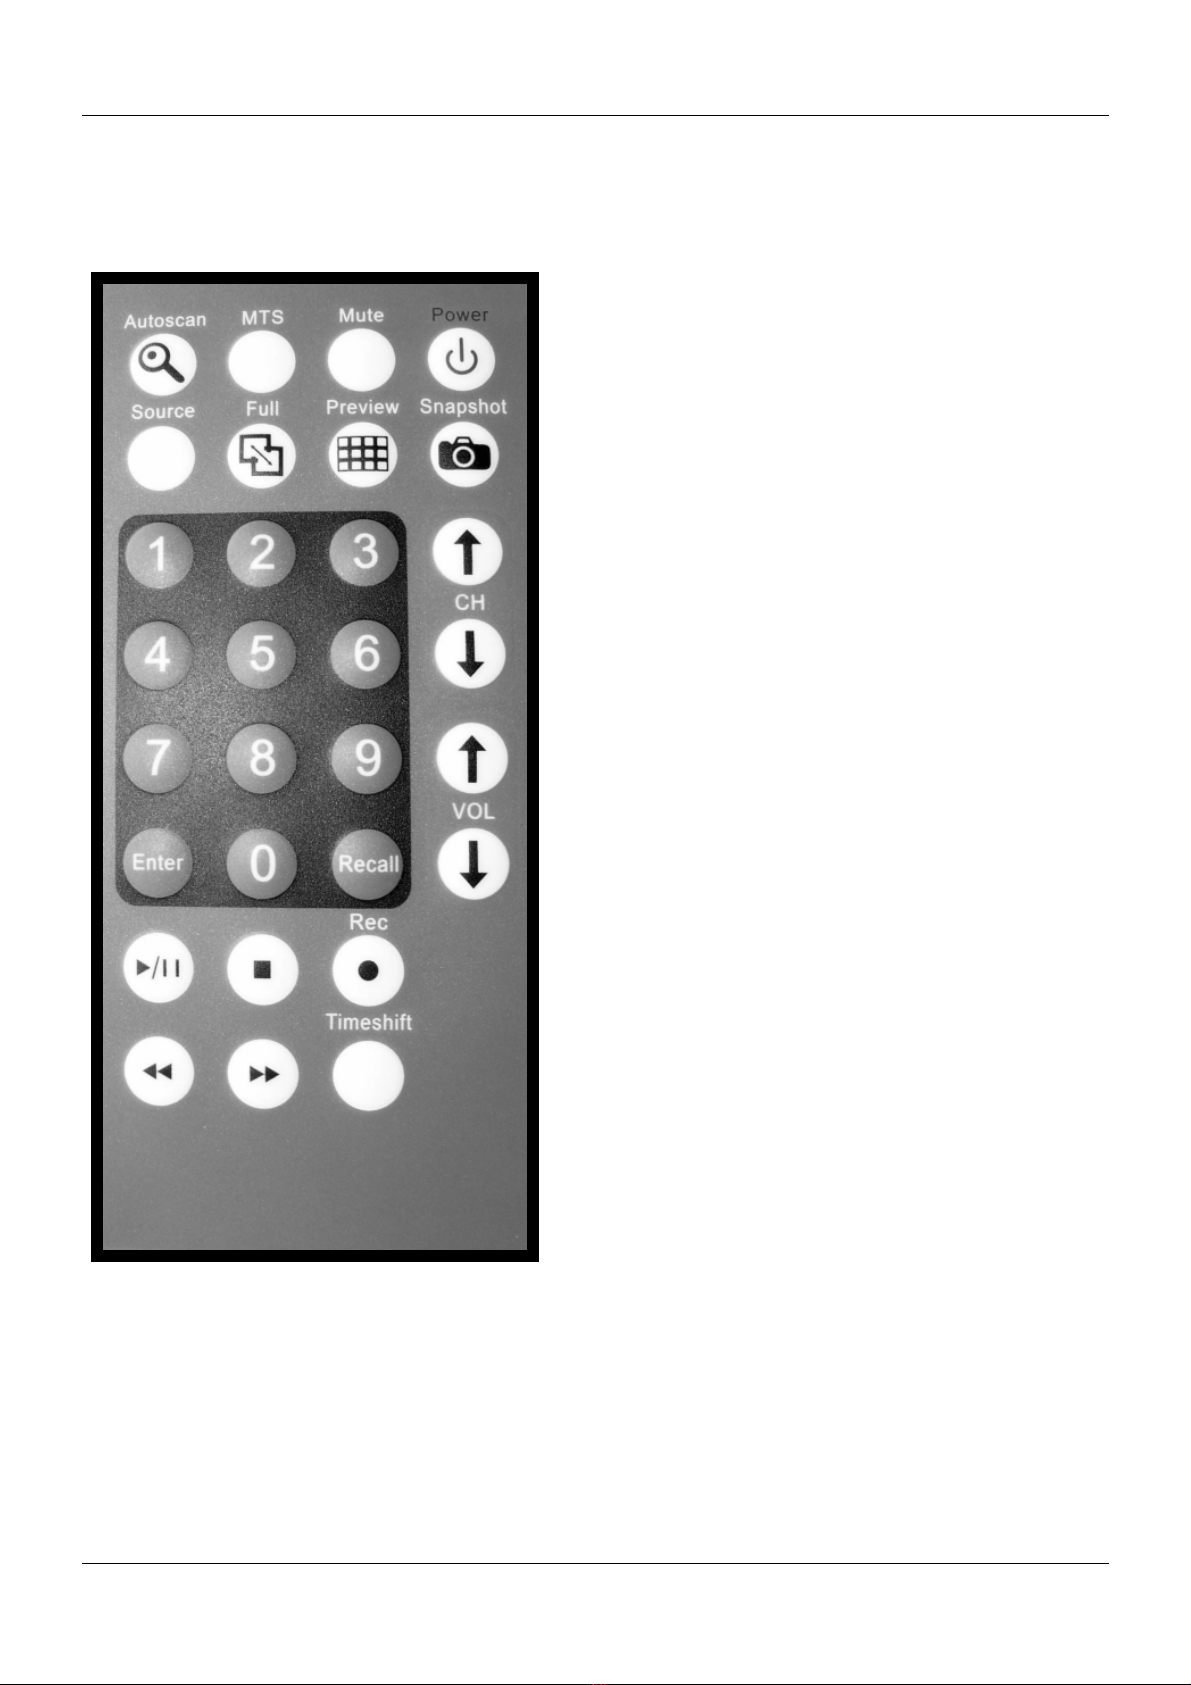
IR Remote Handset: Almost all the functions can be operated by remote control
Instant TV Replay: Pause, and rewind live television, watch in slow motion, and view
instant replays
Multi-Channel Preview: View a selection of the currently broadcast programmes
simultaneously. Once you’ve decided which programme you want, just click the image
and you’ll be able to watch and record in full screen mode
Play list Video Playback: Allows separate video files to be played back seamlessly -
enjoy a long movie without the hassle of opening and closing several video files
TV and Digital Video Recording Capabilities: The super fast software encoder can
record digital video in real-time
Pre-Scheduled TV Recording: You can easily set the time, date, and channel of the
TV programme you want to record
Time Shifting Playback: Record a programme, leave for a period of time, then come
back and watch what you’ve missed. You can even fast forward over commercials to
catch up with the live broadcast. All this can be done without interrupting the recording!
DVD Video File Recording: Video can be recorded directly in, or converted to,
MPEG-2 (DVD format). You can use a DVD Authoring Tool to create your own DVD
titles

Instruction Manual
2
Technical Specifications
Supports RF input for the following TV systems:
o PAL B&G
o PAL D&K
o PAL I
o SECAM L
o SECAM D&K
Connections:
o Video Line In: 4 Pin Mini-DIN S-Video and RCA Composite Video
o Audio Line In: RCA Stereo Audio
o Audio Line Out: Phone jack connector
Interface: USB 2.0 High Speed, Type B
Status LEDs: Power and Link
Power Connector: +5V DC
System Requirements
PC with 2 available USB ports as detailed below –
o USB 2.0 port for connecting the Capture Box
o USB 2.0 port for connecting the USB to DC Power Cable
Minimum recommended CPU – P4 1.5GHz or equivalent
128MB RAM (256MB recommended)
AGP Video Adapter supporting a minimum resolution of 800 x 600
8x speed or above CD-ROM drive for driver and application installation
Sound Card or onboard sound controller
Windows 2000/XP

Instruction Manual
3
Package Checklist
Check and identify the supplied contents match the items below before operating the hub. If any of the items are
missing please contact your dealer as soon as possible.
Audio Cable
(Stereo to Stereo)
LINDY USB 2.0
TV Tuner & Video
Capture Box
IR Remote
Controller Software CD
A
V Connection
Cable
USB 2.0 CableUSB to DC
Power Cable

Instruction Manual
4
Installation and Connections
Please follow the step-by-step process below to complete the connection of all peripherals -
IMPORTANT:
Please install the driver and application from the CD before connecting the Capture Box!
TV RF Cable
1. Connect the TV RF Cable
to the TV Tuner Port on the
rear of the Capture Box
TV Tuner
Port
2. Connect the AV Combined jack to
the AV In Port on the rear of the
Capture Box
3. Connect the Composite Video (Yellow), Audio
L (White) and Audio R (Red) connectors to the
corresponding connectors from your video device
4. Alternatively, if your
video device is suitably
equipped, you can use the
S-Video connection
AV In Port

Instruction Manual
5
5. Connect one end
of the Audio Cable to
the Audio Line Out
Port on the side of
the Capture Box.
Connect the other
end to the Line In
Port on your PC
6. Make sure your
PC has speakers
connected!
7. Connect the USB 2.0 cable to the USB
Out Port on the Capture Box and to an
available USB 2.0 Port on your PC
8. Connect the USB to DC Power Cable to
the DC-In Port on the Capture Box and to a
USB port on the PC
10. Make sure the IR Remote Controller is aimed
directly at the LED detection window when using
it to control the Capture Box
9. Use the SNAP button to
take a snapshot picture
Audio Line
Out Port
To PC’s Line In Port
Speaker Output
USB Out Port
DC In Port
SNAP button

Instruction Manual
6
Remote Control Handset
Note: Before using the remote controller for the first time, remove the plastic tab from the battery compartment.
Power: Turn On/Off Capture Box
Mute: Turn Off/Resume Audio
MTS: Toggles between languages (if the TV channel
offers this feature)
Autoscan: Autoscan TV channels
Snapshot: Capture TV/Video image
Preview: Press to preview multiple channels at the
same time, and then double click the channel you want
to view
Full: Press to display full screen
Source: Switch between TV and external sources
Numeric Pad: Selects channel 0 – 9
CH: Channel up/down buttons
VOL: Volume up/down buttons
Recall: Jump to the previous channel
Enter: Press enter to confirm selection
Rec: Records the selected view
Timeshift: Play and record video at the same time,
press to review the recorded video; press to
restore current playback
:Stops video playback
/: Press for video playback, press again to pause
: Seek forward
: Seek backward

Instruction Manual
7
Driver and Application Installation
Before installation ensure the following –
Windows 2000: Service Pack 4 or above is installed
Windows XP: Service Pack 1 or above is installed
Windows 2000
1. Insert the CD into the drive, installation will start
automatically
2. Click ‘Next’ to continue
3. Click ‘Next’ to continue
IMPORTANT:
Please install the driver and a
pp
lication from the CD before connectin
g
the Ca
p
ture Box!

Instruction Manual
8
4. Once the driver installation is complete, WinDVR
software installation will begin, click ‘Next’ to continue
5. Click ‘Yes’ to agree to the Licence Agreement
6. Enter your details, the product serial number can be
found on the CD envelope, click ‘Next’ to continue

Instruction Manual
9
7. Click ‘Next’ to continue setup
8. Click ‘Next’ again to continue
9. We recommend you install the Help file, click ‘Next’

Instruction Manual
10
10. Select ‘Yes, I want to restart my computer now’
and click ‘Finish’
11. The USB Audio/Video Device Driver will
automatically continue, click ‘Next’
12. When installation has completed, click ‘Finish’

Instruction Manual
11
13. Select ‘Yes, I want to restart the computer now’ and click
‘OK’
14. Once the computer has restarted you can connect
the Capture Box - the hardware will be detected
15. You can confirm correct installation by checking the entry in
Device Manager

Instruction Manual
12
Windows XP
1. Insert the CD into the drive, installation will start
automatically click ‘Next’ to continue
2. Click ‘Next’ to continue
3. Click ‘Next’ to start WinDVR setup

Instruction Manual
13
4. Click ‘Yes’ to the Licence Agreement
5. Enter your details, the product serial number can be
found on the CD envelope, click ‘Next’ to continue
6. Click ‘Next’ to continue

Instruction Manual
14
7. Click ‘Next’ to install the application
8. We recommend you install the Help file, click ‘Next’
9. Click ‘Next’ to continue the installation

Instruction Manual
15
10. Click ‘Finish’ to complete the driver installation
11. Click ‘Finish’ at the next screen
12. Select ‘Yes, I want to restart my computer now’ and
click ‘OK’

Instruction Manual
16
13. When the computer has restarted you can install the
Capture Box. Windows will detect new hardware and
display the ‘Found New Hardware Wizard’. Click ‘Next’
14. Windows will search for the drivers, you may see this
screen. Select the latest version and click ‘Next’
15. Installation is now complete, click ‘Finish’

Instruction Manual
17
WinDVR 3 Software
To launch WinDVR 3, double-click the InterVideo WinDVR3 icon on your desktop –
Features
TV Viewing Functions
o EPG (Electronic Programming Guide)
o TV Control
o Initialisation Wizard
o Viewing Aspect Ratio
o VPS and Channel List
o Video Colour control
o Mute Unlocked Channels
o TV Standards
o Channel Surfing
o Non-Overlay Support On VGA
Recording Functions
o MPEG 1 & 2 Support
o MPEG 1 & 2 at different resolutions
o Recording level control
o VCD and DVD compatible file output
o Advanced de-interlacing and noise reduction
Advanced Functions
o Parental Control
o Screen Capture
o Video desktop
o Time-shifting
o Pan and Zoom
o Sleep timer
o Task Manager
o Personalised Channel Maps
Table of contents
Languages: