Linkskey LKV-E132 User manual
Rev. 1.1 Copyrightc All rights reserved
Hotkeys for full and view-only access control on the
remote console.
Cabling distance 100M/330ft
LKV-E132
CAT5 KVM ExtenderSet
USB&PS/2Keyboard/MouseSupportforComputer
PS/2consoleSupportforConsole
100M/330ftCablingDistance
QuickInstallationGuide
ThankyouforpurchasingtheLKV-E132CAT5KVM
Extender Set! With our highly reliable and quality product,
user can enjoy countless benefits from using this CAT5 KVM
Extender Set.
LKV-E132-TXComputerModulewithLocalConsole
LKV-E132-RX Remote Console
In tro d u ctio n
The LKV-E132CAT5 KVM Extender Set isa new KVM
extender technology that utilizesCAT5 media technology to
extend your console up to 100M/330ft away. This KVM
Extender Set extends your keyboard, monitor and mouse
from your computer up to 100M (330ft) away on a single
CAT5UTPcable, with satisfying video quality.
The LKV-E132 CAT5 KVM Extender Set comprises two
disparateunits- TheLKV-E132-RX and the LKV-E132-TX.
The LKV-E132-RXis the Remote Consoleunit, or simply put,
the receiver on one end of the UTP cable; while the LKV-
E132-TX is the computer module w/ local console, or simply
put the transmitter on the other end of the UTP cable.
However, the LKV-E132-TX also provides a local console, so
that user can also access the computer on local console, in
addition to the remote console on the LKV-E132-RX.
The LKV-E132 CAT5 KVM Extender Set allows manual
adjustment of video parameters such as gain and
equalization by mechanical knobs located on the front-panel.
Userscaneasilyoptimizethevideoscreenoutputonthe
remote end by turning the mechanical knobs on the front
panel. This direct and easy way of video adjustment proves to
be a direct and efficient way to work out an optimized display
quality based on varying cable characteristics.
It is especially useful for setting up a highly flexible
computer/user topology over a long distance up to
100M/330ft away. Applicable either over an exhibition room,
working floors, security room, locked server room, or other
mission-criticalscenarios,theLKV-E132CAT5KVMextender
set allows you to locate your server physically away from the
user due to security or spatial concerns.
Package Co n te n ts
Pleasecheckwhetheryouhaveallthoseitemsinthebox
package:
LKV-E132-TX (Computer Module w/ Local Console) x 1
LKV-E132-RX (Remote Console) x 1
Slim 3-in-1 PS/2 KVM Cable x 1
USB Cable x 1
Power Adapters (DC9V 1A) x 1 (for Remote Console Unit)
This Quick Installation Guide x 1
Fro n t & Re a r View
Both the front-panel and rear-panel are where the various
connectors are located on the two disparate pieces of the
LKV-E132 CAT5 KVM Extender Set. Before you connect
thesetwo units to any computer, cablingsor peripherals, you
should get a glimpse of the main connectors you are going to
encounterwhen you try to set up theLKV-E132CAT5 KVM
Extendersystem
LKV-E132-RX Remote Console Unit
[LKV-E132-RX - Front-panel]
1.RedLEDindicator-Power
2. Green LED indicator Link
3.PS/2keyboardport
4. PS/2 mouse port
5.Adjustmentknobforgain
6. Adjustment knob for equalization.
[LKV-E132-RX-Back-panel]
7. Power receptacle (DC9V 1A)
8. CAT5 Extension Port [RJ-45, connect to a CAT5 UTP cable,
100M max.]
9.Monitorport[HDB15]
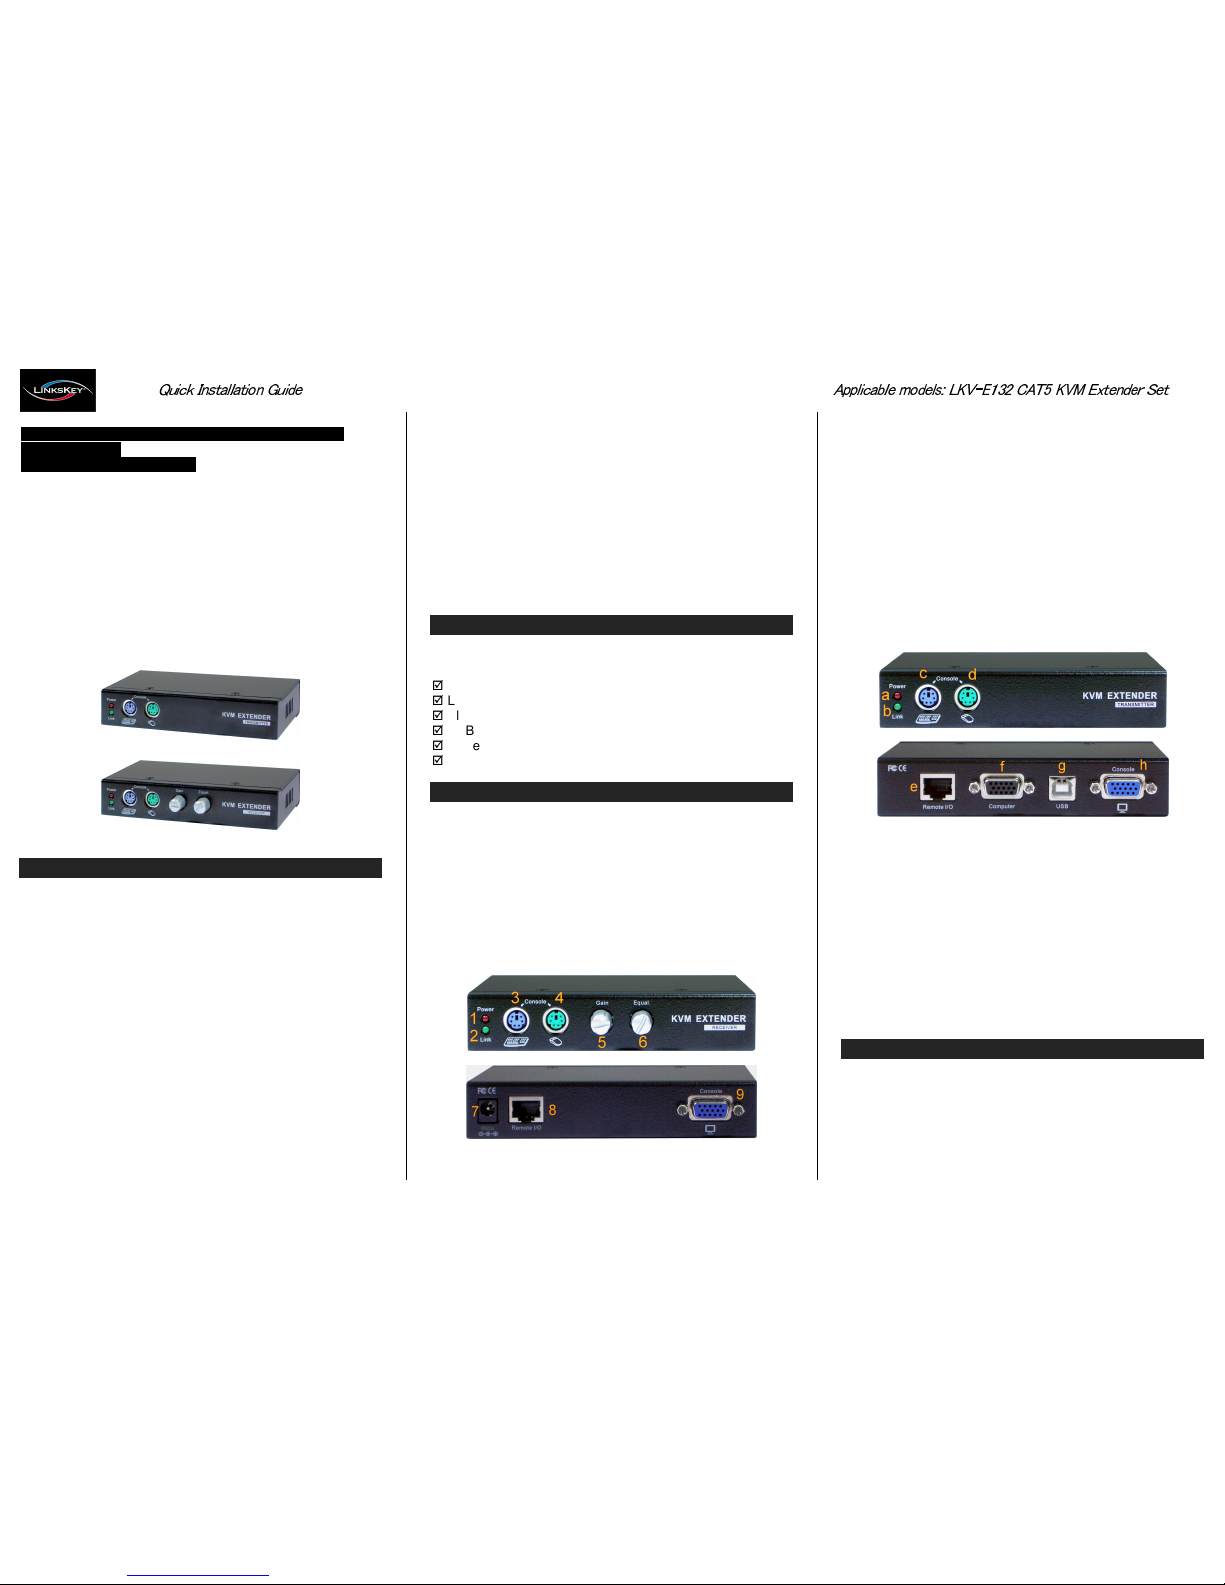
LKV-E132-TX Computer Module with Local Console
[Connected with the computer]
[LKV-E132-TX Front-panel]
a. Red LED indicator - Power
b. Green LED indicator Link
c. PS/2 keyboard port
d. PS/2 mouse port
[LKV-E132-TX Back-panel]
e. CAT5Extension Port [RJ-45, connect to aCAT5 UTP cable,
100M max.]
f.Computer portfor computer connection (integratedwith PS/2
keyboard, mouse and video interface)
g. USB port (TypeB) for computer connection
h. Monitor port [HDB15]
Pre p ara tio n b e fo r e In s tallatio n
Before you install the two pieces of the LKV-E132 CAT5 KVM
Extender Set, you should have these items on the checklist
ready:
1. The computer for extension should be one with either
PS/2 or USB interface.

Rev. 1.1 Copyrightc All rights reserved
2.Youshouldcheckthedisplaymodeofthecomputertobe
no higher than 1600 x 1200 pixel dimension. And refresh
rate to be one that is more commonly used such as 60Hz,
etc.
3. Since the LKV-E132 CAT5 KVM extender supports only
standard5-keymouseandkeyboard,anymore
advanced mouse/keyboard function will not be supported
by CAT5 extension.
4. Use good quality UTP cable (max. 100M/330ft). Note that
good quality cable will give better video outcome with
longer distance span.
5.Anycablingdistancelongerthan100M/330ftwill
experience more degradation with longer span. However,
good quality cable can reach out farther away.
6. The choice of layout path for the CAT5 UTP cable should
not only take into account the shortest possible path, but
also one that is relatively farther away from any
significantelectromagneticinterferencesource.
7. Prepare 1 or 2 sets of keyboard, mouse and monitor -
one set for local console 1 and the other set for remote
console.
8. There should be an available power outlet near where
you locate the remote console unit.
Ou t-o f-th e -bo x In s ta lla tio n
Ta k e t h e p a ck a g e co n t e n t s o u t o f t h e b o x a n d b eg in
i n s t a l la t i o n l .
Plan the layout path and deploy the UTP cable
Step1.Plan the path throughwhich the UTPcable willbe
deployed across the distance between the LKV-
E132-RX and LKV-E132-TX.You shouldchoose the
layout path not only base on shortest possible length
consideration,but also on least electromagnetic
interference.
Step 2. Lay out the UTP cableaccording to your planned
path.
Configure the LKV-E132-TX (Computer Module+ Console1)
Step 3. Connect one end of the UTP cable to the CAT5
Extension port of the LKV-E132-TX.
Step 4. Connect the LKV-E132-TX to the computer
(connector f), using the Slim 3-in-1 PS/2 KVM cable
and/or the USB cable (connector g). (Note that if you
need to connect with the USB interface, you should
connect the USB cable to the computer since the
Slim 3-in-1 PS/s2 KVM cable support only the PS/2
interface). The LKV-E132-TX is powered through the
connector interface with the computer.
Step5.SetupLocalConsole:Connectasetofkeyboard,
mouse and monitor to the LKV-E132-TX Console
connectors (connectors c, d, h).
Step 6. Power on the computer, and check the keyboard,
mouse and video output on Local Console to see if it
works fine. It should work fine before you proceed to
nextsteps.
Configure the LKV-E132-RX (Remote Console)
Step 7. Connect the other end of the UTP cable to the CAT5
Extension port of the LKV-E132-RX.
Step8.ConnectthepoweradaptertotheLKV-E132-RXto
power it up before connecting any devices to it.
Step 9. Set up the Remote Console: Connect a set of
keyboard, mouse and monitor to the LKV-E132-RX
Console ports (connectors 3, 4, 9).
Step 10. Check the keyboard, mouse and video output on the
Remote Console to see if it works fine. At this time,
thevideomightbeveryblurredsinceitisnotyet
adjusted and optimized.
Step 11. Adjust the video gain and equalization level by
turning the two mechanical knobs on the front-panel
of the LKV-E132-TX unit. By conscientiously trials,
you should be able to reach an optimized video
display output on the Remote Console monitor.
For KVM Switch Console Extension:You can also use the
CAT5 KVM Extender to extend your KVM Switch console ¡ K
.
Just connect the transmitter unit (LKV-E132-TX) to the
console port of the KVM Switch,and the rest of the
connection is just like what has been described above. Thus,
you can also extend the KVM switch console up to 100M
away.
Co nfig u ra tio n H o tk e ys
The LKV-E132 CAT5 KVM Extender Set provides
configuration hotkeys thatcan help you configure either the
local console or the remote console for access control, view
only mode as well as hotkey preceding sequence selection.
There are hotkeys that are operable only on local console (on
the LKV-E132-TX unit) as well as hotkey thatare likewise
operable on both local console and remote console. With
these hotkeys, users can either block or grant access from
the remote console, or toggle on/off the view-only mode on
the remote console. For someone who does need to use
different hotkey preceding sequence, it also provides 5
alternatives for choice. Thus, the Local Console (i.e. the TX
unit) will have permanent access of the computer without
limitation; the Remote Console can be enabled with full
access or view-only access, or access disabled entirely.
[Local Console hotkeys]
HotkeyPrecedingSequence
Scroll + Scroll+ H + (x), x =Scroll,CAPS, F12, NUM, Esc
To ggleRem o te Co n s o le ON / OFF
Scroll+Scroll+SPowerLEDflashesinfastmode
To g gl e Re m o te Co n so l e Vi e w On ly ON / OFF
Scroll + Scroll + K Power LED flash es in slow mode
LKV-E132 CAT5 KVM Extender Configuration Diagram
[Remote Console hotkeys]
H o tk e y P re c e d in g S e qu e n c e
Scroll + Scroll +H + (x), x = Scroll, CAPS, F12, NUM, Esc
FCC / CE Sta te m e n ts
FCC Statement:This equipment has been tested and found to
comply with the regulations for a Class B digital device, pursuant to
Part 15 of the FCC Rules. These limits are designed to provide
reasonable protection against harmful interference when the
equipment is operated in a commercial environment. This equipment
generates, uses, and can radiate radio frequency energy and, if not
installedand usedin accordancewith thisQuickInstallationGuide,
may cause harmful interference to radio communications. Operation
of this equipment in a residential area is likely to cause harmful
interference in which case, the user will be required to correct the
interference at his/her own expense.
CE Statement: This is a Class B product in a domestic environment,
this product may cause radio interference, in which case the user
may be required to take adequate measures.
USB Cable
Slim 3-in-1
PS/2 KVM Cable
Technical Support
E-mail: [email protected]
Website: www.linkskey.com
Other Linkskey Extender manuals


