Linkskey LKV-IPM01 User manual

KLE
The IP-based
KVM Link Extender
Anytime Anywhere
User Guide
Revision 1.2
Copyright © 2006

About this manual
This User Guide is the complete reference to the KLE, its functional features and usage. The
Complete User Guide could be found only on the KLE Support CD-ROM disc.
KLE documentation List
Quick Installation Guide Print-out / KLE support CD-ROM disc
User Guide KLE Support CD-ROM disc
How to generate your own set of Certificates KLE Support CD-ROM disc
FCC Statement
This equipment has been tested and found to comply with the regulations for a Class B digital
device, pursuant to Part 15 of the FCC Rules. These limits are designed to provide reasonable
protection against harmful interference when the equipment is operated in a commercial
environment. This equipment generates, uses, and can radiate radio frequency energy and, if
not installed and used in accordance with this User Guide, may cause harmful interference to
radio communications. Operation of this equipment in a residential area is likely to cause harmful
interference in which case, the user will be required to correct the interference at his/her own
expense.
CE Statement
This is a Class B product in a domestic environment, this product may cause radio interference,
in which case the user may be required to take adequate measures.

KLE User Guide R1.2
i
TABLE OF CONTENTS
1INTRODUCTION ..............................................................................................................................1
1.1 PRIMARY FEATURES....................................................................................................................3
General features.............................................................................................................................3
TCP/IP remote connection..........................................................................................................3
Thin-client Viewer Program........................................................................................................3
Hi-Speed PPP Connection............................................................................................................ 3
Power ON-OFF Control Support................................................................................................4
Security..............................................................................................................................................4
User Management.......................................................................................................................... 4
1.2 SYSTEM ARCHITECTURE ............................................................................................................5
1.3 KLE EXTERNAL VIEWS..............................................................................................................8
KLE Front View................................................................................................................................8
KLE Rear View................................................................................................................................. 9
KLE Power Socket..........................................................................................................................9
2KLE INTALLATION ......................................................................................................................10
2.1 PHYSICAL CONNECTIONS ........................................................................................................10
2.2 CONFIGURE YOUR SERVERS FOR CONNECTIONS TO KLE ...................................................11
2.3 MORE TIPS FOR SERVER DESKTOP CONFIGURATION ...........................................................13
2.4 CONFIGURE KLE NETWORK SETTINGS ..................................................................................15
2.5 CONFIGURE PORT BASE SETTING FOR KLE ...........................................................................16
2.6 CONFIGURE YOUR FIREWALL/ROUTER FOR ACCESSING KLE ACROSS INTERNET ................18
2.7 INSTALL CERTIFICATES ON KLE .............................................................................................19
3MAKING A VIEWER CONNECTION.........................................................................................24
3.1 INSTALL WIN32 VIEWER ON THE CLIENT COMPUTER ..........................................................24
3.2 INSTALL JAVA VIEWER ON THE CLIENT COMPUTER................................................................24
3.3 IMPORT CERTIFICATES TO KLE VIEWER ON THE CLIENT COMPUTER ...................................25
Import client certificate to Win32 Viewer...........................................................................26
Import the certificates for the Java-based KLE Viewer.................................................26
3.4 SPECIFY THE VIEWER CONNECTION OPTION BEFORE MAKING A CONNECTION .................27
ENCODING...............................................................................................................................................27
LOCAL CURSOR SHAPE ..........................................................................................................................27
MISC........................................................................................................................................................27
DISPLAY...................................................................................................................................................28
3.5 ESTABLISH THE VIEWER CONNECTION.................................................................................... 28
3.6 MOUSE CURSORS SYNCHRONIZATION ...................................................................................30
3.7 SAVE THE CONNECTION OPTIONS ..........................................................................................30
3.8 WIN32 VIEWER CHARACTERISTICS ....................................................................................... 31
3.9 TITLE BAR INFORMATION ........................................................................................................35
3.10 THE SELECT COMPUTER BOX...................................................................................................35
3.11 VIEWER QUICK MENU..............................................................................................................37
3.12 JAVA VIEWER CHARACTERISTICS ...........................................................................................41
3.13 COMMON VIDEO DISPLAY PROBLEM TROUBLESHOOTING .................................................... 41
4KLE UNIT MANAGEMENT OVER A SECURE HTTPS BROWSER CONNECTION.........44
4.1 WEB-BASED MANAGEMENT INTERFACE ................................................................................. 44
4.2 DOWNLOAD –DOWNLOAD PROGRAMS FOR VIEWERS..........................................................46
4.3 VIEWER –VIDEO SERVER NAME &KEYBOARD TYPE SETTINGS .........................................47

KLE User Guide R1.2
- -
ii
4.4 DATE &TIME –DATE,TIME,GLOBAL TIME ZONE SUPPORT AND NTP SERVER
SYNCHRONIZATION .................................................................................................................................49
4.5 VIDEO SERVER –MISCELLANEOUS SETTINGS FOR VIDEO SERVERS..................................51
4.6 POWER CONTROL –MISCELLANEOUS SETTINGS FOR VIDEO SERVERS..............................53
4.7 COMPUTERS –MISCELLANEOUS SETTINGS FOR VIDEO SERVERS.......................................54
4.8 SERVER LOG –LOGGING SERVER EVENTS............................................................................56
4.9 VIDEO MODES –KEEPING,MODIFYING AND AUGMENTING YOUR VIDEO MODE DATA
BASE 57
4.10 ALARMS –E-MAIL NOTIFICATIONS AND SNMP LOGGING SUPPORT .................................. 60
4.11 KVMS –KEEPING AND ADDING YOUR KVM DATA BASE ....................................................64
4.12 LAN TCP/IP –PORT AND IP SETTINGS ............................................................................... 68
4.13 WAN PPP –PPP SERVER AND CLIENT .................................................................................70
4.14 USER STATUS –SHOW THE CURRENTLY CONNECTED USERS .............................................74
4.15 USER MANAGEMENT –MANAGE USER ACCOUNTS,RADIUS ACCOUNTING AND REMOTE
AUTHENTICATIONS ................................................................................................................................. 75
4.16 SECURITY –CERTIFICATES INSTALLATION,VIEWER ENCRYPTION AND PASSWORD
POLICIES .................................................................................................................................................81
4.17 MAINTENANCE –FLASH IMAGE VERSION INFORMATION,SOFTWARE UPGRADE,
CONFIGURATION BACKUP AND UPLOAD ...............................................................................................85
4.18 LOGOUT –LOG OUT THE WEB MANAGEMENT .......................................................................89
4.19 APPLY SETTINGS –VALIDATE NEW SETTINGS ...................................................................... 90

KLE User Guide R1.2
- -
1
1 INTRODUCTION
The name of KLE is derived from an acronymic combination from it full name, KVM
Link Extender, which well explains the functionality of this powerful machine in itself.
Though lightweight in size and compact in form factor, KLE is nevertheless a heavy-
weight in its functional versatility, rock-solid robustness and formidable security. It
supports full 1024-bit PKI authentication, 128-bit SSL data encryption, LDAP,
RADIUS as well Active Directory authentication and RADIUS accounting.
Dominant yet cost-effective solution for remote server management
scenarios
With the ubiquity of the DSL/Cable technology and the bandwidth availability
therewith, the IP-based KVM technology has emerged as a dominant player in the
new landscape of remote servers management. Today, the IP-based KVM Extender
has been regarded as a better and more cost-effective solution to address the critical
issue of remote servers management, which could only be partially tackled in the
past by expensive yet redundant software solutions or Enterprise Management
System. And KLE is a robust and versatile solution to address the needs of modern
remote server management scenarios.
Total server control from BIOS level up anytime anywhere
KLE gives users total control from preboot stage such as the BIOS-level CMOS
setting up to the GUI applications and daily maintenance routines such as power
cycling (power control unit required). And all these could be nicely done on your
admin desk using an ordinary web-browser management interface and a thin-client
software viewer. All you need for accessing your computer is to login the KLE and
download the viewer program and get yourself connected to a whole bunch of
servers in seconds. A truly anytime anywhere access for the server administrator!
Versatile backup connection featuring a PPP Server or PPP Client
To provide the necessary redundancy of a second backup system while your network
might no longer works in critical situation, KLE also allows an easy and convenient
PPP connection over the dial-in modem phone line. It could serve as a PPP server to
accept a peer computer to make PPP connection request over either a direct cable
connection or a dial-in modem phone line. On the other hand, KLE could also serve
as a PPP client to dial-in to your ISP or enterprise PPP server to connect to internet,
making a truly anytime access for remote client anywhere on the Internet. Thus, the
PPP server/client features in KLE allow users a second backup system, which offers
a direct cable/modem dial-in access to your connected servers via PSTN while your
network is down.

KLE User Guide R1.2
- -
2
KLE – the KVM Link Extender
Edge of critical Advantage over other remote server management solution
The advantages of using KLE,as compared to the conventional software remote
control solution is that: The hardware-based remote control solution such as KLE is
able to access the server regardless of the server states while software remote
control solution is non-functional while the server is still in the POST or preboot
stage or in a “blue screen of death”. KLE also offers power on/off alternatives if used
with a remote power control unit.
Rock-solid stability and ultra-security yet with flexibility and convenience to
use
The KLE distinguishes itself among its peer products not only in its rock-solid
stability in durable performance, but also in its industry-standard security features
such as full 1024-bit PKI Authentication and 128-bit SSL data encryption. Together
with 3 levels of viewer connection security levels in combination with 3 types of
password policies and three categories of user privileges, all these make KLE a
ultra-powerful IP Extender machine with ultra-flexibility for a customized balance
between data safety and user convenience. On the other hand, the robustness and
the ease of maintenance of the embedded systems involve zero costs for the unit
management and maintenance.
Global Time Zone and Timer Servers Support
To make KLE really comfortable with all the global time zones it will be deployed in,
it is vital to provide a convenient Global Time Zone support since it will give a correct
time stamp to all logging events, alert e-mail notifications and won’t leave server
administrators in troubles with calculating the time differences he will inevitably
encounter with servers in different time zones. Additionally, KLE also supports NTP
time servers and keep its time always sync with the timer servers you specify. The
KLE is even sophisticated enough to take care of the daylight saving time in each
and every Time Zone/Region, thus saving troubles for updating time frame with
daylight saving specifics every six months.
Upgrade and Configuration Backup is just a breeze
KLE is fully Web-enabled to allow software upgrade and configuration upload/backup
over the Web Management Interface. All you need to do is to upload the files to KLE
over Web interface and voila it’s freshly restarted and begins working with those

KLE User Guide R1.2
- -
3
latest update functionalities and features-all within minutes and can be performed
across oceans-by a remote SUPERADMIN!
Advantages Galore
With KLE, the server administrator can access enterprise server room or data center
on his own seat without toils and troubles of going anywhere from across the street
to oversea. And organizations can enjoy a uniquely centralized and very cost-
effective control over its dispersed servers in different branch offices, even around
the world, thus saving money for outsourcing costs.
1.1 Primary features
General features
▪Full-featured IP-based Remote Control Solution for server management
▪Provides remote control for several servers when connected to a conventional
KVM Switch
▪Simultaneous access from multiple users
▪No user limitation
▪Facilitate centralized control
▪Total control over the remote server from BIOS level up to GUI applications
▪Remote Power On/Off support
▪Total transparency of control
▪Ultra-security using full 1024-bit PKI Authentication / 128-bit SSL encryption
▪Work with LDAP / RADIUS / Active Directory Servers
▪Ethernet 10/100 and serial PPP connections
TCP/IP remote connection
▪Web Management Interface for all settings and upgrade/backup features
▪Support Telnet session and FTP service (disabled by default for more security)
Thin-client Viewer Program
▪Win-32 viewer and Java viewer for cross-platform compatibility
▪Connection options configurable for optimized performance
▪Shared, Non-Shared and View Only sessions
▪Easy download and installation
▪Multiple viewer instances can be run on a same client computer
▪Automatic video optimization
Hi-Speed PPP Connection
▪PPP Connection support over serial RS-232 interface up to 1 Mbps
▪PPP server enabling for PPP connection across a pair of modems for secure or
backup direct access
▪PPP client enabling for PPP connection to the internet with a modem

KLE User Guide R1.2
- -
4
Video server
▪Support up to 1280 x 1024 @ 60 Hz resolution
▪8/16-bit color
▪3 Video Quality settings
▪3 Video Compression schemes
▪8-bit color reduction
▪JPEG Compression option for low bandwidth internet connections
▪Configurable database to set up new or unknown VGA modes
▪Virtually compatible to any KVM Switch through simple configuration
Power ON-OFF Control Support
▪Remote power ON-OFF control over serial interface
▪Serial commands configurable to fit all serial power control devices
▪Power ON-OFF privilege only for the SUPERADMIN users
Security
▪1024-bit Public key Authentication using certificates generated by an external CA
▪128-bit SSL Encryption for keyboard, mouse and video signal transmissions
▪Remote authentication support for LDAP or RADIUS servers
▪RADIUS accounting support
▪3 SSL security levels :
oNo authentication – No encryption
oServer Authentication – SSL encryption
oServer & Client authentication – SSL encryption
▪3 password policies :
oNo Password
oOne global password for all users
oOne different password for each user
▪Linux operating system offers robust virus resistance
Alarms and Notifications
▪Alert e-mail notification and SNMP trap messages for critical server events such
as No Video, Blue Screen and NumLock Test Failure
User Management
▪User login either by querying the local user database or by connection to remote
LDAP or RADIUS server
▪3 user privileges :
oSUPERADMIN – to access complete set of management features and
user features, including Power ON-OFF remote servers
oADMIN – partial set of management and all user features
oUSER – only user features
Global Time Zone Support
▪Time support for all continents and major cities
▪Time synchronization by connection to any NTP time servers
▪Automatic Daylight Saving management

KLE User Guide R1.2
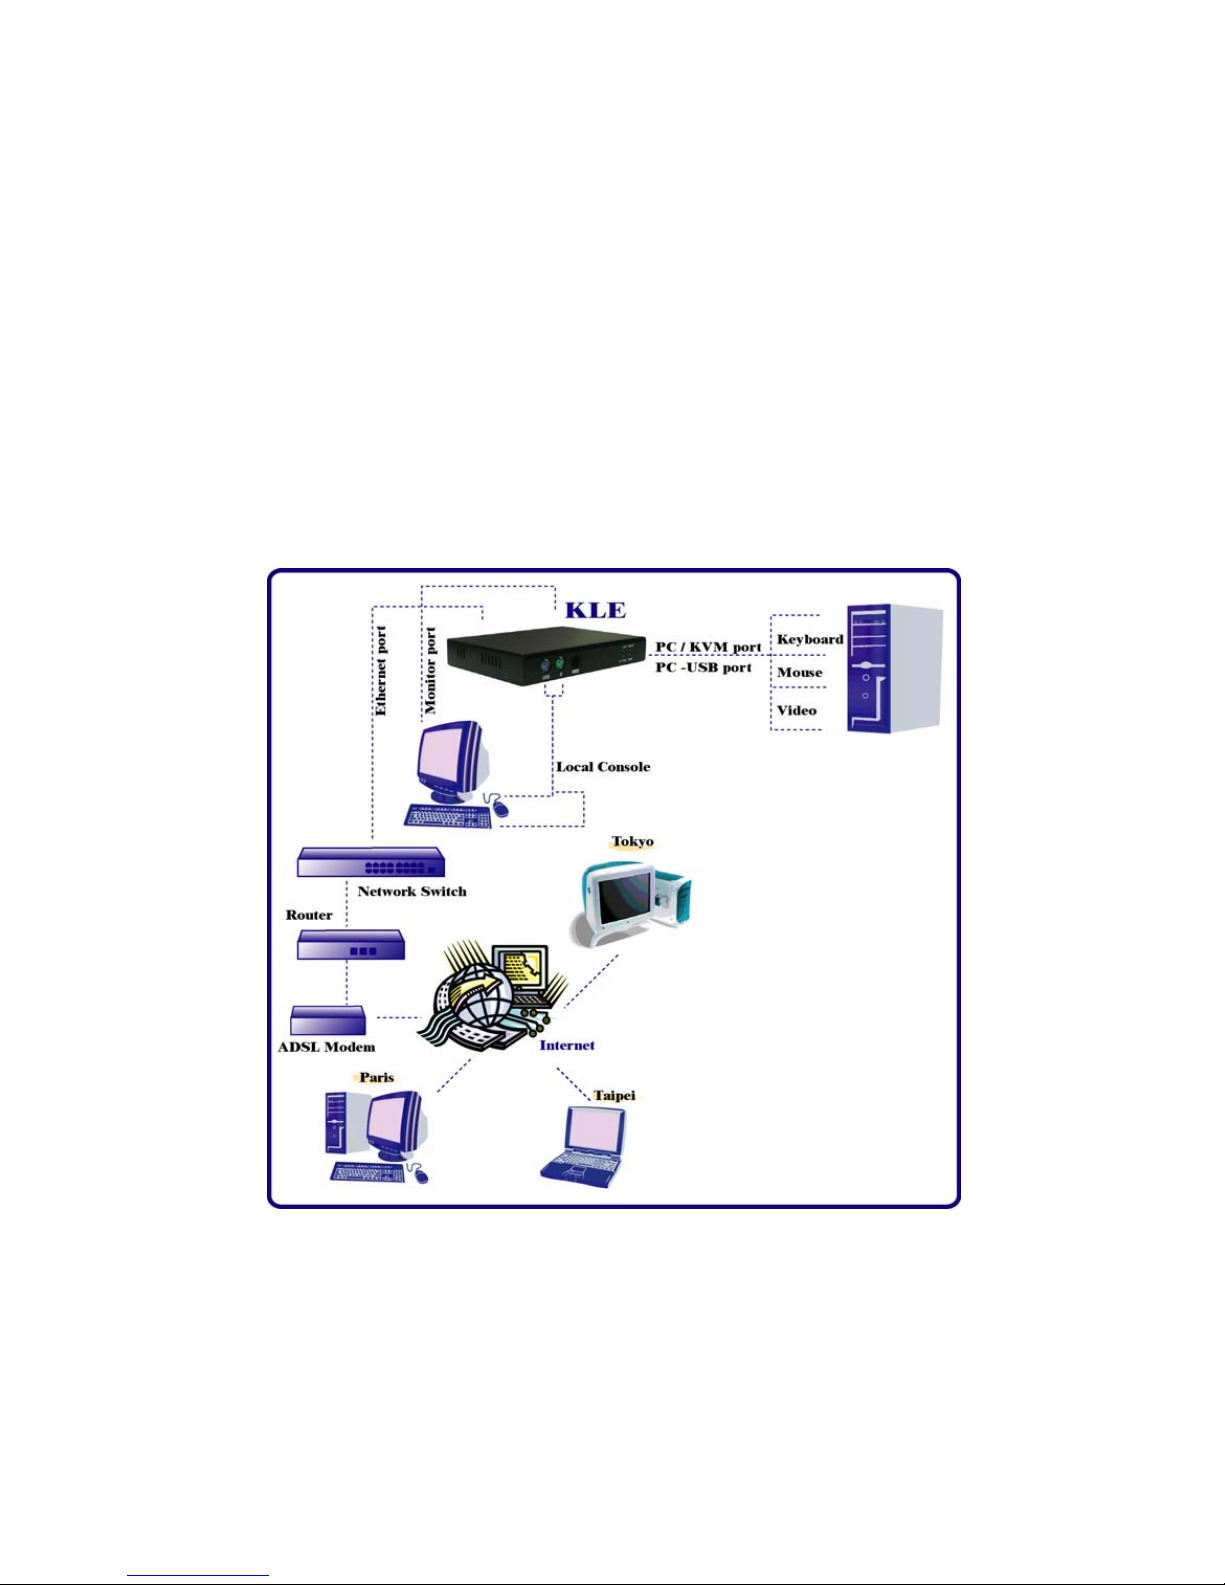
1.2 System Architecture
The KLE is based on an embedded Linux platform for computing power and rugged
stability. The KLE employs a High speed Processor to ensure excellent video quality
and fast keyboard / mouse response across the Internet, even when bandwidth
availability is limited.
LAN/WAN Configurations
KLE connected to a single server
KLE connected to a conventional KVM Switch and multiple servers
- -
5

KLE User Guide R1.2
Power Control Configuration
KLE connected to a Remote Power Control Device
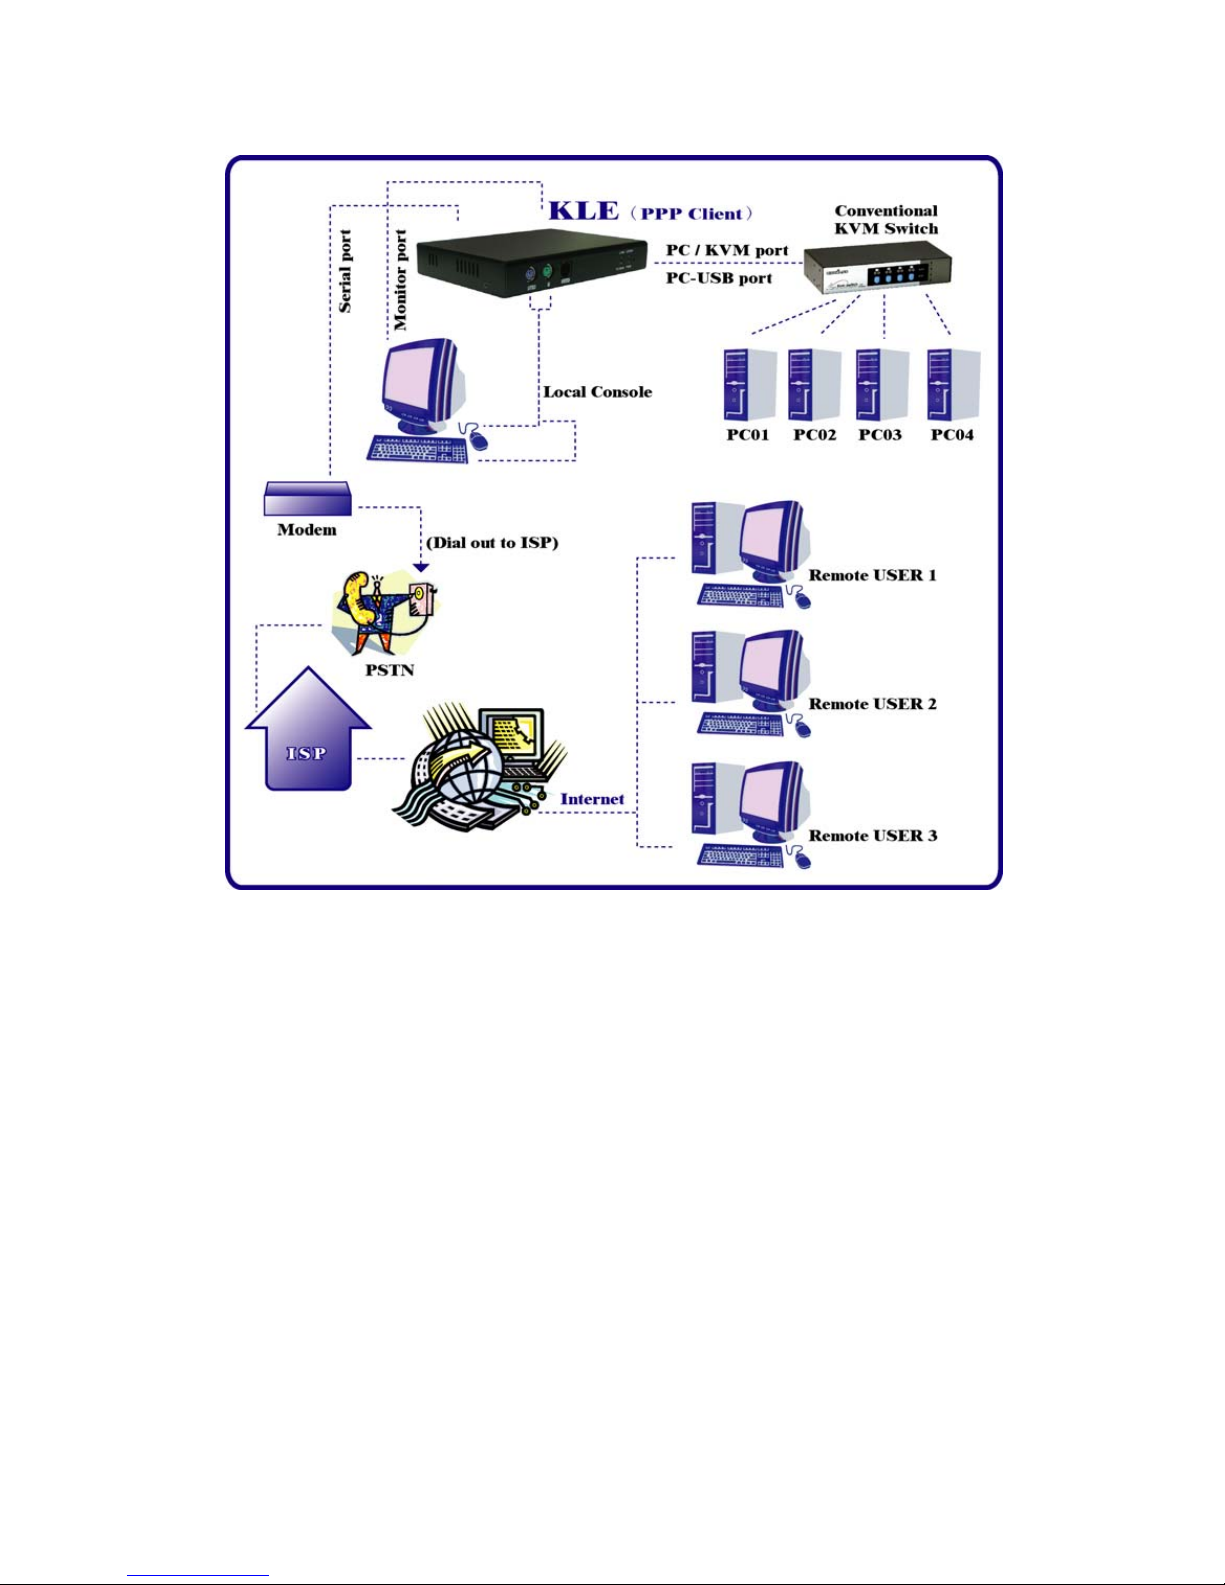
PPP connections
KLE as PPP server to accept dial-in request from a remote PPP client via modem line
- -
6
KLE User Guide R1.2
KLE as PPP client to dial-out to ISP for remote clients to access via internet
- -
7

KLE User Guide R1.2
1.3 KLE External Views
KLE Front View
KLE Front-panel
PS/2 Keyboard port
This is where you connect the PS/2 keyboard for local console.
PS/2 Mouse port
This is where you connect the PS/2 mouse for local console.
Console Management Port (RJ-12)
This is where you connect the serial console cable for advanced console
management of KLE unit via a serial terminal emulation utility such as Windows
HyperTerminal.
Status LEDs
The 10/100Mbps LED is lit as solid orange when the current digital link is running on
100Mbps speed.
The Link/Act LED gives off solid green light when a network link is established and
flashes whenever network transmission are perceived on the digital port.
The Power LED indicates the Power On status when it is lit as solid green.
The Video LED indicates the normal functioning of video server when it is blinking.
Restore-to-Default Button
The Restore-to-Default button is a tiny recessed button located to the right of the
LED indicators, and can only be accessed by prying down with a pointed needle tip.
To depress the recessed button for over 4 seconds, and upon release, it will restore
KLE to factory default – the default IP settings and user account settings that come
with factory default settings.
- -
8

KLE User Guide R1.2
KLE Rear View
KLE Rear Panel
PC/KVM port (HDB-15, integrated with PS/2 Keyboard and mouse signals)
The PC port connector is where you should connect to either a single PS/2 computer
or a single PS/2 KVM Switch, using the 3-in-1 slim KVM cables w/ an integrated
HDB15 connector. However, if you are using USB-enabled computer or USB KVM
Switch, you should additionally use a USB cable to connect to a USB port on your
computer for keyboard/mouse connection.
Monitor Port (HDB-15)
This is where you should plug in the Monitor for your local console on KLE.
USB port (USB Type B)
This USB port provides USB keyboard/mouse connections to a USB-enabled PC, or to
a USB KVM Switch. Thus, if you are connecting any USB-enabled PC or USB KVM
Switch, please use a USB cable to make the connection.
Ethernet Port (RJ-45)
The Ethernet port, or digital port, offers anytime anywhere access of KLE and
subsequently the conventional KVM Switch(es) and servers/computers connected
behind it to the remote login clients lover LAN/Internet.
Serial Control Port (RJ-12)
The serial control port allows you to connect to either an external modem or a power
control unit or to a cascaded chain of power control units. When added with an
external modem to its serial control port, KLE could serve either as a PPP server to
allow direct cable connection or dial-in connection from its peer computers, or as a
PPP client to dial-in to the ISP or an enterprise PPP server. Furthermore, through
serial commands sent over its serial control port, KLE can perform remote power
on/off and power cycling task via the (cascaded) power control module(s).
KLE Power Socket
You should use the DC9V 2A Adapter provided within the package. Use of any other
adapter will nullify the warranty.
- -
9
KLE User Guide R1.2
2 KLE INTALLATION
2.1 Physical Connections
Step 1. Power on the KLE: Connect the KLE Power adapter and power on KLE.
Step 2. Set up a local console on KLE: If a local console (that is a physical
keyboard, mouse and monitor connected to the KLE) is required, connect the
keyboard and mouse to the KLE local console ports (that is keyboard, mouse and
monitor port specifically).
Step 3-a. Single Server Mode: If you need to connect to only one
computer/server. Just connect to the PC/KVM port directly to the PC, using the 3-in-
1 Slim KVM combo cable and/or the USB cable that come with the KLE packing box.
KLE configuration – Single server mode
- -
10

KLE User Guide R1.2
Step 3-b. Multiple Server Mode: If you need to connect to multiple
computers/servers, you should use a KVM switch in between the KLE and your
connected computers/servers. Just connect to the PC/KVM port o the console port of
your KVM switch using the 3-in-1 Slim KVM combo cable and/or the USB cable (if it
is a USB KVM switch) that come with the KLE packing box. And the KVM switch will
in turn be connected to the multiple computers/servers.
KLE configuration – Multiple server mode
Now that you have set up your local console on KLE, you can now configure your
connected servers just by using the ready access provided by KLE’s local console.
2.2 Configure Your Servers for Connections
to KLE
Mouse acceleration is not supported in KLE. Therefore, you must turn off mouse
acceleration on all your connected servers.
Turn off mouse acceleration & “Snap to” option
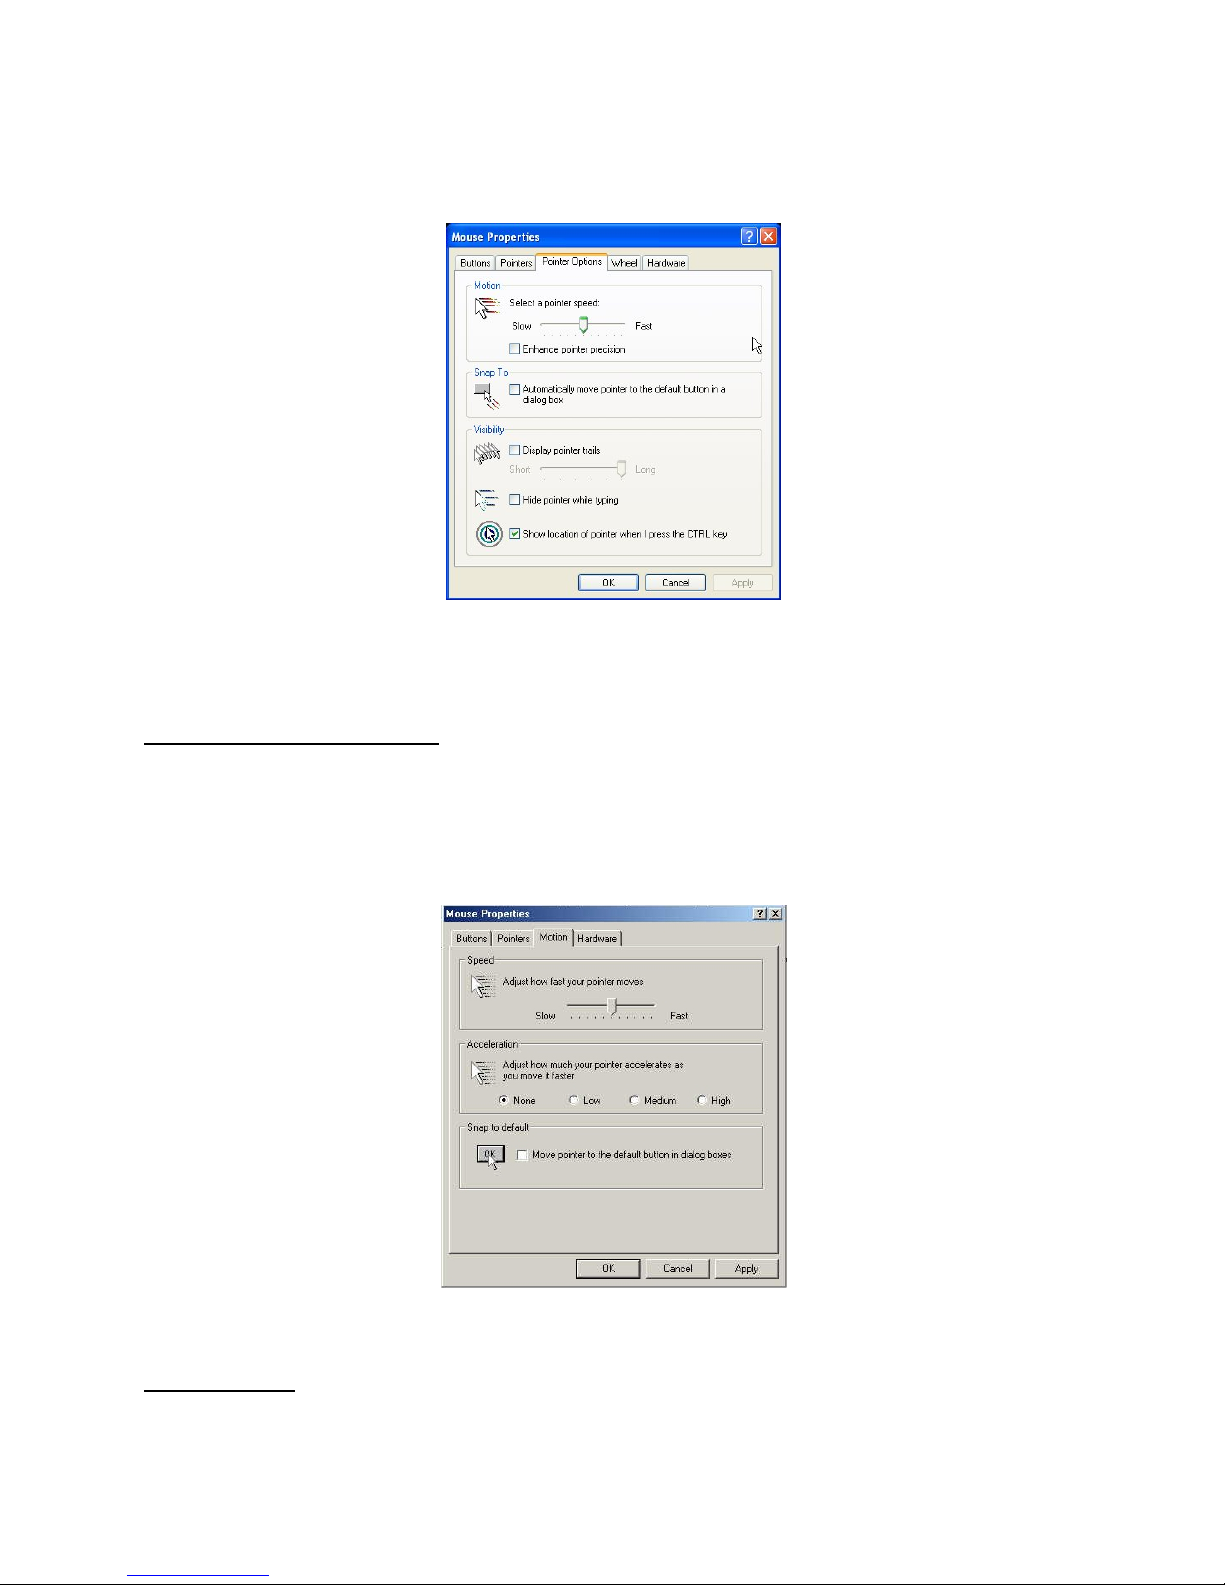
Windows XP Platform
Access Control Panel/Mouse. On the Mouse Properties tab, select the Pointer Options
page :
- -
11
KLE User Guide R1.2
1. Adjust the pointer speed slide bar to the exact middle.
2. Uncheck the Enhance pointer precision option.
3. Uncheck the Automatically move pointer to the default button in a
dialog box
Click OK.
Windows 2000 Platform
Access Control Panel/Mouse. On the Mouse Properties tab, select the Pointer Options
page :
1. Adjust the pointer speed slide bar to the exact middle
2. Select the Acceleration as None
3. Uncheck the Move pointer to the default button in dialog box
Click OK.
Windows 98
Access Control Panel/Mouse. On the Mouse Properties tab, select the Motion page.
Under the Pointer Speed category:
- -
12

KLE User Guide R1.2
1. Adjust the pointer speed slide bar to the slowest (leftmost) position.
Click OK.
The mouse setting page on different Windows platforms might be quite different, some gives mouse
acceleration option and some don’t. If you see any mouse acceleration option, please uncheck it. If there is
no mouse acceleration available on the setting page, you can adjust the mouse speed slide bar to either x1 or
the slowest position (such as on Linux platforms). But sometimes, it requires a middle position on the speed
slide bar to make mouse synchronization on the viewer side, for example, Windows XP requires a middle
position on mouse speed. Anyway, the worst case is that you have to make some trial and error to make your
mouse acceleration off and the speed as x 1 (could be at the slowest position or the middle position).
2.3 More Tips for Server Desktop
Configuration
There are several aspects that have to be taken into consideration and maybe
configured on your computers or servers for best performance:
(1) Resolution modes should refrain from too much peculiarity and better
adopt ones that are within KLE’s standard support.
(2) Turn off the Menu special transition effects on your operating system
(especially on Windows XP, if you are using any) such as fade for best
video refreshing effect, especially when you are using Medium or Low
Video Quality as your video filter setting on KLE.
(3) Adjust the server desktop backgrounds as containing preferably plain,
solid colors with simple designs (only for improving video refreshing
speed when bandwidth is critically limited. No need to do so when
bandwidth is ample)
Configure Display Resolution on your Server
- -
13

KLE User Guide R1.2
KLE supports most display modes up to 1280 x 1024. However, you might encounter some display
problems when your display card is outputting an unusual display mode. These possible problems are either
no video or abnormal display on viewer screen.
To simplify the display factor before connection to KLE, we suggest you use more standard display modes
such as: 800 x 600 @ 72Hz/75Hz, 1024 x 768 @ 72Hz/75Hz, etc. For the suggested display modes, please
refer to the following table.
640 x 400 640 x 480 800 x 600 1024 x
768 1152 x
864 1280 x
1024
56Hz
60Hz DDDDD
61Hz
64Hz
70Hz D
DD
72Hz DD
74Hz
75Hz DDD
76Hz D
78Hz
D
84Hz
85Hz DDDD
100Hz DDD
Note: These are suggested display modes for server desktop connected KLE. However, the actual feasible display
modes for as specific server desktop will be dependent on its display card. Some display modes listed here might not be
feasible with some display card. Try to do some trials to determine the best display mode for your desktop on KLE
viewer.
Disable special transition effects on the screen outputs of your connected servers
Go to Control Panel/ Display / Appearance / Effects. And then uncheck the option to disable transition
effects such as Fade for the menus and tool tips. You should perform the same check on each of your
connected servers.
On Windows platforms such as Windows 98, 2000, XP and 2003 Server, some transition effects might
yield undesirable video refreshing artifacts, especially when you are using Medium or Low Video Quality as
your video filter settings. To avoid undesirable artifacts from appearing on your screen, please turn off the
special transition effects.
- -
14

KLE User Guide R1.2
Choose plain and solid server desktop backgrounds for your connected servers.
To optimize the bandwidth efficiency and speed up video performance across
bandwidth-limited environment, one should preferably adopt a server desktop which
should be as plain as a color background with a solid and light-colored graphics.
Complex patterns or color gradients should be avoided, if bandwidth is critical in
your application, since they will create more bandwidth demands for their
transmission across internet.
2.4 Configure KLE Network Settings
Step 1. Connect your KLE to the Ethernet LAN.
The factory default network settings for KLE are as follows:
IP address: 192.168.1.200
Net mask: 255.255.255.0
Gateway: 192.168.1.254
DNS: 192.168.1.254
Step 2. Access KLE Web Browser Management interface by typing the following in
the address bar of your browser window on a remote client:
https://192.168.1.200:5908
Step 3. Then a login prompt will ask you for the account name the password. Use
the default account and password:
User Name: superuser
Password: superu
After logging in, you will see the KLE Web Browser Management Interface.
- -
15

KLE User Guide R1.2
Step 4. Go to the LAN TCP/IP page on the KLE Browser Management Interface and
modify your IP settings. Refer to Section 4.12, LAN TCP/IP – Port and IP Settings.
Step 5. Apply the new setting by clicking Apply Settings.
Step 6. Verify KLE’s network connection.
Connect to KLE by Web Management Interface using the new IP address.
Note that the IP address should be followed immediately by a colon and the port
base +8 for port number,
https://<IP_address>:<PortBase+8>.
For example, if the IP address is 192.168.1.7 and the port base number is 5900,
then you should enter
https://192.168.1.7:5908
Remember that it’s a secure SSL encrypted connection, so you should type “https” instead of the usual
“http”. Otherwise, the connection will not be established.
2.5 Configure port base setting for KLE
If you are satisfied with the default port base setting as 5900, you can skip this section.
The default port base for KLE connection is set at 5900. This means it will use port
5900 (port base) for viewer connection and port 5908 (port base + 8) for https web
browser connection.
<Port base> – used for viewer connection
<Port base + 8> – used for secure browser connection
- -
16
Other manuals for LKV-IPM01
3
Table of contents
Other Linkskey Extender manuals


