Linsar LS51DVD User manual

5.1 CHANNEL
DVD Player
User Manual
MODEL: LS51DVD

2
Congratulations on choosing to buy a Linsar product.
By doing so you now have the assurance and peace of mind that comes with purchasing a product made by
one of the leading manufacturers.
All products brought to you by Linsar are manufactured to the highest standards of performance and safety
and, as part of our philosophy of customer service and satisfaction, are backed by a comprehensive 1Year
Warranty.
We hope you will enjoy using your purchase for many years to come.
Welcome

3
Welcome 2
Product Overview 4
Controls and Connections 5
Remote Control 7
Operation 10
Troubleshooting 16
Specifications 17
Compliance and Responsible Disposal 18
Contents

4 | PRODUCT OVERVIEW
Product Overview
A. 5.1 Channel DVD Player
B. Remote Control
C. AAA Batteries
D. AC Adaptor
E. AV Cable
F. User Manual
G. Warranty Certificate
H. General Safety Warnings
What’s in the box:
CONTROLS AND CONNECTIONS | 5
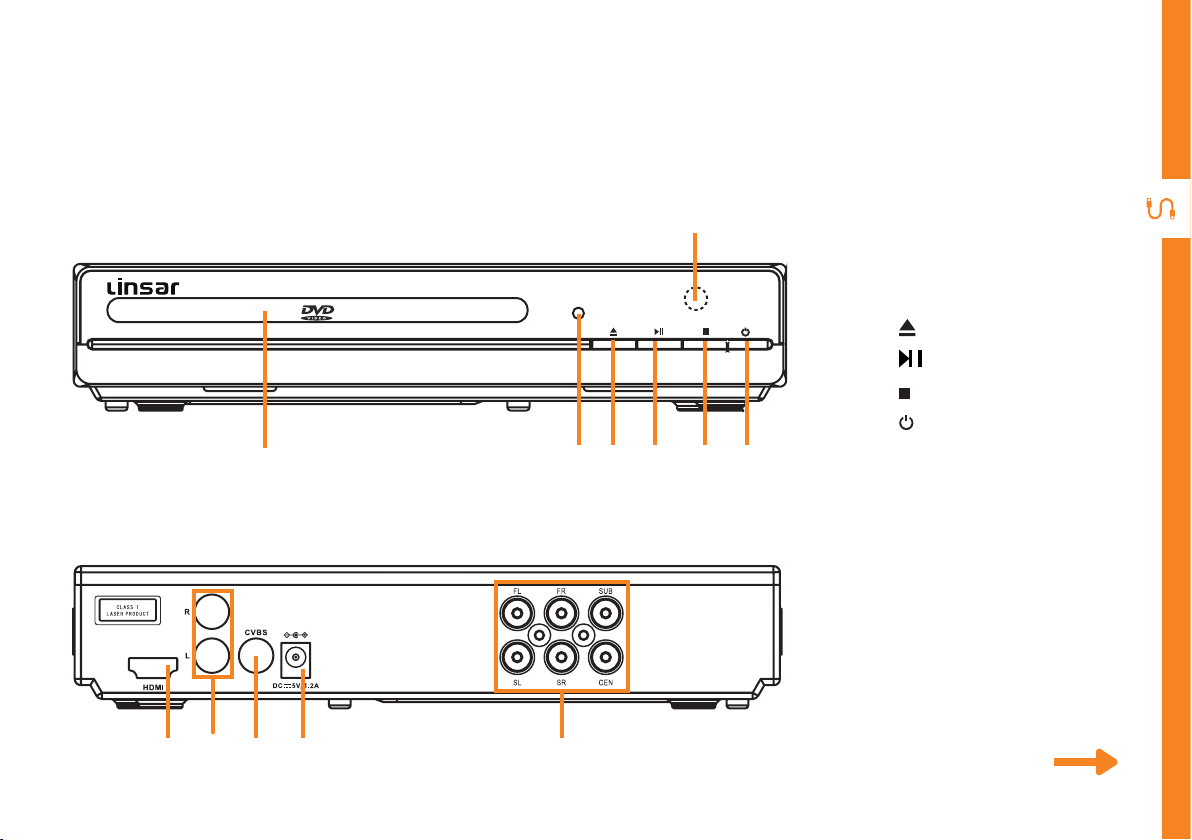
Controls and Connections
1. DiscTray
2. Power Indicator
3. (Open/Close) Button
4. Play/Pause Button
5. Stop Button
6. Power Button
7. Remote Sensor
Front view
Rear view
21
8 121110
9
3 4 5 6
7
See next page for more info on the connections.

6 | CONTROLS AND CONNECTIONS
8
HDMI
Use a HDMI
cable for best
picture and
sound quality.
SOUND
PICTURE
COMPUTER
All-digital connection between the DVD player and any HDMI
device.
9Audio L/R
SOUND
You can use this to connect audio from your DVD player using
the AV cable (included).
10 CVBS
CVBS
PICTURE
You can use this to connect your DVD player. Supports
Standard Definition (SD) picture quality. Requires an AV cable
(included).
11 DC IN
POWER
Please only use the supplied AC adaptor.
12 5.1 Channel
Audio Output
SOUND
For 5.1 channel amplifier/speakers connection.

REMOTE CONTROL | 7
1
2
3
Setup
Insert two AAA size batteries according to the polarity
markings (+ / -) inside the compartment. Make sure the
batteries are correctly aligned and properly pushed into
place.
Precautions When Using Batteries
• Do not use old and new batteries together.
• Do not use different types of batteries (e.g.
Manganese and Alkaline batteries) together.
• Remove the batteries from the remote if you do
not intend to use it for a long time.
• When discarding used batteries, follow any
guidelines for recycling and disposal of batteries
that apply in your local area.
• Keep batteries away from children and pets.
• Never throw batteries into a fire or expose them
to extreme heat.
Remote Control
AAA size
batteries
included

8 | REMOTE CONTROL
N/P
STANDBY
OPEN/CLOSE
VOLUME
1 2 3 +
-
4 5 6
7 8 9
0/10 10+
MUTE
MENU
SETUP
OK
OSD
SUBTITLE STEP STOP TITLE
ANGLE ZOOM GOTO AUDIO
PROG A-B SLOW REPEAT
N/P
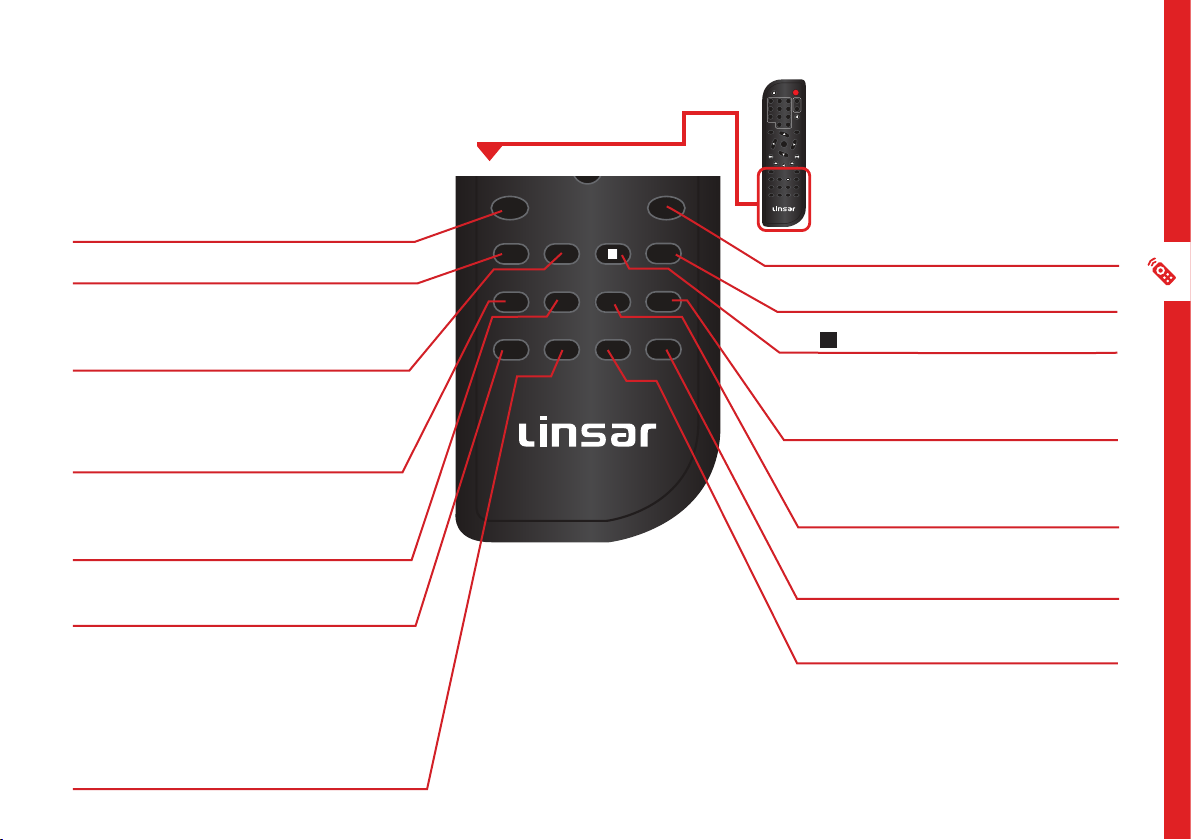
Remote Control
OPEN/CLOSE: Press to open
or close the disc tray
NUMBER BUTTONS: Numerical
input to directly access a specific
chapter or track
SETUP: Access/exit the System
Setup menu
/ / / : Navigate the
System menu
OK: Confirm a selection
: Skip to the previous title,
chapter or track
: Fast rewind current track
STANDBY: Turn the unit ON
from standby mode; press again
to put the unit back into standby
mode
VOL + / VOL - : Adjust the
volume level
/ MUTE: Mute the sound;
press again to restore the sound
MENU: Return to the disc’s menu
in DVD mode. Set the menu
function on/off in VCD mode.
: Skip to the next title, chapter
or track
: Fast forward current track
: Play/pause playback
N/P
STANDBY
OPEN/CLOSE
VOLUME
1 2 3 +
-
4 5 6
7 8 9
0/10 10+
MUTE
MENU
SETUP
OK
OSD
SUBTITLE STEP STOP TITLE
ANGLE ZOOM GOTO AUDIO
PROG A-B SLOW REPEAT
N/P
REMOTE CONTROL | 9
N/P
STANDBY
OPEN/CLOSE
VOLUME
1 2 3 +
-
4 5 6
7 8 9
0/10 10+
MUTE
MENU
SETUP
OK
OSD
SUBTITLE STEP STOP TITLE
ANGLE ZOOM GOTO AUDIO
PROG A-B SLOW REPEAT
N/P
N/P
STANDBY
OPEN/CLOSE
VOLUME
1 2 3 +
-
4 5 6
7 8 9
0/10 10+
MUTE
MENU
SETUP
OK
OSD
SUBTITLE STEP STOP TITLE
ANGLE ZOOM GOTO AUDIO
PROG A-B SLOW REPEAT
N/P
OSD: Display/hide detailed
information about the currently
playing media
SUBTITLE:Turn the subtitle on/off
STEP: Press to freeze the current
frame, press repeatedly for
following frames
ANGLE: While playing a DVD
with multi-angle recording, press
repeatedly to select the viewing
angle
ZOOM: During DVD playback, press
repeatedly to zoom in or out of the
picture
PROG: Enter or exit the PROGRAM
function
A-B: During DVD playback, press to
define a starting point, then press
again to define a finishing point.The
selected portion will then be played
continuously.To cancel, press the
A-B button again. (Function not
available for all discs)
N/P: Switch between NTSC or PAL
TITLE: Return to the title page
/ STOP: Stop playback
AUDIO: DVD mode: select multi
language sound. CD/VCD: select
audio channel
GOTO: Press to input a specific
title/chapter/time to jump to on the
DVD/CD
REPEAT: Press repeatedly to cycle
through available repeat modes
SLOW: To play the video in slow
speed

10 | OPERATION
Operation
Connect to power
• Plug in the AC/DC adaptor to the power outlet, and connect the other end to the power input on the unit,
then switch on the power at the outlet. Once the unit is connected to power, the indicator will turn red.
Playing a DVD/VCD/CD
• Press the POWER button on the unit or the STANDBY button on the remote to turn the unit on.
The indicator will turn green.
• Press the OPEN/CLOSE button on the unit or the remote to open the disc tray. Play a disc on the tray
with its label side facing up. Press the OPEN/CLOSE button again to close the disc tray.The unit will start
playing the disc automatically.
• To put the unit into standby, press the POWER button on the unit or the STANDBY button on the remote.
The unit will turn off and enter standby mode and the indicator will turn red.
During playback
• Press the / buttons repeatedly to fast-search backwards or forwards. Press the PLAY/PAUSE button
to resume normal playback.
• Press the / buttons to skip to the previous or next chapter or track.
• Press the PLAY/PAUSE button to pause playback; press it again to resume playback.
• Press the VOLUME +/- buttons to increase or decrease the volume level.
Table of contents


