Linvatec Hall Surgical PowerPro PRO3600 User manual
The
Power
Pro
®
(PRO3600)
Battery Charger Instruction Manual

Proprietary Information
This manual contains information deemed proprietary to Linvatec Corporation. The
information contained herein, including all of the designs and related materials, is the sole
property of Linvatec and/or its licensors. Linvatec and/or its licensors reserve all patent,
copyright and other proprietary rights to this document, including all design, manufacturing
methodology and reproduction.
This document, and any related materials, is confidential and is protected by copyright laws
and shall not be duplicated, transmitted, transcribed, stored in a retrieval system, or
translated into any human or computer language in any form or by any means, electronic,
mechanical, magnetic, manual or otherwise, or disclosed to third parties, in whole or in part,
without the prior express written consent of Linvatec.
Linvatec reserves the right to revise this publication and to make changes from time to time in
the contents hereof without obligation to notify any person of such revision or changes, unless
otherwise required by law.
Linvatec, Hall, SureCharge and PowerPro are trademarks or registered trademarks of
Linvatec Corporation.
©
Linvatec Corporation 2002.All Rights Reserved. Printed in USA
Record the Model and Serial Numbers of the charger and date received. Retain for future
reference.
Charger Model No. Serial No Date
Charger Model No. Serial No Date

Table of Contents Page
i
1.0 INTRODUCTION
1.1 Intended Use. . . . . . . . . . . . . . . . . . . . . . . . . . . . . . . . . . . . . . . . . . . . . . . . . . . . . . . . .1
1.2 General Warnings. . . . . . . . . . . . . . . . . . . . . . . . . . . . . . . . . . . . . . . . . . . . . . . . . . . . .2
1.3 Symbol Definitions. . . . . . . . . . . . . . . . . . . . . . . . . . . . . . . . . . . . . . . . . . . . . . . . . . . .3
1.4 Battery Charger. . . . . . . . . . . . . . . . . . . . . . . . . . . . . . . . . . . . . . . . . . . . . . . . . . . . . . .4
1.4.1 Front Panel. . . . . . . . . . . . . . . . . . . . . . . . . . . . . . . . . . . . . . . . . . . . . . . . . . . .4
1.4.2 Rear Panel . . . . . . . . . . . . . . . . . . . . . . . . . . . . . . . . . . . . . . . . . . . . . . . . . . . .5
2.0 BATTERY CHARGER OPERATION
2.1 Charging Standard Large (PRO3010) and Small (PRO3020) Battery Packs
without the SureCharge Sterilization/Charging Case. . . . . . . . . . . . . . . . . . . . . . . . . .8
2.2 Charging Standard Large (PRO3010) and Small (PRO3020) Battery Packs
using the SureCharge Sterilization/Charging Case. . . . . . . . . . . . . . . . . . . . . . . . . . . .9
2.3 Charging Sterile Transfer Batteries . . . . . . . . . . . . . . . . . . . . . . . . . . . . . . . . . . . . . .13
3.0 MAINTENANCE
3.1 Cleaning and Sterilizing . . . . . . . . . . . . . . . . . . . . . . . . . . . . . . . . . . . . . . . . . . . . . . .16
3.1.1 Cleaning Precautions . . . . . . . . . . . . . . . . . . . . . . . . . . . . . . . . . . . . . . . . . . .16
3.1.2 Cleaning Instructions for the Battery Charger. . . . . . . . . . . . . . . . . . . . . . . .17
3.1.3 Cleaning Instructions for the Sterile Transfer Battery Platform . . . . . . . . . .17
3.1.4 Sterile Transfer Shroud, Sterile Transfer Battery Case and
Sterile Transfer Battery . . . . . . . . . . . . . . . . . . . . . . . . . . . . . . . . . . . . . . . . .18
3.1.5 Cleaning Instructions for Standard Battery Packs. . . . . . . . . . . . . . . . . . . . .19
3.1.6 Cleaning Instructions for the SureCharge Battery Sterilization/
Charging Case . . . . . . . . . . . . . . . . . . . . . . . . . . . . . . . . . . . . . . . . . . . . . . . .19

ii
Table of Contents Page
3.0 MAINTENANCE (Continued)
3.1.7 Sterilization Information . . . . . . . . . . . . . . . . . . . . . . . . . . . . . . . . . . . . . . . . 20
3.1.7.1 Sterilization Warnings, Precautions and Notes . . . . . . . . . . . . . . . 20
3.1.7.2 Ethylene Oxide Sterilization Guidelines for
Standard Battery Packs without the
SureCharge Battery Sterilization/Charging Case . . . . . . . . . . . . . 22
3.1.7.3 STERRAD Sterilization System Guidelines for
Standard Battery Packs without the
SureCharge Battery Sterilization/Charging Case . . . . . . . . . . . . . 22
3.2 Troubleshooting . . . . . . . . . . . . . . . . . . . . . . . . . . . . . . . . . . . . . . . . . . . . . . . . . . . . . 23
3.3 Fuse Replacement. . . . . . . . . . . . . . . . . . . . . . . . . . . . . . . . . . . . . . . . . . . . . . . . . . . . 26
3.4 Ground Bond Test . . . . . . . . . . . . . . . . . . . . . . . . . . . . . . . . . . . . . . . . . . . . . . . . . . . 26
3.5 Leakage Test. . . . . . . . . . . . . . . . . . . . . . . . . . . . . . . . . . . . . . . . . . . . . . . . . . . . . . . . 27
3.6 Technical Specifications. . . . . . . . . . . . . . . . . . . . . . . . . . . . . . . . . . . . . . . . . . . . . . . 28
3.6.1 Battery Charger (PRO3600) . . . . . . . . . . . . . . . . . . . . . . . . . . . . . . . . . . . . . 28
3.6.2 System Environmental Requirements . . . . . . . . . . . . . . . . . . . . . . . . . . . . . . 29
3.6.3 Power Cord Requirements for Battery Charger . . . . . . . . . . . . . . . . . . . . . . 29
3.6.4 Batteries. . . . . . . . . . . . . . . . . . . . . . . . . . . . . . . . . . . . . . . . . . . . . . . . . . . . . 30
3.6.4.1 Standard Large Battery Pack (PRO3010) . . . . . . . . . . . . . . . . . . . 30
3.6.4.2 Standard Small Battery Pack (PRO3020) . . . . . . . . . . . . . . . . . . . 30
3.6.4.3 Sterile Transfer Battery (PRO3115) . . . . . . . . . . . . . . . . . . . . . . . 30
3.7 Accessories. . . . . . . . . . . . . . . . . . . . . . . . . . . . . . . . . . . . . . . . . . . . . . . . . . . . . . . . . 31

1
1.0
INTRODUCTION
t is recommended that personnel study this
manual before attempting to operate, clean
and/or sterilize the Hall
®
PowerPro
®
Bat-
tery Charger (PRO3600), batteries and accesso-
ries. The safe and effective use of this equipment
requires the understanding of and compliance
with all warnings, cautionary notices and
instructions marked on the product, and
included in this manual and any associated
information insert.
1.1 Intended Use
he
PowerPro
Battery Charger is used to
charge all
PowerPro
batteries, which
includes the Sterile Transfer Batteries
(PRO3115) and the Standard Large (PRO3010)
and Small (PRO3020) Battery Packs, with or
without the use of the SureCharge™ Steriliza-
tion/Charging Case.
The Sterile Transfer System requires that only
the Sterile Transfer Battery Case (PRO3110) be
sterilized, not the battery. The battery only needs
to be cleaned, and then charged using the Sterile
Transfer Platform (PRO3135). This eliminates
the loss of charge in the battery due to the
extreme heat of the sterilization environment.
Once charged, the battery is transferred into the
sterile battery case within the surgical field.
Standard batteries may be charged
prior
to ster-
ilization by placing the battery pack directly on
the battery charger. Or, they can be charged
after
sterilization by placing them in the Sure-
Charge Sterilization/Charging Case. Charging
the battery packs
after
sterilization prevents a
loss of charge in the battery due to the extreme
heat of the sterilization environment, thus allow-
ing for longer use during surgery. When battery
packs are charged
after
sterilization, they can
either be transferred to the sterile field via the
use of the SureCharge Sterilization/Charging
Case or stored ready for use.
I
T

2
1.2 GeneralWarnings
1. This equipment is designed for use by med-
ical professionals completely familiar with
the required techniques and instructions for
use of the equipment.
Read and follow all
warning and cautionary notices and
instructions marked on the product and
included in this manual
.
2. Do not open the battery charger, as
this may void the warranty. There
are no user-serviceable parts inside.
Removing the cover may introduce an elec-
tric shock hazard by exposing you to dan-
gerously high voltages or other risks.
3. Do not expose the battery charger to mois-
ture, operate in wet areas, or place liquids
on or above the unit.
4. Prior to use, inspect all equipment for
proper operation.
5. Do not handle the battery charger by the
cord. Do not pull on the power cord or
accessory cord to remove it from the battery
charger or the power outlet.
6. Do not excessively bend or kink the battery
charger power cord or accessory cord.
Always inspect cords for signs of excessive
wear or damage. If wear or damage is
found, discontinue use and replace immedi-
ately.
7. Do not expose batteries to fire or incinera-
tion.
8. Do not short circuit the battery pack metal
contacts or allow them to contact metal
objects. This could cause a shock or burn
injury and also damage the battery.
9. Inspect battery pack for damage (i.e., cracks
in battery case) prior to use or charging. Do
not use or charge damaged battery packs. If
battery pack is damaged and leakage or res-
idue is noticed, do not allow it to come in
contact with skin, eyes or clothing. These
materials could contain Potassium Hydrox-
ide (KOH) which is an alkaline and can
burn. If leakage or residue comes in contact
with skin or eyes, flush affected area with
copious amounts of water and seek medical
attention immediately.
10. Battery packs contain nickel cadmium or
nickel metal hydride, which must be recy-
cled or disposed of properly. The disposal
of nickel cadmium or nickel metal hydride
batteries as municipal waste is prohibited.
Dispose or recycle in accordance with your
local, state and government regulations. In
the U.S. call 1-800-925-4255 for additional
information on battery pack disposal or
recycling. Outside the U.S. contact your
local Linvatec representative.
11. After each use, thoroughly clean the
charger (See
“3.1 Cleaning and Steriliz-
ing” on page 16
).
12. Equipment grounding is vital to ensure safe
operation. Plug the power cord of the bat-
tery charger into a properly earthed mains
supply outlet whose voltage and frequency
characteristics are compatible with those
listed on the unit or in this manual. Do not
use plug adapters or extension cords; such
devices defeat the safety ground and could
cause injury.
13. Do not use any equipment, especially the
battery charger, in the presence of flamma-
ble anesthetics, gases, disinfecting agents,
cleaning solutions, or any material suscepti-
ble to ignition due to electrical sparking.

3
1.3 Symbol Definitions
Power “ON”, connected to
mains.
Power “OFF”, disconnected
from mains.
Power on, Stand-by mode.
Attention, consult accompany-
ing documents.
Warning - For continued protec-
tion against risk of fire, replace
only with the same type and rat-
ing fuse.
Mains Fuse.
Type BF equipment. Pertains to
the Battery Pack.
Alternating Current.
Protective earth ground.
User service not recommended.
Refer servicing to qualified
Linvatec service personnel.
Indicates product component
should not be sterilized.
Indicates product component
should not be immersed in any
type of fluid.
Warning: Burn potential.
Caustic materials.
Single Use Only.
~
Indicates battery is being
charged when illuminated.
Indicates battery is fully charged
when illuminated.
Indicates a battery fault. See “3.2
Troubleshooting” on page 23 for
more information.
Indicates that a battery is going
through a quick-discharge cycle
when blinking, and remains con-
stantly lit when completely dis-
charged.
Caution: Federal Law restricts
this device to sale by or on the
order of a physician.
Batteries contain either nickel cadmium
or nickel metal hydride which must be
recycled or disposed of properly. The dis-
posal of batteries as municipal waste is
prohibited. Dispose or recycle in accor-
dance with your local, state and govern-
mental regulations. In the U.S. call 1-800-
925-4255, or outside the U.S. contact your
local Linvatec representative for addi-
tional information on battery disposal or
recycling.
Rx ONLY
4
1.4 Battery Charger
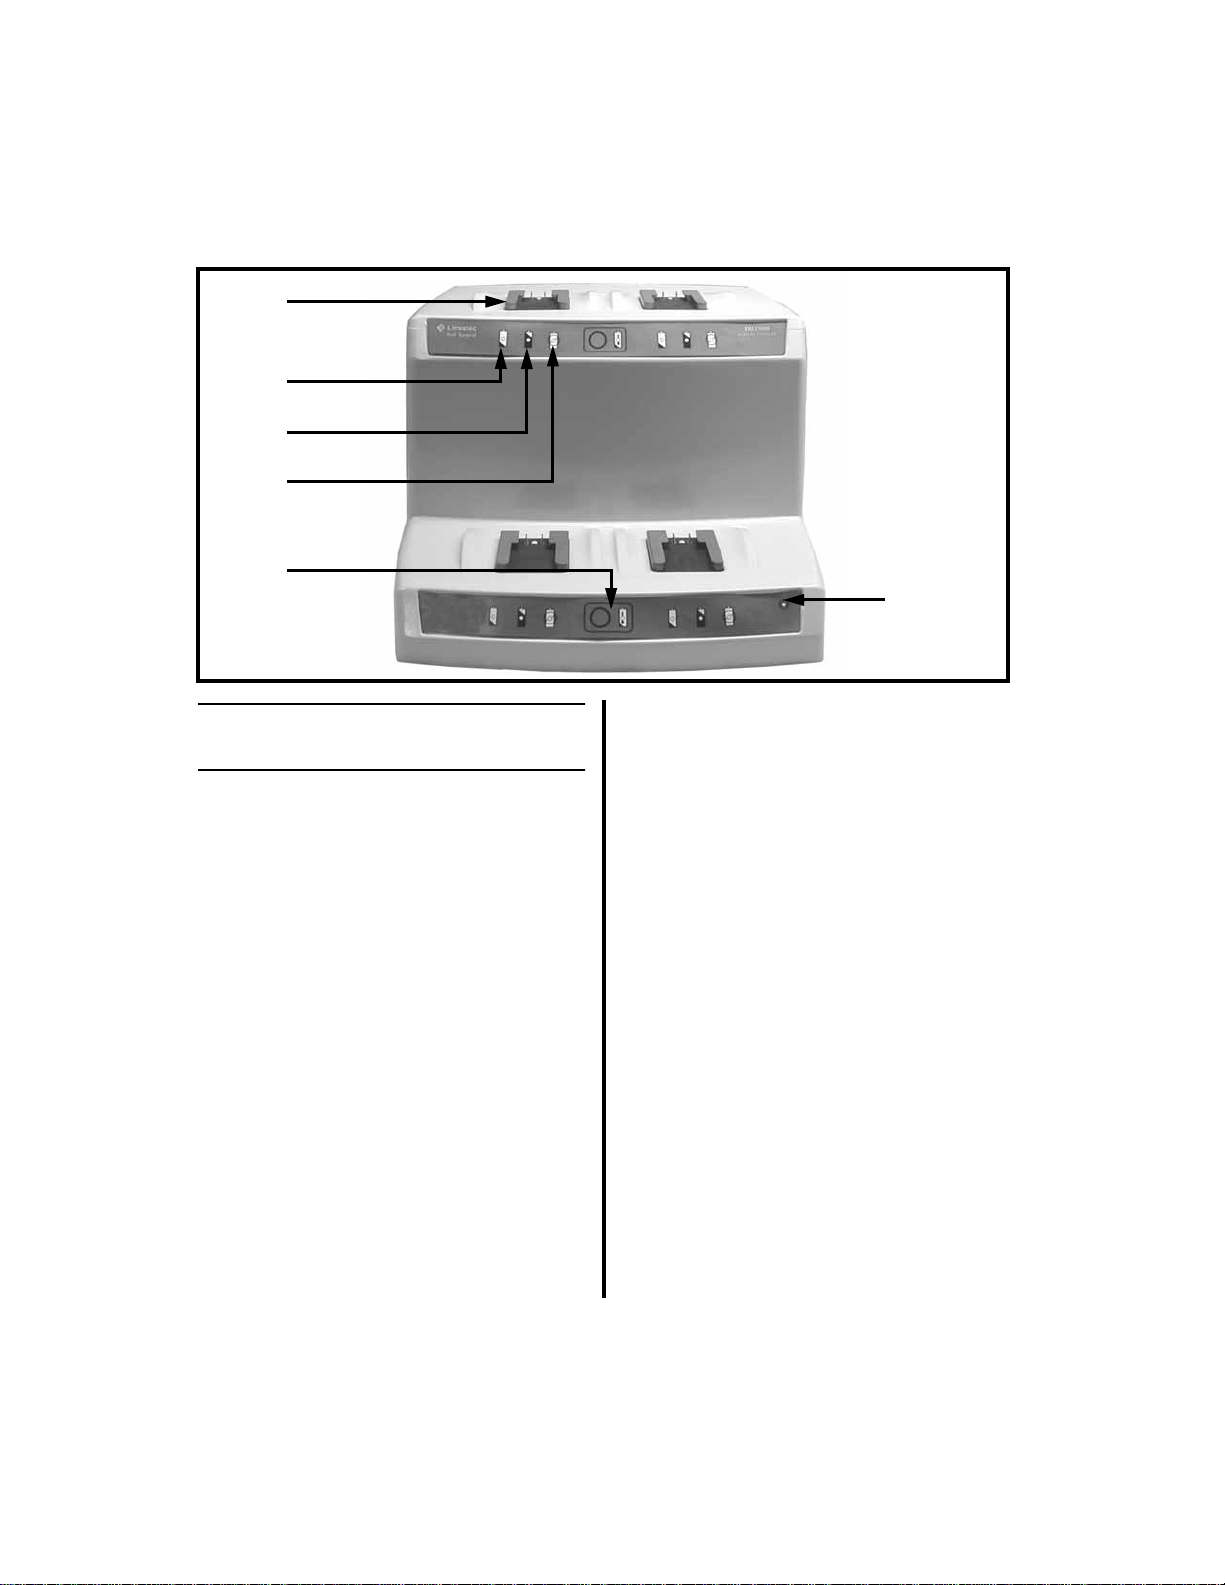
1.4.1 Front Panel
❶
Battery Receptacle Platform (4) —
Accepts the Sterile Transfer Battery Plat-
form (PRO3135), used for charging Sterile
Transfer Batteries (PRO3115); the Standard
Large (PRO3010) and Small (PRO3020)
battery packs; and the SureCharge Steriliza-
tion/Charging Case (PRO3200) used to
charge standard battery packs after steriliza-
tion.
❷
Charging Indicator Light —
Steadily illu-
minates to indicate the battery pack is con-
nected and charging.
NOTE: Battery pack must be cooled to
room temperature prior to charging. Failure
to do this will result in increased charge time.
❸
Charged Indicator Light —
Steadily illu-
minates when the battery pack is charged
and the charging cycle is complete.
❹
Battery Fault Indicator Light —
Steadily
illuminates when there is a battery fault.
See
“3.2 Troubleshooting” on page 23
for
more information.
NOTE: During initial power up, all
indicator lights will flash during the self-
diagnostic test.
❺
Discharge Button and Indicator —
Used
to discharge standard battery packs prior to
sterilization when using the SureCharge
Sterilization/Charging Case. Depletes any
residual charge that may be remaining in
the battery. Discharge of the battery must be
made within the first minute after the Sure-
Charge Sterilization/Charging Case is
attached to the battery charger. The indica-
tor will blink during the discharge cycle and
stop blinking when discharging is complete.
❻
Power Indicator Light —
Illuminates
when the power is in stand-by mode.
❸
❶
❷
❹
❺
❻

5
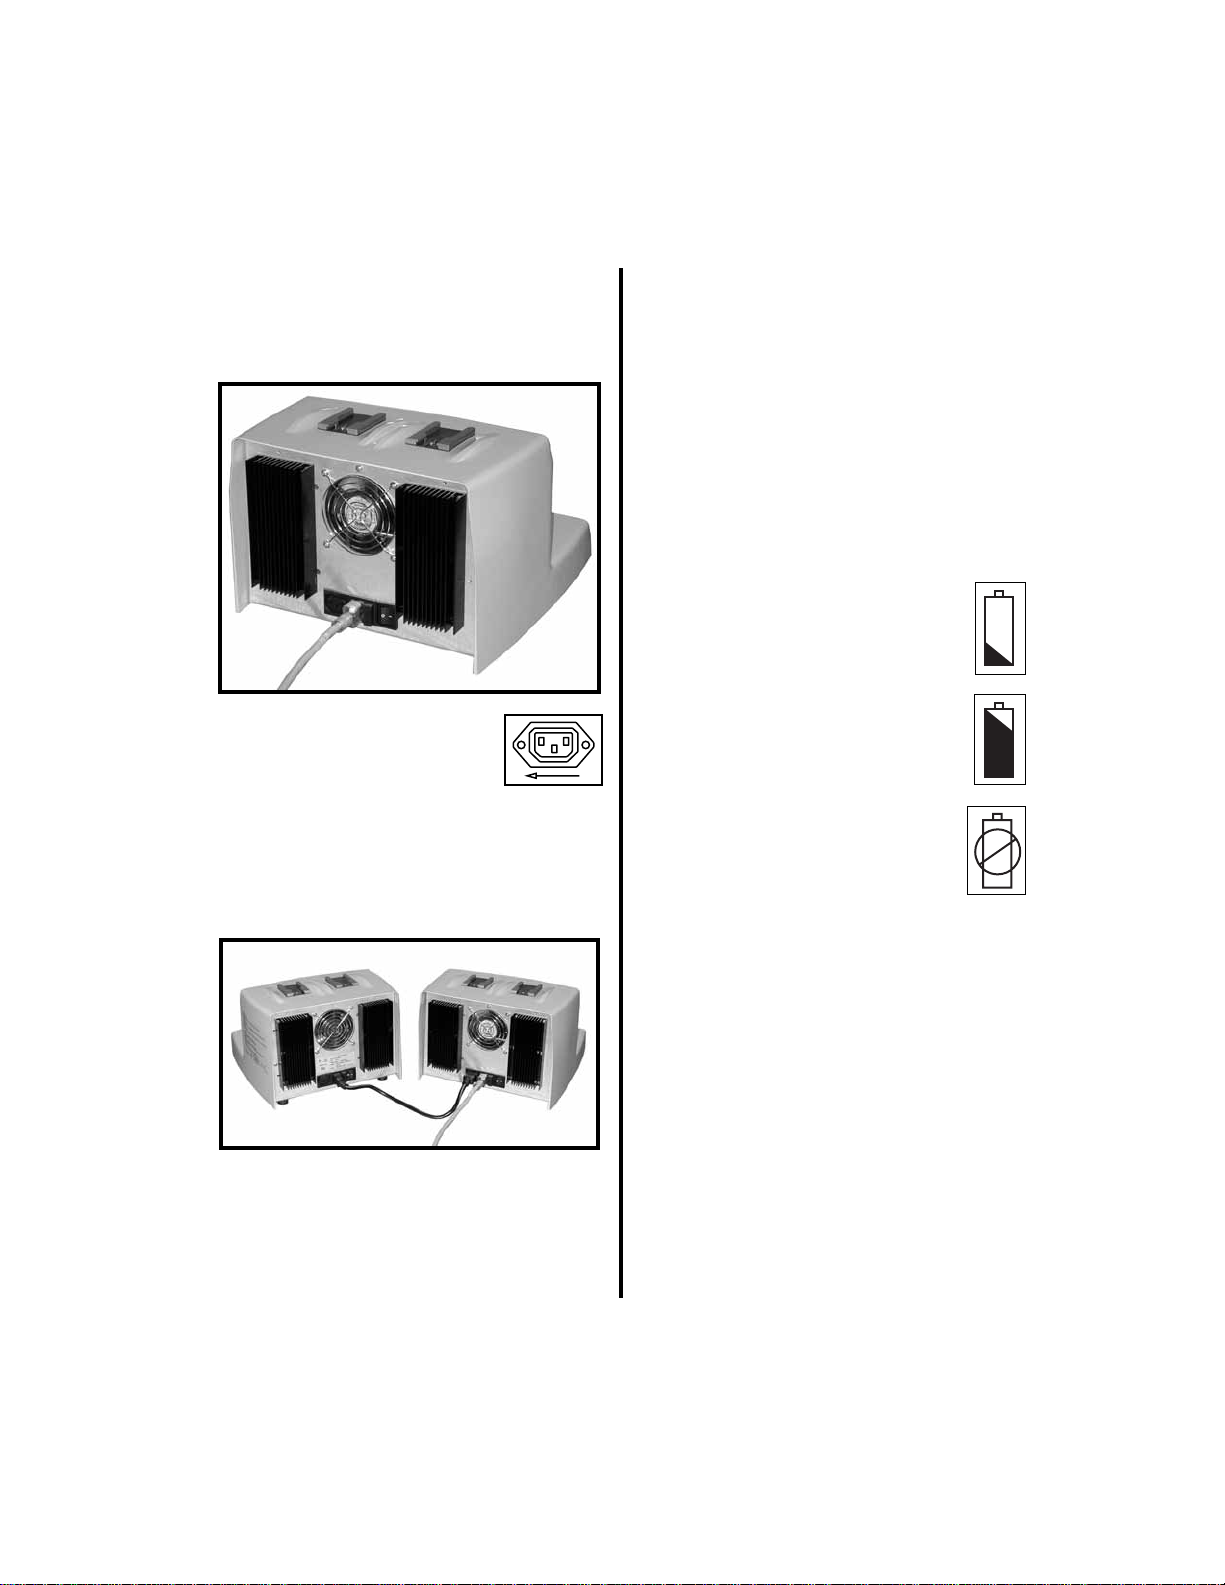
1.4.2 Rear Panel
❶
Cooling Fan —
Removes heat build-up
within the unit.
❷
AccessoryOutlet —
Allows for
a second battery charger to be
plugged into the primary
charger using the accessory cord
(PRO2601).
Do not connect more than
one charger.
❸
Mains Receptacle —
Accepts the supplied
hospital grade power cord to provide AC
power.
❹
Fuse Holder —
Contains two fuses. To
replace fuses see
“3.3 Fuse Replacement”
on page 26
.
❺
Mains Power Switch —
Place this switch
to the ON position to activate the charger.
❸
❶
❷
❹
❺

6
2.0
BATTERY CHARGER
OPERATION
NOTES:
1. Batteries are shipped uncharged and
non-sterile.
2. Always clean and sterilize batteries prior
to charging. Refer to “3.1 Cleaning and
Sterilizing” on page 16 or the informa-
tion insert supplied with the battery pack
for sterilization guidelines and parame-
ters.
3. Charge batteries before initial use using
only the
PowerPro
Battery Charger
(PRO3600).
4. Do not charge batteries unless they are at
room temperature. Failure to do this will
result in increased charging time.
WARNINGS:
1. Inspect batteries for
damage prior to use,
i.e.,cracksinbattery
case. DO NOT use or charge damaged
batteries. Discard or recycle properly.
2. Do not autoclave batteries above the rec-
ommended temperature, or leave them in
the autoclave longer than recommended.
See “3.1.7 Sterilization Information” on
page 20 or the information insert sup-
plied with the battery pack for steriliza-
tion guidelines and parameters. Damage
to the battery pack could result, possibly
causing injury.
3. Any of the above conditions could
shorten the life of the batteries and/or
compromise the seal integrity, resulting
in leakage of Potassium Hydroxide
(KOH) which is alkaline and can burn
skin, eyes or clothing.
4. Do not allow battery leakage or residue
to come in contact with your skin, eyes or
clothing. If leakage does contact your
skin, eyes or clothing, flush affected areas
with copious amounts of water and seek
medical assistance immediately. If there
is any evidence of case cracking, white
residue or fluid leakage, follow these
guidelines:
(a) Handle product with protective
gloves.
(b) Place battery in a leak-proof double
bag, lined with absorbent material
such as paper toweling. Secure the
bag. If battery is damaged, package
any loose parts in a separate bag to
prevent short-circuiting.
5. Improper fuse size in the charger
could result in fire. Replace only
with time delay fuses as marked
on the charger or listed in “3.6.1 Battery
Charger (PRO3600)” on page 28 in the
Technical Specifications section.
7
1. Ensure the charger is turned off. Plug the
power cord into the receptacle on the rear of
the charger and a properly earthed mains
supply outlet.
2. A second charger may be
powered from the primary
charger by connecting the
accessory cord (PRO2601)
from the second charger to the primary
charger’s accessory output.
NOTE: Do not connect more than one
charger.
3. Using the power switch located on the back
of the charger, turn the charger on. The
green indicator light on the front of the
charger will illuminate.
4. When initially turned on, the charger will
perform a self-diagnostic test, at which time
the LED’s will blink and the charger fan
will cycle on and off several times. When
the charger has satisfactorily completed its
diagnostic test, all LED’s will go off indi-
cating that the charger is ready for use. If
any LEDs stay illuminated, see
“3.2 Trou-
bleshooting” on page 23
for more informa-
tion.
5. The charger icons and indicator light colors
designate the following:
• Yellow: Battery is charging.
• Green: Battery is fully charged.
• Red: Battery fault. If the red
LED illuminates, see
“3.2
Troubleshooting” on
page 23
for more infor-
mation.
8
2.1 Charging Standard Large
(PRO3010) and Small
(PRO3020) Battery Packs
without the SureCharge
Sterilization/Charging Case
NOTES:
1. Always clean the battery pack prior to
charging. Refer to “3.1.5 Cleaning
InstructionsforStandardBatteryPacks”
on page 19, or the information insert sup-
plied with the battery pack. Charging
must be performed prior to sterilization.
2. Battery packs must be cooled to room
temperature prior to charging. Failure to
do this will result in increased charging
time.
1. To charge a battery pack, perform the fol-
lowing:
(a) Slide the battery pack onto one of the
charger receptacles. Ensure it is seated
completely in the receptacle. If it is not
completely seated, a battery fault (red
LED will illuminate) will result (see
“3.2 Troubleshooting” on page 23
for
more information). Up to four battery
packs may be placed on each charger.
2. Charging of the battery pack will
begin automatically. During the
charge cycle, the yellow “charging”
LED will illuminate.
3. When the battery pack has com-
pleted its charge cycle, the yellow
“charging” LED will go out and the
green “charge complete” LED will
illuminate. It takes approximately
55 minutes to obtain a complete charge.
4. If the red LED illuminates, or no
LED illuminates, see
“3.2 Trou-
bleshooting” on page 23
for more
information.
5. After charging, sterilize the battery packs.
Refer to
“3.1.7 Sterilization Information”
on page 20
or the information insert sup-
plied with the battery pack for sterilization
guidelines and parameters.
6. To remove the battery pack from the
charger, simply slide it off.
9
2.2 Charging Standard Large
(PRO3010) and Small
(PRO3020) Battery Packs using
the SureCharge Sterilization/
Charging Case
When using the SureCharge Sterilization/
Charging Case, cleaning and sterilization are
performed on the battery packs
prior
to
charging. Reference
“3.1 Cleaning and
Sterilizing” on page 16
.
WARNINGS:
1. Do not short circuit the SureCharge Ster-
ilization/Charging Case contacts or allow
them to come into contact with metal
objects. This could cause a shock or burn
injury, damage the battery pack and/or
the charger.
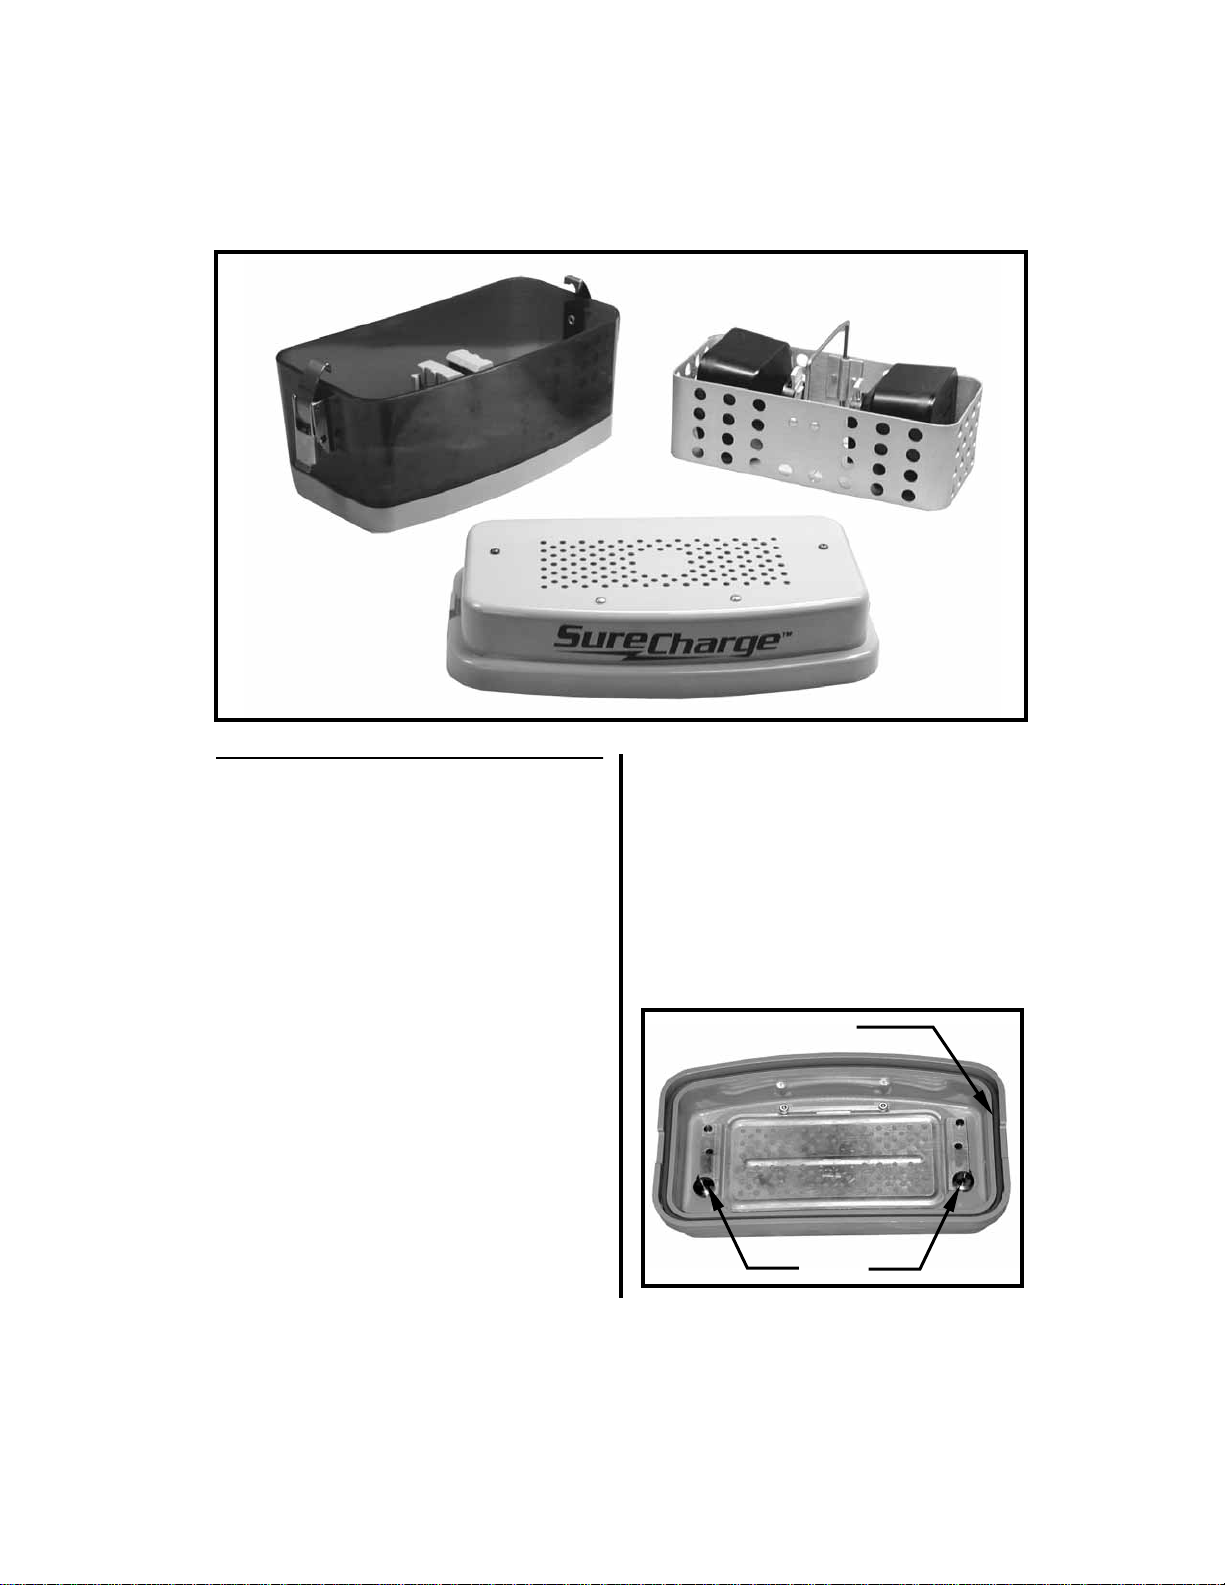
2. Prior to sterilization, inspect the lid of
the case. Ensure the seal is not damaged
or missing. Ensure the filter is placed
correctly within the designated area of
the lid, and the filter bracket is latched
correctly. Also ensure there are no tears
or holes in the filter, as sterility of the
batteries will be compromised and
patient infection may occur. If there are
any tears or holes, replace the filter.
Seal
Latch

10
3. Do not reuse filters. Filters are
single-use only. Whenever the
case is opened after sterilization
the filter must be removed and disposed
of properly.
4. Inspect the SureCharge Sterilization/
Charging Case for any damage, such as:
damaged or worn connectors on the
underside or within the case, faulty and/
or missing battery clips, cracks, dents, or
broken latches. If damage is found, do
not use. Sterility may be compromised
and patient infection may occur.
CAUTIONS:
1. Always clean battery packs prior to plac-
ing in the SureCharge Sterilization/
Charging Case.
2. Do not immerse any part of the Sure-
Charge Sterilization/Charging Case in
any fluids.
3. Charge batteries only on the
PowerPro
Battery Charger (PRO3600).
1.
Prior
to sterilizing battery packs, remove
them from the handpiece and clean them
according to
“3.1 Cleaning and Steriliz-
ing” on page 16
.
2. Place a new disposable filter onto the under-
side of the lid:
(a) Remove the filter plate by pressing
inward on the release knobs.
(b) After removing the filter plate, install a
filter by aligning the cutouts in the filter
with the brackets on the underside of
the lid.
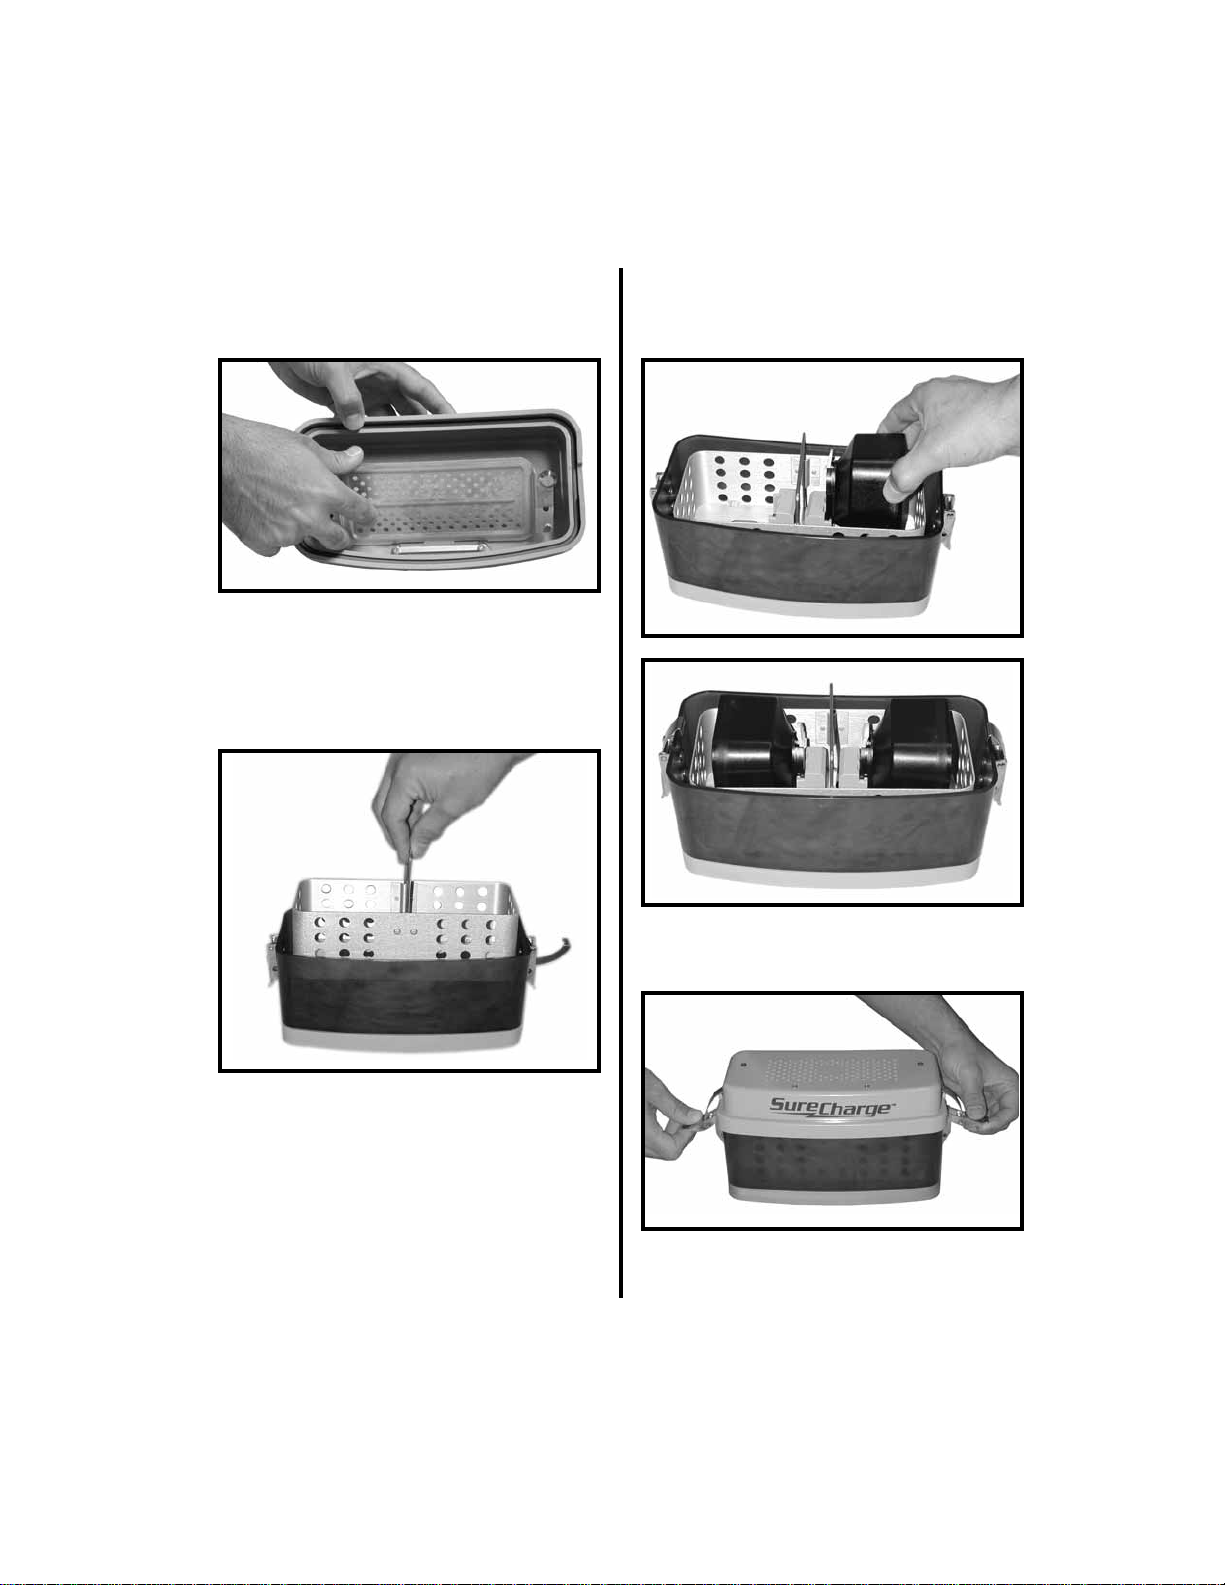
11
(c) Insert the flange of the filter plate
behind the metal bar on the underside
of the lid.
(d) Firmly press on the side tabs until both
latches lock into place. A clicking
sound must be heard from each latch.
3. Insert the inner basket into the outer case.
4. Slide the metal contacts of the battery pack
into the receiving receptacle of the inner
basket.
5. Attach and secure the lid to the case by
engaging both side latches of the case lid.
12
Important: Battery packs must be cooled to
room temperature prior to discharging them
on the battery charger. Failure to do this will
result in an increased discharge time.
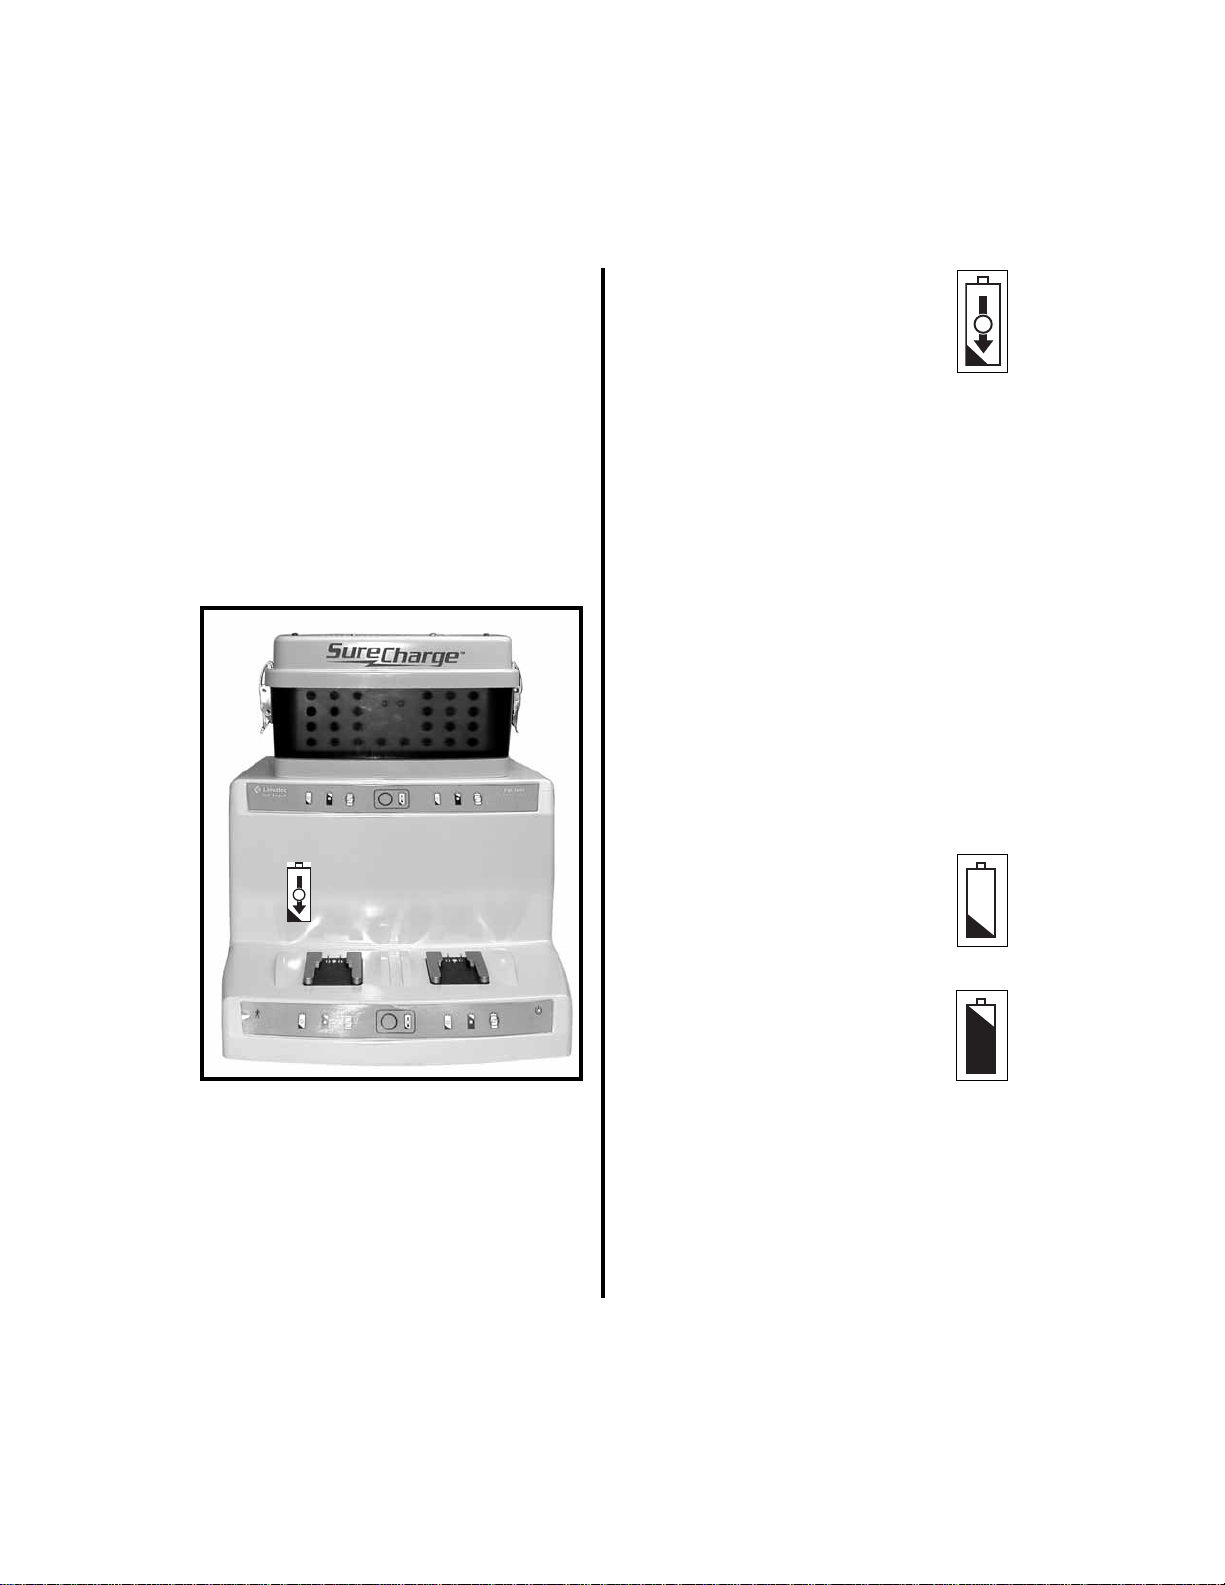
6. Prior to placing the SureCharge Battery
Sterilization/Charging Case in the auto-
clave, and after the battery packs have
cooled to room temperature, slide the case
onto the PowerPro Battery Charger.
7. Press the discharge button to deplete any
residual charge remaining in the battery
pack(s).
NOTE: Discharge of the battery packs
must be made within the first minute after
the case is attached to the charger. Once the
charging process begins, the discharge button
becomes inoperative.
(a) During the discharge cycle, the
associated yellow LED will
blink. When the battery packs
are completely discharged, the
associated yellow LED will illu-
minate steadily.
8. Remove the SureCharge Battery Steriliza-
tion/Charging Case from the battery charger
and place it in the autoclave. See
“3.1.7
Sterilization Information” on page 20
.
9. After sterilization is complete, and the bat-
tery packs have cooled to room tempera-
ture, they can be charged. To charge the
battery packs:
Important: Battery packs must be cooled to
room temperature prior to charging them on
the battery charger. Failure to do this will
result in increased charging time.
(a) Slide the SureCharge Battery Steriliza-
tion/Charging Case onto the PowerPro
Battery Charger.
(b) Charging of battery packs
begins automatically. During
the charge cycle the yellow
“charging” LED will illumi-
nate.
(c) When battery packs are com-
pletely charged, the yellow
“charging” LED will go out
and the green “charging com-
plete” LED will illuminate. It
will take approximately 55 minutes to
obtain a full charge.
13
(d) If no LED illuminates, or the
red (replace) LED illuminates,
reference
“3.2 Troubleshoot-
ing” on page 23
for more
information.
(e) If all three LEDs flash, this is a system
fault. Reference
“3.2 Troubleshoot-
ing” on page 23
for more information.
(f) After battery packs are charged, the
case may be removed from the charger
and stored ready for use.
(g) Note that nickel cadmium batteries lose
approximately 15 - 20% of their charge
per month during storage in nominal
room temperature. Recharge periodi-
cally to ensure use of a fully charged
battery.
10. The circulator will remove the case from
the charger, remove the lid from the case,
then present the case to the scrub person.
11. The scrub will grasp the handle of the inner
basket, remove it from the case, and place it
within the sterile field.
12. The scrub will remove the battery pack(s)
from the basket and attach one to the hand-
piece.
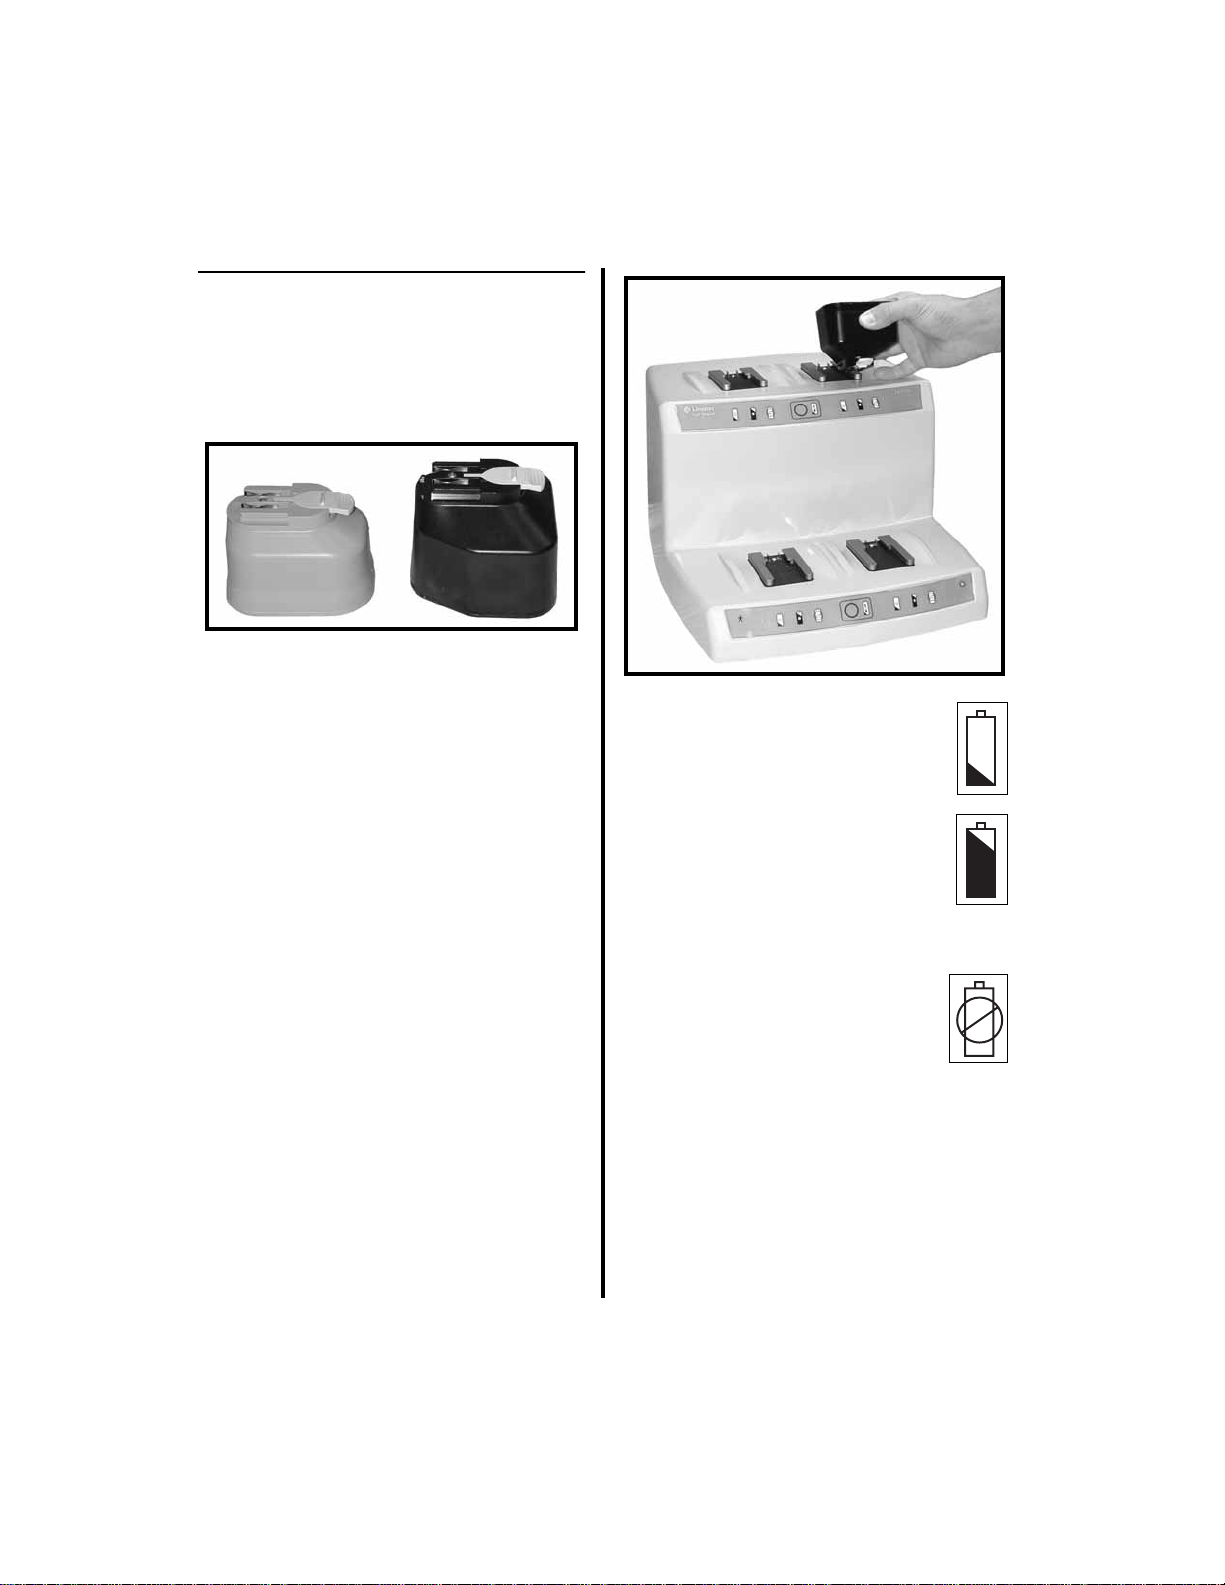
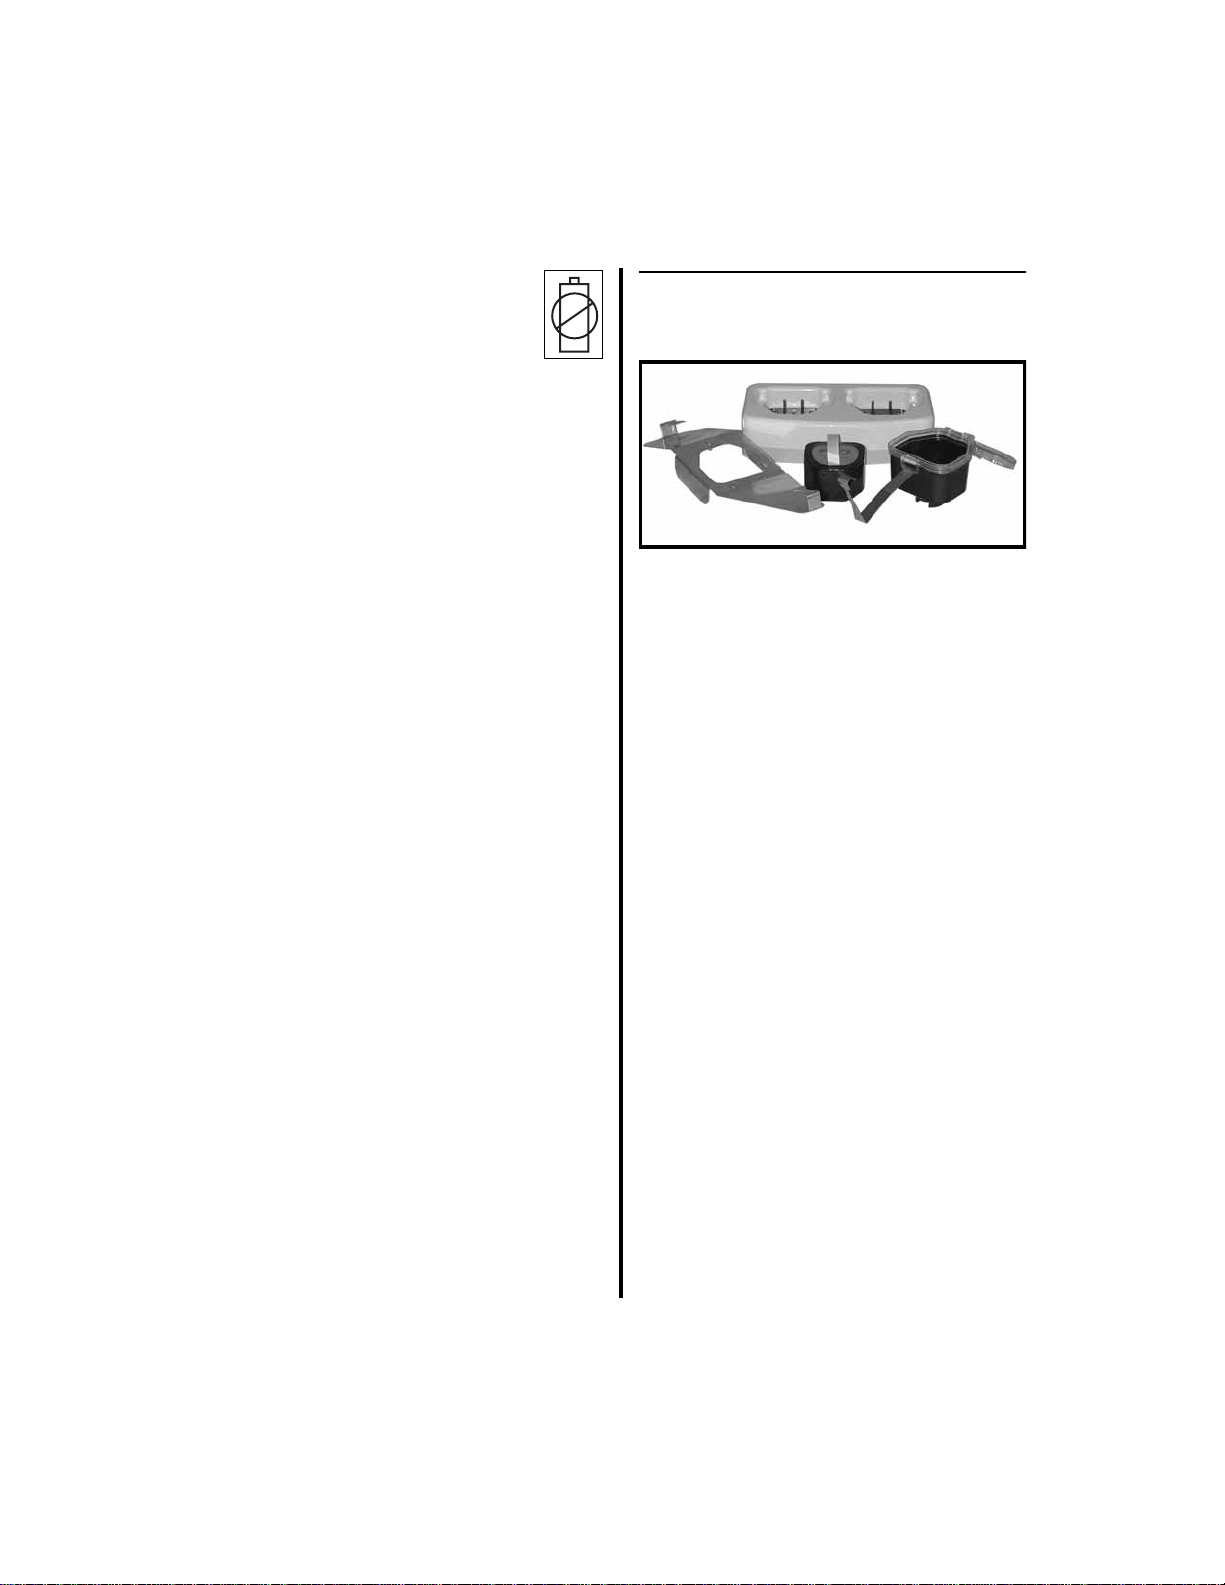
2.3 Charging SterileTransfer
Batteries
NOTES:
1. Only the battery case (PRO3110) and
shroud (PRO3130) require sterilization.
Referto“3.1.7 Sterilization Information”
on page 20, or the information insert sup-
plied with each battery case for steriliza-
tion information.
2. Do not sterilize the battery (PRO3115).
3. Never charge the battery while it is in the
battery case (PRO3110).
4. The battery can only be charged using
the Sterile Transfer Platform (PRO3135).
5. Always clean the battery and battery
case after each use and prior to charging
the battery.
6. Use only one battery and one shroud per
battery case per procedure. Do not reuse
the shroud without sterilizing it first. Do
not put a second battery into the battery
case without sterilizing the case first.

14
1. To charge a battery, perform the following:
(a) Slide the sterile transfer battery plat-
form (PRO3135) onto the battery
charger until it completely snaps into
place.
If the platform is not completely seated
on the charger, a battery fault (red LED
will illuminate) will result (see
“3.2
Troubleshooting” on page 23
for
more information).
(b) Insert the battery into a receptacle of
the battery platform. Press on the bat-
tery until it completely engages in the
platform.
2. Charging of the battery will begin automati-
cally and will take approximately 5 to 70
minutes to fully charge each battery,
depending on the amount of charge remain-
ing in the battery.
3. During the charge cycle, the yellow
“charging” LED will illuminate.
4. When charging is completed, the
yellow “charging” LED will go out
and the green “charge complete”
LED will illuminate. The battery
may be stored on the charger to ensure a
fully charged battery, as long as the charger
is left powered on.
5. If no LED illuminates, or the red
LED illuminates, see
“3.2 Trou-
bleshooting” on page 23
for more
information.
6. After charging, the circulator will remove
the battery from the sterile transfer platform
on the charger.
NOTE: All nickel metal hydride batteries
lose approximately 15-20% of their charge
per month during storage in nominal room
temperature. Recharge periodically if stored
for any period of time to ensure use of a fully
charged battery.
7. The scrub will place the sterile transfer
shroud (PRO3130) onto the sterile transfer
battery case. The pins on the underside of
the shroud go on the outside of the case to
center the shroud on the case.

15
8. The circulator will insert the battery
through the sterile transfer shroud and into
the battery case. Press the battery into the
case until it is completely engaged.
9. The circulator removes the sterile transfer
shroud from the battery case by pulling on
either finger pull.
10. The scrub closes the lid of the battery case
and flips the latch mechanism up and over
the lid.
11. The scrub secures the lid by pressing first
on the bottom of the latch, then on the front
of the latch, ensuring the latch is fully
engaged on the tabs of the Sterile Transfer
Battery Case.
12. The scrub then attaches the battery case to
the handpiece.

16
3.0
MAINTENANCE
Regular and proper maintenance of your
PowerPro
Battery Charger are the best ways to
protect your investment. It is essential that you
have your equipment serviced, as scheduled, in
order to retain its optimum performance and
reliability, which will reward you with safer, less
problematic product performance over time.
Linvatec recommends that the Hall
PowerPro
Battery Charger be returned to the factory for
routine maintenance every 24 months.
Recommended care and handling of the battery
charger includes proper day-to-day operation,
cleaning, and sterilization which are extremely
important to ensure safe and efficient operation.
Your authorized Hall Surgical service depart-
ment is the most knowledgeable about the
PowerPro
instruments and will provide compe-
tent and efficient service. Service at Linvatec/
Hall Surgical at the recommended service inter-
val is mandatory to keep your product warran-
ties in effect. Any services and/or repairs done
by any unauthorized repair facility may result in
reduced performance of the instruments or
instrument failure.
Failure to follow this routine maintenance
schedule may result in damage to the battery
charger and may invalidate the product war-
ranty.
3.1 Cleaning and Sterilizing
CAUTION: Prior to cleaning and/or
sterilization, always inspect batteries for
damage or leakage. If any is found, discard
battery. Do not attempt to repair. Batteries
contain nickel cadmium or nickel metal
hydride which must be recycled or disposed
of properly. Disposal of batteries as
municipal waste is prohibited. Dispose or
recycle in accordance with your local, state
and governmental regulations. In the U.S. call
1-800-925-4255. Outside the U.S. contact
your local Linvatec representative for
additional information on battery disposal or
recycling.
3.1.1 Cleaning Precautions
1. Follow universal precautions for protective
apparel when handling and cleaning con-
taminated instruments.
2.
Never immerse battery charger,
SureCharge Battery Sterilization/
Charging Case, batteries, or
power cords.
3. Never clean equipment in an ultrasonic
cleaner or combination washer/sanitizer.
4. Do not use bleach, chlorine based deter-
gents, or caustic solutions that contain phe-
nol to clean the SureCharge Battery
Sterilization/Charging Case, battery case or
battery packs.
5. Do not rinse batteries under running water.
6. Always remove battery pack from hand-
piece prior to cleaning and sterilization.
7. Always clean battery pack before inserting
into the SureCharge Battery Sterilization/
Charging Case.
Table of contents


