Lioncast LM50 User manual

LM50
ESPORTS MOUSE
MANUAL ENGLISH

2 3
PACKAGE CONTENTS
» LM50 Esports Mouse
» Quick Installation Guide
» Downloadable software available at
www.lioncast.com > Support > LM50
SYSTEM REQUIREMENTS
» PC with a free USB port
» Windows 10 / 8 / 7
» Internet connection (for installing the mouse driver)
TECHNICAL SPECIFICATIONS
» 100-12,000 DPI optical sensor
» High-performance glide feet
» 6 buttons
» Software for customized programming of buttons and LED‘s
» Gold-plated USB connector
» Size: approx. 12.5 x 6.7 x 41cm
» Weight: 90g
LIONCAST LM50 ESPORTS MOUSE
The LM50 is the rst uncompromising esports mouse from Lioncast. We‘ve
designed it in conjunction with well-known esports professionals to deliver pure
performance and all the essentials for competitive gaming.
The PixArt PMW 3360 optical sensor ensures the nest, trouble-free tracking
on almost any surface.With its speed of 250 IPS, acceleration of up to 50G, and
tracking of up to 12,000FPS, it‘s ready to precisely transmit all of your move-
ments.
Gaming-grade switches from Omron ensure a guaranteed life of 10 million clicks,
as well as perfect triggering.The polling rate of up to 1000Hz gives you reaction
times of just 1 ms, so you can always be a hair quicker than your competitors.
The internal LEDs can be freely congured with the available software and saved
in ve separate proles, along with the DPI settings and button assignments.The-
se proles are also saved in the mouse, so they‘re always available to you – simply
by plugging into your computer. It‘s the perfect solution for tournaments or your
next LAN party! In developing the LM50 mouse, ergonomics were of the utmost
importance for us. The shape of the mouse, optimized for many different grip
styles, combined with a material specically chosen for superior grip, and with no
unnecessary gimmicks, guarantee the most important thing: total control of your
gaming experience.
No frills – just performance!
4 5
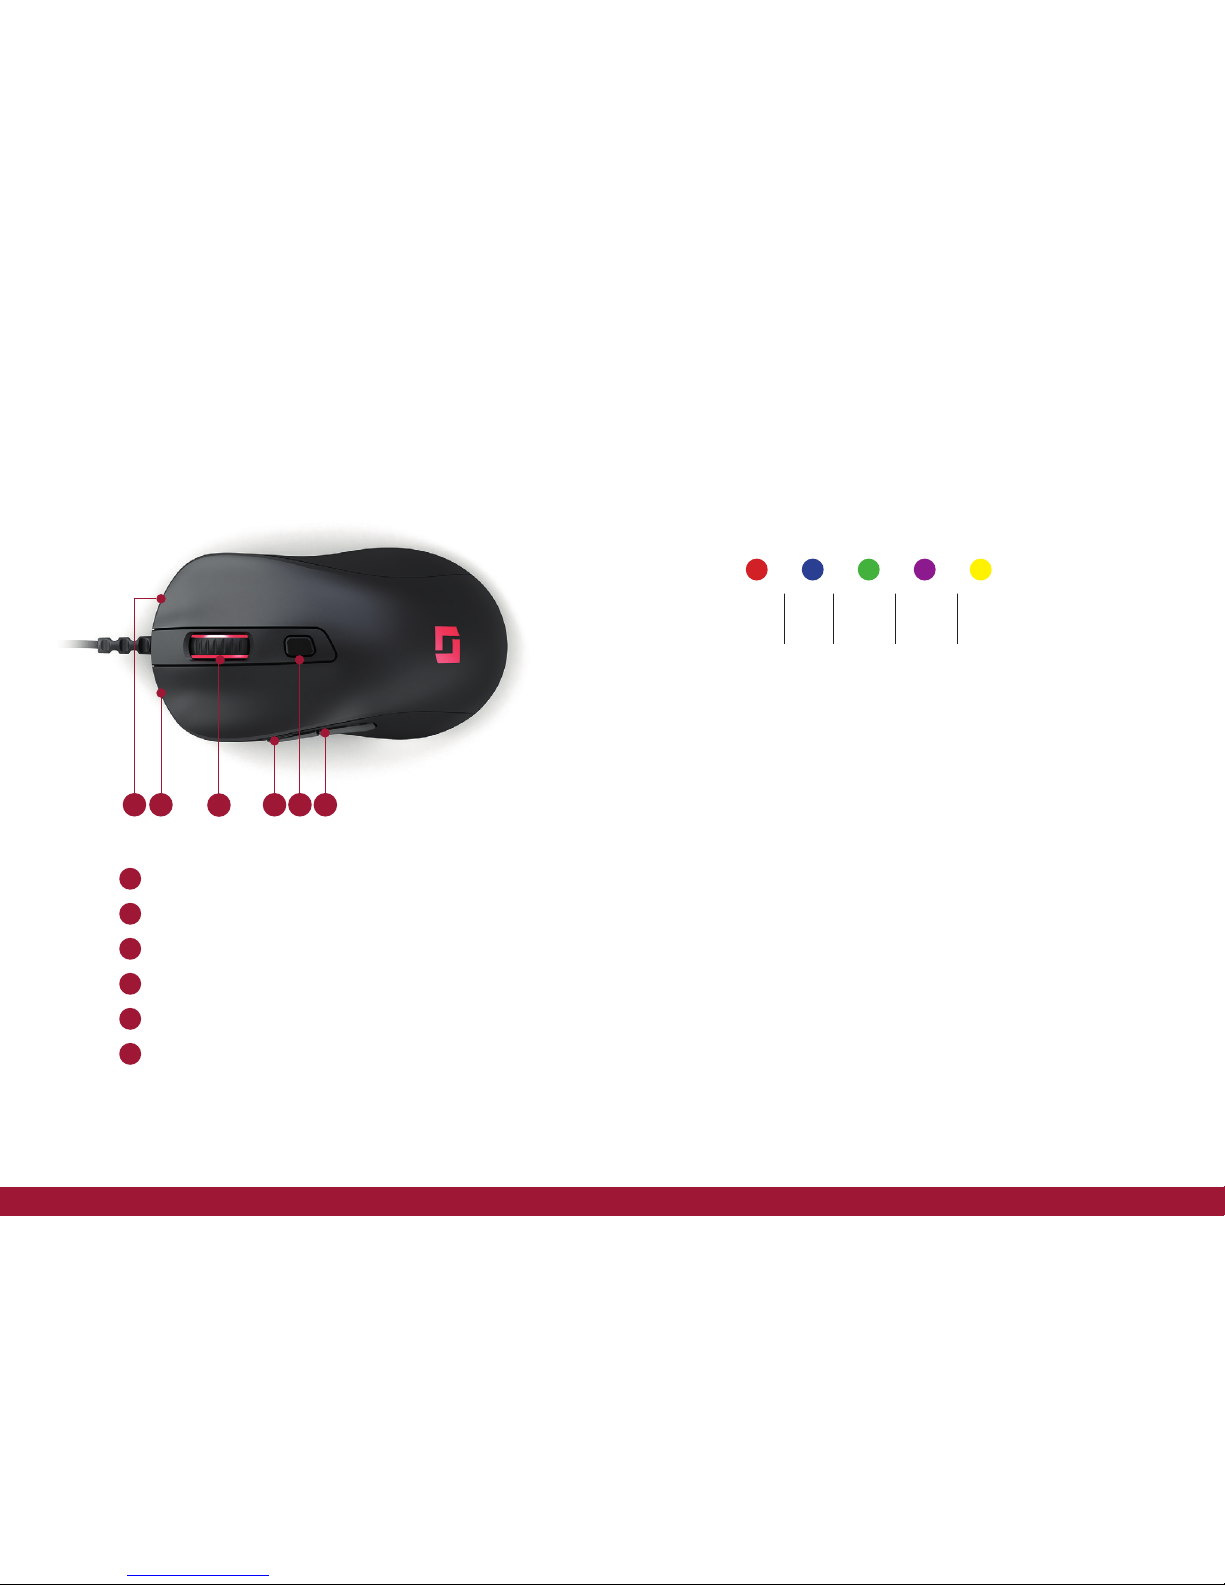
1 2 3 4 5 6
BUTTONS PROFILE & MOUSE CONFIGURATION
Right mouse button
Left mouse button
Mouse wheel / third mouse button
Fourth mouse button
DPI button
Fifth mouse button
Standard Conguration:
DPI
DPI-Stage
800
2/5
1600
4/5
400
1/5
1200
3/5
3200
5/5
1
3
5
2
4
6
Mouse operation (without software):
If the mouse is used without software, the standard settings (see above) apply
up to this point if only one prole is set up.The DPI settings can be changed with
the DPI button on the top side.
We recommend downloading and using the software to congure the mouse.
Using the software you can congure up to ve proles, LED colors, DPI stages,
and numerous key assignments.
Installing the Lioncast LM50 Software:
1. Plug the mouse into a free USB port on the computer.
2. Download the software www.lioncast.de > Support > LM50
3. Run the installer and follow the instructions on the screen.
Lioncast Tip:
After the mouse has been congured using the software, all settings are saved in
the mouse and will be available simply by plugging the mouse into any compu-
ter.

6 7
SOFTWARE BASIC FUNCTIONS I SOFTWARE BASIC FUNCTIONS II
General tab
Here you can set all the basic functions of the LM50 mouse.
Sensitivity
Changes the sensor sensitivity, which affects the cursor [pointer?] speed. We re-
commend the standard setting for optimum precision.The pointer speed should
be set higher than the DPI if possible.
Pointer speed
Changes the mouse pointer speed (Windows function).The standard setting is
recommended; this can be set more precisely on the DPI tab.With the checkbox
you can activate or deactivate mouse acceleration (Windows function).
Scrolling speed
Changes the speed of the mouse wheel.
Double-click speed
Changes the delay time for the mouse to recognize a double click.
Polling rate
Changes the frequency of report rate. Recommended setting: 500-1000Hz.
Save as
Saves all settings in a le.
Load le
Loads saved settings from a le.
Reset prole
Resets the current prole to the default settings.
Reset all
Resets all proles to the default settings.
OK
Conrms changes and closes the software window.

8 9
SOFTWARE BASIC FUNCTIONS III SOFTWARE BASIC FUNCTIONS IV
Cancel
Cancels all changes and closes the software window.
Apply
Saves the current settings to the mouse‘s internal memory, and the software
window remains open.
Proles (1-5)
The desired prole can be selected with the prole buttons.
Prole adjuster (arrows)
You can use the prole adjuster to set the number of proles the mouse stores
internally. This is advantageous when, for example, you need only two internal
proles so you can more quickly switch between them.
Button assignment
Each button of the LM50 mouse can be assigned to any mouse button or key-
board function. In addition, the Key Shift function lets you assign a second func-
tion to each button.
All functions can be assigned by clicking the numbered elds.
The following options are available:
Left click
Executes a left click
Right click
Executes a right click
Center button
Executes a mouse wheel click
Forward
Forward browser function
Back
Back browser function
Single button
Assigns a keyboard function to a mouse
button
Combo button
Assigns a keyboard combination (e.g.
Shift+A or CTRL+SHIFT+A)
Basic
Basic ofce editing functions (e.g. cut, copy,
paste, etc.)
Advanced
Advanced Windows functions (e.g. open
Explorer, lock PC, etc.)
Media
Multimedia and audio functions
Macro
Assigns a recorded sequence of com-
mands to a mouse button. This function
will be further explained below.
Fire button
Automatic re function; number and delay
can be set.
DPI selector
Cycles through the activated DPI modes;
when the highest level is reached, it begins
the cycle again.
DPI (+)
Increases the DPI stage up one level
DPI (-)
Decreases the DPI stage down one level
Prole selector
Cycles through the ve proles; this cor-
responds to the prole selector switch on
the bottom side of the mouse.
Deactivate
Deactivates a button.
Sniper
While this button is held, the mouse tem-
porarily changes to the DPI specied here.

10 11
SOFTWARE BASIC FUNCTIONS V SOFTWARE - MACRO MANAGER I
Key Shift
The Key Shift function enables you to assign a second function to all mouse
buttons.
In the standard assignment, if a button is assigned as a Key Shift button, this func-
tions like a „Shift“ key.While this button is held, all mouse buttons change to their
second function until the button is released.
Default: The standard button assignment is displayed and can be set.
Key Shift: The second assignment is displayed and can be set.
Lift Range
Sets how quickly the sensor stops tracking when the mouse is lifted.
Low: The mouse pointer stops moving with the slightest lift of the mouse
High: The mouse pointer takes somewhat longer to react when the mouse is
lifted
Angle Snapping
Angle snapping OFF: Deactivates tracking correction for the mouse pointer
Angle snapping ON: Activates tracking correction for the mouse pointer
Macro assignment
With the Macro Manager a sequence of commands can be executed with per-
fect timing, with the click of a mouse button.This feature is useful for all kinds of
uses and is limited only by your imagination. Since this is a rather complex topic,
take a little time to learn it – it will be worth it.

12 13
SOFTWARE - MACRO MANAGER II SOFTWARE - MACRO MANAGER III
First Steps
Step 1
Start the Macro Manager by selecting the desired mouse button in the General
tab, then click „Macro“ and Macro Manager.
Step 2
Click „New“ and choose a name for your macro.
Step 3
Click the Record button and press a sequence of keys on the keyboard (e.g. your
name), then click the Stop button.
Step 4
Click OK to conrm the macro.
Step 5
Click Apply in the General tab to transmit the changes to the mouse.The macro
name should now be displayed in the mouse button eld.
Step 6
Test your macro, for example in Windows Editor. Open the editor, click in the
window, and press the mouse button to which the macro is assigned. Now the
macro should run and be visible in the editor.
You can now edit the macro with the „Action edit tools,“ on the right side of the
macro manager, or create a new macro in a new memory location.With the op-
tions on the upper right, you can automatically insert delays between the button
presses.The rst option „Record delays between actions“ records the delay in
real time, and the second option inserts a xed-length delay between the entries.
This can be entered in milliseconds in the applicable eld.With the loop function
you can run the macro multiple times in succession. Mouse buttons are not re-
corded in real time and can only be added by using the „mouse action“ function.
Action edit tools:
Record after
With this tool the recording can be started after the selected line of the macro.
Delete
Deletes the currently selected line of the macro
Up
Moves the selected line up
Down
Moves the selected line down
Copy
Copies the selected line
Cut
Cuts the selected line
Paste
Pastes the cut/copied line into the selected position.
„Mouse Action...“
Inserts mouse button commands into the macro

14 15
SOFTWARE - DPI SETTINGS I
DPI tab
Step 1
Decide how many DPI stages are needed for the selected prole; in the above
example we have selected three stages. Deactivate the unneeded stages by cli-
cking the DPI(x) button.The button will light up to conrm inactivity.
SOFTWARE - DPI SETTINGS II
Step 2
Decide whether the X andY axes should have the same DPI stage. If you want to
assign different speeds for turning (X-axis) and vertical movement, the axes can
be uncoupled.The recommended setting is that these remain linked.
Step 3
Choose your desired DPI setting with the corresponding slider for each DPI
stage.
Step 4
Click Apply to transmit the settings to the mouse.

16 17
SOFTWARE - LED SETTINGS
Light tab
Here you can select the settings for the LEDs on the LM50 Gaming Mouse.The
colors for the mouse wheel and logo can be selected either independently or
simultaneously and are also saved in the prole.The brightness and effect speed
can likewise be set or turned off.

4250541 920589
LM50 | ESPORTS MOUSE
Color: Black
Art.-No.: 15413
Lioncast®is a registered trademark of
Ströer Products GmbH | Torstr. 49 | 10119 Berlin
Made in China
REACH
Table of contents
Other Lioncast Mouse manuals


