Lioncast LM20 User manual

1
LM 20 GAMING MOUSE

2 3
Inhalt Content
DE EN
Einführung Seite 4
Buttons und Installation Seite 5
Konguration ohne Software Seite 6
Software - Grundfunktionen Seite 7
Software - DPI-Einstellungen Seite 10
Software - Makro Manager Seite 11
Software - LED Einstellungen Seite 13
Introduction page 16
Buttons and Installation page 17
Conguration without Software page 18
Software - Main Functions page 19
Software - DPI page 22
Software - Macro Manager page 23
Software - LED page 25
4 5
FRONT
BACK
Lioncast LM20 Gaming Mouse Buttons und InstallationDE DE
Die Lioncast LM20 ist die nächste kompro-
misslose Evolutionsstufe in der Geschichte
der Lioncast Gaming Mäuse. Optimiert für
den Einsatz in FPS-, RTS- und MOBA-Ga-
mes wurde jedes Detail speziell für diese
Anwendungsgebiete angepasst.
Der modizierte Avago 9800 Laser Sensor
sorgt für feinste Abtastung auf nahezu allen
Oberächen und ist mit seinen Eckdaten
von 150 IPS, einer Beschleunigung von bis
zu 30G und einer Abtastung bis zu 12.000
FPS bereit, jede deiner Bewegung auf das
genaueste zu Übertragen. Gaming Grade
Switches von Omron sorgen für garantier-
te Haltbarkeit von 5 Millionen Auslösungen
und ein perfektes Auslösen bei jedem Klick.
Die Pollingrate von bis zu 1.000Hz sorgt für
Reaktionszeiten bis zu 1ms, damit du immer
den kleinen Tick schneller bist, als deine
Konkurrenten.
Die internen LEDs lassen sich in der mitge-
lieferten Software frei kongurieren und kön-
nen zusammen mit den DPI-Einstellungen
und der Belegung der Knöpfe in den fünf
Prolen gespeichert werden. Diese Prole
werden auch in der Maus selbst gespeichert
und sind somit immer für dich verfügbar -
einfach durch das Einstecken am Compu-
ter. Die perfekte Lösung für Turniere oder
deine nächste Lan-Party!
Die Ergonomie war bei der Entwicklung der
LM20 Maus von höchster Wichtigkeit für
uns. Die für verschiedende Griffarten opti-
mierte Form der Maus, das in jeder Situation
perfekten Griff bietende Material, die in der
Hitze des Gefechts immer gut erreichba-
ren Feuerknöpfe, die Reaktionszeit im Mil-
Packungshinhalt
1 LM20 Gaming Maus
1 Bedienungsanleitung
1 Installations-CD
System Anforderungen:
• PC mit Windows 8 / 7 / Vista / XP
und ein freier USB-Port
• 13 MB freier Festplattenspeicher
• CD-Rom Laufwerk oder Internet-
verbindung zur Installation
Technische Spezikationen:
• 16.400 DPI Laser Sensor
• Bis zu 1.000 Hz Polling Rate / 1 ms
Reaktionszeit
• High-Performance-Teon-Gleitfüße
• 12 Tasten (davon ein Prolwahlschal-
ter)
• Software zur freien Programmierung
von Tasten und LEDs
• Weight Tuning System
• Vergoldeter USB-Anschluss
• Größe: ca. 12,5 x 7,9 x 4,1 cm
• Gewicht: 122g (inklusive 8x 2,4g
Gewichte)
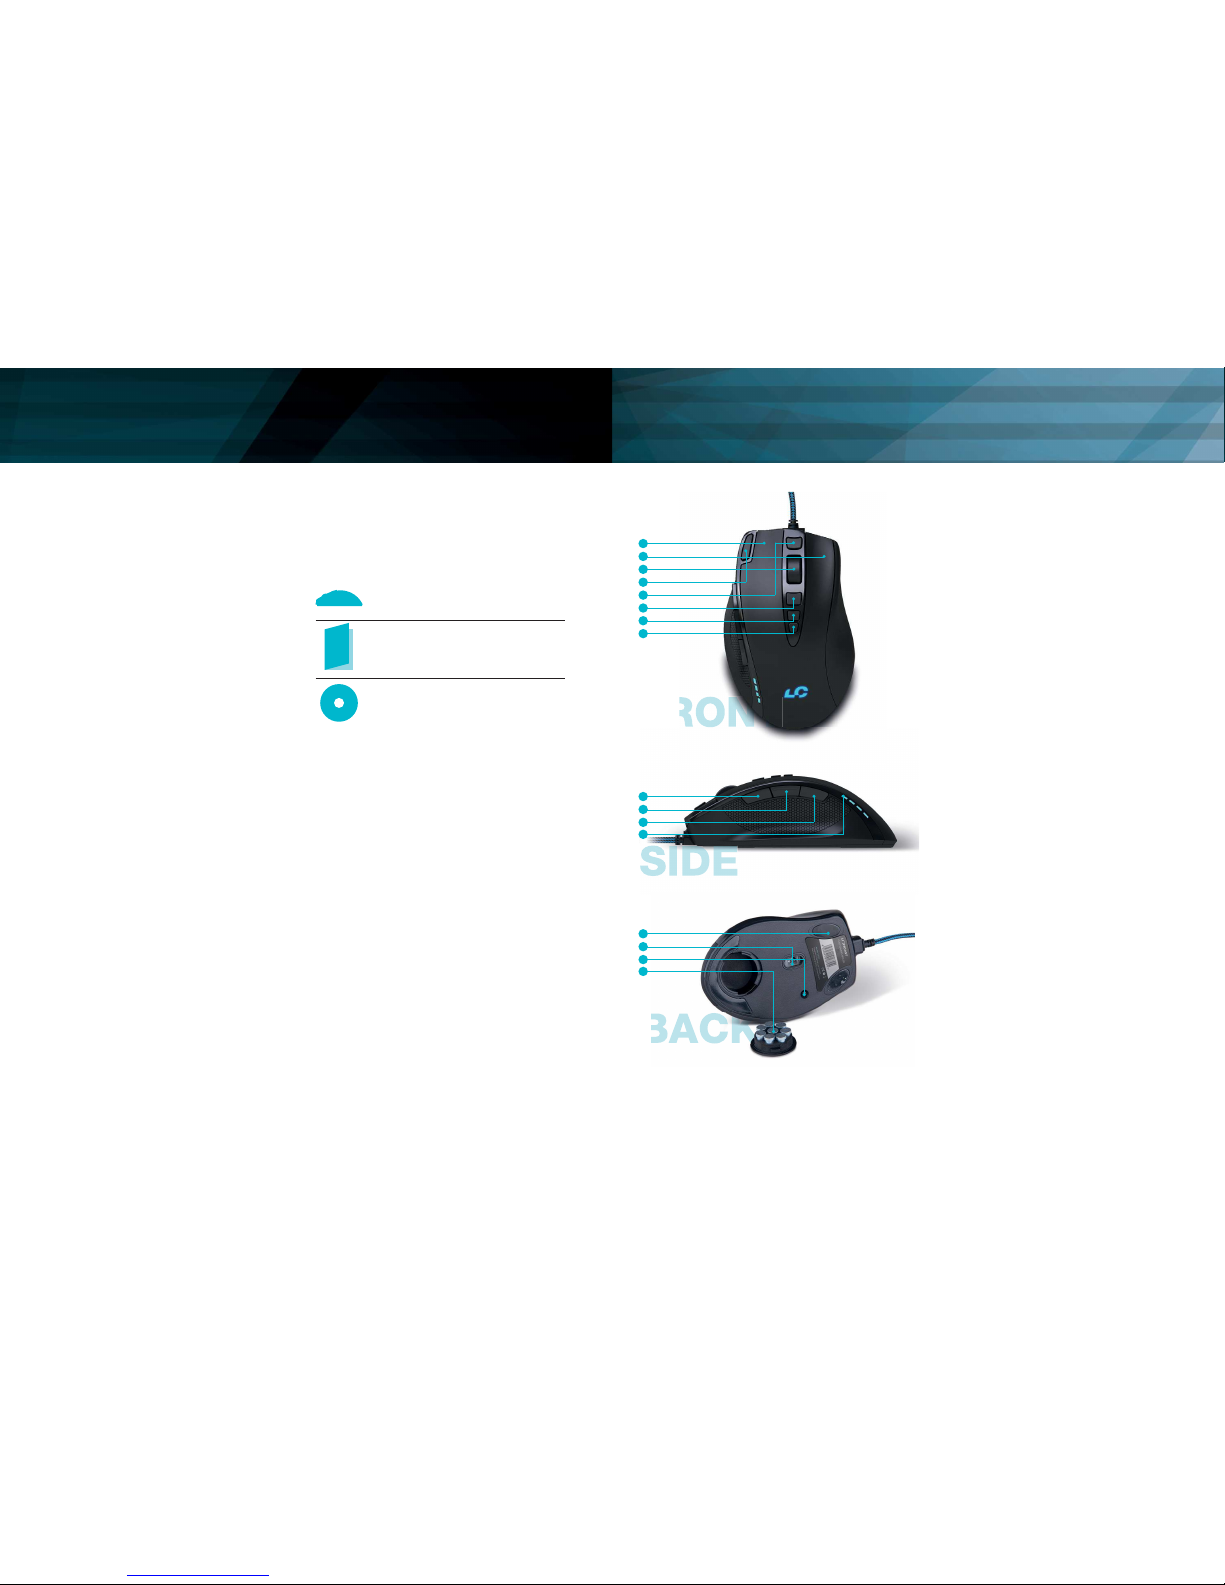
Front:
1. Linke Maustaste
2. Rechte Maustaste
3. Mausrad
4. Feuerknopf
5. Vowärts
6. Zurück
7. DPI + Knopf
8. DPI - Knopf
Seite:
9. Alt
10. Ctrl
11. Shift
12. DPI Status LEDs
Unterseite:
13. Teon-Mausglides
14. High Performance Laser Sensor
15. Prolwahlschalter
16. Gewichtssystem
lisekundenbereich und das anpassbare Ge-
wicht - jedes Detail wurde bedacht um dir
den größtmöglichen Vorteil in deinem Game
zu verschaffen! 1
9
13
3
11
12
15
16
5
7
2
10
14
4
6
8
6 7
Pro le 1
1.000
1/5
DPI
DPI Stage
Pro le 2
2.000
2/5
Pro le 4
8.200
4/5
Pro le 3
4.000
3/5
Pro le 5
16.400
5/5
Pro le & Mouse Kon guration Software - Grundfunktionen IDE DE
Kon gurieren der Maus
(ohne Software):
Wenn die Maus ohne Software verwendet
wird, kann mittels dem Prolwahlschalter
auf der Unterseite zwischen fünf Prolen
und den korrespondierenden Farben ge-
wählt wählen. Die Standardeinstellungen
sind der Tabelle oben zu entnehmen. An
der Farbe der LED kann das gewählte Pro-
l erkannt werden. Jedes Prol hat eine
Standard-DPI-Einstellung, die mit den DPI
+ / - Tasten auf der Oberseite gewechselt
werden kann. In jedem Prol kann darübe
hinaus zwischen fünf DPI-Einstellungen
gewählt werden (Voreingestellt sind 1000 /
2000 / 4000 / 8200 / 16400 DPI).
Lioncast Tipp:
Nachdem die Maus mit der Software kon-
guriert wurde, sind alle Einstellungen in
der Maus gespeichert und durch einfaches
Einstecken an einem beliebigen Computer
verfügbar. An diesem Computer muss keine
spezielle Software installiert werden, nur die
Plug and Play Treiber von Windows werden
automatisch installiert.
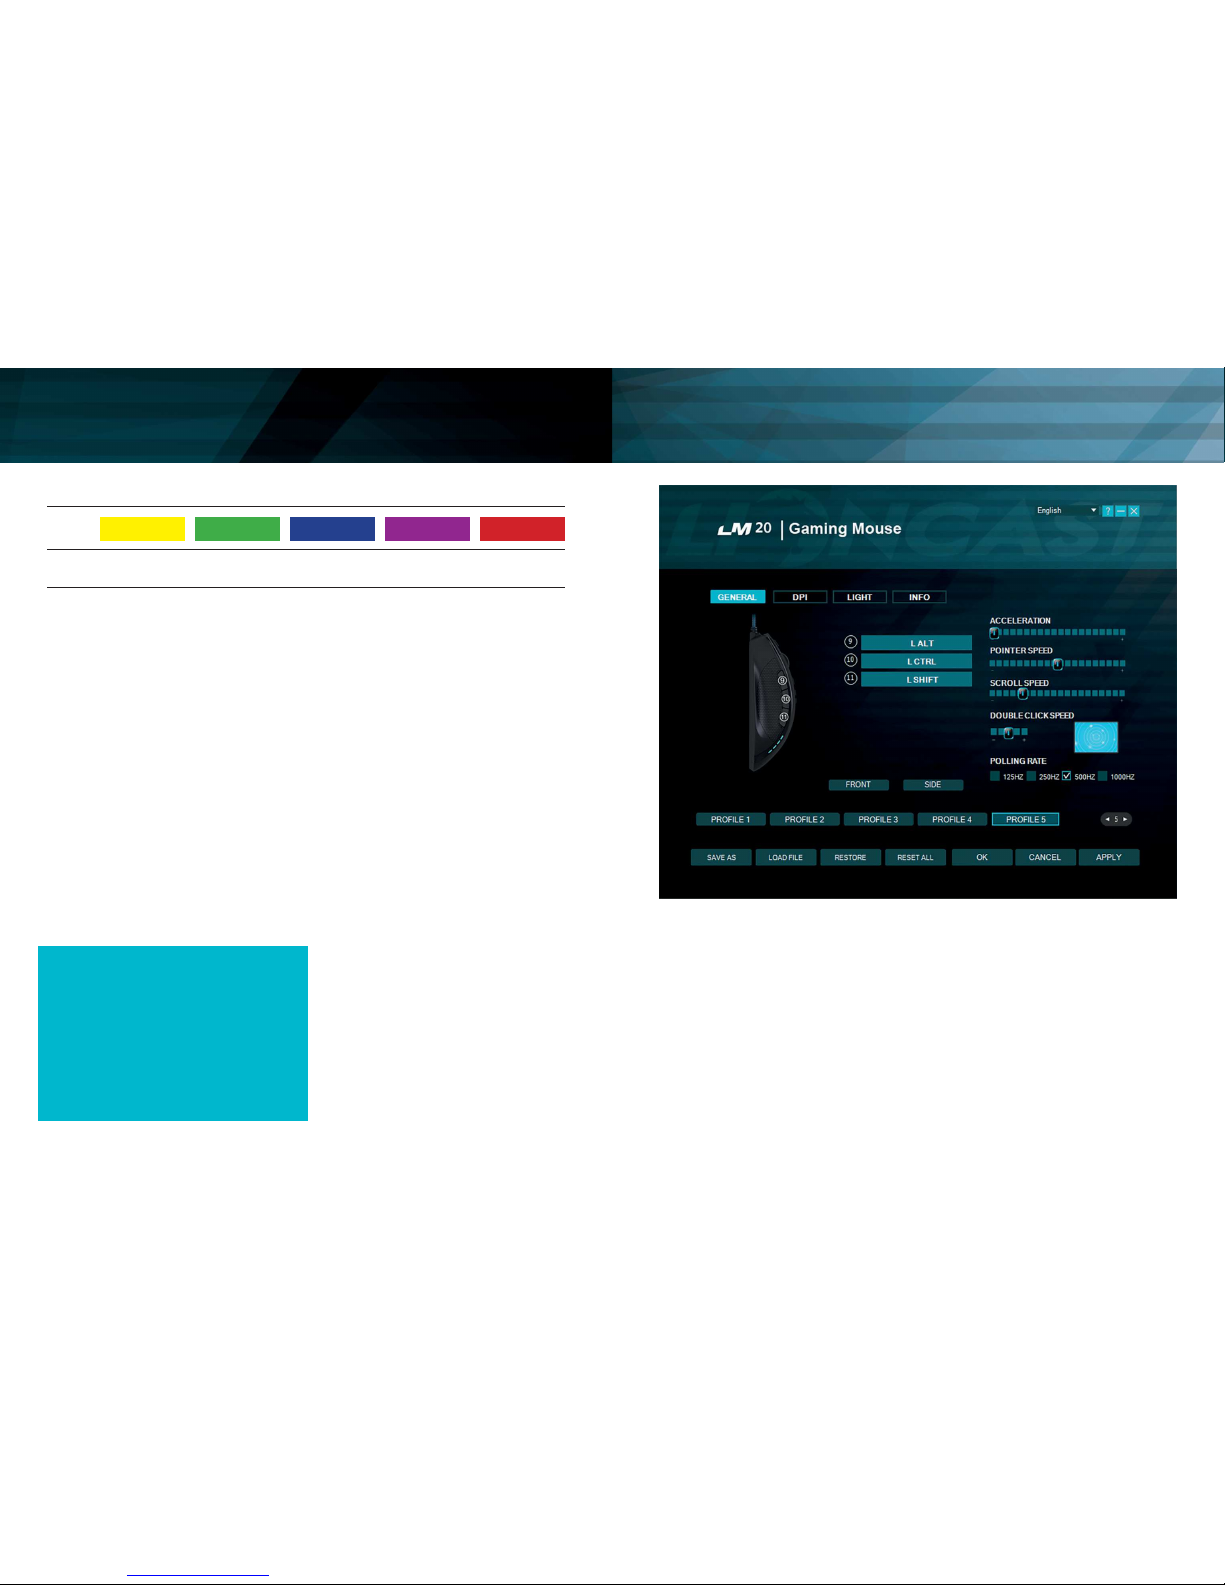
Reiter Allgemein
Hier können alle grundlegenden Funktionen
der LM20 Maus eingestellt werden.
Beschleunigung
Ändert die Beschleunigung des Mauszei-
gers in Abhängigkeit von der Geschwin-
digkeit, empfohlene Einstellung ist null für
höchste Genauigkeit.
Zeigergeschwindigkeit
Ändert die Geschwindigkeit des Mauszei-
gers, empfohlene Einstellung ist die Stan-
dardeinstellung, über den DPI Reiter kann
diese Einstellung noch genauer vorgenom-
men werden.
Scrollgeschwindigkeit
Ändert die Geschwindigkeit des Scrollrades.
Doppelklickgeschwindigkeit
Ändert die Verzögerung für die Erkennung
eines Doppelklicks, kann mit dem nebenlie-
genden Feld getestet werden.
Polling Rate
Ändert die Häugkeit, in der die Position des
Installation der Lioncast
LM20 Software:
1. Steck die Maus an einen freien USB-
Port an deinem Computer.
2. Installiere die Software entwe-
der mit der mitgelieferten CD oder
durch runterladen des Installers von
www.lioncast.de/downloads.
3. Führe den Installer aus und folge den
Anweisungen auf dem Bildschirm.
Hinweis: Auf einigen Windows-Versio-
nen kann eine Fehlermeldung erschei-
nen. Diese ignorieren und einfach mit
der Installation fortfahren.
8 9
Mauszeigers abgefragt wird, empfohlene
Einstellung 500 - 1000 Hz.
Speichern als
Speichert alle Einstellungen in einer Datei.
Datei laden
Lädt gespeicherte Einstellungen aus einer
Datei.
Prol zurücksetzen
Setzt das aktuelle Prol auf die Grundein-
stellungen zurück.
Alle zurücksetzen
Setzt alle Prole auf die Grundeinstellungen
zurück.
Ok
Bestätigt die Änderungen und schließt das
Software Fenster.
Abbrechen
Verwirft die Änderungen und schließt das
Software Fenster.
Anwenden
Überträgt die aktuellen Einstellungen in den
internen Speicher der Maus und das Soft-
ware Fenster bleibt geöffnet.
Prole (1-5)
Mit den Prol-Knöpfen kann das
gewünschte Prol gewählt werden. Dies
entspricht der Funktion des Prolwahl-
schalters auf der Unterseite der Maus.
Proleinsteller
Mit dem Proleinsteller kann die Anzahl an
Prolen, die die Maus intern speichert ange-
passt werden. Dies ist vorteilhaft, wenn zum
Beispiel nur zwei interne Prole benötigt
werden, da dann schneller zwischen ihnen
umgeschaltet werden kann.
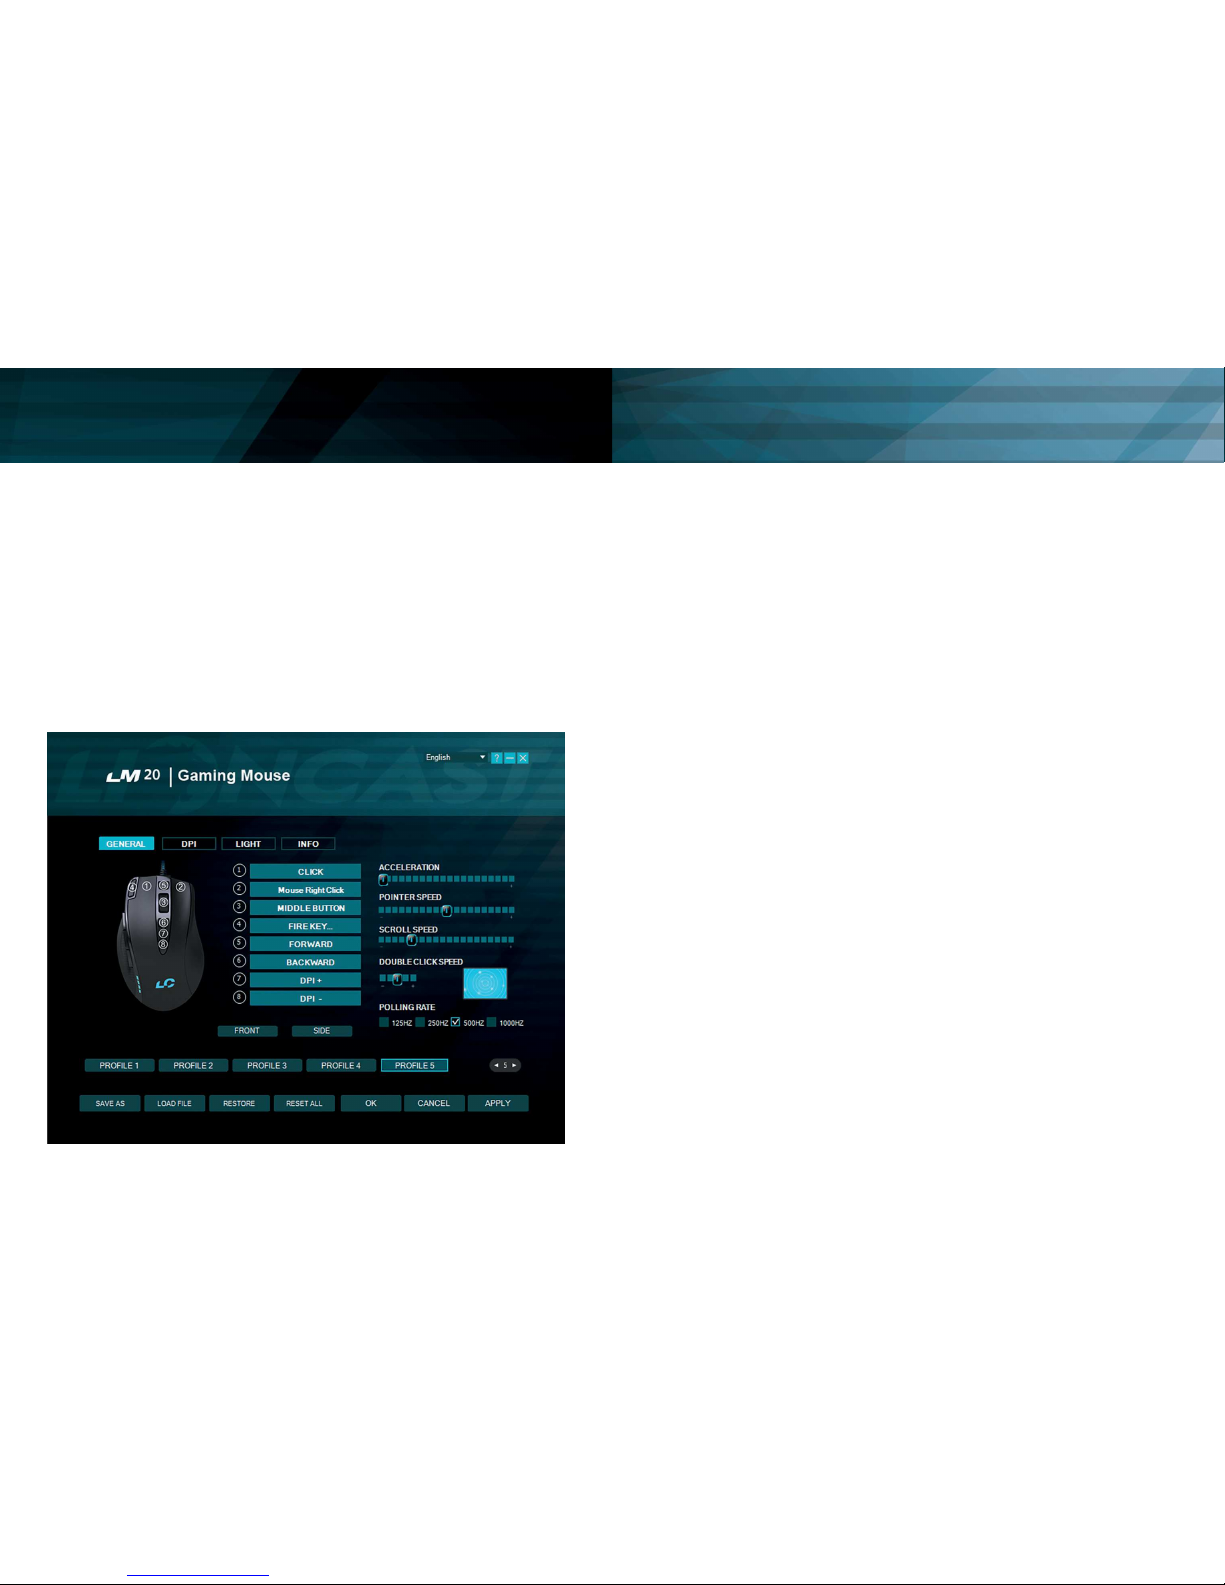
Tastenzuweisung
Front
Knöpfe auf der Vorderseite darstellen
Seite
Knöpfe auf der Seite darstellen
Jede Taste der LM20 Maus kann mithilfe
der Software einer beliebigen Maustaste
oder Keyboard-Funktion zugewiesen wer-
den. Darüber hinaus gibt es noch die Feuer-
knopf-Funktion, Tastenkombinationen und
Makros als mögliche Zuweisungen.
Diese Funktionen können durch Klicken auf
die nummerierten Felder zugewiesen wer-
den.
Folgende Optionen sind verfügbar:
Klick
Führt einen Linksklick aus
Rechtsklick
Führt einen Rechtsklick aus
Mittlere Taste
Führt eine Mausrad-Klick aus
Vorwärts
Browser-Funktion Vorwärts
Zurück
Browser-Funktion Zurück
Einzelne Taste
Weist eine Tastatur-Funktion einer
Maustaste zu
Kombotaste
Weist eine Tastaturkombination zu (z.B. Shift
+ A oder CTRL + SHIFT + A)
Basic
Gundlegende Editierfunktionen für Büro-
funktionen (z.B. Ausschneiden, Kopieren,
Einfügen etc.)
Fortgeschritten
Erweiterte Windows-Funktionen (z. B. Ex-
plorer öffnen, PC sperren etc.)
Media
Multimedia- und Audio-Funktionen
Makro
Weist eine aufgenommene Sequenz von
Befehlen mit genauer zeitlicher Abfolge ei-
ner Maustaste zu, diese Funktion wird unten
genauer erläutert.
Feuerknopf
Automatische Feuerfunktion, Anzahl und
Verzögerung können eingestellt werden.
DPI-Schalter
Schaltet duch die aktivierten DPI-Modi,
wenn die höchste Stufe erreicht ist, wird
wieder zu Stufe eins gewechselt.
DPI (+)
Schaltet die DPI-Stufe um eins nach oben
DPI (-)
Schaltet die DPI-Stufe um eins nach unten
Prolschalter
Schaltet durch die fünf Prole, dies ent-
spricht dem Prolwahlschalter auf der Un-
terseite der Maus.
Deaktivieren
Deaktiviert einen Knopf
Software - Grundfunktionen II Software - Grundfunktionen IIIDE DE

10 11
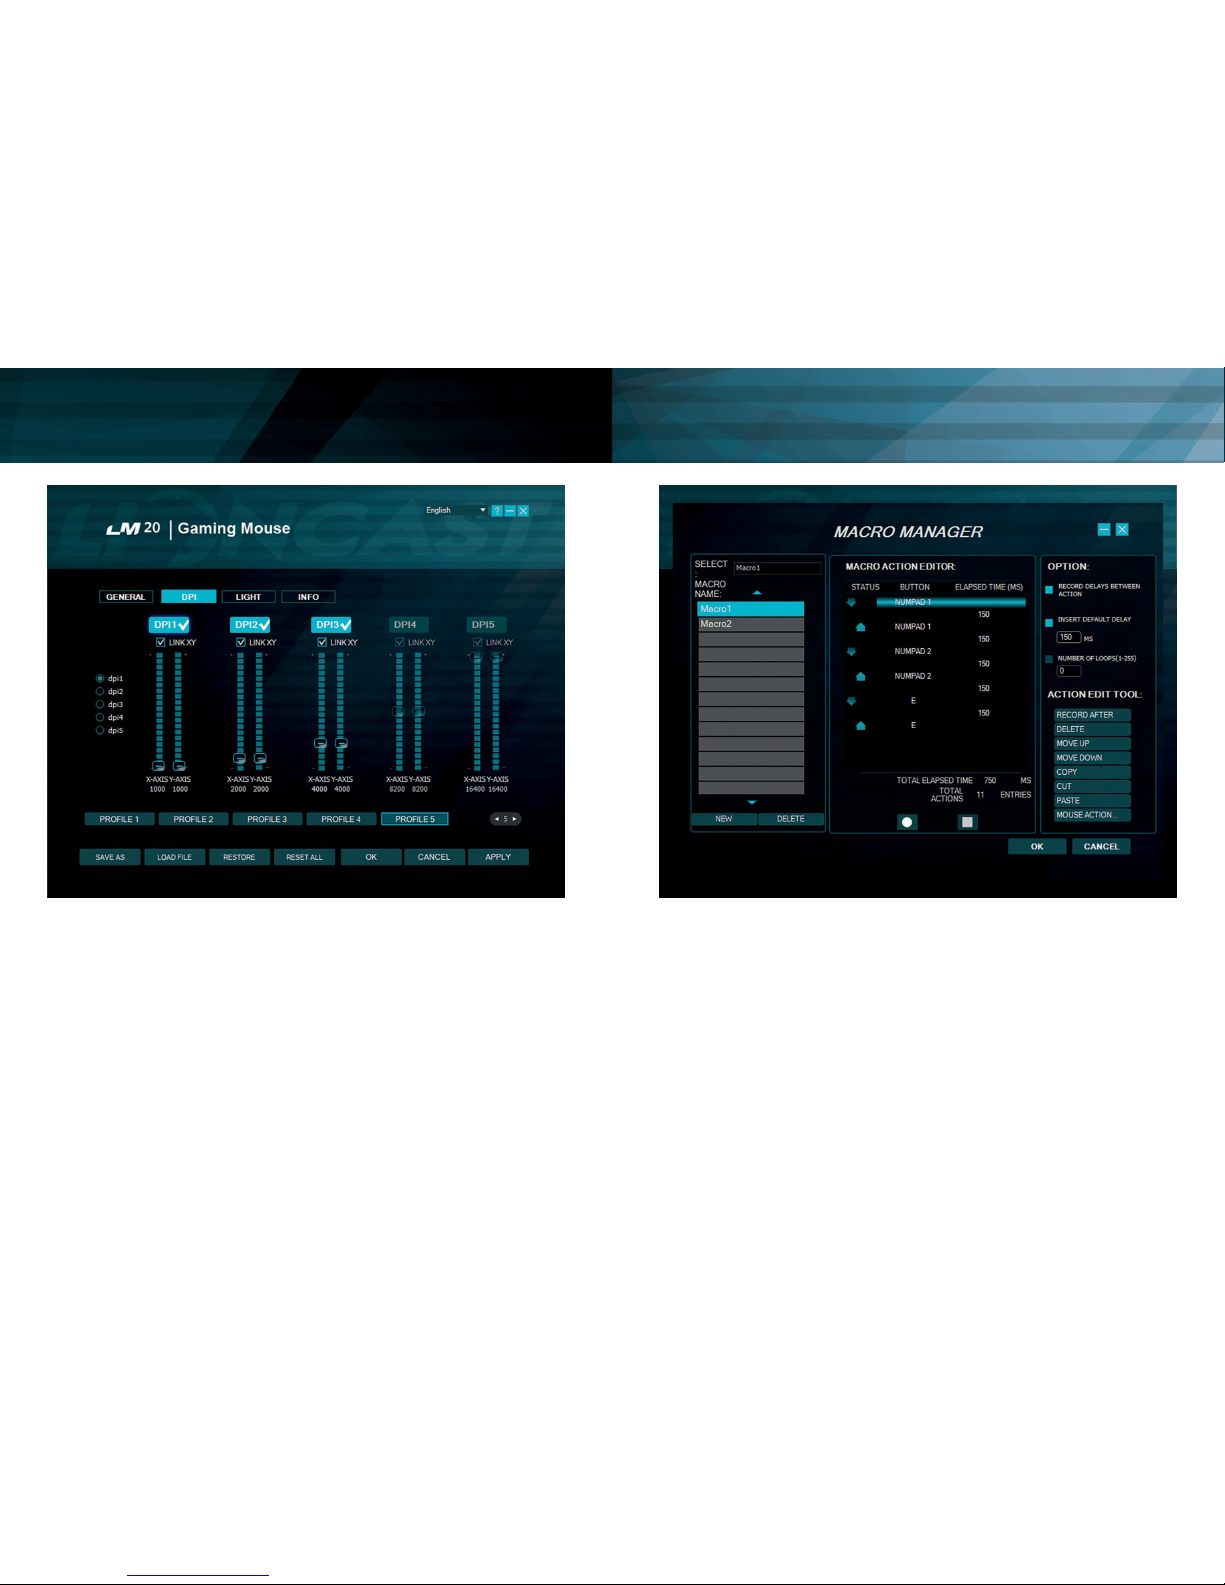
Reiter DPI
Schritt 1
Entscheide wie viele DPI-Stufen für das
gewählte Prol benötigt werden, im obigen
Beispiel haben wir drei Stufen gewählt. De-
aktiviere die nicht benötigten Stufen durch
drücken des DPI(x)-Knopfes, der Knopf wird
dunkel, um die Inaktivität anzuzeigen.
Schritt 2
Entscheide, ob die X- und Y-Achse die sel-
be DPI-Stufe haben sollen, wenn eine unter-
schiedliche Geschwindigkeit für das Drehen
(X-Achse) und die vertikale Bewegung ge-
wünscht ist, können die Achsen entkoppelt
werden. Die empfohlene Einstellung ist die
Verlinkung beizubehalten.
Schritt 3
Wähle deine gewünschte DPI-Einstellung
mit dem dazugehörenden Slider für jede
DPI-Stufe. Zum Feintunen können auch die
Hoch/Runter Pfeiltasten verwendet werden,
hierfür muss der gewünschte Slide einmal
angeklickt werden.
Schritt 4
Drücke auf Anwenden um die Einstellungen
auf die Maus zu übertragen.
Makro-Zuweisung
Mit dem Makromanager kann eine Folge
von Befehlen mit perfektem Timing durch
das Drücken einer Maustaste ausgeführt
werden. Dies ist nützlich für alle möglichen
Anwendungsgebiete und deine Vorstel-
lungskraft ist gefragt, um die besten Wege
für dein Spiel zu nden. Da dies ein recht
komplexes Thema ist, nimm dir etwas Zeit
und erwarte eine gewisse Einarbeitungszeit.
Wir sind gespannt auf die coolen Lösungen,
die du nden wirst!
Erste Schritte
Schritt 1
Starte den Makromanager durch das Aus-
wählen der gewünschten Maustaste im
Reiter Allgemein, dann klicke auf Makro und
Makromanager.
Schritt 2
Klicke auf Neu und wähle einen Namen für
dein Makro.
Schritt 3
Klicke auf den Aufnahmeknopf und nimm
einige Tastendrücke auf der Tastatur auf,
Software - DPI-Einstellungen Software - Makro Manager IDE DE
12 13
schreibe zum Beispiel deinen Namen, dann
klicke auf die Stop-Taste.
Schritt 4
Klicke OK, um das Makro zu bestätigen.
Schritt 5
Klicke auf Anwenden im dem Reiter Allge-
mein, um die Änderungen auf die Maus zu
übertragen, der Makro-Name sollte jetzt
auch in dem Feld der Maustaste angezeigt
werden.
Schritt 6
Öffne den Editor, klicke in sein Fenster und
drücke die Maustaste, der das Makro zuge-
wiesen ist. Jetzt sollte das Makro ablaufen
und im Editor sichtbar sein.
Du kannst nun das Makro mit den Action
edit tools, auf der rechten Seite des Mak-
romanagers, bearbeiten oder ein neues
Makro in einem neuen Speicherort anlegen.
Mit den Optionen oben rechts, kannst du
automatisch Verzögerungen zwischen den
Tastendrücken einfügen. Mit den Optionen
oben rechts, kannst du automatisch Ver-
zögerungen zwischen den Tastendrücken
einfügen. Die erste Option „Verzögerung
zwischen Aktionen aufnehmen“ nimmt die
Verzögerung in Echtzeit auf und die zweite
Option fügt eine xe Verzögerung zwischen
den Eingaben ein. Diese kann in Millisekun-
den in dem dazugehörigen Feld eingegeben
werden. Mit der Loop-Funktion kannst du
das Makro mehrmals hintereinander ablau-
fen lassen. Maustasten lassen sich nicht in
Echtzeit aufnehmen und können nur durch
die Funktion „Maus-Aktion“ hinzugefügt
werden.
Hab Spaß beim Experimentieren und hol dir
den Vorsprung vor deiner Konkurrenz!
Action edit tools:
Danach Aufnehmen
Hiermit kann die Aufnahme nach der ge-
wählten Zeile des Makros gestartet werden.
Löschen
Löscht die aktuell gewählte Zeile des Mak-
ros
Nach oben
Bewegt die gewählte Zeile um eins nach
oben
Nach unten
Bewegt die gewählte Zeile um eins nach
unten.
Kopieren
Kopiert die gewählte Zeile
Ausschneiden
Schneidet die gewählte Zeile aus
Einfügen
Fügt die zwischengespeicherte Zeile an der
gewählten Position ein.
„Maus Aktion…“
Fügt Maustasten-Befehle in das Makro ein
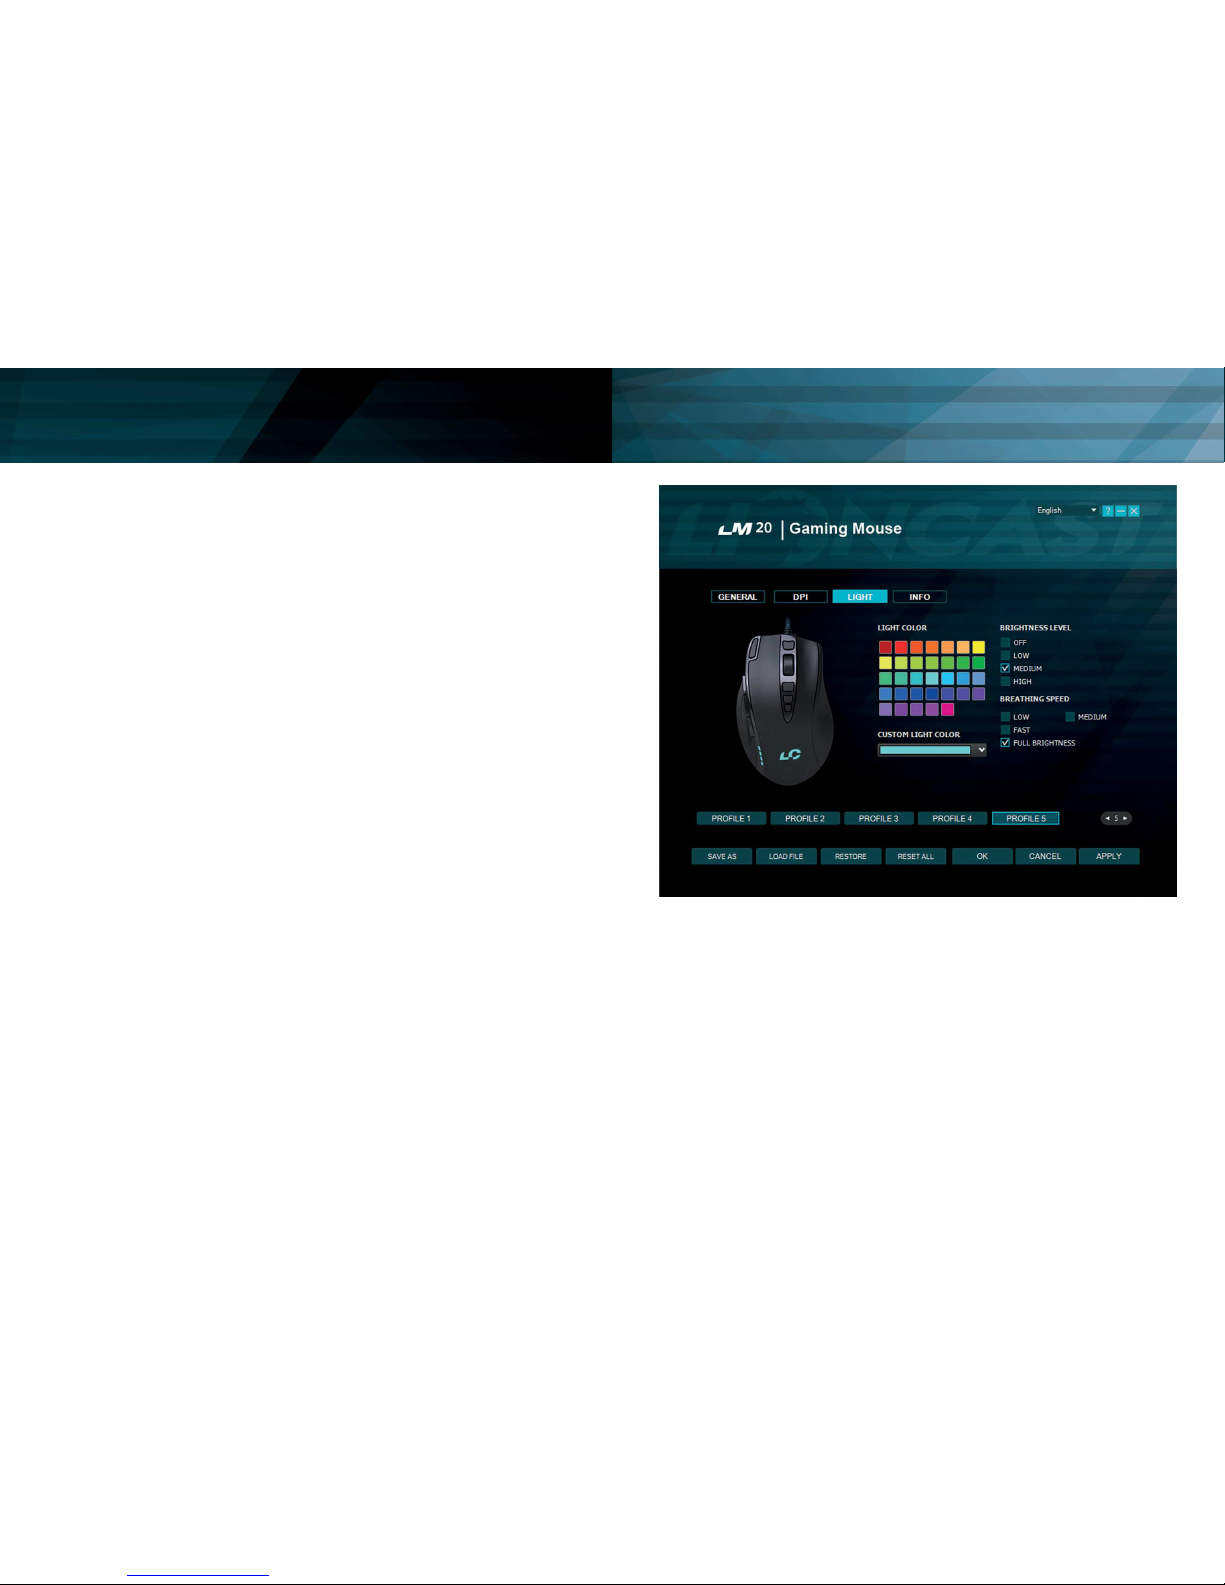
Reiter Licht
Hier können die Einstellungen für die LEDs
der LM20 Gaming Maus gewählt werden.
An der Farbe der LEDs kann immer das
gewählte Prol erkannt werden. Wähle das
Prol mit deiner bevorzugten Farbe als
Startpunkt und passe das Prol nach deinen
Wünschen an. Die Farbe für das Logo kann
völlig frei gewählt werden und wird auch
im Prol gespeichert. Die Helligkeit und die
Pulsgeschwindigkeit können ebenfalls ein-
gestellt werden oder sogar abgeschaltet
werden.
Software - Makro Manager II Software - LED-Einstellungen IDE DE

14 15
Pro le 1 Pro le 2 Pro le 4Pro le 3 Pro le 5
Schritt 1
Wähle dein Prol aus.
Schritt 2
Wähle deine bevorzugte Farbe für das Logo
mit dem Dropdown kann diese noch weiter
speziziert werden.
Schritt 3
Wähle die Helligkeit.
Schritt 4
Wähle die Pulsgeschwindigkeit.
Schritt 5
Drücke Anwenden, um die Einstellungen auf
die Maus zu übertragen.
Software - LED-Einstellungen IIDE Notizen

16 17
FRONT
BACK
Buttons and Installation EN
Front:
1. Left Mouse Button
2. Right Mouse Button
3. Mousewheel
4. Fire Button
5. Forward
6. Back
7. DPI + Button
8. DPI – Button
Side:
9. Alt
10. Ctrl
11. Shift
12. DPI Status LEDs
Back:
13. Teon Mouse Glides
14. High Performance Laser Sensor
15. Prole switch
16. Weight System
Lioncast LM20 Gaming MouseEN
The Lioncast LM20 is the next evolutionary
step in the history of Lioncast gaming mice.
Optimized for the use in FPS-, RTS-, and
MOBA-Games, every detail was especially
adjusted for these elds of application.
The modied Avago 9800 laser sensor
with its scanning speed of 150IPS, acce-
leration of up to 30G and scanning speed
of 12.000FPS is ready to convey all of your
movements into your game. Omron gaming
grade switches have superior longevity with
a guaranteed lifetime of over 5 million clicks
and perfect activation every single time.
The polling rate of 1000Hz enables reaction
times up to 1ms to give you the that critical
edge over your opponents.
The internal LEDs are congurable through
the included software and can be stored in
the ve internal proles, together with the
DPI and button settings. Those proles are
stored in the internal hardware memory of
the mouse and therefore available on every
PC even without installing the software. The
perfect solution for your tourneys or your
next Lan-party!
Ergonomics were of the highest importance
to us when developing the LM20 mouse.
Optimized for different grips and hand sha-
pes, materials which provide the best grip
in every situation, buttons which are easily
accessible even in the heat of battle, milli-
second reaction times and the adjustable
weight – every detail was considered to give
you the biggest possible advantage over
your competition!
Package content:
1 LM20 Gaming Mouse
1 Manual
1 Installation CD
System requirements:
• PC with Windows 8 / 7 / Vista / XP
and a free USB port
• 13MB of free disk space
• CD-Rom drive or internet connection
for software installation
Technical Specications:
• 16.400DPI Laser Sensor
• Up to 1.000Hz polling rate / 1ms
reaction time
• High performance teon mouse glides
• 12 Buttons (including one prole
switch)
• Software for programming individual
button congurations and LEDs
• Weight tuning system
• Gold-plated USB connector
• Measurements: ca. 12,5 x 7,9 x
4,1cm
• Weight: 122g (including 8x 2,4g chan-
geable weights)
1
9
13
3
11
12
15
16
5
7
2
10
14
4
6
8

18 19
Software - Main Functions I EN
General Tab
Here you can customize all the basic func-
tions of your LM20 Mouse.
Acceleration
Changes the acceleration of the mouse
depending on the speed of the movement,
recommended setting is zero to improve ac-
curacy.
Pointer Speed
Changes the speed of the mouse cursor.
Recommended setting is the default; use
the DPI Tab to select desired sensitivity in
the most accurate way.
Scroll Speed
Changes the speed of the scroll wheel.
Double Click Speed
Changes the delay in which two clicks are
recognized as a double click, you can use
the adjacent eld for testing.
Polling Rate
This changes the rate at which the compu-
ter checks the information from your mouse,
Prole 1
1.000
1/5
DPI
DPI Stage
Prole 2
2.000
2/5
Prole 4
8.200
4/5
Prole 3
4.000
3/5
Prole 5
16.400
5/5
Prole & Mouse CongurationEN
Conguring your mouse
(without the software):
When using the mouse without the software
you can choose between ve proles and
the corresponding colors by using the prole
switch on the bottom of the mouse. Plea-
se check the table above for reference. The
chosen prole can always be checked by
the color of the LED.
Each prole also has a standard DPI setting
that can be changed by using the DPI + / -
switches on the top of the mouse. In each
prole you can freely choose any of the ve
standard DPI settings (1000 / 2000 / 4000 /
8200 / 16400 DPI).
Lioncast Tip:
When conguring your mouse with the soft-
ware, you can save all the settings into the
mouse itself and use them on every compu-
ter just by plugging it in. No installation
of the software is needed for this, only the
plug and play drivers from Windows will be
installed.
Installing the Lioncast LM20 Software:
1. Plug the Lioncast LM20 Mouse intothe
USB port on your computer.
2. Install the software either from
the included CD or by down-
loading the installer from
www.lioncast.de/downloads.
3. Run the installer and follow the inst-
ructions on the screen Note: On some
Windows versions there is a warning
prompt. Please ignore it and continue
with the installation.

20 21
mouse. When only two proles are needed
this is advantageous, as they can be swit-
ched faster.
Button Assignment
Front
Display the front mouse buttons
Side
Display the thumb keyboard buttons
Each of the buttons of the LM20 Mouse
can be assigned to any mouse button or
keyboard function. It is also possible to use
the special re key, key combinations and
macros. Below we will explain how to set up
all these options.
You can switch the function of any button
by clicking the panel with the corresponding
number on it.
The following options are available:
Click
Performs a left click
Right click
Performs a right click
Middle Button
Performs a mouse wheel click
Forward
Forward button in most browsers
Backward
Backward button in most browsers
Single Key
Here you can assign any key from your key-
board to a mouse button.
Combo Key
Here you can assign a combination of keys
to a mouse button (e.g. Shift + A or CTRL +
SHIFT + A).
Basic
Basic editing functions for ofce work (e.g.
cut, copy, paste etc.)
Advance
Some more advanced Windows functions
(e.g. open explorer, lock pc etc.)
Media
Performs remote functions for media players
and audio settings
Macro
Assigns a recorded sequence of button
presses with exact timing to a button, this is
explained in detail below.
Fire Key …
Here you can dene an automatic ring fun-
ction and also specify a delay between the
clicks.
DPI Switch
This cycles through the activated DPI mo-
des, when you reach the highest activated
DPI stage it will cycle to stage 1.
DPI (+)
This cycles up one DPI stage
DPI (-)
This cycles down one DPI stage
Prole Switch
This cycles through the ve available proles
according to the button on the bottom of the
mouse.
Disable
Disable one button
Software - Main Functions III EN
recommended settings are 500 – 1000 Hz.
Save As
Save all the settings of your mouse in a le.
Load File
Load a settings le into the software.
Restore
Restore the current prole to the factory de-
fault settings.
Reset All
Restore all the proles to the factory default
settings.
OK
Apply the changes and minimize the soft-
ware window.
Cancel
Discard the changes and minimize the soft-
ware window.
Apply
Apply the changes to the prole and load it
into the mouse.
Prole 1-5
With the ve prole buttons you can
change the selected prole. This is identical
to the prole switch on the bottom of the
mouse.
Prole selector
With the prole selector you can choose
the number of active internal proles of the
Software - Main Functions IIEN
22 23
Macro Assignment
With the macro manager you can create a
series of commands that are executed with
perfect precision just by hitting one button.
This is useful for all kinds of applications and
your imagination is the limit. As this is a very
complex topic you should take your time
with this and expect some learning curve.
We are interested in which cool solutions
you will come up with!
Getting Started
Step 1
Start the macro manager by selecting a
mouse button on the general tab and cli-
cking on macro and then macro manager.
Step 2
Click on New and choose a name for your
macro.
Step 3
Click on the record button and record some
key presses on your keyboard, like writing
your name, then click the stop button.
Software - Macro Manager EN
DPI tab
Step 1
Decide how many DPI stages you need for
your prole, in the example above we cho-
se three. Deactivate the unneeded proles
by clicking on the DPI(x) button on the top.
They will darken to let you know they are
inactive.
Step 2
Decide if you want the same DPI setting for
the x and y axis. Recommended is keeping
it linked. If you want to turn faster than look
up and down, you can unlink them and
choose different speeds.
Step 3
Choose your desired sensitivity by using the
corresponding slider for each DPI stage.
You can also ne tune them with the up and
down arrows on your keyboard after clicking
on them once.
Step 4
Hit Apply to transfer your settings to the
mouse.
Software - DPIEN

24 25
Light Tab
Here you can change the LED lights of the
LM20 Gaming Mouse. Just choose your fa-
vorite color for your main prole and tweak
from there. The color for the logo and the
thumb keyboard can be chosen freely and
are saved in the prole. You can also adjust
the breathing speed and brightness level of
the LED or even turn it off.
Software - LED I EN
Step 4
Click OK to conrm your work.
Step 5
Click Apply on the General tab to transfer
the macro to your mouse. The macro with
its number should be displayed in the corre-
sponding panel.
Step 6
Open Notepad to test your creation. Click
into the notepad window and press your
macro key on the mouse. Your macro
should now be running and you should see
the result on the notepad screen.
You can now tweak your macro with the
action edit tools on the right hand side of
the macro editor or record a new macro in
another slot. With the options at the top
right position you can automatically insert
delays between your actions. The rst op-
tion records the delay in real time and the
second option inserts a xed delay between
the actions. The delay can be inserted in the
proper eld in milliseconds. With the “Num-
ber of Loops” option you can let your macro
cycle the desired amount of times. Mouse
action can be recorded with the “Mouse Ac-
tion” button on the bottom of the page only,
but not in real time.
Have fun experimenting with this feature and
get your advantage over the competition!
Action edit tools:
Record after
This will arm the recording after the selected
line in your macro.
Delete
Delete the selected line
Move up
Move the selected line up one step
Move down
Move the selected line down one step
Copy
Copy the selected line
Cut
Cut the selected line
Paste
Paste the line from the memory
Mouse action…
Insert mouse actions, they cannot be recor-
ded in real time.
Software - Macro Manager IIEN

26 27
Pro le 1 Pro le 2 Pro le 4Pro le 3 Pro le 5
Step 1
Choose your prole for tweaking.
Step 2
Choose your preferred color from the list
and tweak it with the dropdown „Custom
Light Color“.
Step 3
Choose the brightness level of your LED.
Step 4
Choose the breathing pattern of your LED.
Step 5
Hit Apply, to transfer the settings to the
mouse.
Software - LED IIEN Notes

28
Art.-No.: 14717
Wir sind für Euch da / We support your gaming experience
www.lioncast.de
Lioncast®is a registered trademark of Lioncast GmbH.
4 250541 916704
Table of contents
Languages:
Other Lioncast Mouse manuals


