Liquid Image Explorer Series User manual

©2011 Liquid Image Co, LLC. All rights reserved
E
x
p
l
o
r
e
r
S
e
r
i
e
s
D
E
P
T
H
W
A
T
E
R
P
R
O
O
F
15ft
5m
TM
Models UDCM 304
ES032011VERS2
Explorer Series 8.0MP
NEDERLANDS
Gebruiksaanwijzing - Brimasker met ingebouwde Digitale
Onderwatercamera
FRANCAIS
Manuel Utilisateur- Le masque d'appareil photo numérique
sous-marin
ESPANOL
Manual del usuario - Máscara con cámara digital subacuática
PORTUGUES
Manual de instruções - Máscara Digital subaquática de Câmera
User Manual - Underwater Digital Camera Mask ENGLISH
SVENSKA
Användarhandbok - Dykarglasögon med digitalkamera
NORSK
Brukerhåndbok - Undervannsmaske for digitalkamera
ITALIANO
Manuale d'uso - Maschera con Macchina Fotografica Digitale
Subacquea
DEUTSCH
Bedienungsanleitung - Taucherbrille mit Digitalkamera
Ελληνικά
Εγχειρίδιο Χρήσης - ΥΠΟΒΡΥΧΙΑ ΜΑΣΚΑ ΜΕ ΕΝΣΩΜΑΤΩΜΕΝΗ
ΨΗΦΙΑΚΗ ΦΩΤΟΓΡΑΦΙΚΗ ΜΗΧΑΝΗ
Explorer Series

Products mentioned above or throughout the manual may be trademarks or registered trademarks of their respective
companies.
ATTENTION
This manual explains how to safely operate the Underwater Digital Camera Mask.
Please read these instructions carefully before using the camera.
Keep this manual in a safe place for later reference
Disclaimer
While every effort has been made to ensure that the information contained in the
guide is accurate and complete, no liability can be accepted for any errors or
omissions. Liquid Image Co reserves the right to change the specifications of the
hardware and software described herein at any time without prior notice.
Liquid Image Co declines all responsibility for damages due to improper use of
this product, failure to adhere to the instructions given in this manual, or
modifications to the UNDERWATER DIGITAL CAMERA MASK.
Cautions concerning data storage: Stored data may be lost or corrupted. It is
recommended that any important data be copied onto a separate media (such as
a hard disk, DVD-R or CD-R disk). Liquid Image Co makes no warranties and shall
not be held responsible for damages resulting from corrupted or lost data due to a
malfunction of the camera, the software, the memory cards, personal computer,
peripheral devices, use of memory cards, or for any losses that result from images
that could not be recorded, are erased, destroyed, or damaged in any way due to a
problem or a mistake while utilizing the camera or any of its accessories.
The Underwater Digital Camera Mask is a sophisticated electronic device
and should be supervised by an adult at all times. This product should not
be used by children under 13 years. This product is not a toy. The inserting
of memory cards, USB cable, and batteries must be performed by an
adult 18 years or older who has read and understands this manual. An
adult must always check all water tight compartments prior to each use.
ENGLISH

CONTENTS
1.0 Get to know your Camera Mask - Explorer Series
1.1 Features ENG- 2
1.2 Specifications ENG- 2
1.3 System requirements ENG- 2
2.0 Functional Parts
2.1 Included Parts and accessories ENG- 3
2.2 Part Names - Front View ENG- 4
2.3 Part Names - Back View ENG- 5
2.4 Part Names - Exploded View ENG- 6
3.0 Set up
3.1 Inserting or Replacing Batteries ENG- 7
3.2 Inserting Micro SD Memory CardENG- 8
3.3 Setting the Date and Time Mode ENG- 9
3.4 Storage Compartment ENG-10
4.0 Recording Pictures and Video
4.1 Still Image Mode ENG-10
4.2 Video Mode ENG-11
4.3 Power OffENG-11
5.0 Transferring Still images and video to a computer
5.1 Opening Memory Compartment ENG-12
5.2 Connecting and Transferring Files ENG-12
5.3 Disconnecting and Closing Memory CompartmentENG-13
6.0 Camera Test Instructions
6.1 Part One - Taking test images and videos ENG-13
6.2 Part Two - File Size Test ENG-14
6.3 Part Three - Using the Cross Hairs (View Finders) ENG-15
6.4 Part Four - Testing the CAMERA MASK in water ENG-16
7.0 Care and MaintenanceENG-16
8.0 Camera Warnings and Precautions ENG-18
9.0 Mask Warnings and Precautions ENG-19
10.0 Battery Warnings and Precautions ENG-20
11.0 Commonly Asked Questions and Troubleshooting ENG-21
12.0 Accessories ENG-23
ENG-1
TM

1.0 GET TO KNOW YOUR CAMERA MASK
1.1 Features
Still images
Video Clips
Internal 32MB NAND flash memory and Micro SD Card support
Driver free for Windows 2000/ME/XP/Vista/7 and Mac 9.x and X.x
1.2 Specifications - Subject to change without notice
Sensor 5.0MP CMOS sensor
Image Resolution 8.0Megapixels (3264 * 2448)
Lens F/3.2 f = 4.0mm
Focus range 0.8m to infinity
Internal Memory 32MB NAND Flash Memory
External Memory Card Micro SD/SDHC up to 32GB
Video Mode Up to 30 FPS @VGA
File Format Picture: JPEG, Video: AVI
Status Display LCD Display
PC Interface USB
Power 2AAA 1.5V (LR03, FR03) Alkaline,
Energizer® Lithium, or NiMH
Auto Off System time 180 seconds
1.3 System Requirement
Operating System Windows 2000/ME/XP/Vista/7 and
Mac 9.x or X.x
CPU Pentium II or above
RAM At least 64MB
Interface USB port
CD 4x speed CD ROM or above
ENG-2
E
x
p
l
o
r
e
r
S
e
r
i
e
s
D
E
P
T
H
W
A
T
E
R
P
R
O
O
F
15ft
5m
TM
Quantity of pixels is only an approximate number Approximate frames per second
*
***
**

2.0 Functional Parts
2.1 Included Parts and Accessories
Please check the contents now (before use) to confirm that it is complete.
Contact your Liquid Image Co dealer if anything is missing.
USER MANUAL
UNDERWATER DIGITAL CAMERA MASK
USB CABLE
WARRANTY
Accessories may include:
CARRYING CASE
BATTERIES
SILICONE GREASE TUBE
NOTE: The UNDERWATER DIGITAL CAMERA MASK will be referred to as the
"CAMERA MASK" throughout this instruction manual.
WARNING: NEVER OPEN THE CAMERABODY THAT IS FACTORY
SEALED WITH SCREWS. THIS WILLVOID ANY WARRANTY. NEVER USE
ASCREW DRIVER TO OPEN ANY PORTION OF THE CAMERA MASK.
ENG-3
MEMORY
COMPARTMENT
CAMERA
HOUSING
CAMERA
LENS AND
SHUTTER
POWER/MODE
BUTTON
SHUTTER/SELECT
BUTTON
STORAGE
COMPARTMENT
BATTERY
COMPARTMENT
TEMPERED
FRONT GLASS
WITH CROSS HAIRS
(VIEW FINDER)
SILICONE
SKIRT
USB CABLE
ENG-4
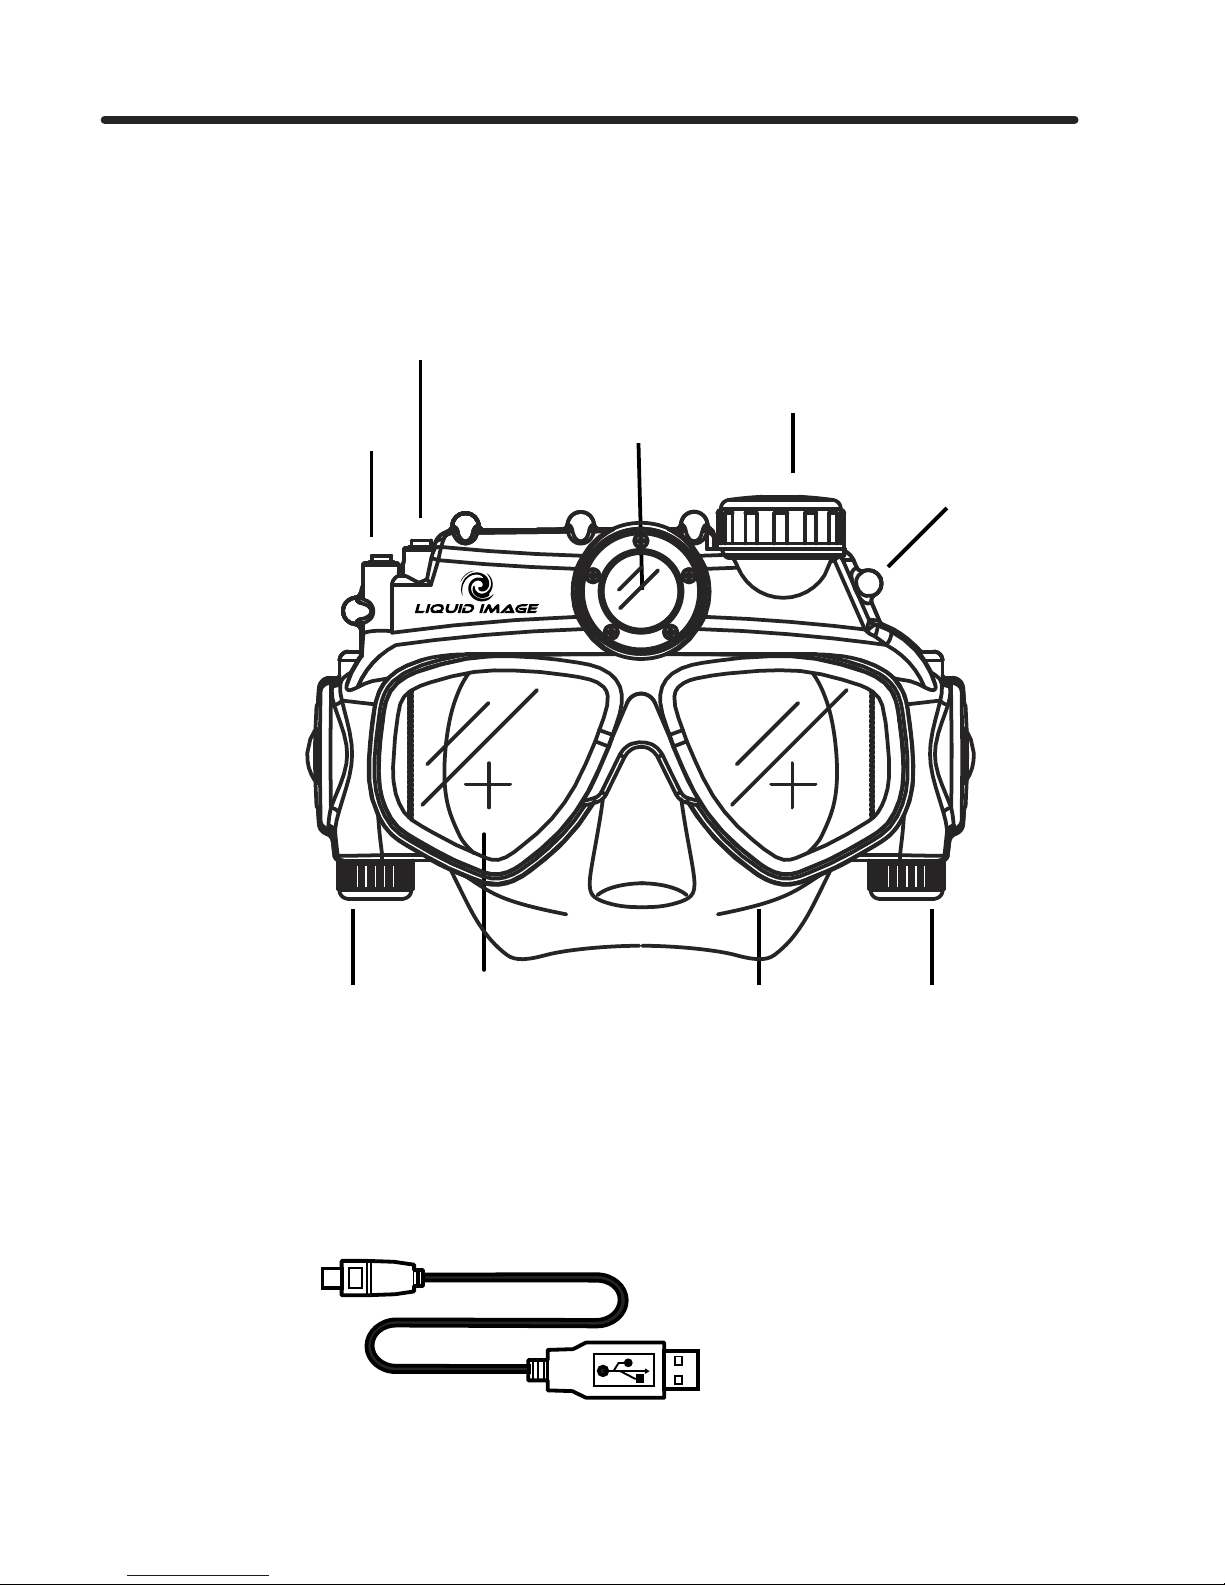
2.2 Part Names - Front View
Explorer Series

CAMERA
VIDEO CAMERA MEMORYCARD
BATTERYLIFE
NUMBER OF
FILES
ENG-5
2.3 Part Names - Back View
STRAP
CLIP
MEMORY
COMPARTMENT
LCD DISPLAY
MODE LIGHT
INDICATOR
(red - still image)
(blue - video)
POWER/MODE
BUTTON
SHUTTER/SELECT
BUTTON
ATTACHMENT
CONNECTOR
FOR SIDE
LIGHTS
(SIDE LIGHTS -
NOT INCLUDED)
Make sure to close caps to
within the water proof range.
Do not overtighten caps.
WATER PROOFING CAPS
Not Water Proof Water Proof Water Proof
Rotate cap until you see the black ring show through
the clear caps. This is a visual indication that the cap
is waterproof.
MEMORYCOMPARTMENT CAP
USB CABLE MICRO
SD CARD
UP TO 32GB
MEMORYCOMPARTMENT
OUTER WALL THREADS
DRIP
GUARD
O-RING
CAMERA LENS
O-RING
O-RING
STORAGE
COMPARTMENT
CAP
BATTERY
COMPARTMENT
CAP
BATTERIES
BATTERY
COMPARTMENT
BATTERY
PLUG
SILICONE HEAD STRAP
SILICONE SKIRT
2
1
ENG-6
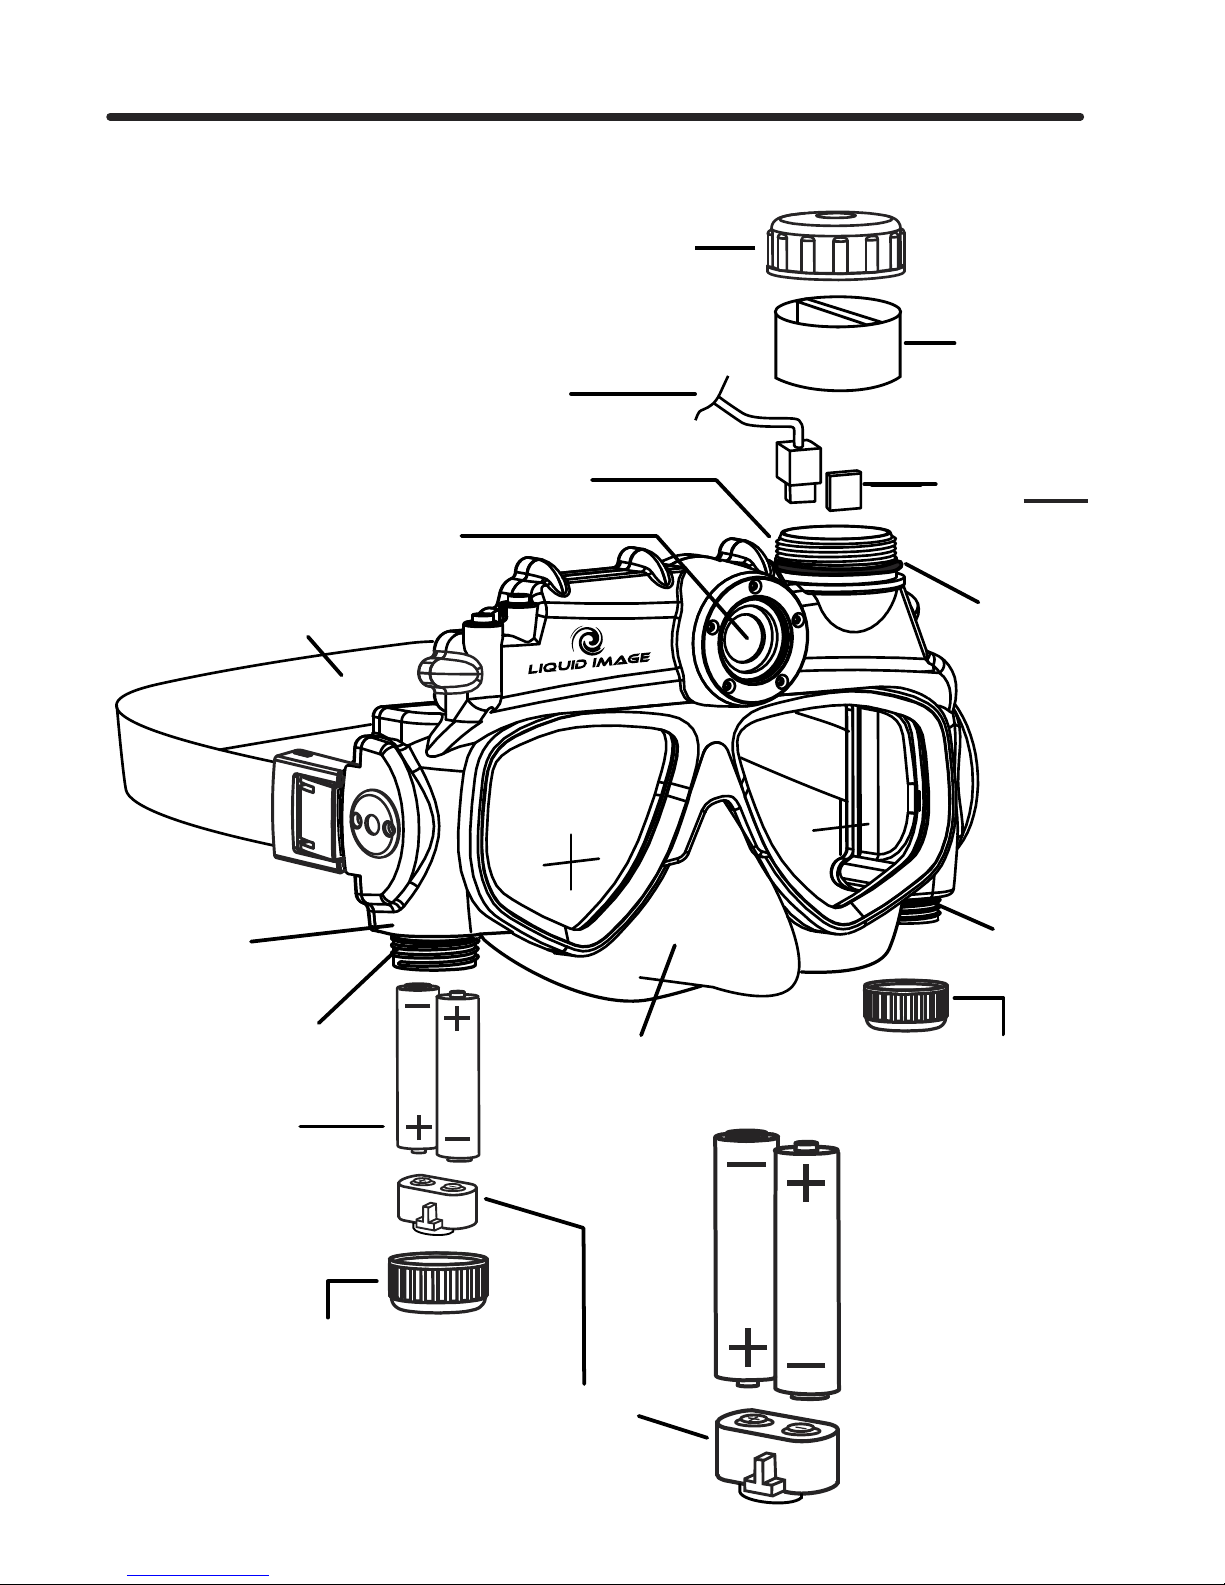
2.4 Part Names - Exploded View
(not included)
2
1
Explorer Series

ENG-7
3.0 CAMERA MASK SET UP
CAUTION: An adult 18 years or older should perform this function. Always
make sure the CAMERA MASK is completely dry before performing these
steps. Set up should always take place in a clean dry space with a controlled
environment. These steps should be performed indoors to avoid exposure to
the elements.
3.1 Inserting or Replacing Batteries
You may use AAAAlkaline, AAA Lithium, or AAA NiMH batteries to power the
CAMERA MASK (1.5V AAA, LR03, FR03). NOTE: We suggest using Energizer ®
Lithium batteries to power this product. The battery life is approximately 10 times
longer than alkaline batteries when used in the CAMERA MASK.
NOTE: The LCD indicator shows battery life. When no remaining bars are
displayed, the battery is low. Replace batteries to continue using. Files on either the
internal memory or on the Micro SD card will not be lost if battery power runs out or
during replacement of the batteries.
CAUTION: Always insert two new batteries of the same type and brand. Do not mix
different types of batteries. Follow all instructions from the battery manufacturer of
the batteries that you use.
To insert or replace batteries:
1. Locate the BATTERYCOMPARTMENT.
2. Open the BATTERYCOMPARTMENT. Remove the cap slowly.
3. Locate and remove the BATTERYPLUG. CAUTION: Do not lose this part. The
CAMERA MASK will not function without this part.
4. Remove and dispose of the old batteries in accordance with local laws.
5. Insert the new batteries in accordance with the Diagram inside the BATTERY
COMPARTMENT on the CAMERA MASK.
6. Reinsert the BATTERYPLUG.
7. Close the BATTERYCOMPARTMENT to the water proof range marked on the
mask housing (detail pg5). Do not overtighten cap.

ENG-8
Estimated Battery life for Alkaline and Lithium AAA batteries
Alkaline AAA Battery
Still image mode: up to 400 pictures
Video clip recording mode: up to 30 minutes
Lithium AAA (Energizer®) Battery
Still image mode: up to 4000 pictures
Video clip recording mode: up to 250 minutes
3.2 Inserting Micro SD Card (OPTIONAL STEP - Recommended)
NOTE: AMicro SD Memory Card is not included with your camera. It is
recommended that you purchase a commercially sold Micro SD Card to increase
the memory. This CAMERA MASK works with a Micro SD/SDHC card up to 32 GB.
Carefully read the instructions and warning that come with the card.
To insert a Micro SD Memory Card into your CAMERA MASK:
1. Locate the MEMORY COMPARTMENT on the top of the CAMERA MASK. (This
compartment also houses the USB port.)
2. Open the MEMORYCOMPARTMENT.
3. Locate and remove the rubber DRIP GUARD. CAUTION: Do not lose this part.
The DRIP GUARD is part of the water proofing system.
4. Insert the Micro SD/SDHC Card in accordance with the diagram next to the card
port. CAUTION: Liquid Image Co, LLC is not responsible for damage to the CAMERA MASK or to
the memory card if the card is inserted improperly.
5. Reinsert the rubber DRIP GUARD into the MEMORYCOMPARTMENT.
6. Close the MEMORYCOMPARTMENT to the water proof range marked on the
mask housing (detail pg5). Do not overtighten cap.
Internal 32MB Memory
Approximate File Storage
Images: 27-30
Video: 47-52 seconds
Micro SD Card 1GB
Images: 1100 - 1400
Video: 28 - 35 minutes
* included memory

ENG-9
3.3 Setting the Date and Time Mode
This feature allows you to set the Date and Time to the photo or video file.
1. Press and hold the POWER/MODE button to turn on the camera.
2. Press and hold SHUTTER/SELECT button down then press POWER/MODE
button 3 times continuously and then release the SHUTTER/SELECT button.
The LCD screen will access the Time Setting mode.You will be able to change
Year(YYYY),Month(MM),Day(DD),Hour(hh),and Minute(mm).The first window will
be YYYY for Year. Press the SHUTTER/SELECT button and the numbers will
appear(ie.2009).The first number “2” in the year will start blinking.
3. Press the POWER/MODE button to change the blinking character from 0-9.
Press the SHUTTER/SELECT button to select the number and move onto the
number “0”. The setting process is from the left to right and will go through the
different settings from Year, Month, Day, Hour,and minute. Once the number is
confirmed by pressing the SHUTTER/SELECT button,the next digit will start
blinking.Once the you see the letters again such as MM for Month, press the
SHUTTER/SELECT button to move to the numbers representing the month.
Continue the process until you return to YYYY.
4. To get out of the Date and Time Setting Mode, press and hold the
SHUTTER/SELECT button for 2 seconds. The CAMERA MASK will return to the
still image mode(RED LED).
5. In case the battery needs to be replaced or the battery runs out ,the date setting
data will be maintained for 24 hours.

ENG-10
3.4 Storage Compartment (OPTIONAL STEP)
You may use the STORAGE COMPARTMENT on the CAMERA MASK to store a
small object such as lip balm, batteries, or rolled up money. Be sure to close the cap
to the water proof range marked on the mask housing (detail pg5). Do not
overtighten cap.
CAUTION: An adult of 18 years or older must always check all three water tight
compartments for closure prior to the CAMERA MASK entering any water. Liquid
Image Co, LLC declines any claim for compensation for product damage etc. in
case of a failure due to any compartment that was not completely resealed
according to the directions set forth in this user manual.
4.0 RECORDING PICTURES AND VIDEO
CAUTION: Read and perform the 4 Part CAMERA TEST described in this manual
prior to using in the water!
NOTE: The CAMERA MASK has 2 modes and pressing the POWER/MODE button
cycles through the modes in the following order: Still Image and Video. To advance
to the next mode, press the POWER/MODE button one time. The camera will
remain on and ready to use for 180 seconds, after which the CAMERA MASK will
turn off automatically. If you press and hold the POWER/MODE for more than 1
second, the camera will also turn off.
4.1 Still Image Mode - RED LIGHT
1. Press the POWER/MODE button for at least 1 second. The camera turns on.
The camera will power up in STILL IMAGE mode.
Note: the RED MODE LIGHT INDICATOR is on and the CAMERA MASK is now in
the STILL IMAGE READY mode and set to take pictures. The LCD screen displays
the camera icon.
2. Press the SHUTTER/SELECT button once. Astill image is captured.
NOTE: To capture in focus images, it is important that the distance between the
camera and the subject is at least 0.8 Meters (32 inches).

4.2 Video Mode -BLUE LIGHT
1. Press the POWER/MODE button for at least 1 second. The camera turns on.
2. Press the POWER/MODE button again for less than a second to change to
VIDEO Mode.
Note: the BLUE MODE LIGHT INDICATOR is on and the CAMERA MASK is now in
the VIDEO READY mode and set to take videos. The LCD screen displays the
movie camera icon.
3. Press the SHUTTER/SELECT button once. Recording begins.
Note: the BLUE MODE LIGHT INDICATOR is blinking. The light will continue to
blink until the camera stops recording.
4. To stop recording, press the SHUTTER/SELECT button again.
4.3 Power Off
1. Press the POWER/MODE button for more than 1 second to turn the camera off.
NOTE: If either the POWER/MODE or the SHUTTER/SELECT button has not been
used in 180 seconds, the CAMERA MASK will turn off automatically.
5.0 TRANSFERRING STILLIMAGES AND VIDEO TO A
COMPUTER
CAUTION: ALWAYS FOLLOW THE CARE AND MAINTENANCE INSTRUCTIONS
FOR RINSING IN FRESH WATER AND DRYING THE CAMERA MASK PRIOR TO
OPENING THE MEMORYCOMPARTMENT.
The CAMERA MASK has two ways to transfer your image and video files to a
computer.The CAMERA MASK comes with a USB cable to connect your CAMERA
MASK directly to a computer. You may also choose to purchase and use a
commercially sold Micro SD Card to store and transfer images and videos that were
taken with the CAMERA MASK.
The computer does not require software to access the files stored on the CAMERA
MASK. The CAMERA MASK will act as an external hard drive when the USB cable
connects the camera to a computer.
ENG-11

5.1 Opening Memory Compartment
1. Make sure the CAMERA MASK is thoroughly clean and dry. Follow the CARE
AND MAINTENANCE instructions.
2. Open the MEMORYCOMPARTMENT.
3. Locate and remove the rubber DRIP GUARD. Make sure the DRIP GUARD is
clean and dry before proceeding. CAUTION: Do not lose this part. The DRIP
GUARD is part of the water proofing system.
5.2 Connecting and Transferring Files
1. Choose a method to transfer files: USB or Micro SD Card.
USB TRANSFER
Plug the USB cable into the USB connection port on the computer and
then into the USB Port on the CAMERA MASK. The CAMERA MASK
automatically turns on in TRANSFER (PC) Mode. NOTE: The USB
cable will be able to access both the internal memory and the files
stored on the Micro SD Card.
MICRO SD CARD TRANSFER
Press down on the Micro SD Card gently. The card will pop up for
removal. Carefully remove the card and insert it into the Micro SD card
adapter that comes with the Micro SD Card and then insert the card into
your computer's SD Card Slot as directed by the manufacturer.
CAUTION: Never insert a wet Micro SD Card into a card adapter or into a
Computer.
2. The connection screen opens on your computer monitor automatically. Choose
the option: OPEN FOLDER TO VIEW FILES.
NOTE: If the screen does not automatically open, look for a new hard drive icon on
the computer next to your other hard drive icons. Click on the icon to view your
image and video files.
3. The image and video files will appear in a folder.
4. Copy the files to a folder on your computer (For example: My Pictures\Hawaii).
Alternatively, you may copy the entire folder to your computer.
ENG-12

ENG-13
5. If you wish to delete the data from the CAMERA MASK'S internal memory or from
the Micro SD Card, select the files you wish to delete and press delete on your
computer keyboard.
6. Click the close button.
NOTE ON MEDIA PLAYERS:
There are multiple media players available online to play the AVI video files created
with the CAMERA MASK. If your default computer media player is unable to play the
videos, your player may be out of date and you may need to update it online. You
may also try using an alternate media player if your computer has one or if you
choose to download one from a source that you trust online.
5.3 Disconnecting and Closing Memory Compartment
1. Safely disconnect the USB from your computer and from the CAMERA MASK.
Alternatively, if you transferred files using the SD Card method, disconnect the SD
Card from the computer and then remove the Micro SD card from the adapter.
Reinsert the Micro SD Card into your CAMERA MASK.
2. Reinsert the rubber DRIP GUARD into the Memory compartment and close the
Memory compartment cap to the water proof range marked on the mask housing
(detail pg5). Do not overtighten cap.
NOTE: It is recommended that you always delete all the files from your CAMERA
MASK or from your Micro SD Card after transferring your files to a computer. This will
free up space for more images and video files.
6.0 CAMERA TEST INSTRUCTIONS - 4 PARTS
6.1 Part One - Taking test images and video:
Before using this product in water and before capturing important digital images and
video, be sure to first record a test image and test video to confirm that your camera
is set up and ready to go. It is best to move slowly when taking pictures and videos
and avoid moving your head side to side as the video will be bouncy and the pictures
will be blurry. Follow the download instructions to complete PART ONE of your test.
Liquid Image Co, LLC declines any claim for compensation for recorded contents
etc. in case of recording failure due to a camera or card flaw.
6.2 Part Two - File Size Test
When recording video it is very important that you are already familiar with the file
size that your computer can store and playback. If you record a continuous video
clip onto the CAMERA MASK internal memory or onto a Micro SD Card, you may
not be able to download or play the video file on your computer because of the large
file size.
Please conduct a FILE SIZE TEST before you use your CAMERA MASK to capture
important images and video. Test various video file sizes to make sure your
computer will be able to store and play the videos that you record. If you have
difficulty in playing back video files smoothly, try taking a shorter video. You may
also try opening the video file with a different media player as not all media players
work the same.
Please read the sample chart below to estimate your file size per minute of
recording time.
Approximate Video File Sizes -
NOTE: Depending on the batteries that you use and if you add a Micro SD Card
with 2 GB, you may be able to record a video for an hour or more. It is, however,
best to take short videos. This will make transferring files and playing them back
easier.
ENG-14
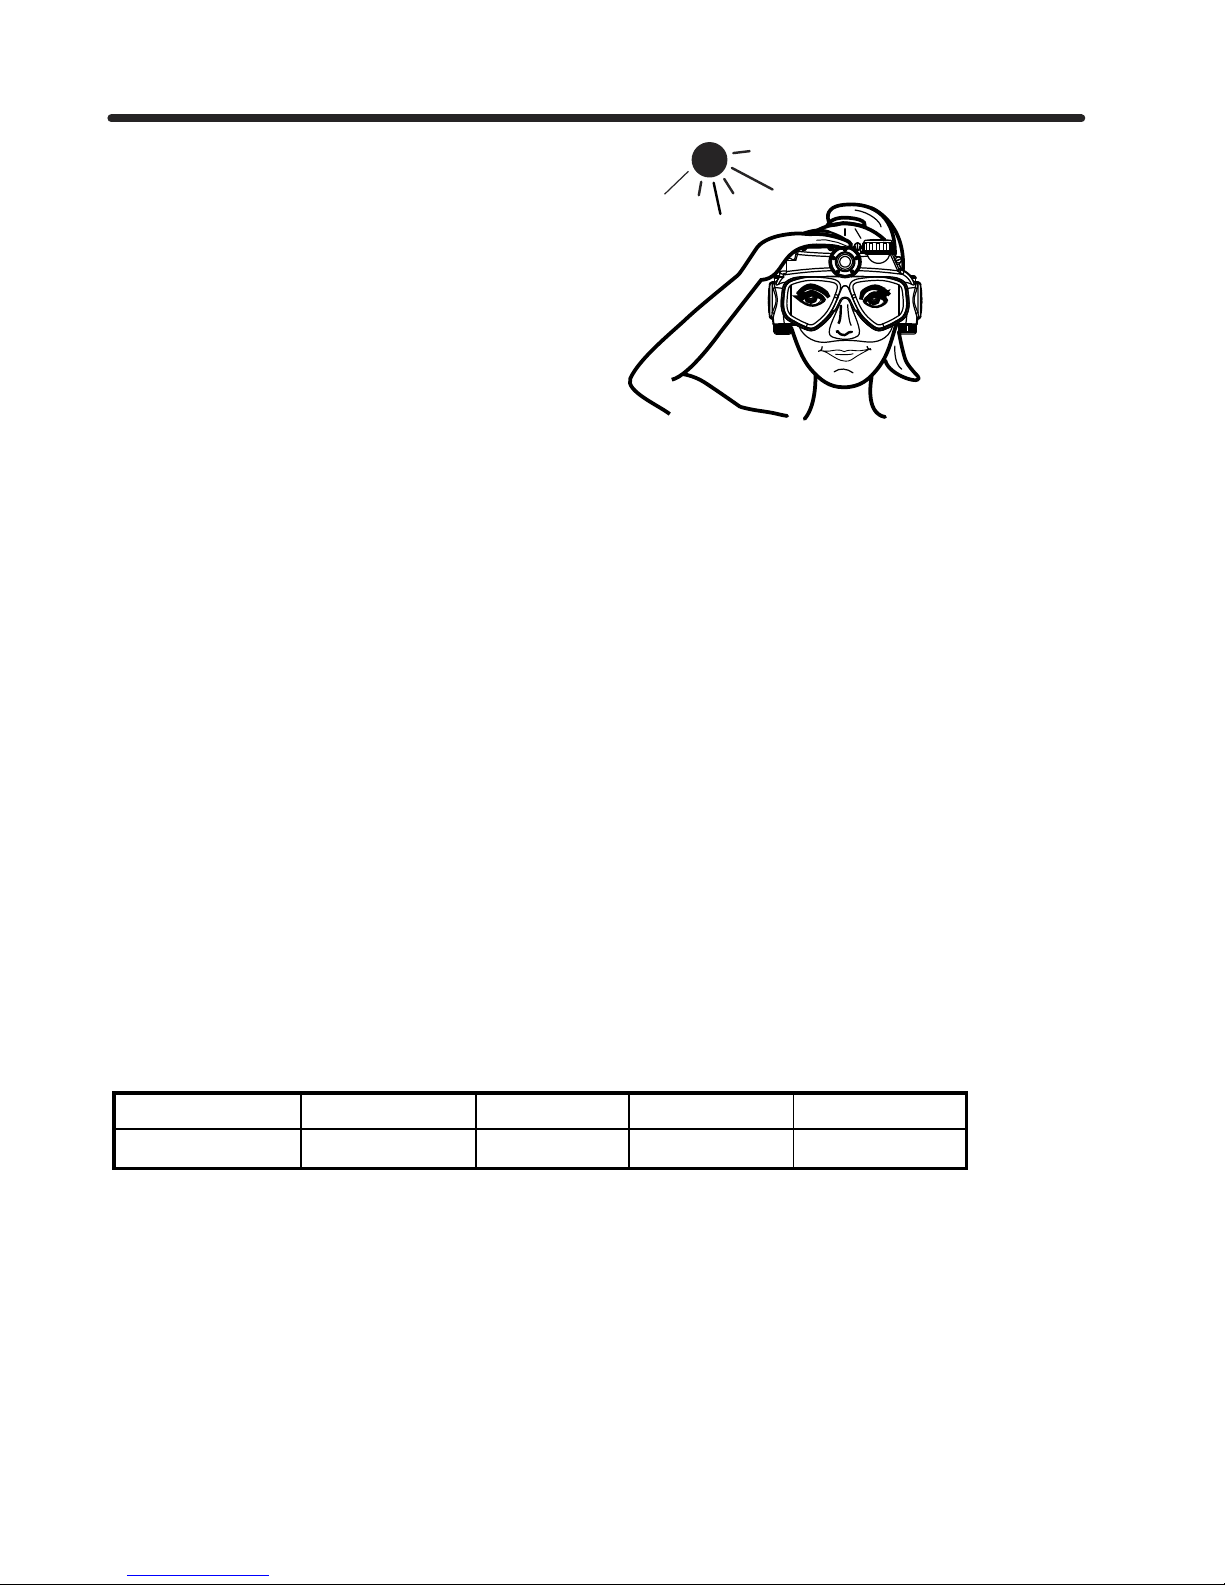
In bright sunshine, the LED light
may be hard to see. Shade the
area over your eye with one hand
to see the MODE LIGHT easier.
NOTE: Video file sizes will vary due to the complexity of the scene. The file sizes listed are only estimates.
TIME (min): 0.5 1 10 30
SIZE OF FILE: 18MB 36MB 360MB 1080MB
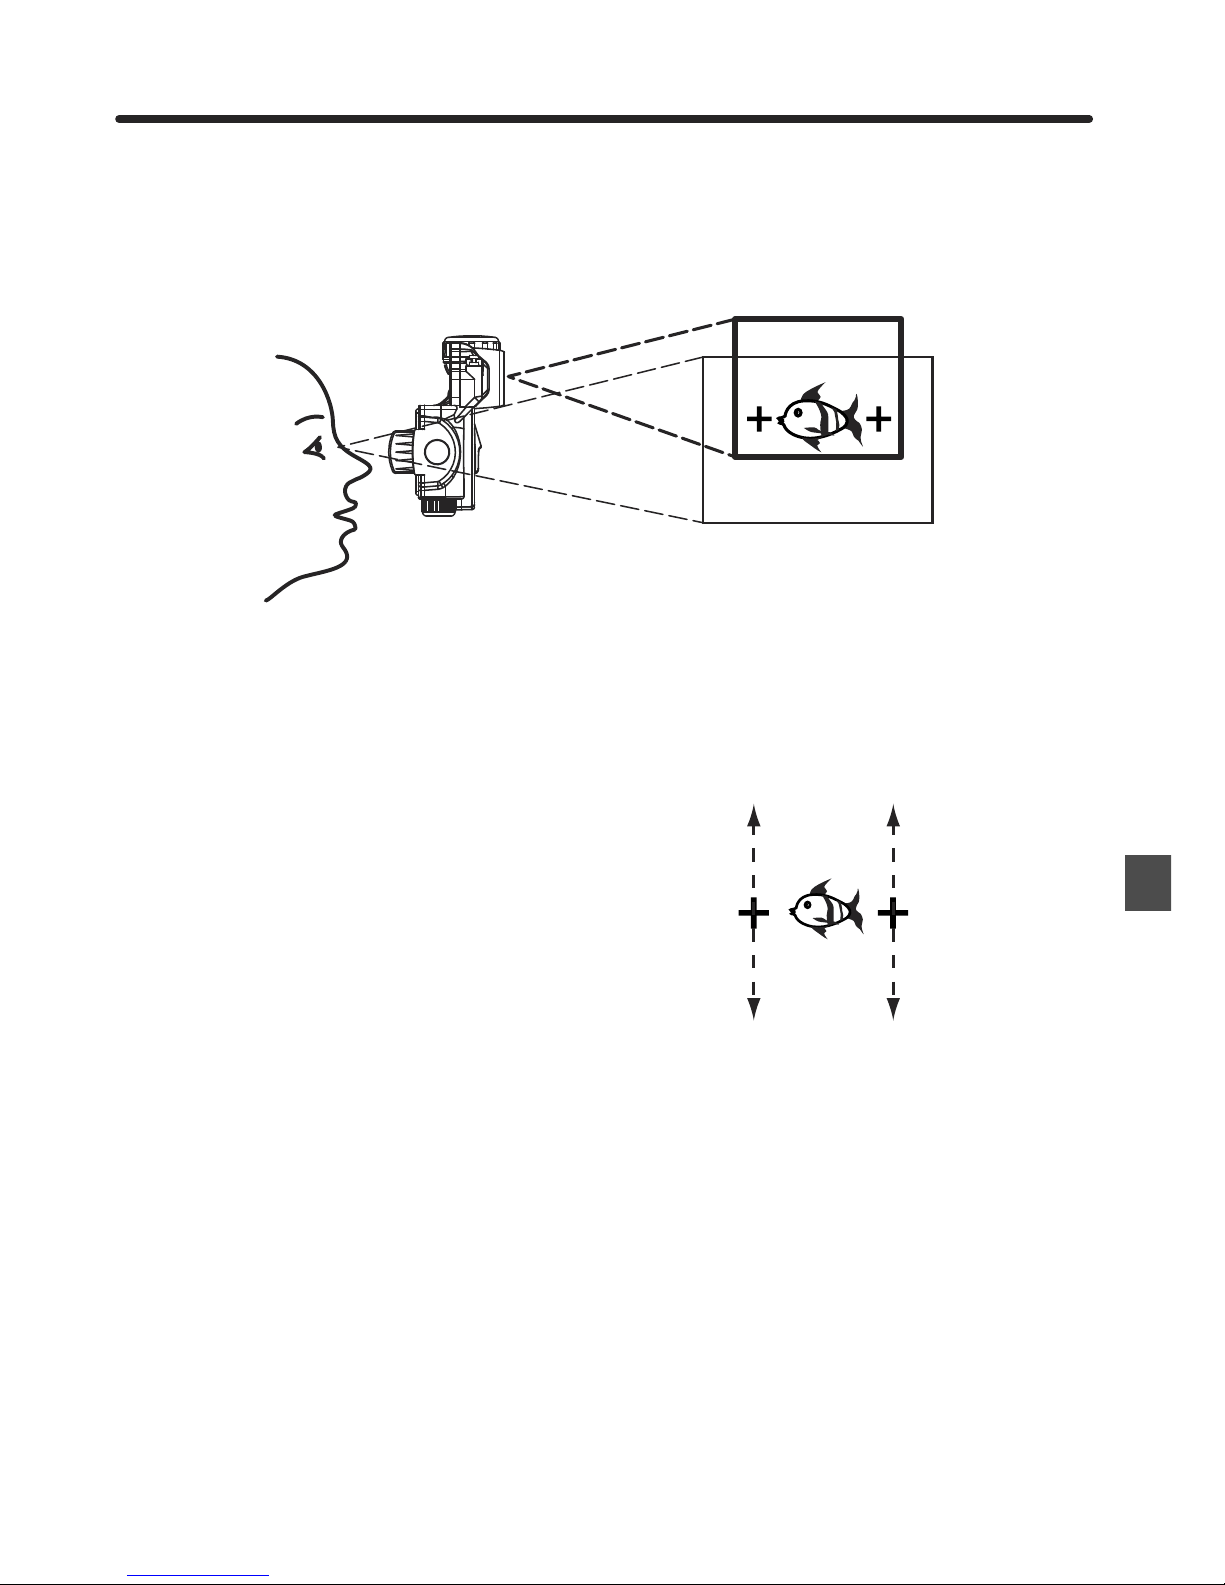
6.3 Part Three - Using the CROSS HAIRS (View Finder):
The CROSS HAIRS on the goggles of the CAMERA MASK help you to approximate
the camera view. In general, the camera will record a view that is directly in front of
you. The view from your eyes will be larger than the image captured.
Depending on the position of your eyes in relation to the camera lens and cross hair
viewfinders, you may notice that the camera records images which are slightly
higher or lower than the view straight in front of you and centered in your crosshairs.
This is due to the variance of the location of the eyes in relation to the camera lens.
NOTE: Close up images will be higher (above your cross hairs or your view point)
because the camera lens is above your eyes.
After performing your first camera test, if you notice the top or the bottom of your
subject is cut from the image, try looking slightly up or down to perform another test.
This will help you determine how best to record your subject while taking an image
or video. You may then use the CROSS HAIRS as a reference to determine where
your image is framed. For some people, the CROSS HAIRS may rest in the middle
of the image. For others, the CROSS HAIRS may be at the top or at the bottom of
the image. It is very important to make this determination prior to using the mask for
any important images. Practice taking pictures to learn your focal points both close
and far.
NOTE: When you first try on the CAMERA MASK, you may barely notice the
CROSS HAIRS on the GOGGLE LENSES. The CROSS HAIRS are more
noticeable when you wear the mask underwater.
ENG-15

6.4 Part Four - Testing the CAMERA MASK in shallow water
It is important to test the CAMERA MASK in a shallow area where you can stand
with your head above water.
1. Make sure the water is calm and free of obstacles, including people.
2. Wet hair, and then place the CAMERA MASK over the head. Make sure hair is
pulled back so that the seal around the mask is water tight.
3. Test the fit and water tightness around the eyes.Tighten or loosen the head
strap if needed.
4. Feel the buttons on the top right side of the mask. Become familiar with the
finger placement.
5. Test all the camera modes and notice the MODE LIGHTINDICATOR colors
above your right eye.
6. Press and hold the power button until you see the MODE LIGHTINDICATOR
disappear.This indicates that the power to the CAMERA MASK is OFF.
7. Remain in shallow water and practice using the buttons on the CAMERAMASK
to record images and video until you are comfortable wearing and using the
CAMERA MASK while swimming.
CAUTION: For use while snorkeling or scuba diving, be sure you are comfortable
with the fit and use of the mask and camera functions prior to use during an
excursion. Perform the Camera Test prior to every excursion to check that all parts
are functioning.
CAUTION: The CAMERA MASK compartments should only be opened in a safe
indoor environment (away from sand and water) to perform necessary operations.
NEVER open any compartment that is sealed with screws.
ENG-16
7.0 CARE AND MAINTENANCE
When you are finished using the CAMERA MASK, always clean and wipe away any
water, sand, salt, or other debris before opening or storing. Always clean with FRESH
WATER.
To Clean:
1. Check all three caps for water tight closure before exposing to water.
2. Always rinse the CAMERA MASK in FRESH WATER to remove any sand, salt
or other debris. Do not use hot water or high pressure which may damage camera.

3. Use a soft dry cloth to thoroughly remove all water. Carefully press around the
seams of all compartments to absorb any water left in the cracks.
4. Once the camera is completely dry on the outside, check to make sure that you
are also thoroughly dry including your hands, hair, and clothes before opening any
compartments. This precaution is necessary so that you will not drip water into or
onto the camera.
5. Gently open each compartment. If you find any moisture, sand or debris caught
inside the threads of the outer compartment wall, immediately remove them with a
cloth or cotton swab.
6. If any moisture or debris has accumulated inside a compartment use a cotton
swab to remove it, being careful not to touch the CAMERA MASK electronic
components.
7. Before closing any compartment, replace any loose parts. Then inspect and
clean the inside of the cap prior to positioning over the open compartment.
9. Follow the instructions for downloading any files.
10. Store the CAMERA MASK in a dry place away from direct sunlight.
1
12. HUMID CLIMATES - Make sure to only open the camera briefly in Humid
Climates as moisture in the air may be trapped in the inner compartments if the
camera caps are left opened for a period of time. This will result in condensation on
the LENS when the CAMERA MASK is submerged in warm water.
13. Safe Operating Temperature: 0 to 40°C (32 to 104°F) / Safe Storage
Temperature: -20 to 60°C (-4 to 140°F) / Safe Operating Humidity: 30 to 90% (when
no condensation is visible)/ Safe Storage Humidity 10 to 90% (when no
condensation is visible).
8. To keep the O-RINGS working properly, wipe sand, salt, or debris away from the
O-RING after use. and apply a thin layer of SILICONE GREASE to the O-RING
before closing compartment. Keep away from Electronic components.
11.Keep the CAMERA MASK at normal room temperatures that do not fluctuate
widely. Do not store next to a heater or an air conditioning unit. The extreme
temperatures may damage the CAMERA MASK. Exposure to extreme temperatures
or temperature fluctuations may cause condensation inside the CAMERA MASK
which may damage the device. If you notice condensation, do not use the CAMERA
MASK. Set in a dry area with room temperature until the condensation disappears.
Run a camera test to check its function prior to regular use. Do not use a hair dryer.
ENG-17

8.0 CAMERA WARNINGS AND PRECAUTIONS
Never touch the camera connection components that are exposed when the
MEMORYCOMPARTMENT OR BATTERYCOMPARTMENT are open. There is a
risk of shock if the components in the compartments become wet.
If the CAMERA MASK emits a strange noise, smoke or odor, turn off
immediately and remove the batteries.
1. Using the CAMERA MASK in a manner other than what the product use is
intended for may result in injury to you, the product, or other persons. Never use the
CAMERA MASK for activities other than swimming, snorkeling, or scuba diving.
2. Avoid jolts, drops, collision with other hard objects, or shaking of the CAMERA
MASK. These movements may damage the components.
3. Never open the camera body.There is a risk of shock if you touch the camera
components.
4. Children under 13 years of age should never wear or operate the CAMERA
MASK.
5. Children age 13 to 17 should always have adult supervision with use of this
product in and out of water.The CAMERA MASK is not a toy and needs to be
treated with the same care as any other underwater digital camera.
6. An adult age 18 or older should always dry the product thoroughly before
performing the battery replacement or before performing the transfer of image and
video files to a computer.
7. Pay close attention to your surroundings when using the camera. Failure to do
so may lead to an accident or injury. If you are not in a safe swimming environment,
do not use the camera features.
8. Only use the CAMERA MASK to the depth rated on the camera and
packaging. Use within the depth parameters. This camera complies with the
CAMERA MASK depth rating printed on its packaging and on the camera body for a
maximum depth. Using the camera at a depth that exceeds this parameter may
expose the interior to water and cause the CAMERAMASK to malfunction.
9. Do not press the buttons of the Underwater Digital Camera Mask with
unnecessary force. This may cause damage to the housing.
10. This device contains a specified time limit to water exposure of approximately
60 minutes of consecutive use underwater. Using the camera in conditions that
exceed the one hour may expose the interior to water and cause the CAMERA
ENG-18
Table of contents
Other Liquid Image Digital Camera manuals

Liquid Image
Liquid Image Hydra HD 720P UDCM 305 User manual

Liquid Image
Liquid Image Scuba Series HD User manual

Liquid Image
Liquid Image Scuba HD 720P series User manual

Liquid Image
Liquid Image Scuba Series Wide Angle 322 User manual

Liquid Image
Liquid Image hydra series User manual

Liquid Image
Liquid Image Hydra HD 720P UDCM 305 User manual


