LIQUIPRINT WB20141117 User manual

User Manual for LIQUIPRINT 3D Printers
Version:
WB20141117
LIQUIPRINT 3D PRINTER
USER MANUAL
VERSION: WB20141117
User Manual for LIQUIPRINT 3D Printers
Version:
WB20141117
Table of Contents
A. MACHINE SPECIFICATIONS ............................................................................................................................................ 2
B. SOFTWARE INSTALLATION............................................................................................................................................. 2
B.1 SOFTWARE INSTALLTION............................................................................................................................................ 2
B.2 SOFTWARE CONFIGURATION.....................................................................................................................................3
C. SOFTWARE SETTINGS ..................................................................................................................................................... 4
C.1 CONFIGURATION FILE LEAD-IN ................................................................................................................................ 4
C.2 QUICKPRINT PRINTING................................................................................................................................................ 5
C.3 FULL SETTINGS PRINTING .......................................................................................................................................... 6
D. ACCESSORIES INSTALLATION AND BASIC FUNCTIONS....................................................................................... 7
D.1 A
CCESSORIES
I
NSTALLATION
............................................................................................................................................. 7
D.2 B
ASIC
F
UNCTIONS
.............................................................................................................................................................. 8
D.2.1 MACHINE TESTS ................................................................................................................................................... 9
D.2.2 Level Build Plate (Important) ................................................................................................................................. 9
D.2.3 LOADING ............................................................................................................................................................... 1
D.2.4 Change Filament During Printing........................................................................................................................ 11
D.2.5 UNLOADING.......................................................................................................................................................... 13

User Manual for LIQUIPRINT 3D Printers
Version:
WB20141117
E. MACHINE MENU EXPLANATION .................................................................................................................................. 13
F. START PRINTING............................................................................................................................................................... 14
F.1 MODEL EDITION........................................................................................................................................................... 14
F.1.1 ROTATE................................................................................................................................................................... 15
F.1.2 SCALE ..................................................................................................................................................................... 15
F.1.3 FLIPPING (MIRROR) ............................................................................................................................................ 16
F.1.4 OTHER EDITTINGS.............................................................................................................................................. 16
F.1.5 VIEM MODE ........................................................................................................................................................... 17
F.2 PRINT FROM SD CARD (RECOMMENDED) ............................................................................................................. 17
F.3 PRINT FROM COMPUTER............................................................................................................................................ 18
G. CONTINUE THE PRINT AFTER POWER CUT............................................................................................................. 20
H. MACHINE MAINTENANCE.............................................................................................................................................. 23
I. CONTACT US....................................................................................................................................................................... 24
AFTER-SALE SERVICES..................................................................................................................................................... 25

1
We are so excited to welcome you to the Liquiprint 3D printer community. 3D printers are precision
manufacturing equipment. Therefore, this User Manual is designed to start your journey with the Liquiprint
desktop 3D printers in the right direction.
Due to long distance of transportation, please kindly unpack the machine box and check all the accessories
and tool sets before using your new machine, to make sure everything is OK: bolts fastened. Also please
remove those fixtures or padding used for the transportation. If there are questions or exceptions, please feel
free to contact us any time!
Before the first print, you need to know the following:
1. This is machine have been strictly tested before delivery. If it refuses to work when you receive it, please
kindly contact us as soon as possible.
2. Please save all packing materials for the machine in case of transportation and future repair (in factory). If
the machine will go through long distance transportation or be sent back to the factory for repair work,
please make sure that the machine has been well packed as the original packing. For repair issue, it is
unnecessary to send back the related accessories, such as the glass.
3. If you encounter any malfunctions for unknown reason, please turn off the machine and contact us as
soon as possible.
4. The materials for this machine are PLA and PETG.
5. Since it is a kind of plastic modeling machine, it may give out certain unpleasant smell during printing.
Please make sure the machine is working in a place with good ventilation.
6. The machine’s working environment should be between 15 to 35
℃
.
7. Protect the machine from humidity and dust.
8. Both the build plate and the extruder are heating parts. Please keep away from these two parts during
heating or printing process. Before repair, please cool down these two parts first.
9. The glass is fragile. During maintenance or repair work, please take away the glass first.
10. A 3D printer is a machine instead of a toy. Therefore, please don’t leave the kids along with the
machine.
11. This User Manual is updated all the time. You may contact us for the latest version if we fail to notify you.
We will reserve the final interpretation on the User Manual.
12. Unpack the machine. Take out the machine as well as the accessories.
13. Install CURA, the software on the computer.
14. Power on the machine and level the build plate.
15. Load the material: PLA or PETG.
16. Transfer STL file into “.gcode”by CURA.
17. Save the “.gcode”file to the SD card and insert it to the machine. Find out the “.gcode” file that you need
to print.
18. Wait for the printing.
19. Make sure the machine is well working and material is enough.

User Manual for LIQUIPRINT 3D Printers
Version:
WB20141117
2
A. MACHINE SPECIFICATIONS
B. SOFTWARE INSTALLATION
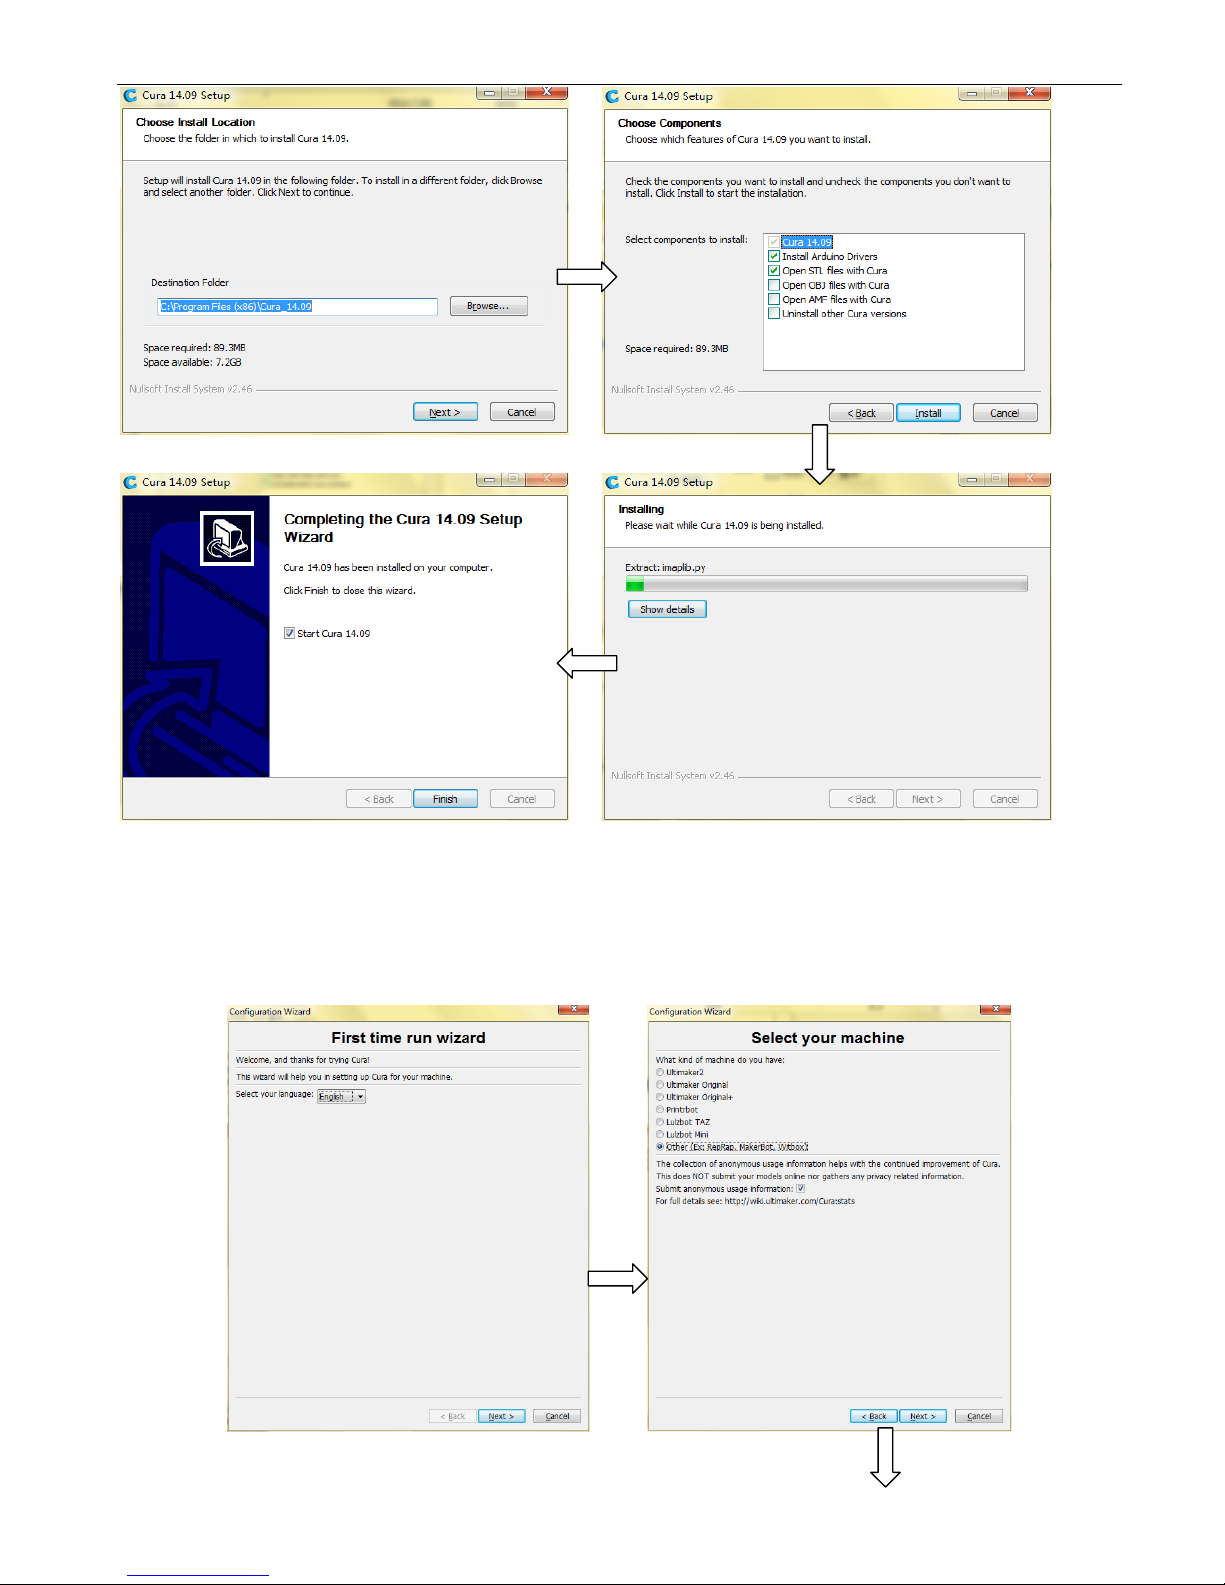
B.1 SOFTWARE INSTALLTION
Inside the SD card, there is the operation software for our machine. Double-click on “Cura_14.09.exe” and
install it by following default options as shown below:
PHYSICAL SPECIFICATIOS
DRAGO
MACHINE SIZE: 44 x 36 x 74 mm
CBM: 56 x 485 x 96 mm
MACHINE WEIGHT: 16.2 kg
SHIPPING WEIGHT: 38.5 kg
PRACTICAL
MACHINE SIZE: 44 x 36 x 54 mm
CBM: 56 x 485 x 76 mm
MACHINE WEIGHT: 14.5 kg
SHIPPING WEIGHT: 35.4 kg
VALUE
MACHINE SIZE: 38 x 36 x 44 mm
CBM: 52 x 5 x 625 mm
MACHINE WEIGHT: 11.7 kg
SHIPPING WEIGHT: 19.7 kg
MII
MACHINE SIZE: 335 x 3 5 x 39 mm
CBM: 475 x 445 x 56 mm
MACHINE WEIGHT: 9.2 kg
SHIPPING WEIGHT: 14.4 kg
TEMPERATURE
NOZZLE TEMPERATURE:
-24
(
no
more than 26
℃
)
BUILDPATE TEMPERATURE: -11
℃
(
adjustable
)
BUILDPATE HEATING: around 5 min
NOZZLE HEATING: around 3 min
PRITIG
LAYER THICKNESS: . 6- .4 mm (adjustable)
PRITNING MATERIALS: PLA / PETG / ABS
FILAMENT DIAMETER: 3. mm
NOZZLE DIAMETER: .4 mm
NOZZLE MOVING SPEED: 2
-15 mm/s
(
ADJUSTABLE
)
POSITIONING PRECISION:
Z-AXIS: . 2 mm
XY-AXIS: . 1 mm
BUILD TYPE:
FDM (FUSED DEPOSTION MODELING)
POWER SUPPLY
Connection: USB or SD CARD
AC INPUT: 95-23 V, 5 -6 Hz
Output: 24V
Rated current: 14.6A
MACHINE POWER: 35 W (Mini Style: 15 W)
Working temperature: -2
℃
-6
℃
SOFTWARE
FILE FORMAT: .stl
Input file: Gcode
OPERATONAL SOFTWARE: Professional 3D
printer software
SUPPORTS: Windows
,
Linux
,
Mac OX
3D DESIGN SOFTWARES:
SolidWorks, PRO-E, UG, Auto CAD, 3ds-Max,
Maya etc.
User Manual for LIQUIPRINT 3D Printers
Version:
WB20141117
3
B.2 SOFTWARE CONFIGURATION
To run the software for the first time, you will encounter a welcome interface. Click on “Next” to enter the First
time run wizard and you may follow the instructions as below:
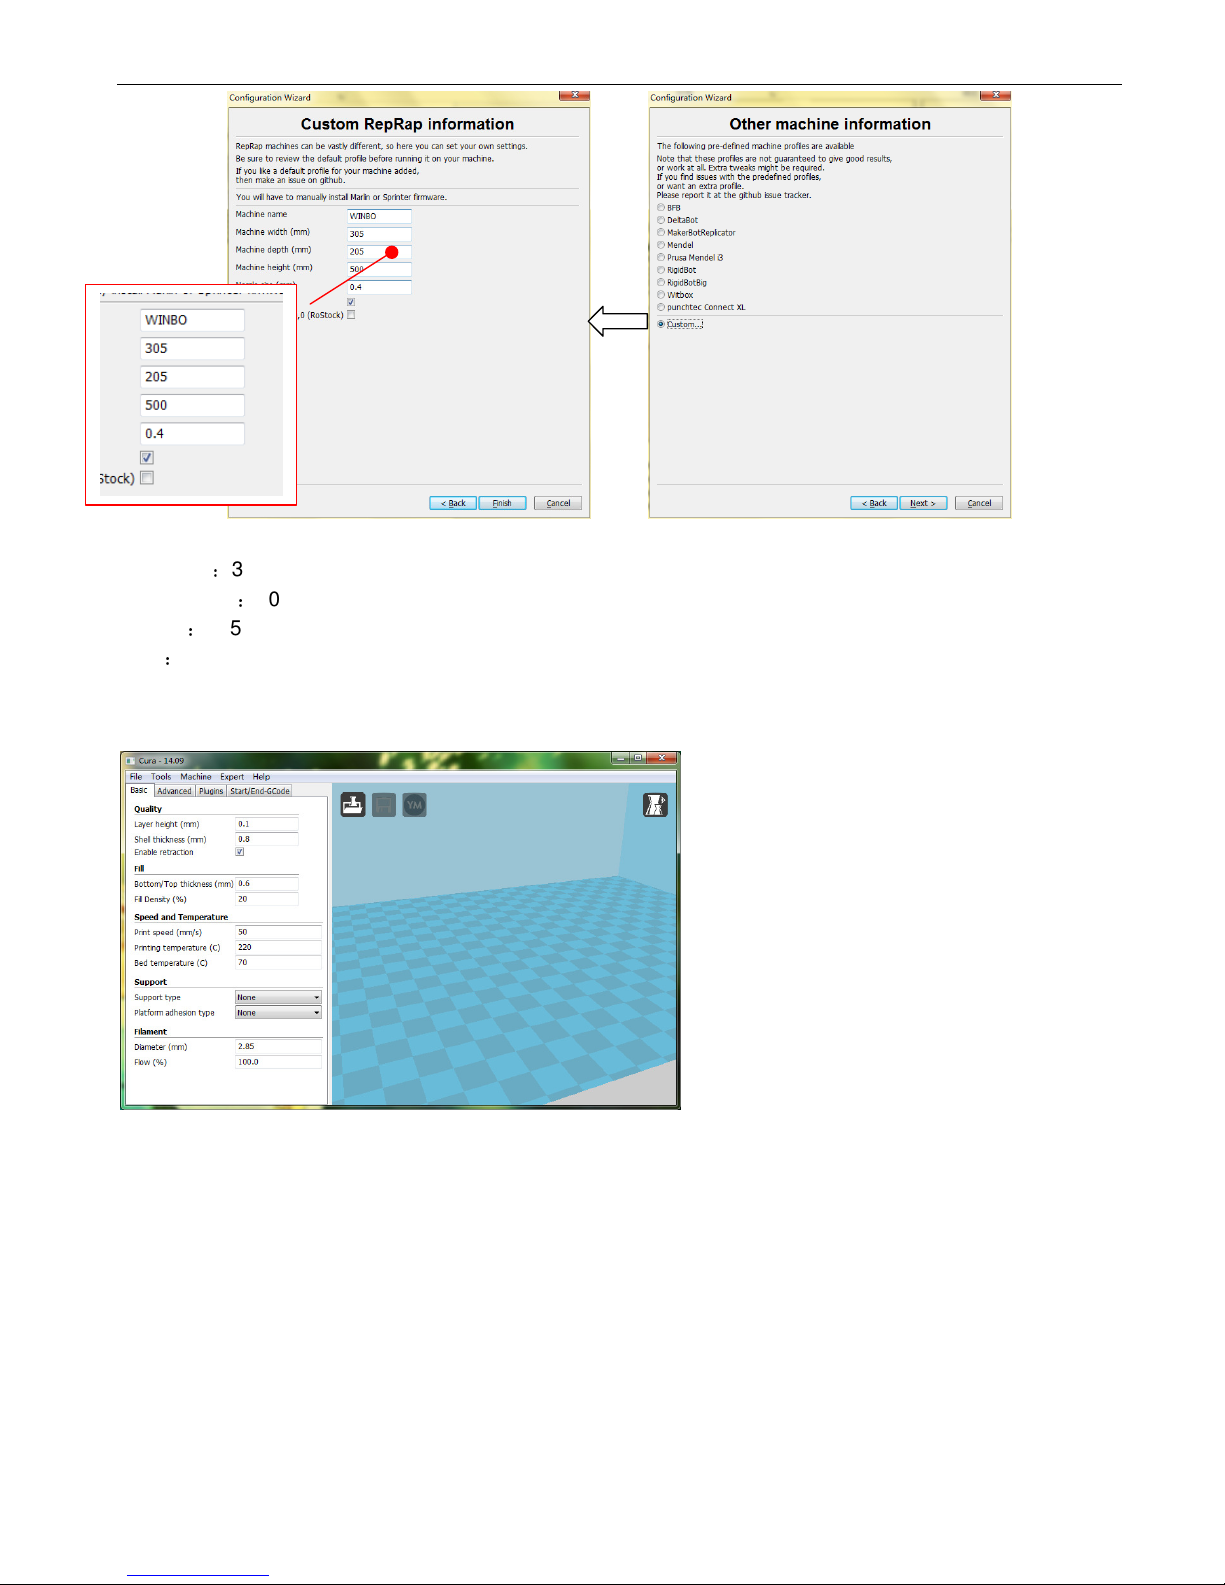
ext C oose Ot er and ext
User Manual for LIQUIPRINT 3D Printers
Version:
WB20141117
4
Build size:
DRAGON
:
305 x 205 x 500 mm
PRACTICAL
:
305 x 205 x 300 mm
VALUE
:
245 x 205 x 200 mm
MINI
:
210 x 150 x 150 mm
Here comes the interface for the software:
If the machine has not been connected with the computer, you may skip the First time run wizard. When
running the software, you may enter the First time run wizard by coming to the “Expert” →”ReRun first run
wizard” under the menu.
C. SOFTWARE SETTINGS
C.1 CONFIGURATION FILE LEAD-IN
You may finish the software settings by leading in the configuration file in the SD card. Click on “File” and
choose “Open Profile”. Find out the “WinBo-3D Printer.ini” and click on it.
C oose Option and ext
Put in mac ine specifications
and Finis

User Manual for LIQUIPRINT 3D Printers
Version:
WB20141117
5
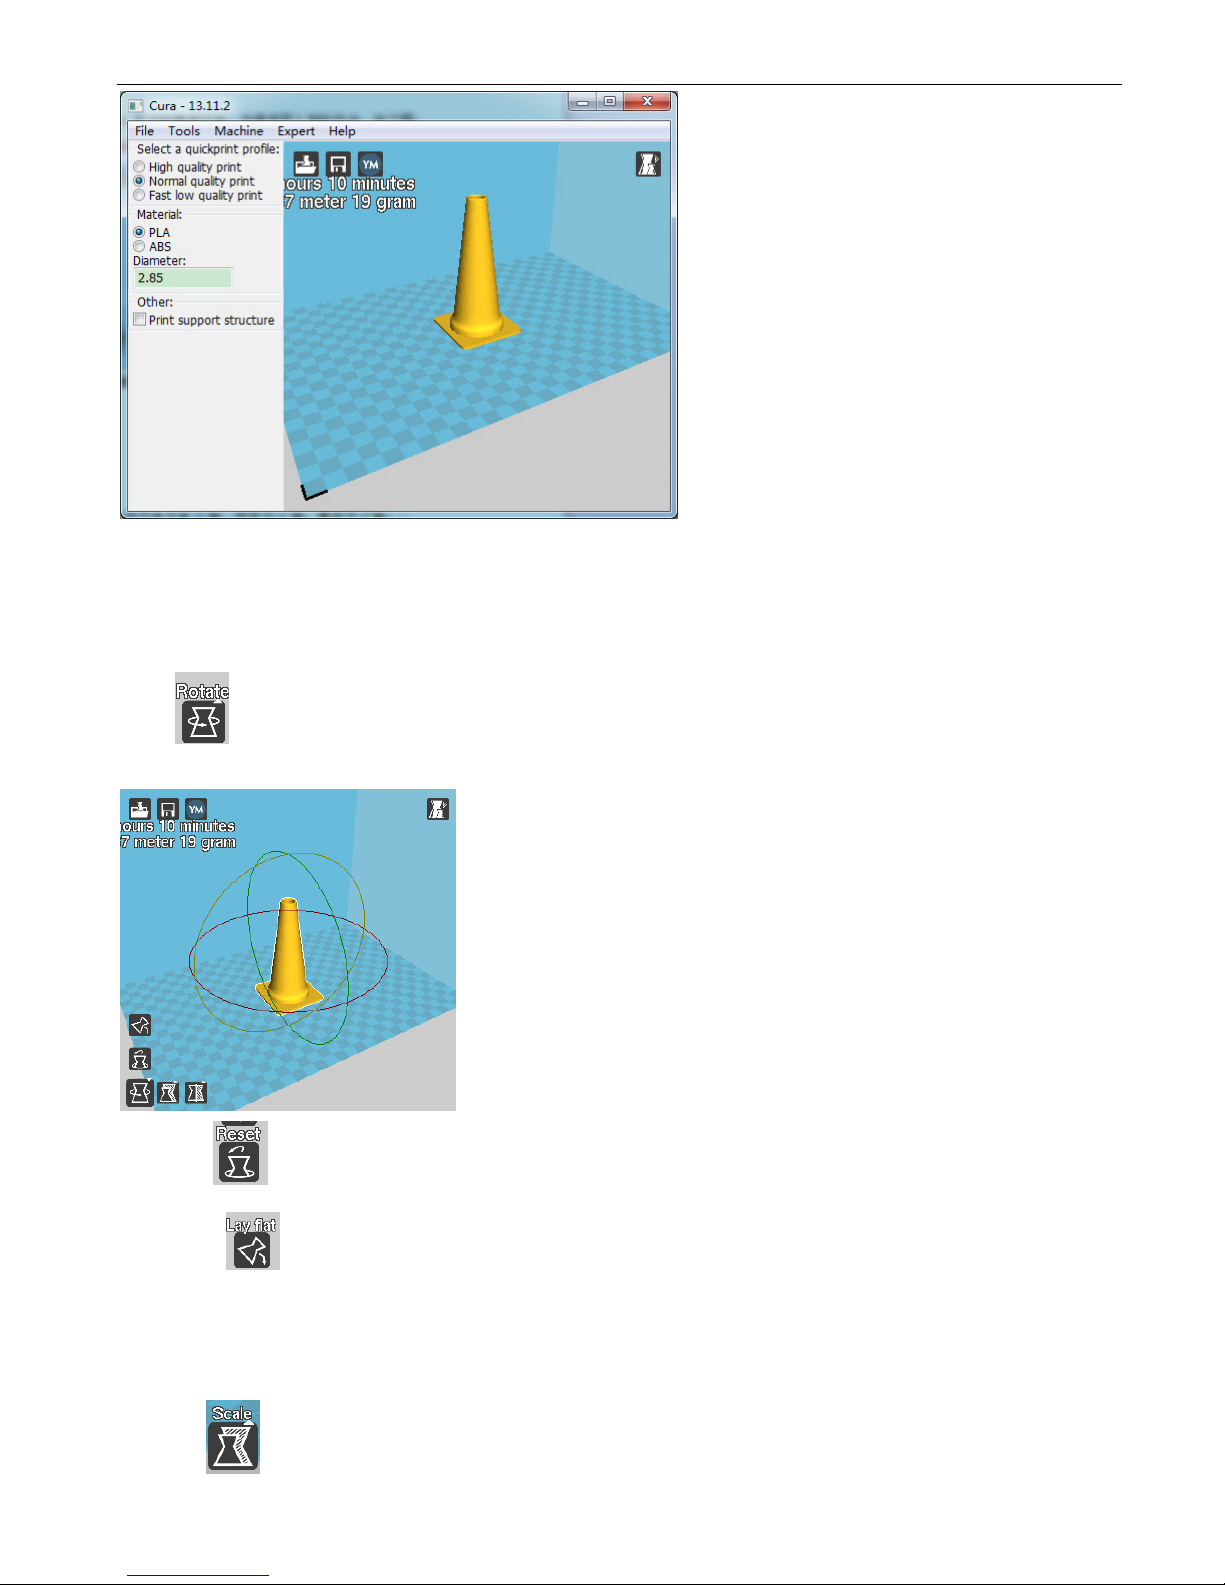
C.2 QUICKPRINT PRINTING
When running the software the default option is QUICKPRINTING mode. On the left, you will find the
Specifications and Screen as shown below:
There are 3 types of QUICK PRINT High quality print, Normal quality print, Fast low quality print. You may
print with PLA or PETG.
A. 3 types of QUICK PRINT:
High quality print
Normal quality print
Fast low quality print
B. Choose the material for the printing: PLA or ABS
C. Diameter for the filaments: 2.85mm
D. Print suport for the sample
Specifications
Screen
User Manual for LIQUIPRINT 3D Printers
Version:
WB20141117
6
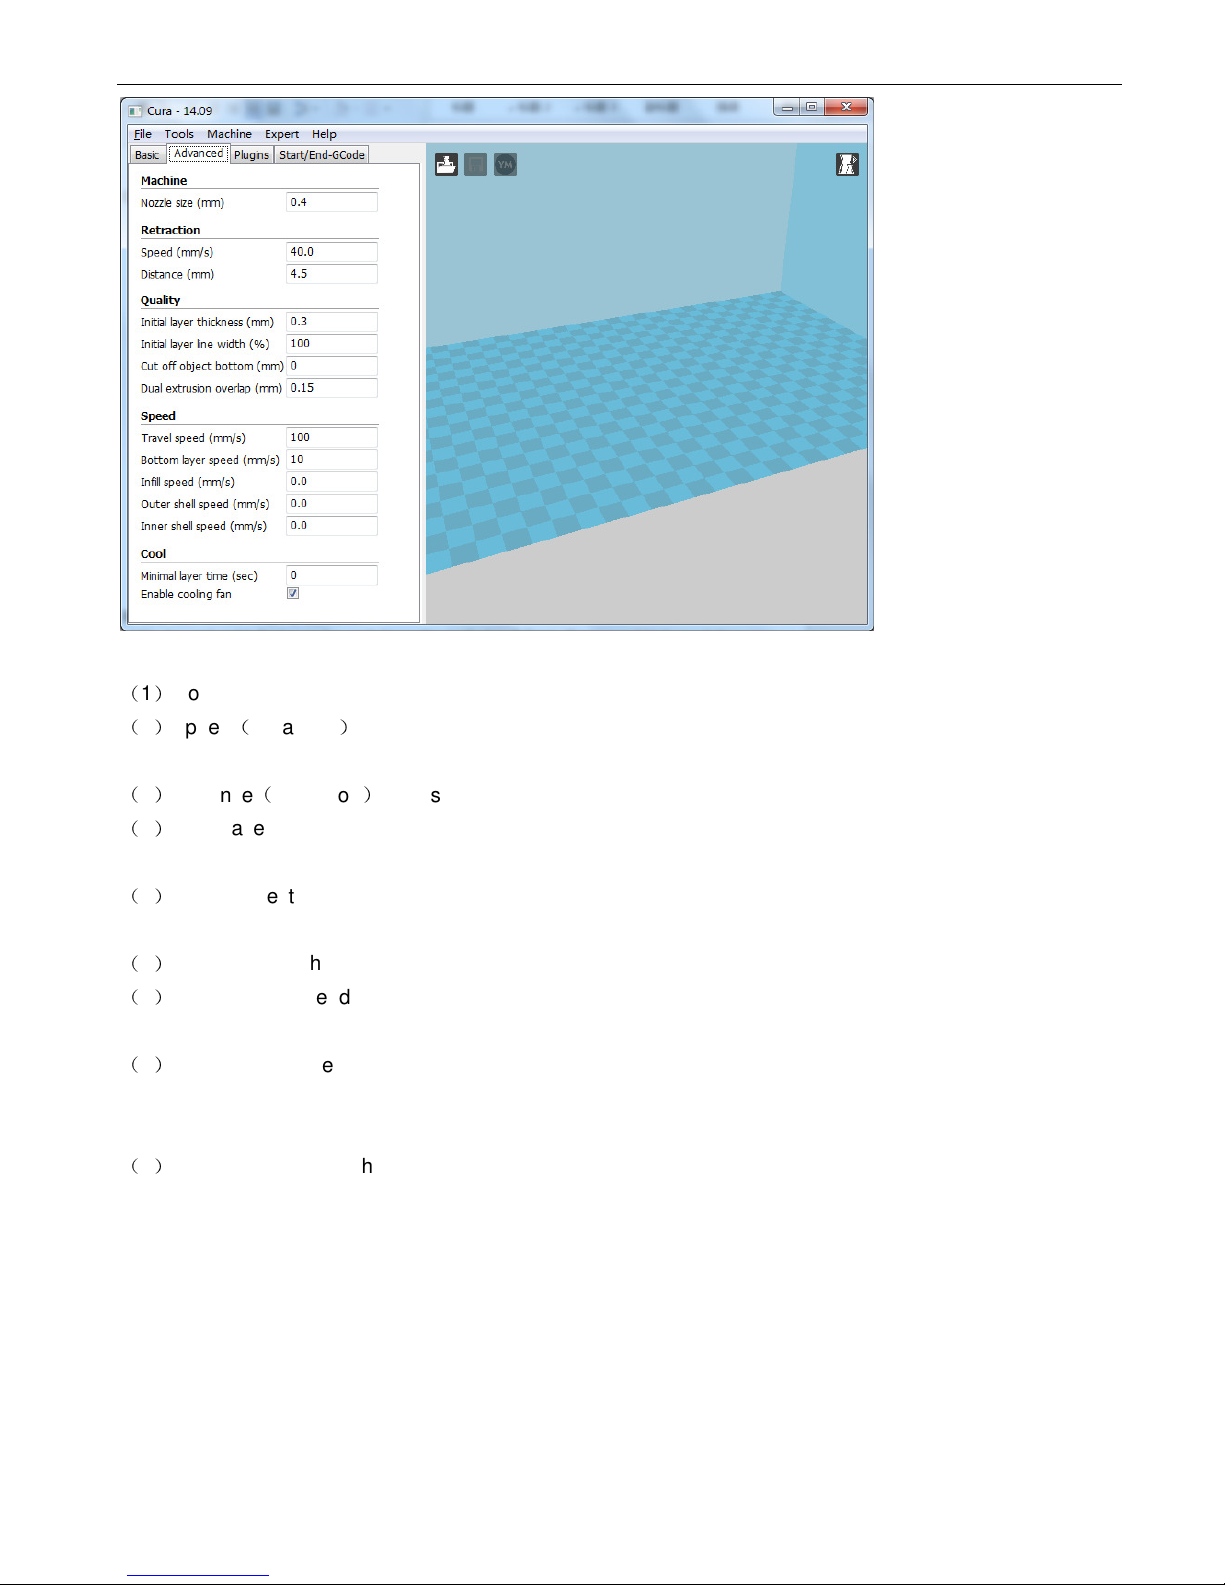
C.3 FULL SETTINGS PRINTING
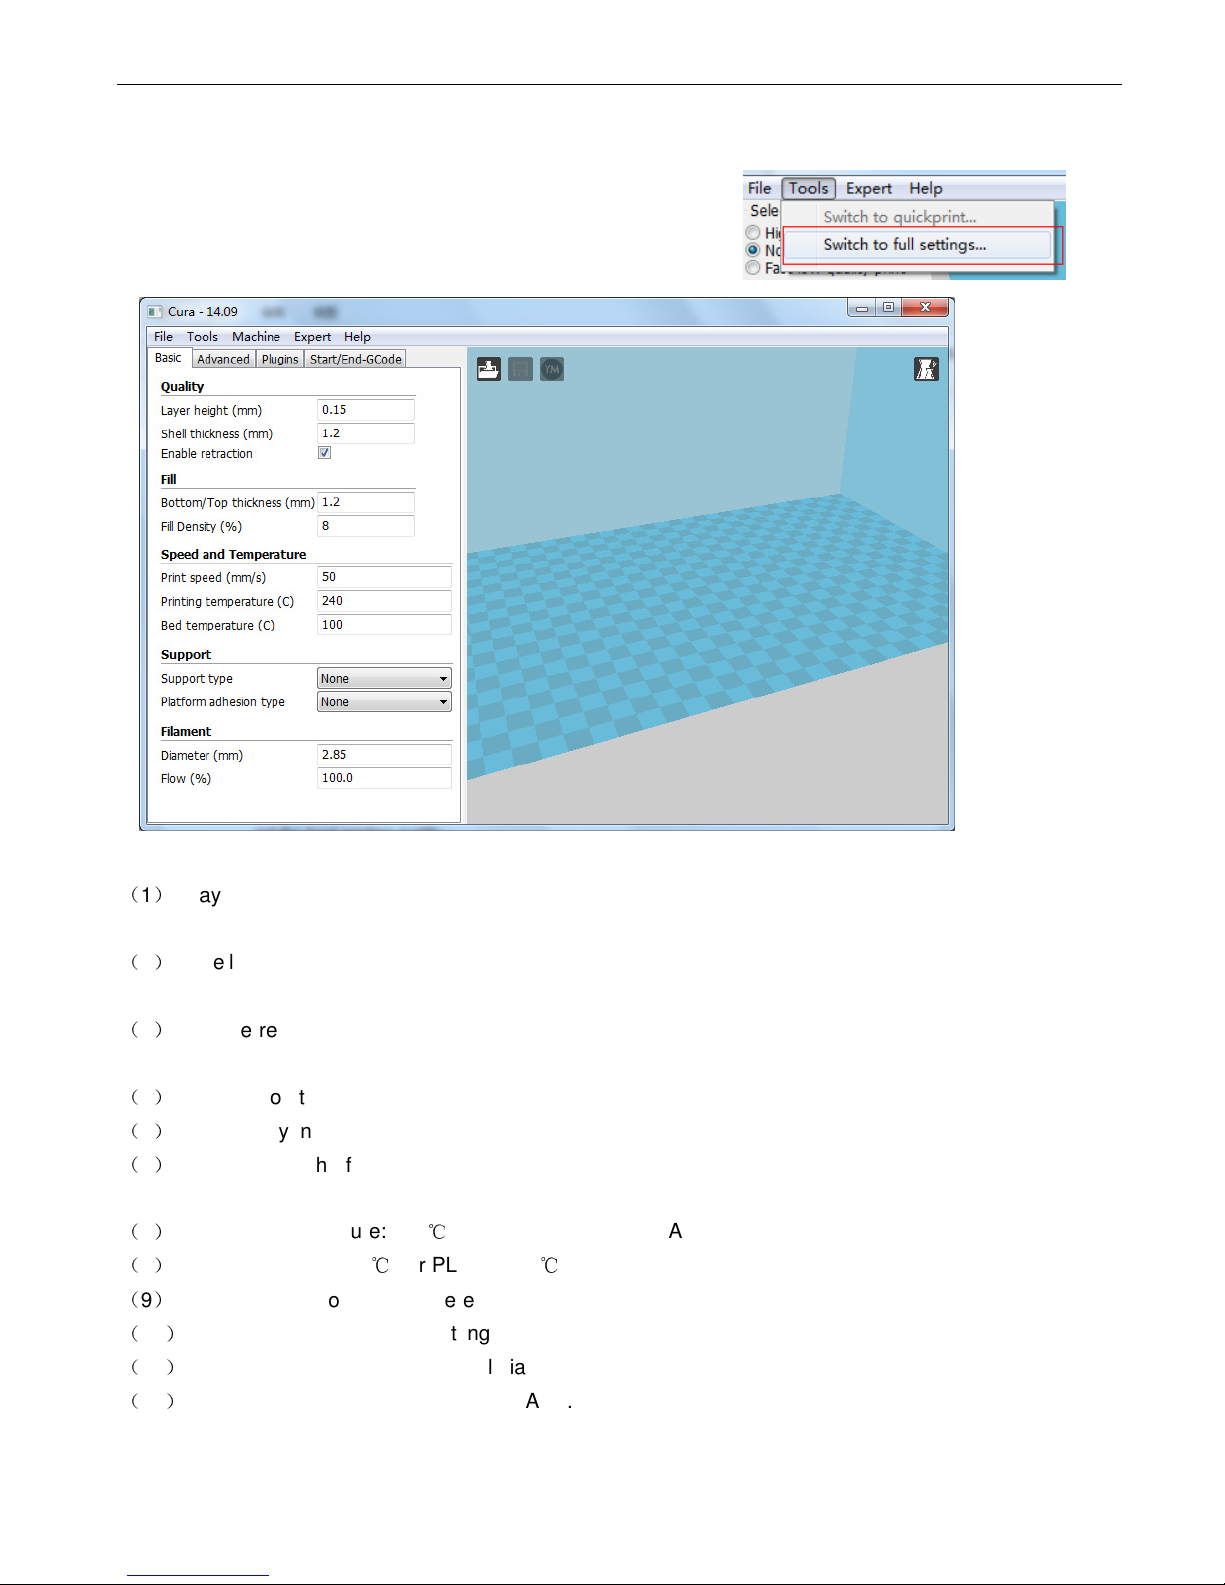
Choose “Tools” under the menu”Switch to full settings” as below:
BASIC SETTINGS ARE AS BELOW:
(
1
)
Layer height: thickness for each layer. Normally it is 0.15mm. If you need high resolution, you may
choose smaller one.
(
2
)
Shell thickness: the amount should bea multiple of 0.4. You may need to adjust this amount to get the
best printing quality.
(
3
)
Enable retraction: Retract the filament while it is not printing. Enable recommended, otherwise, it will
create fine lines during printing.
(
4
)
Bottom/Top thickness: it is related to the printing speed.
(
5
)
Fill Density: normally it is 10-30%.
(
6
)
Print Speed: the faster the print speed, the faster the feeding speed. And the result is burrs created
during printing.
(
7
)
Printing Temperature: 230
℃
for ABS, PETG and PLA.
(
8
)
Bed Temperature: 0
℃
for PLA and 70
℃
for ABS.
(
9
)
Support Type: to choose where to print the support.
(
10
)
Platform adhesion type: a setting to help the printed object stick to the printer bed.
(
11
)
Diameter: you may put the actual diameter.
(
12
)
Flow (%):100% for PLA and 85% for ABS.
User Manual for LIQUIPRINT 3D Printers
Version:
WB20141117
7
Advanced settings:
(
1
)
Nozzle size: 0.4mm (fixed).
(
2
)
Speed
(
retraction
)
: the speed for retraction. Retraction is pulling the filament back when moving over a
gap in the print.
(
3
)
Distance
(
retraction
)
: if it is 0, it mean no retraction made at all.
(
4
)
Initial layer thickness: a thicker layer gives a thicker bottom layer which is easy to stick to the platform. If
it is 0, it means the same bottom layer as the printing layer.
(
5
)
Cut off object bottom: Cut the bottom of the model, this effectively sinks the object into the printer bed. If
your object does not have a lot of contact area with the printer bed then this feature could help you.
(
6
)
Travel speed: the speed at which the printhead moves when it is not printing.
(
7
)
Bottom layer speed: the speed at which the printhead moves while it is laying down the first layer. This is
done to make the print stick easier.
(
8
)
Minimal layer time: the minimal time spent on printing a single layer. If a layer takes less time to print than
this configured time, then the layer is cooled down. This ensures that a layer is cooled down and solid
enough before the next one is put on top.
(
9
)
Enable cooling fan: the cooling fan is usually enabled and greatly improves print quality for PLA.
Note: for the Advanced setting, normally, they are default and require little adjustment.
D.
Accessories Installation and Basic Functions
D.1 Accessories Installation
Unpacking the machine, you need to install the accessories:

User Manual for LIQUIPRINT 3D Printers
Version:
WB20141117
8
D.2 Basic Functions
There is a control knob on the right of the LCD panel and the functions are as below:
You may press the knob for confirmation
Rotate it counter-clockwise: you are reading the next menu
Rotate it clockwise: you are reading the last menu
With power on, the LCD panel shows as below:
Put the spool holder
Load the filaments spool
Connect the cable
Put on the glass plate
Pull out he blue buckle on the
feeder mechanism
Insert the other end of the
transparent tube
Put back the blue buckle
2
22
2
1
11
1
3
33
3
4
44
4
5
55
5
6
66
6
7
77
7

User Manual for LIQUIPRINT 3D Printers
Version:
WB20141117
9
After pressing the knob, there will be “ticking” sound and then comes to the next interface on the LCD panel:
D.2.1 MACHINE TESTS
You may need to test the machine first before printing.
Check the movement on each axis.
1) Check the X-axis. If it moves, it is OK.
Go to the LCD panel and choose “Prepare” →”Move Axis” →”Move 1mm” →”Move X” and press the control
knob. If the X-axis moves, it is OK.
2) In the same way, you may check the movement on Y and Z axis accordingly.
Check the heating process.
Go to the LCD panel and choose “Prepare” →”Preheat PLA” and press the control knob. Go back to the main
menu and watch temperature fluctuations. If it is on the rise, it is OK.
Notes: by preheating the machine, you may save time waiting for the printing. You may stop the heating by go
to “Prepare” →”Cooldown”.
D.2.2 Level Build Plate (Important)
The build plate has been well leveled before delivery. However, it requires re-leveled after long time
transportation. If the build plate is far away from the extruder, the material will fail to stick to the build plate.
However, if they are too close, the extruder will fail to make printing at all. Therefore, the gap between the
build plate and the extruder should be 0.3mm.
Choose “prepare” under the main menu and then “auto home”, the X, Y and Z axis will return home. You may
use your hand to move the extruder to each point on the build plate to adjust the gap
between the build plate
and the extruder as shown below:

User Manual for LIQUIPRINT 3D Printers
Version:
WB20141117
10
Tips: you may level the build plate roughly first and then make small adjustment during printing. The gap
should be 0.3mm.
D.2.3 LOADING
For smoother feeding, the spool should be rotated clockwise as below:
The feeding should be:
Use a name card to check the gap Adjust the gap by the knobs
under the build plate
Recheck the gap
User Manual for LIQUIPRINT 3D Printers
Version:
WB20141117
11
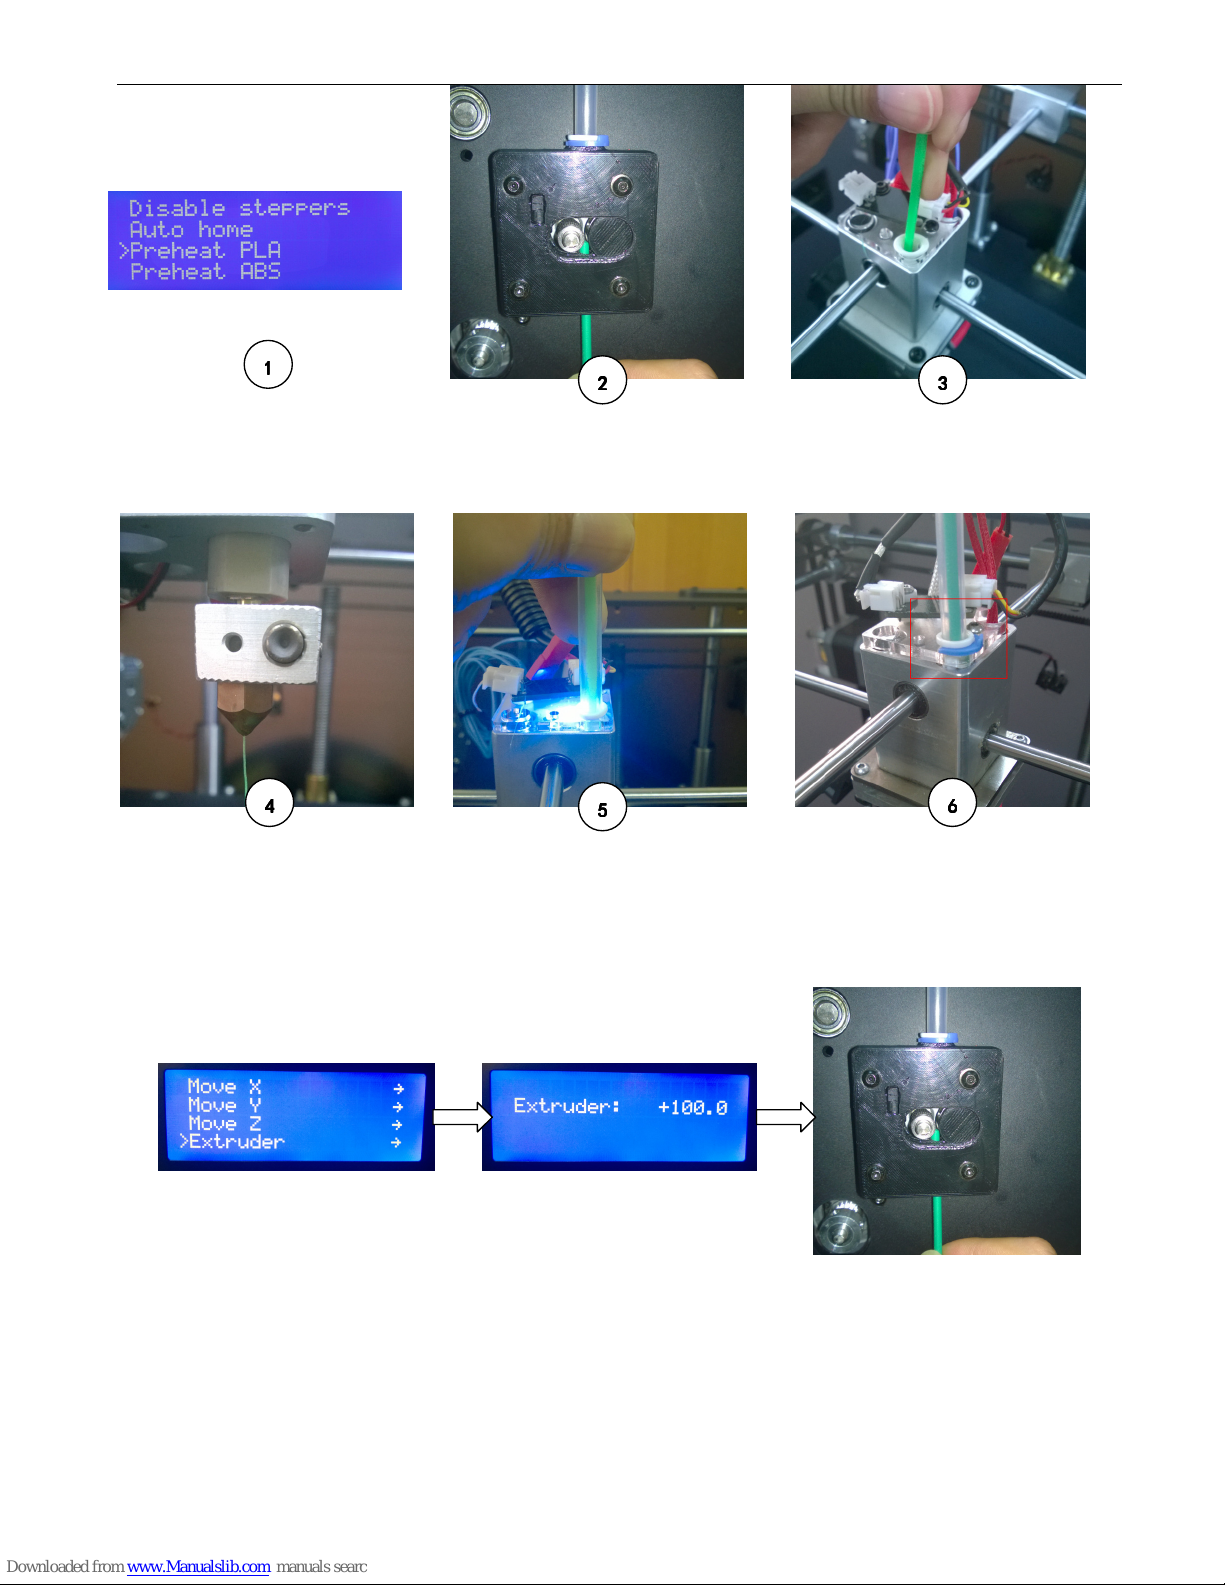
Tips: If the filament refuses to go into the feeder, you may need to preheat the extruder first and then go to the
LCD pane: “Prepare” →”Move Axis” →”Move 1mm” →”Move Extruder” to make the value as 100 or above.
After that, you may push the filament into the feeder as shown below:
D.2.4 Change Filament During Printing
If you find that the material is running out during printing or you want to change another color, you may do as
shown below. (Note: the yellow material is the current one while the green one is the new material).
On the main menu
“prepare”“preheat
PLA”or“Preheat ABS” to heat the
extruder
Push the filament through with
strength until the filament passes the
gear to the tube
After heating, inser
t the filament to
the extruder and push it down a
little
Insert the tube to the extruder
Material comes out of the nozzle
Put back the blue buckle
1
11
1
2
22
2
3
33
3
4
44
4
5
55
5
6
66
6

User Manual for LIQUIPRINT 3D Printers
Version:
WB20141117
12
Use the pliers to cut one end of the
new filament and make sure the cut
is flat and smooth
In the same way, make sure the cut
on one end of the current filament
is flat and smooth
Push the new filament into the
feeder to make sure the new one
and the current one are well
jointed.
Take away the current spool
Until the green one passes
the gear at the feeder.
Replace a new one
2
22
2
3
33
3
4
44
4
5
55
5
6
66
6
1
11
1
The result
User Manual for LIQUIPRINT 3D Printers
Version:
WB20141117
13
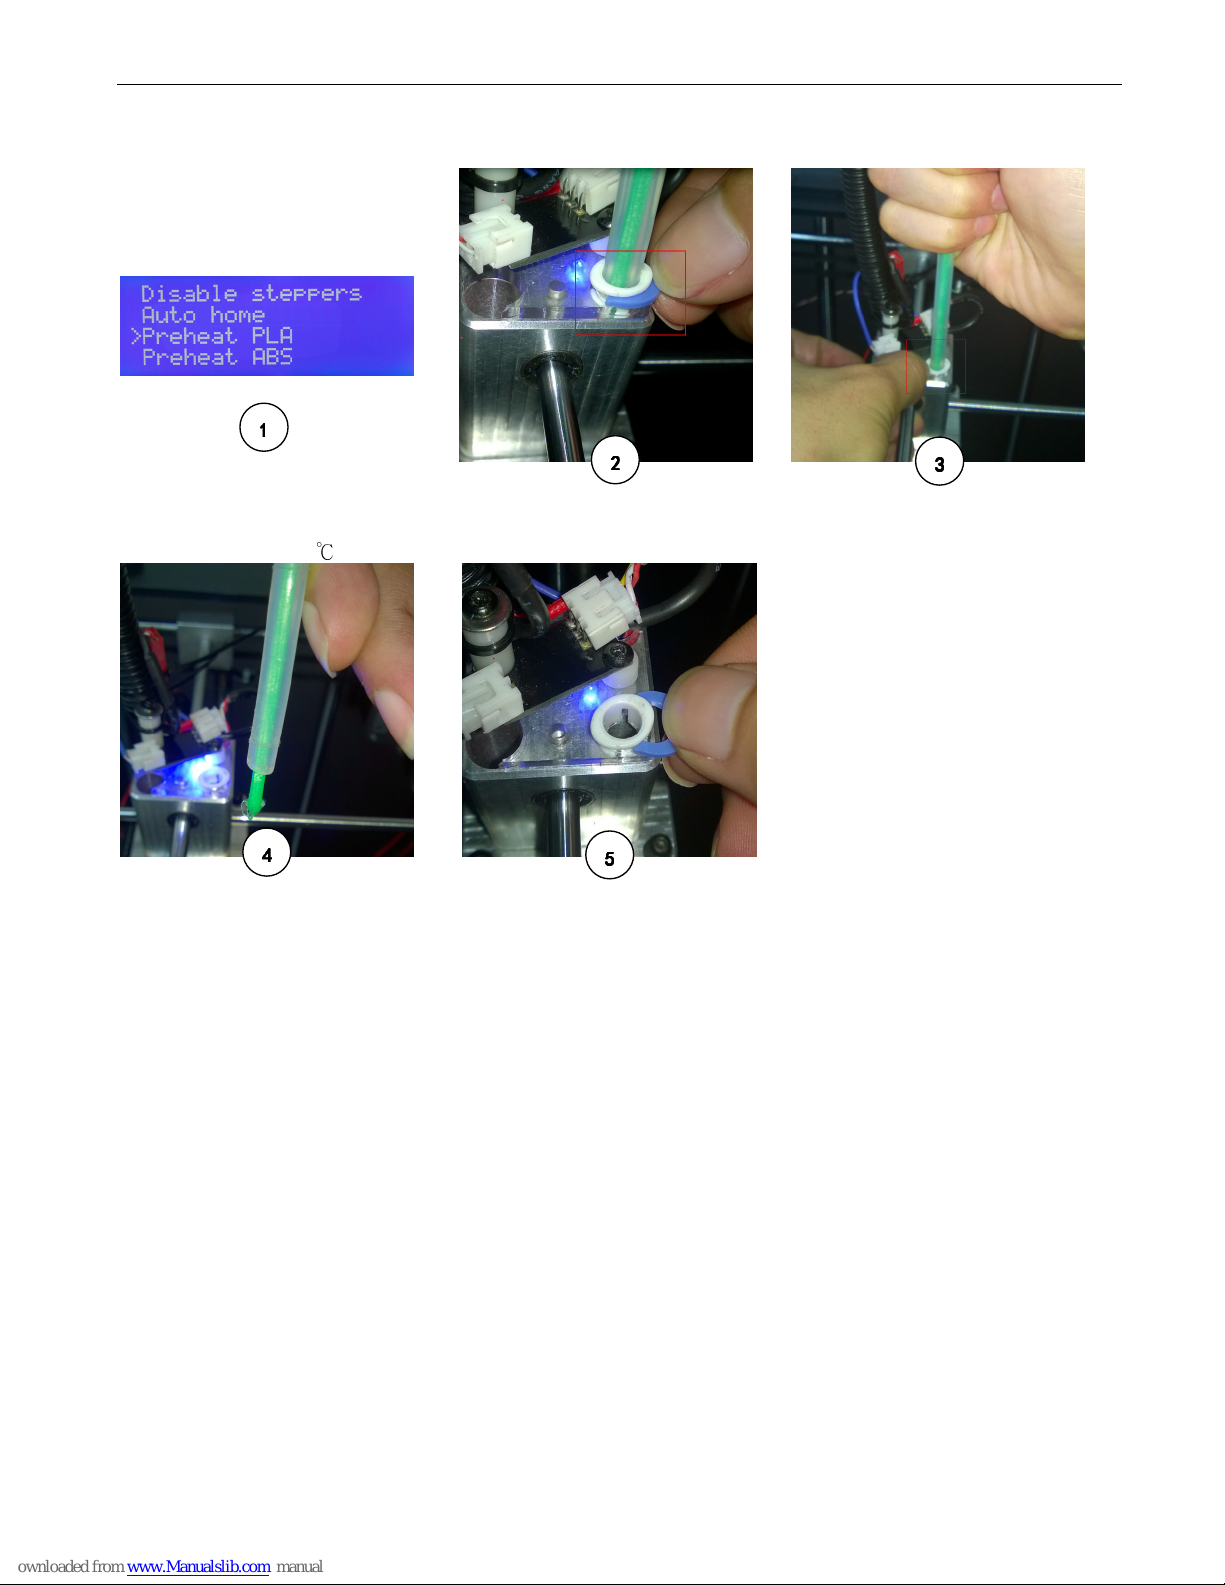
D.2.5 UNLOADING
E. MACHINE MENU EXPLANATION
By pressing the knob, you will enter the main menu as below:
MAIN MENU:
Info Screen
Prepare
Temperature
Print From SD (O CARD)
Prepare:
Sub-menu
Main
Auto Home
Move Axis
MOVE AIXS
:
::
:
Sub-menu
Prepare
Move X
Move Y
Move Z
Extruder
On the main
menu“prepare”“preheat
PLA”or“Preheat ABS”to heat the
extruder to 23
℃
Pull out the blue buckle Pin on the lock catch and pull
out the transparent tube
Put back the blue buckle
Unloading
1
11
1
2
22
2
3
33
3
4
44
4
5
55
5

User Manual for LIQUIPRINT 3D Printers
Version:
WB20141117
14
Pre eat PLA
Pre eat PLA:
Sub-menu
Pre eat PLA All
Pre eat PLA
Pre eat PLA Bed
Pre eat ABS
Pre eat ABS:
Sub-menu
Pre eat ABS All
Pre eat ABS
Pre eat ABS Bed
Cool Down
Switc Power off
Disable Steppers
Temperature
:
::
:
Sub-menu
This menu is involved with mahcine’s working condition. It is not adviced that changes shoould be madeonit.Here
we will make introduction to certain functions.
Main
ozzle
Bed
Fan Speed
With the start of printing, there will be more functions appear on the main menu and they are
Temperature
、
Pause
print
、
Resume Print
、
Stop print.
Temperature
:
::
:
Sub-menu
Main
ozzle
Bed
Fan Speed
Pause print
:
::
:
suspend the printing.
Resume Print:
Continue the printing.
Stop print
:
::
:
cancel the printing.
F. START PRINTING
F.1 MODEL EDITION
Run the software and click on to choose the model that need to print:
User Manual for LIQUIPRINT 3D Printers
Version:
WB20141117
15
There are many functions to make adjustment to the model, such as flipping, rotating, scaling and so on.
F.1.1 ROTATE
Click and you can rotate the model from X, Y or Z axis. The red one is X-axis, green Y-axis and yellow
Z-axis.
Reset : reset the model that has been rotated.
Lay flat : lay down the model that has been rotated.
F.1.2 SCALE
Click on to adjust the size of the model. You may make adjustment by dragging the mouse on the
three points or inputting exact value as below:

User Manual for LIQUIPRINT 3D Printers
Version:
WB20141117
16
TO max : to make the model to the maximum size within the build size.
Reset : reset the model that has been adjusted.
F.1.3 FLIPPING (MIRROR)
Click on to flip the model as below:
Mirror X : flip the model toward X-axis.
Mirror Y : flip the model toward Y-axis.
Mirror Z : flip the model toward Z-axis.
F.1.4 OTHER EDITTINGS
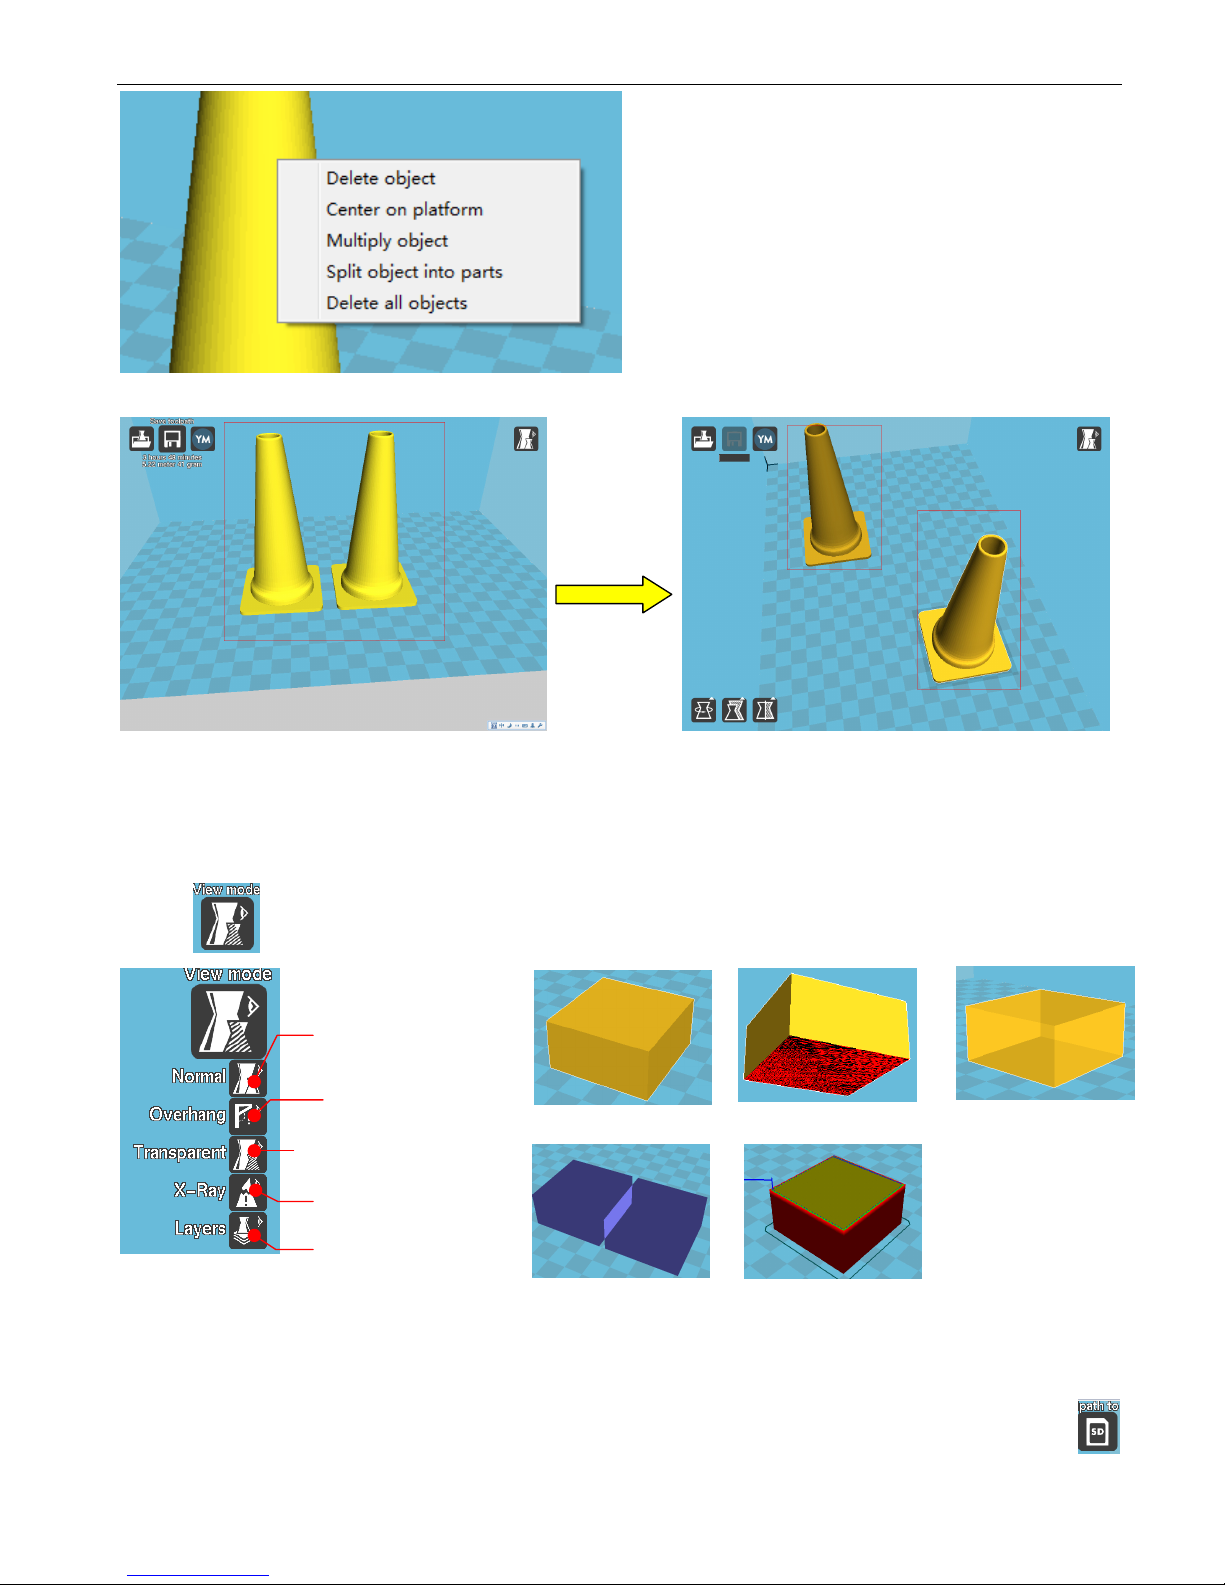
Right click on the model and you will find other editing functions: delete object, center on platform, multiply
object, split object into parts and delete all objects as shown below:
User Manual for LIQUIPRINT 3D Printers
Version:
WB20141117
17
Note: Slit object into parts is to separate two models instead of slitting a model into two parts.
F.1.5 VIEM MODE
You may adjust the view mode for better checking and editing on the model.
Click on and you may change view mode for the model as below:
F.2 PRINT FROM SD CARD (RECOMMENDED)
After editting, you may save it into SD card as G-Code. Insert the SD card and click on ”Toolpath to SD”
to save the model. The model is saved into SD card automatically. If there is no SD card, click on “Save
Standard view mode
Pending view mode
X-Ray view mode
Scenograph view mode
Layering view mode
Standard view mode
Pending view mode
Scenograph view mode
X-Ray view mode
Layering view mode
A whole Two wholes
Split into two models
Table of contents


