MiiCraft 150 User manual

3D production system ►Make a better world
1
MiiCraft125 series
150/125/100/80/50/100X
3D Printer
User Manual for Hardware
Version 1.6

3D production system ►Make a better world
2
Content
1 Product Information---------------------------------------------------------------------------------------------------------------3
1.1 Instructions for Use-------------------------------------------------------------------------------------------------------3
1.2 Regulatory Statements---------------------------------------------------------------------------------------------------3
1.3 Safety Precautions--------------------------------------------------------------------------------------------------------4
1.4 General Information------------------------------------------------------------------------------------------------------5
1.5 Package ontents----------------------------------------------------------------------------------------------------------5
1.6 Product Overview---------------------------------------------------------------------------------------------------------6
2 Set up your 3D printer -Hardware----------------------------------------------------------------------------------------------7
2.1 Unpack-----------------------------------------------------------------------------------------------------------------------7
2.2 onnect omputer--------------------------------------------------------------------------------------------------------7
2.3 Power Button ontrol----------------------------------------------------------------------------------------------------8
2.4 Install Picker----------------------------------------------------------------------------------------------------------------9
2.5 Fill Resin Tank--------------------------------------------------------------------------------------------------------------9
3 Operate your 3D printer -Software-------------------------------------------------------------------------------------------10
4 After Print---------------------------------------------------------------------------------------------------------------------------10
4.1 Remove Model-----------------------------------------------------------------------------------------------------------10
4.2 lean Picker---------------------------------------------------------------------------------------------------------------10
4.3 lean Resin Tank---------------------------------------------------------------------------------------------------------10
Appendix 1. Specifications--------------------------------------------------------------------------------------------------------11
Appendix 2. Resin uring Time--------------------------------------------------------------------------------------------------12
Appendix 3. Printing Parameter-------------------------------------------------------------------------------------------------12
Appendix 4. Indoor Air Quality Evaluation Summary-----------------------------------------------------------------------13
3D production system ►Make a better world
3
1 Product Information
1.1 Instructions for Use
Please read through the following Instructions before you start using your printer.
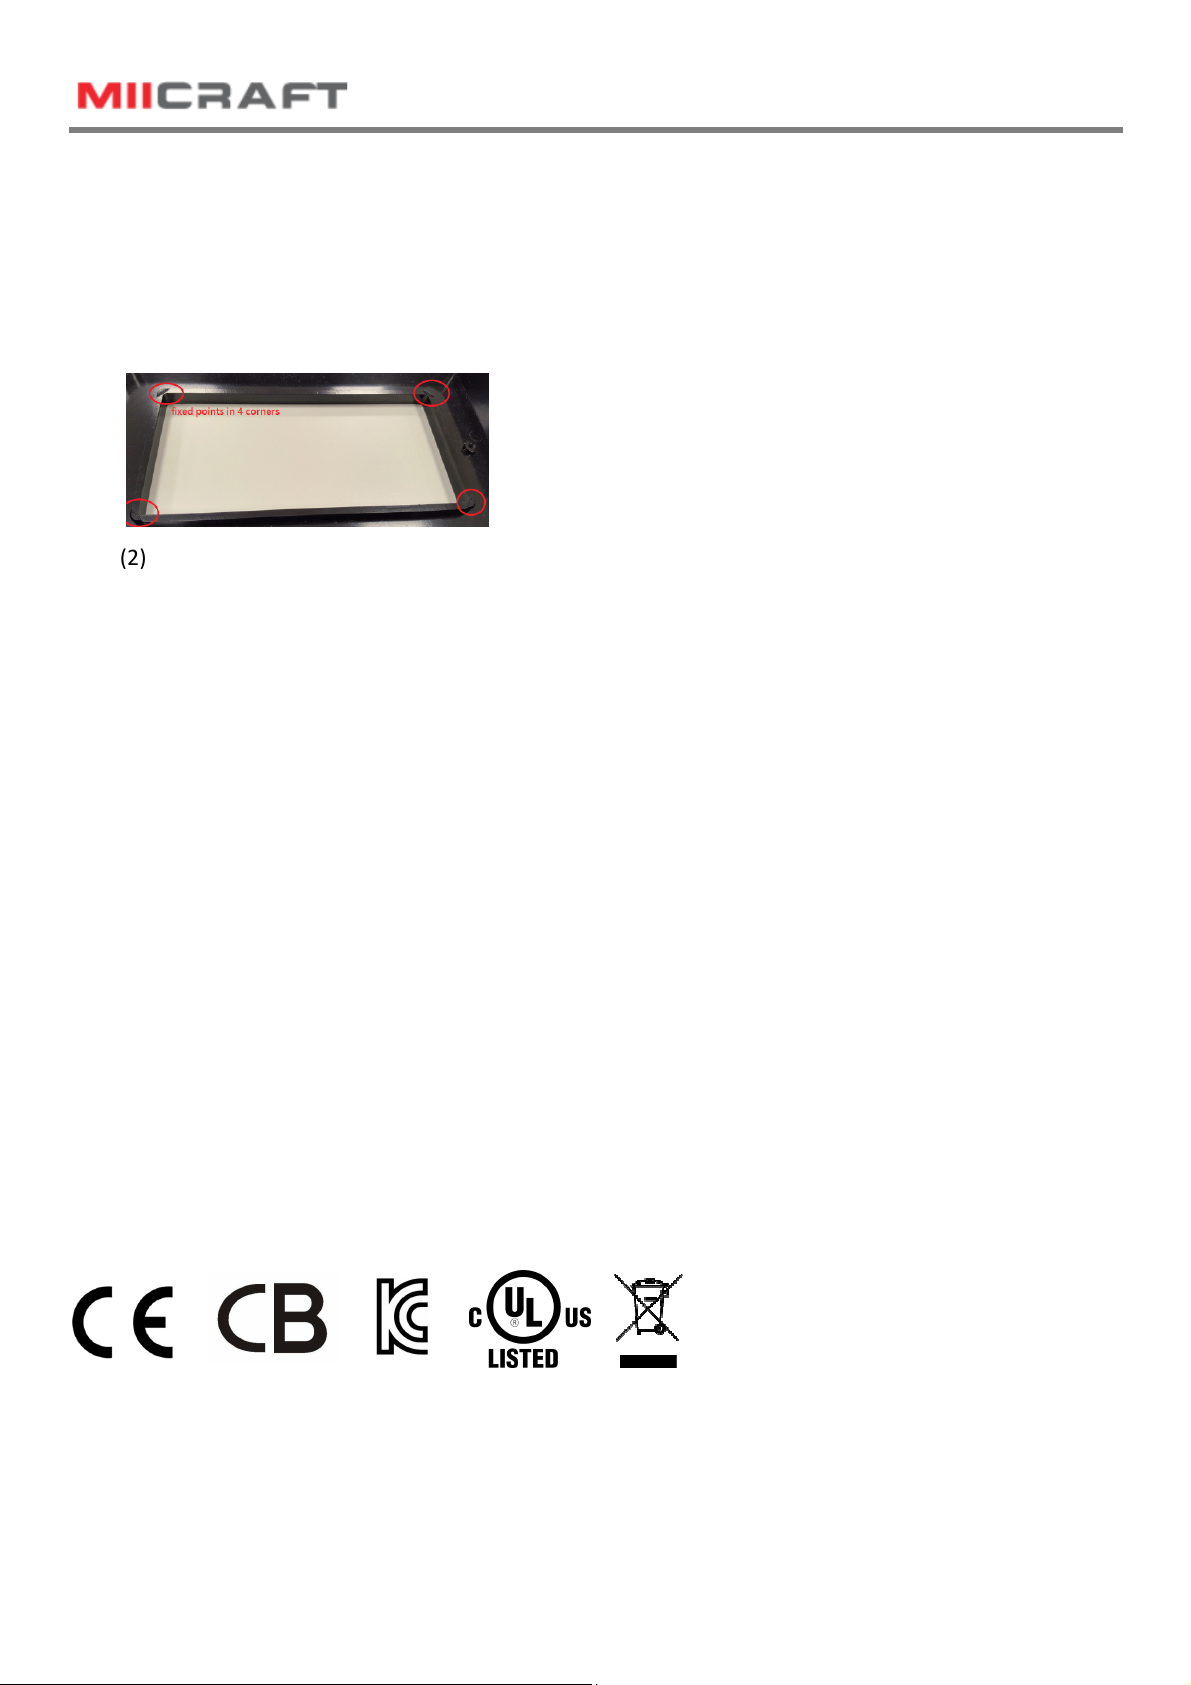
(1) Ensure that the glass under tank is positioned flat at the corners point, for not damaging printer
while printing.
(2) Ensure no residuals inside the tank and the glass is well setup before printing.
(3) Avoid print at center point with a single object or small parts repeatedly, it may damage the tank.
1.2 Regulatory Statements
FCC NOTICE
This equipment has been tested and found to comply with the limits for a class"A" digital device, pursuant
to Part 15 of the F Rules.
These limits are designed to provide reasonable protection against harmful interference. This equipment
generates, uses, and can radiate radio frequency energy and, if not installed and used in accordance with
the instruction manual, may cause harmful interference to radio communications. Operation of this
equipment in a residential area is likely to cause harmful interference in which case the user will be
required to correct the interference at their expense.
SAFETY CERTIFICATION
This equipment has been tested and compliance to safety requirement.
WEEE
INDOOR AIR QUALITY Evaluation
This equipment has passed INDOOR AIR QUALITY Evaluation base on UL281 Standard. Please see appendix
4.

3D production system ►Make a better world
4
1.3 Safety Precautions
Please read through the following Safety Precautions before you start using your printer.
(1) Use only the power adapter and accessories provided by the manufacturer.
(2) Before plugging the power adapter into an electrical outlet, verify the local power rating conforms
with the specified voltage and frequency.
(3) This printer needs a grounded, 1-phase electrical power source.
(4) Make sure power and communication cables are well managed to prevent from tripping.
(5) Only use resins supplied by Mii raft manufacturer. Use of other unauthorized resins may cause
printing failure.
(6) Do not expose the resin tank to direct light source because the resin will solidify under UV light.
(7) hemical substances like resin may cause skin irritation, please read the guidelines in Material
Safety Data Sheet (MSDS) of the resin supplied by manufacturer. It is recommended to wear gloves
when necessary.
(8) When moving the printer for a long distance, be sure to withdraw the remaining resin in reaction
tank and clean the tank in advance to prevent from resin overflow.
(9) Keep doors closed during printing or curing to prevent UV leakage.
(10) UV light may cause injury of eyes, do not stare into the printer directly when it is in operation. It is
recommended to wear UV protective glasses during operating the printer.
(11) Place the device on a level surface and keep the printer in an upright position at all times.
(12) Do not store the printer in extreme hot and cold temperatures.
(13) Do not disassemble or repair the device yourself. Doing so may cause device malfunction or danger.
(14) Warning :Picker is hazadous moving parts in Mii raft Printer. Keep body parts out of picker's motion
path.
(15) Emergency shut down method : Press the power button to "Power down" mode, then press and hold
the power button for 2 seconds to shut down. And press power button again to turn on the printer, the
picker will turn to original position.

3D production system ►Make a better world
5
1.3 General Information
Product Name Mii raft 150/125/100/80/50/100X
Power Input Printer : 24V D , 3.75A
With Adapter : 100~240V A , 2A, 50/60Hz
Net Weight 37.5 kg
Package Size and Weight 80x80x94 cm / 58 kg (Including pallet)
Operating Temperature 10° to 30°
Humidity (RH) 40% to 60%
Our printer should keep in dry conditions
Storage of Printing Material Store the materials at ambient temperature from 15° to 28°
And do not exposure to the light, otherwise resin may solidified
‧Liability: In case you do not follow the operating manual we cannot be held responsible for
damages of the machine or injuries on the operator.
‧Repair can only be carried out by authorized person of Mii raft.
1.4 Package ontents
There is a printer and an accessory box inside the package. As soon as you receive our products, please
verify its content and check if there's any exterior damage due to transportation.
3D Printer RJ-45 cable
Cord
Adapter
Scraper
Putty knife
Picker
Tray for resin tank

3D production system ►Make a better world
6
1.6 Product Overview
Power utton
Printer Door
Front Panel
Picker
Resin Tank
US Port
Network Port
Power Jack Front view
Handle
Storage Area
3D production system ►Make a better world
7
2 Setting up your 3D printer - Hardware
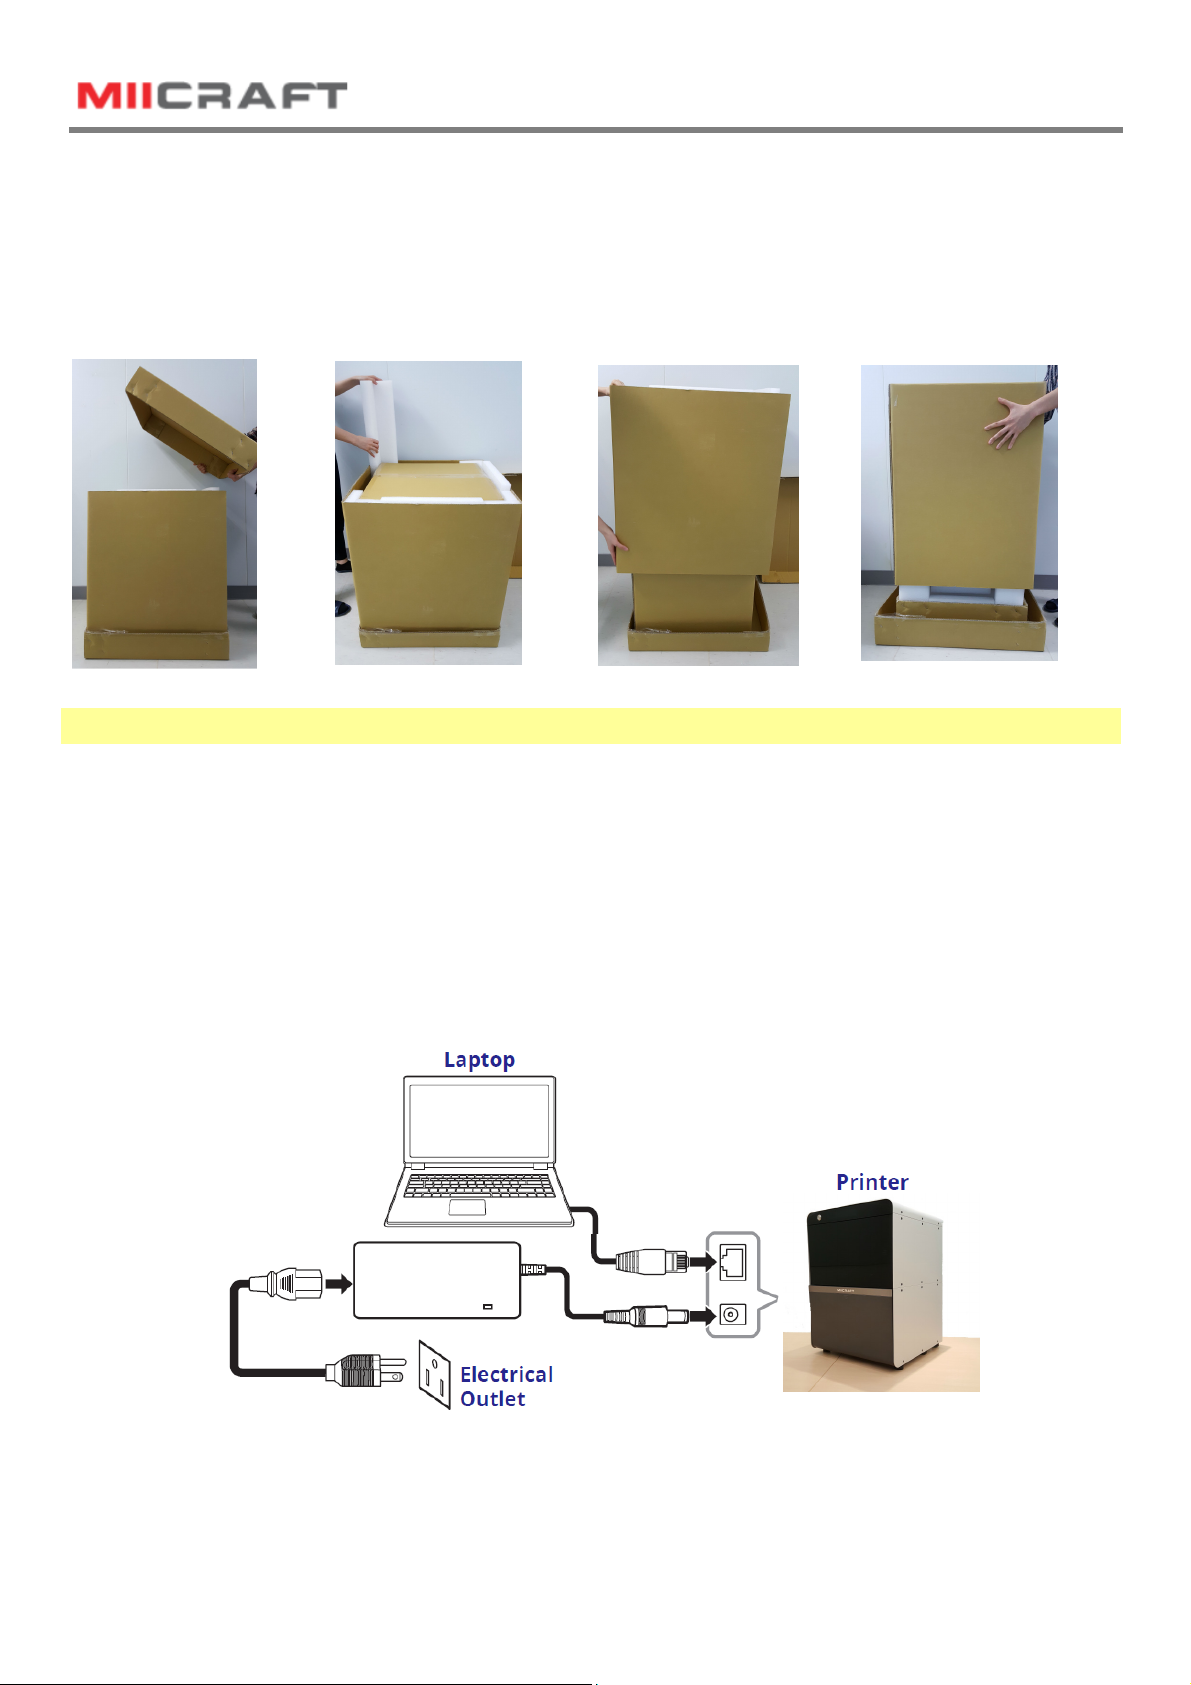
2.1 Unpack
(1) Remove the top
cardboard
(2) Remove the EPE
surround the inner box
(3) Remove the side
cardboard
(4) Remove the inner
box
2.2 onnecting to the Power adapter and able
(1) onnect the power cord and adapter to your device, and then plug it into an electrical outlet
(2) onnect your printer with laptop
-Basic : onnect printer and laptop by RJ-45 cable (Graph1.) [Initiating time 1 minute ]
-LAN : onnect both printer and laptop to local area network [Initiating time a few seconds ]
-IP sharer : onnect both printer and laptop to IP sharer [Initiating time a few seconds ]
Network port
ARJ-45
cable
Graph1.
WARNING
Printer net weighs 37.5kg. Please be careful, and use proper lifting techniques to avoid injury.

3D production system ►Make a better world
8
2.3 Power Button ontrol
Purple
Blinking System warms up
Blue
Solid Standby mode
Blinking Printing in progress
Red
Solid
Error
Besides Power on and off, you can use Power button to select file in USB to print. Or download the latest
firmware from our website, and execute firmware upgrade by USB.
-Press power button : change mode in the same level
-Pressed and Hold power button : hold down the power button for up to 2 seconds to enter the next level
-Emergency shut down method : Press the power button to "Power down" mode, press and hold the power
button for 2 seconds to shut down. And press power button again to turn on the printer, the picker will turn
to original position.
Level 1
Insert USB to printer
Upgrade Firmware
Select filez
Level 2 Level 3 and above Power Indicator
Firmware version
Press
Press
Press Press
Hold 2 sec. Hold 2 sec.
Press power button to start
※ Download the latest firmware from http://www.miicraft.com/support/ to your USB first.
Save as .ZIP file, and select it for upgrade

3D production system ►Make a better world
9
2.4 Install Picker
arry both end of picker and install it
onto the machine
1
Put down the handle to lock the Picker
2
Handle
※ Remove the Picker: Lift the handle→ arry both end of picker→Remove the Picker
2.5 Fill resin tank
※ Remember to lock four corners of resin tank after install it.
※ EPE has to be removed before First printing
Unlock the Resin tank from four corners
1
Pick up the resin tank
2
Pour resin
3

3D production system ►Make a better world
10
3 Operate your 3D printer –Software
Please refer to MiiUtility User Manual, all-in-one software for Mii raft printers.
4 After Print
4.1 Remove Model
Lift the handle→Remove the Picker and printed model→Use air gun and ethanol to clean the printed
model →Post curing (Additional post curing unit is required)→ arefully remove the printed model from the
picker. → Use putty knife to help separate the printed model and picker
* Do not expose the resin tank to direct light source because the resin will solidify under UV light. Use tray
to cover the resin tank to prevent solidify.
4.2 lean Picker
Use putty knife or similar object to scrape away the excess printed model on the picker. If any greasy
residue persists, use a soft cloth dipped in alcohol to rub the surface until the grease is removed.
4.3 lean Resin Tank
Pour resin out of tank→ Pour ethanol into tank and soak in a while→ Use Ɵssue or lens Ɵssue soŌly wipe
the boƩom of tank→ Finished cleaning. Or let the projector help cleaning Tank, please refer to MiiUtility
user manual, the cleaning Tank Process on Page 20.
Notifications:
- Do not shut down the power during curing
- Do not interrupt the firmware upgrade process. Any interruptions during the firmware upgrade process
may cause your printer to malfunction.
- Update the firmware frequently for better user experience, please refer to page8, page14 for upgrade
- Before printing, please check the surface of picker and tank is clean, no residual, or may affect printing
quality.
- Tank and Picker are consumables, suggest replace for a period, or may affect printing quality.
- Tank has lifespan around 1,000 hours. Evenly arrange the printing model can protect the tank, do not
print on one single point repeatedly.
3D production system ►Make a better world
11
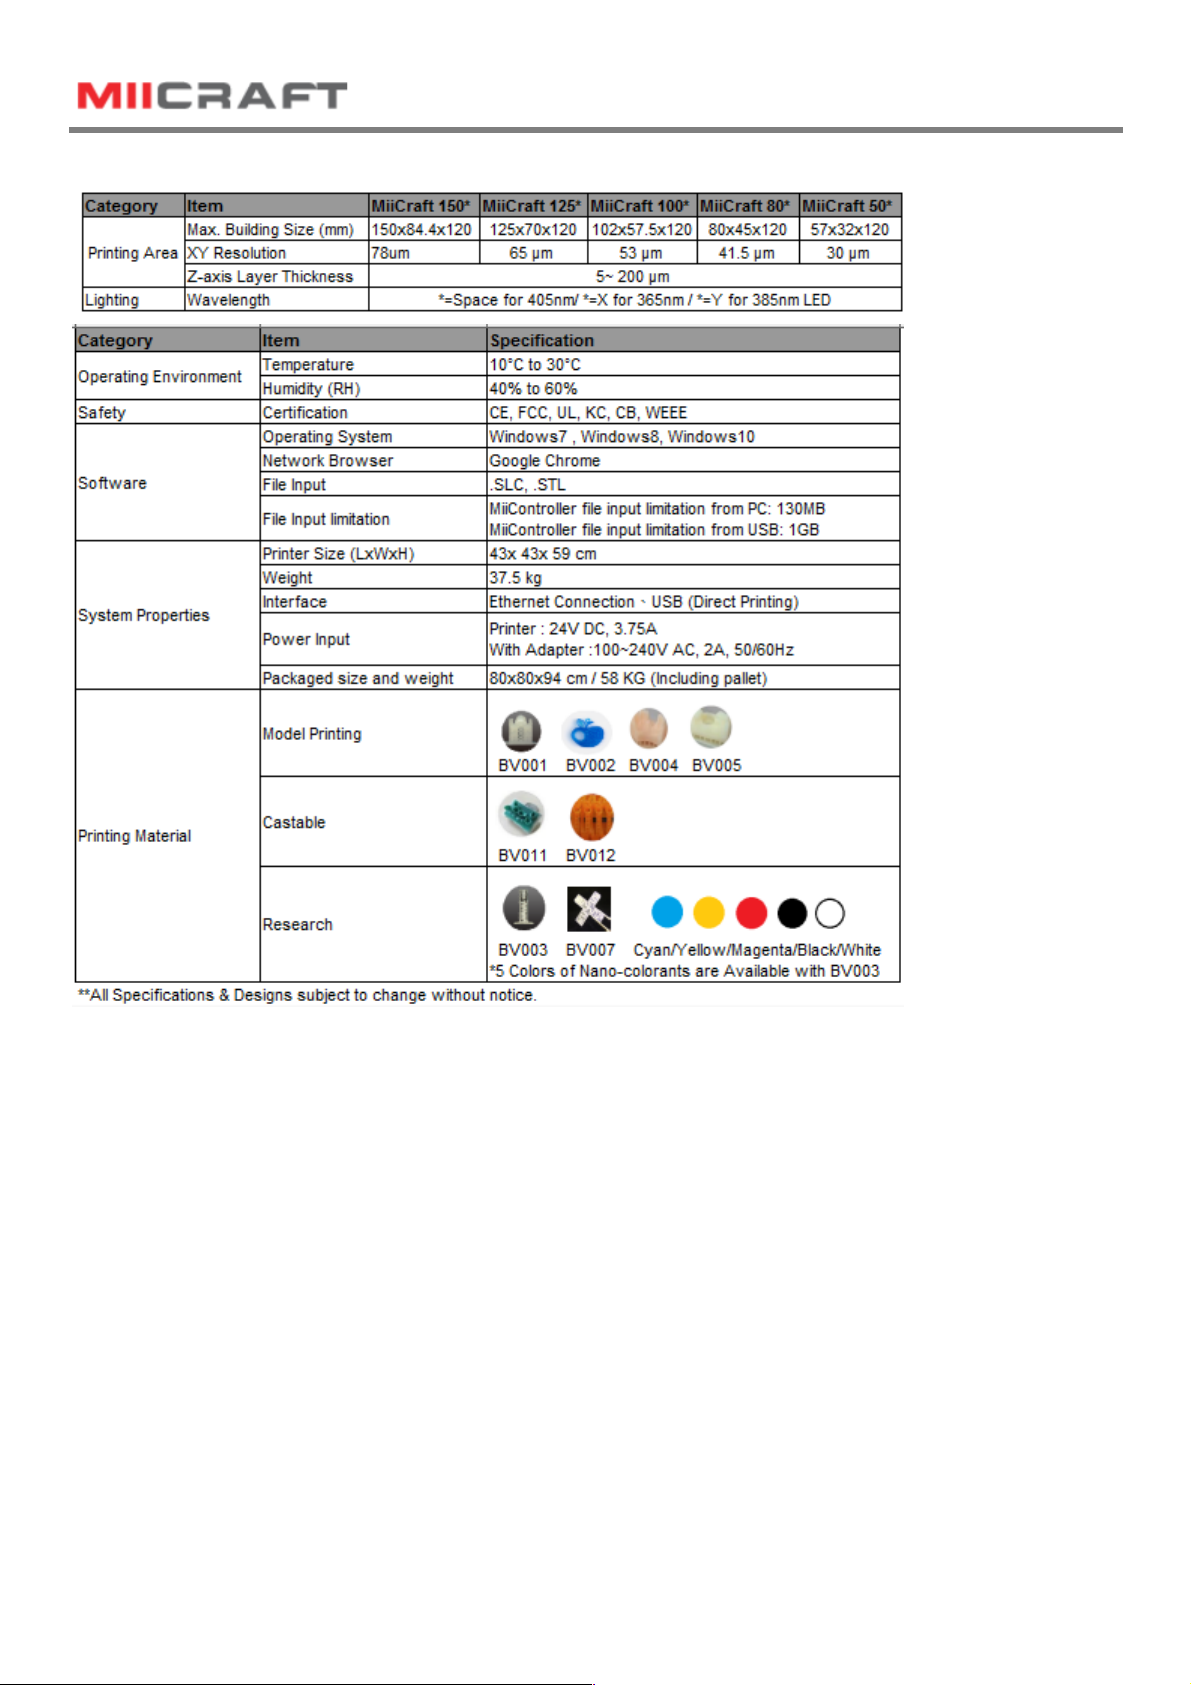
Appendix 1. Specifications
3D production system ►Make a better world
12
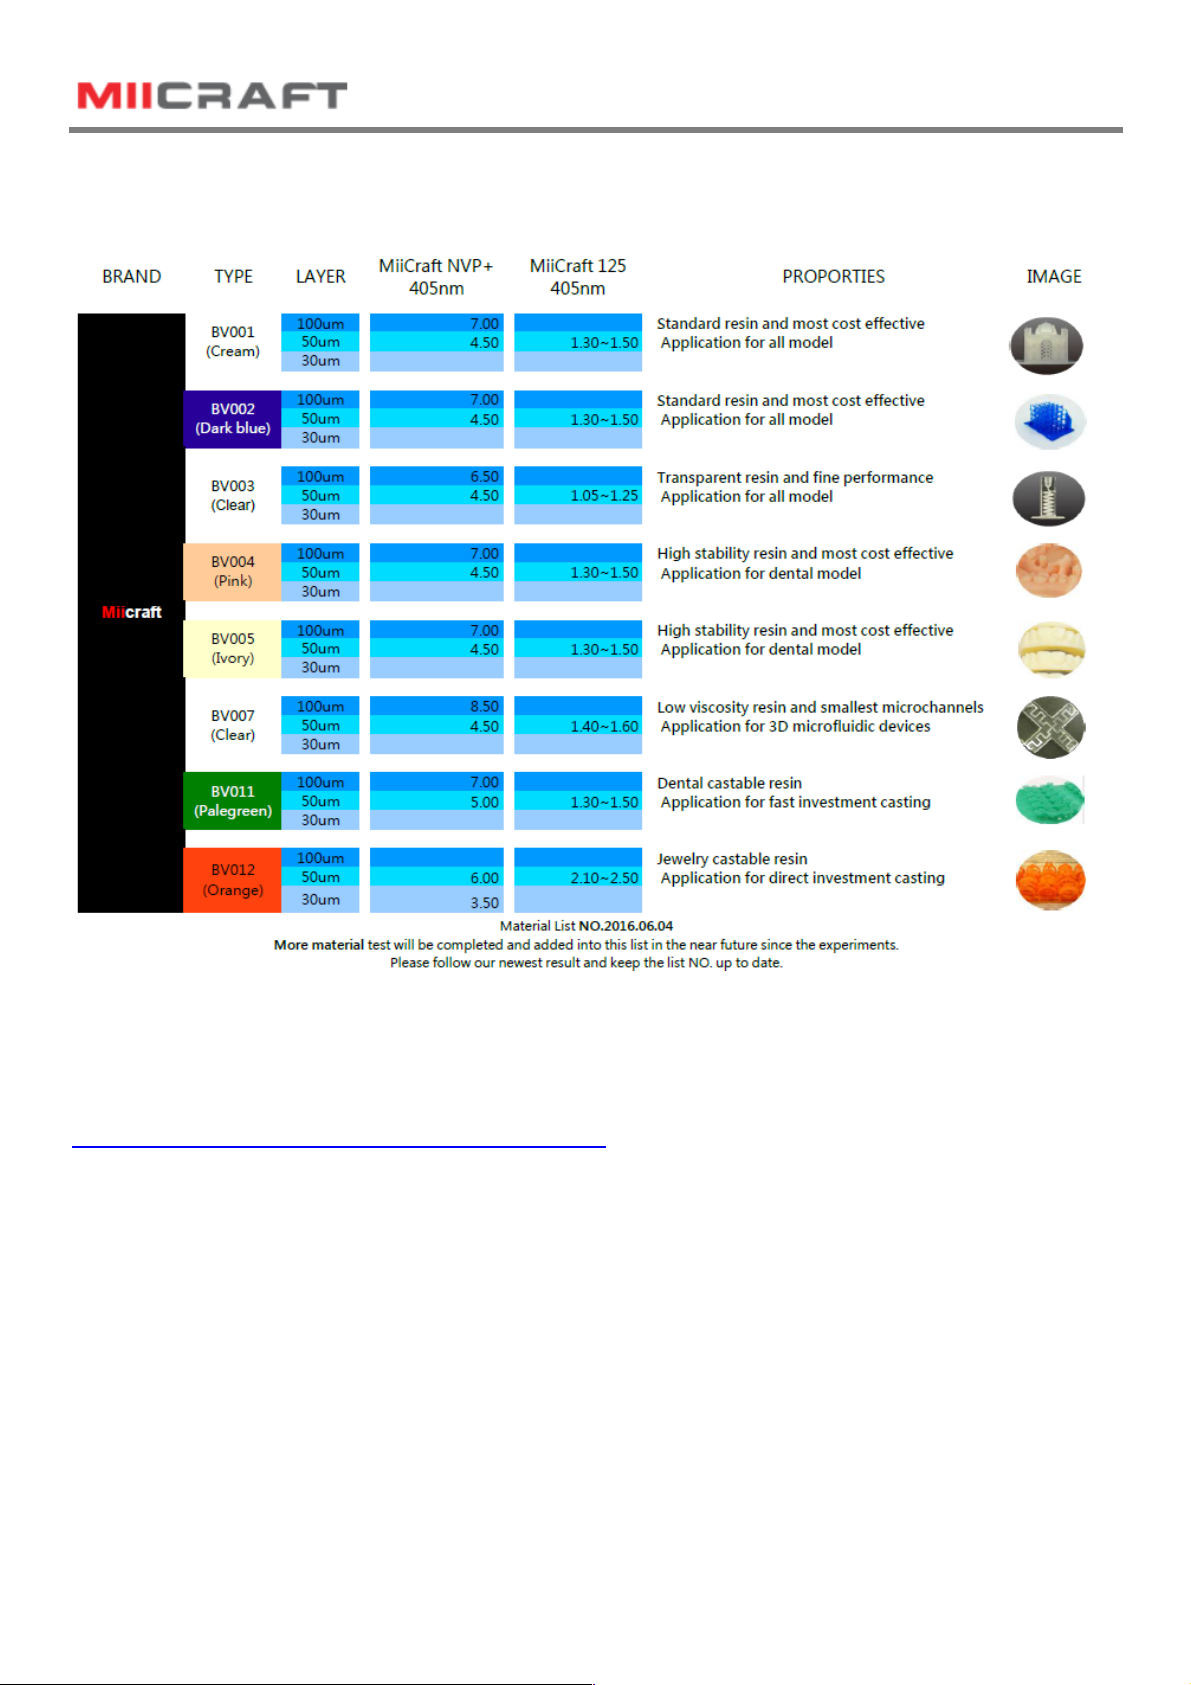
Appendix 2. Resin curing time
Appendix 3. Printing Parameter
Download printing parameter from our website:
http://www.miicraft.com/support/printing-parameter/

3D production system ►Make a better world
13
Appendix 4. Indoor Air Quality Evaluation Summary
This manual suits for next models
5
Table of contents
Other MiiCraft 3D Printer manuals


