LiteGear SOLVELA 40-740-4800LM User manual

Anleitung / Manual 1
Solar-LED-Straßenleuchte
Solar LED Streetlight
Montageanleitung Installation manual
4800lm
lm
140x70°
ASYM 40W
Power
IP65
SOLVELA
Sensor

2 Anleitung / Manual
Allgemeine Hinweise General Information
Allgemeine Sicherheitshinweise:
Um die Gefahr von Personen- oder Sachschäden durch Feuer, Stromschlag, herabfallendeTeile, Schnitte/
Abschürfungen und andere Gefahren zu vermeiden, beachten Sie bitte die folgenden Hinweise, bevor Sie
die Leuchte montieren.
• Lesen Sie die Anleitung vor der Montage/Inbetriebnahme und übergeben Sie diese nach der Montage
dem Kunden zur Aufbewahrung.
• Keine beschädigten Produkte montieren.
• Bei einer unsachgemäßen Montage oder Änderungen im Nachhinein wird keine Haftung übernommen.
• Zum Schutz der Leuchte und der Oberfläche vor Verschmutzungen und Fingerabdrücken empfehlen wir
das Tragen von Schutzhandschuhen.
• Vermeiden Sie den direkten Blick in die eingeschaltete Lichtquelle.
• Halten Sie brennbare Materialien von der Leuchte/Linse fern.
• Kleinteile und Verpackungsmaterial aus der Reichweite von Kindern fernhalten.
Achtung:
• Achten Sie auf die in Ihrem Land gültigen Unfallverhütungsvorschriften.
• Die Montage und Instandhaltung darf nur von qualifiziertem Personal durchgeführt werden.
• Überprüfen Sie die Spannungsfreiheit des Systems vor der Montage.
General safety instructions:
To avoid the risk of personal injury or property damage from fire, electric shock, falling parts, cuts/abrasions
and other hazards, please read the following notes before mounting this device.
• Read the instructions before mounting/installation and hand it over to the customer for storage after
installation.
• Do not mount damaged products.
• No liability is accepted for improper installation or changes afterwards.
• We recommend wearing protective gloves to protect the luminaire and the surface from dirt and
fingerprints.
• Avoid looking directly into the switched on light source.
• Keep small parts and packaging material out of the reach of children.
Caution
• Pay attention to the local safety and accident prevention guidelines.
• Installation and maintenance may only be carried out by qualified personnel.
• Check that the system is switched off before installation.
DE
EN
!
!
Betriebsmodus / Working mode:
Durch Drücken derTaste (ON/OFF) schalten Sie die
Leuchte ein oder aus und wählen den Betriebsmodus.
Press the button to turn the luminaire on/off and se-
lect working mode.
• Modus A: einmal drücken.
• Mode A: press once.
• Modus B: zweimal drücken.
• Mode B: press twice.
• Aus: dreimal drücken
• Off: press three times.

Anleitung / Manual 3
Installation und Montage Installation and Mounting
Die Leuchte schaltet sich automatisch mit voller Helligkeit ein, wenn eine Bewegung im Bereich ≤ 12 m erkannt
wird. Nach 20 Sekunden ohne Bewegung schaltet die Leuchte auf 30 % Helligkeit um.
The luminairy automatically turns on to full brightness when motion is detected in the range ≤ 12 m and then
turns to weak brightness (30 % brightness) after 20 seconds of no motion.
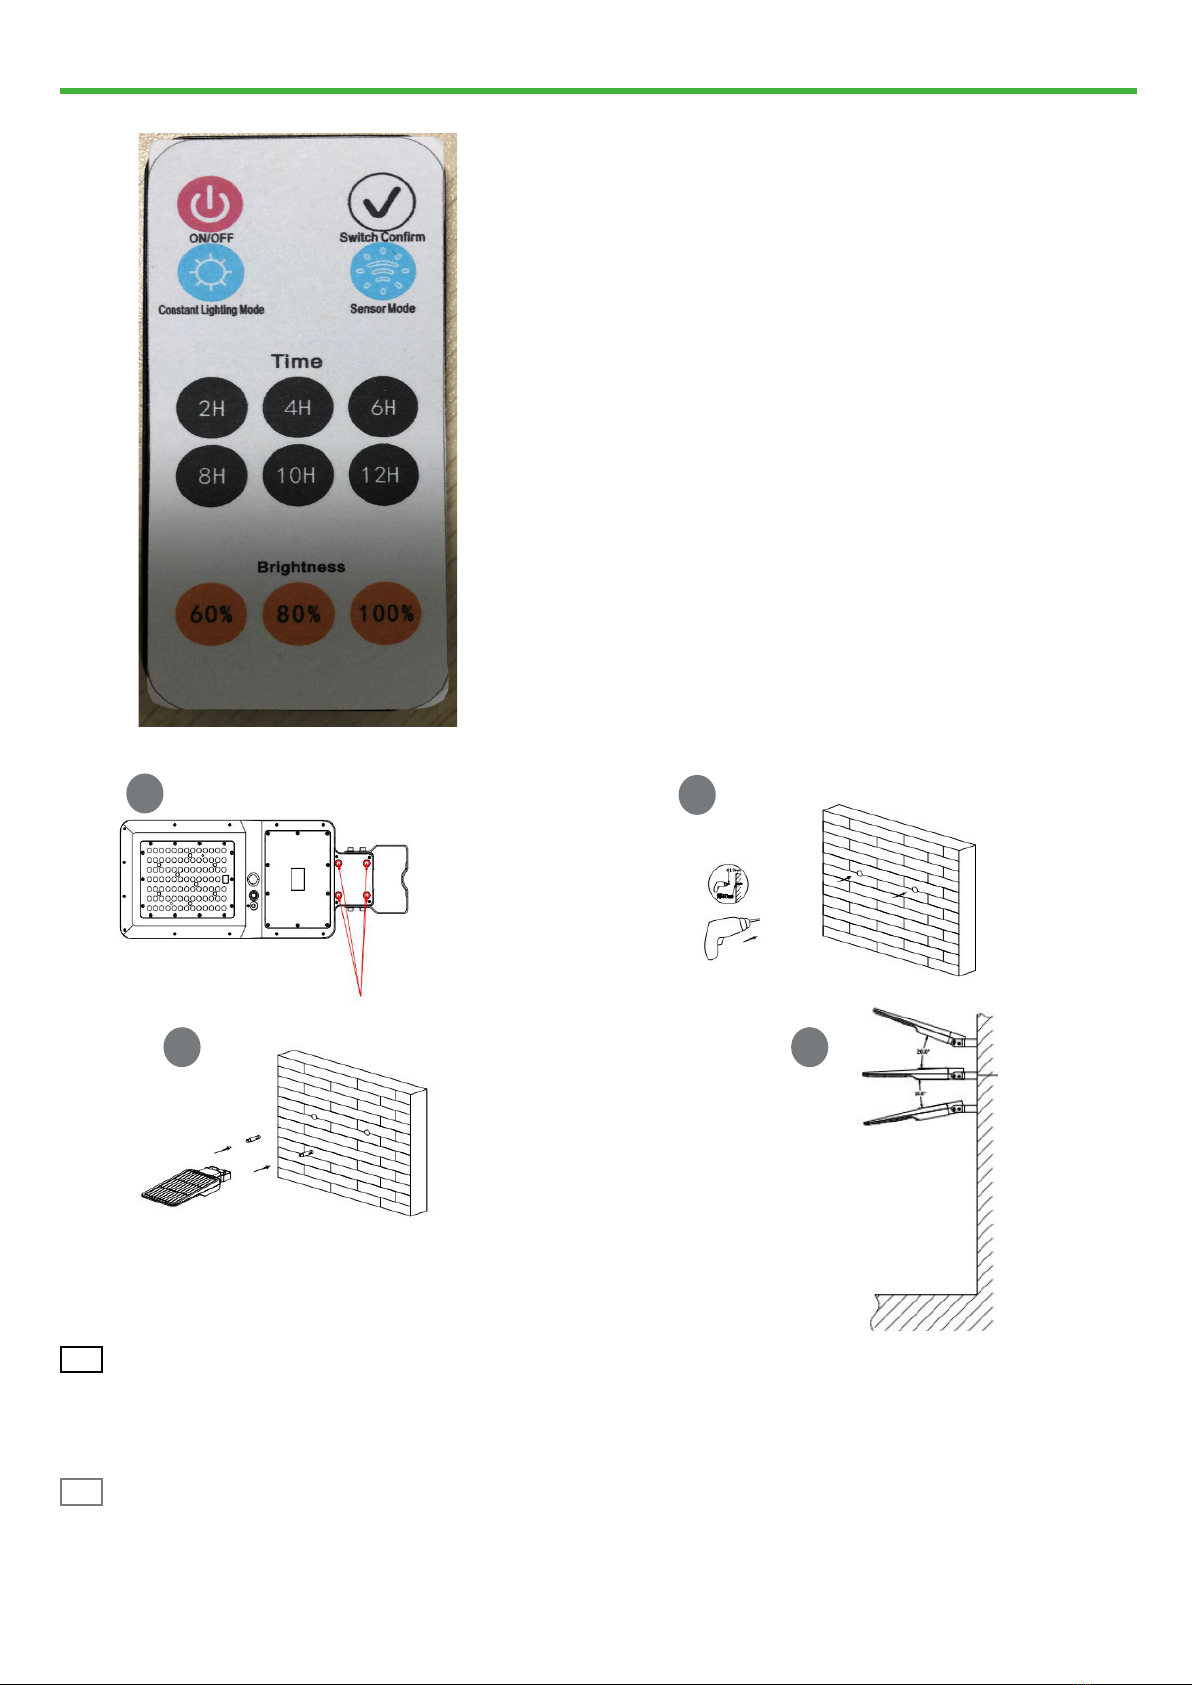
IR-Fernbedienung zur Anpassung der Betriebsmodi / Working Mode by IR Remote Controller:
Modus A (Konstantlichtmodus) / Mode A (Constant lighting mode):
Modus B (Sensor-Modus) / Mode B (sensor mode):
Die Leuchte schaltet sich nachts automatisch mit 50 % Helligkeit ein. Nach 5 Stunden oder wenn die Batterieleis-
tung weniger als 30 % beträgt, schaltet die Leuchte auf Modus B (Sensor Modus) um.
At night the luminairy turns on automatically with 50% brightness. After 5 hours or when battery power is less
than 30%, the light will switch to Mode B (Sensor mode).
Modus A (Konstantlichtmodus): Zeit und Helligkeit sind einstellbar.
1)Drücken Sie dieTaste „Constant Lighting Mode“.
2)Drücken Sie dieTaste „Time 2H“.
3)Drücken Sie dieTaste „Helligkeit 60%“.
4)Drücken Sie dieTaste „Switch Confirm“.
Die Lampe blinkt einmal nach jedemTastendruck. Das zeigt an, dass die
Taste erfolgreich eingestellt wurde. Der Konstantlichtmodus schaltet
automatisch 60% Helligkeit ein und die Leuchte ist 2 Stunden lang ein-
geschaltet. Nach 2 Stunden wechselt die Leuchte automatisch in den
Modus B (Sensormodus).
Mode A (Constant lighting mode): time and brightness are both ad-
justable.
1)choose button “Constant Lighting Mode”;
2)choose button“Time 2H”.
3)choose button “Brightness 60%”;
4)press button”Switch Confirm”,
the lamp will flash one time after pressing each button, it indicates
that the button set successfully. Constant lighting mode automatical-
ly turns on 60% brightness and keep constant lighting for 2hrs. After
2hours working, it turns to mode B(sensor mode).
Nach 5St oder Batterie bei weniger als 30 %.
After 5Hr or battery at less than 30%.
100 % Helligkeit wenn Bewegung
erkannt wird.
100 % brightness when motion
detected.
30 % Helligkeit nach 20 Sekunden
wenn keine Bewegung erkannt wird.
30 % brightness after 20 seconds
when no motion detected.
Sensor aus.
sensor OFF.

4 Anleitung / Manual
Installation und Montage Installation and Mounting
1. Stellen Sie vor der Installation sicher, dass die 4 Schrauben fest angezogen sind!
2. Bohren Sie mit der Maßkarte zwei Löcher 8 mm mit einerTiefe von 60 mm in die Wand.
3. Befestigen Sie die Leuchte mittels Schrauben und Dübeln an der Wand.
4. Justieren Sie die Leuchte nach Bedarf um +20° nach oben oder um -10° nach unten.
DE
1. Before installation, make sure these 4 screws are tightened.
2. Drill two 8 mm holes with a depth of 60 mm into the wall using the measure card.
3. Fix the luminaire to the wall using screws and dowels.
4. Adjust the luminaire upwards by +20° or downwards by -10° as required.
EN
Wandmontage / Wall Mounted:
12
43
Modus B (Sensor-Modus): Nur die Helligkeit ist einstellbar.
1)Drücken Sie dieTaste „Sensor Mode“.
2)Drücken Sie dieTaste “Brightness 60%”;
3)Drücken Sie dieTaste „Switch Confirm“.
Die Leuchte blinkt einmal nach jedemTastendruck. Dies zeigt an, dass
dieTaste erfolgreich eingestellt wurde. Der Sensormodus schaltet
sich automatisch mit 60% Helligkeit ein, wenn eine Bewegung im
Bereich ≤ 12 m erkannt wird, und wechselt dann nach 20 Sekunden
ohne Bewegung zu einer schwächeren Lichtstärke (30%).
Mode B (sensor mode):only brightness is adjustable.
1)choose button “Sensor Mode”;
2)choose button “Brightness 60%”;
3)press button”Switch Confirm”,
the lamp will flash one time after pressing each button, it indicates
that the button set successfully. Sensor mode automatically turns
on with 60% brightness when motion is detected in the range
≤ 12mtrs, then turns to weak brightness(30% ) after 20 seconds of
no motion.

Anleitung / Manual 5
Installation und Montage Installation and Mounting
1. Lösen Sie die Schrauben.
2. Demontieren Sie die Wandhalterung.
3. Lösen Sie die Schrauben des Deckels.
4. Entfernen Sie den Deckel.
5. Installieren Sie die Leuchte auf dem Rundrohr.
6. Justieren Sie die Leuchte auf dem Mastrohr und richten Sie diese entsprechend aus und verschrauben Sie
die Schrauben.
DE
1. Loose the screws and take off the bracket.
2. Take off the U-shaped bracket.
3. Loose the screws of the cover.
4. Move the cover of lamp socket.
5. Set up the lamp onto the lamp pole.
6. Adjust the lamp and balance it, then lock the arch-shaped bracket.
EN
Mastmontage (Peitschenmast) / Curved Pole:
1 2 3 4
5 6

6 Anleitung / Manual
Installation und Montage Installation and Mounting
1. Stellen Sie vor der Installation sicher, dass die 4 Schrauben fest angezogen sind!
2. Entfernen Sie die Muttern der U-förmigen Halterung.
3. Befestigen Sie die Leuchte mit der U-förmigen Halterung und den Muttern am Mast.
4. Schrauben festziehen.
5. Stellen Sie den Winkel der Leuchte wie benötigt ein (+20° nach oben, -10° nach unten) und ziehen Sie die
Schrauben der Leuchte fest.
1. Before installation, make sure these 4 screws are tightened.
2. Remove the nut spacer of U-shaped bracke.
3. Use the U-shaped bracket to fix the lamp on the pole.
4. Tighten the screws.
5. Adjust the angle of the lamp as needed(upward 20°, downward.10°), and tighten the screws of the lamp
Mastmontage (Senkrecht) / Straight Pole:
21
4
DE
EN

Anleitung / Manual 7
Installation und Montage Installation and Mounting
Entsorgungshinweise / Disposal instructions:
Elektrische und elektronische Geräte dürfen nach der europäischen WEEE Richtlinie nicht mit dem Hausmüll
entsorgt werden. Deren Bestandteile müssen getrennt der Wiederverwertung oder Entsorgung zugeführt
werden, weil giftige und gefährliche Bestandteile bei unsachgemäßer Entsorgung die Umwelt nachhaltig
schädigen können.
Sie sind als Verbraucher nach dem Elektro- und Elektronikgerätegesetz (ElektroG) verpflichtet, elektrische
und elektronische Geräte am Ende ihrer Lebensdauer an
den Hersteller, die Verkaufsstelle oder an dafür
eingerichtete, öffentliche Sammelstellen kostenlos zurückgeben. Einzelheiten dazu regelt das jeweili-
ge Landesrecht.
Das Symbol auf dem Produkt, der Betriebsanleitung oder/und der Verpackung weist auf diese Be-
stimmungen hin. Mit dieser Art der Stofftrennung, Verwertung und Entsorgung von Altgeräten leis-
ten Sie einen wichtigen Beitrag zum Schutz unserer Umwelt.
According to the European WEEE directive, electrical and electronic equipment must not be disposed with
consumers waste. Its components must be recycled or disposed apart from each other. Otherwise contami-
native and hazardous substances can pollute our environment.
You as a consumer are committed by law to dispose electrical and electronic devices to the producer, the
dealer, or public collecting points at the end of the devices lifetime for free. Particulars are regulated in natio-
nal right.
The symbol on the product, in the user`s manual, or at the packaging alludes to these terms.
With this kind of waste separation, application, and waste disposal of used devices you achieve an import-
ant share to environmental protection
DE
EN

8 Anleitung / Manual
follow us on:
litegear.gmbh
Litegear GmbH
LITEGEAR GmbH
An Fürthenrode 45
52511 Geilenkirchen
Deutschland / Germany
WEEE: DE61698887
Tel.:
+49
(0)
2451
/
48453
-
0
www.litegear.de
Stand: 07/23
LiFePo4
This manual suits for next models
1
Table of contents
Other LiteGear Outdoor Light manuals
Popular Outdoor Light manuals by other brands

Gama Sonic
Gama Sonic GS-139 instruction manual

LightPro
LightPro Azar15 Manual and safety instructions

Thorn
Thorn ISARO PRO installation instructions

Dr. Mach
Dr. Mach Mach M5 Instructions for use

Laura Ashley
Laura Ashley SORRENTO IL2898 Assembly instructions

mitzi
mitzi LIZA HL321401 Assembly and mounting instructions