LIVARNO home 1002-W Quick guide

24W LED OUTDOOR SPOTLIGHT
IAN 365678_2010 LT LVPL
DE AT CH
LED-AUSSENSTRAHLER 24 W
Bedienungs- und Sicherheitshinweise
LV
LED ĀRTELPU PROŽEKTORS
24 W
Lietošanas un drošības norādījumi
EE
LED VÄLISKIIRGUR 24 W
Käsitsus- ja ohutusjuhised
LT
LED LAUKO PROŽEKTORIUS,
24 W
Valdymo ir saugos nurodymai
PL
REFLEKTOR ZEWNĘTRZNY
LED 24 W
Uwagi dotyczące obsługi i bezpieczeństwa
SE
LED-STRÅLKASTARE FÖR
UTOMHUSBRUK 24 W
Bruks- och säkerhetsanvisningar
FI
LED-ULKOVALO 24 W
Asennus-, käyttö- ja turvallisuusohjeet
GB
24W LED OUTDOOR
SPOTLIGHT
Operating and safety information

GB
Before you start reading, please fold out the illustrations page and familiarise yourself with all of
the item’s functions.
FI
Ennen kuin luet, avaa kuvilla varustettu sivu ja tutustu sitten artikkelin kaikkiin toimintoihin.
SE
Vik ut sidan med bilderna innan du läser igenom anvisningarna. Ta sedan reda på hur alla
funktioner i artikeln fungerar.
PL
Przed lekturą instrukcji obsługi otworzyć stronę z rysunkami i zapoznać się z wszystkimi
funkcjami produktu.
LT
Prieš skaitydami atsiverskite puslapį su paveikslėliais ir paskui susipažinkite su visomis šio
gaminio funkcijomis.
EE
Avage enne lugemist joonistega lehekülg ja tutvuge seejärel toote kõikide funktsioonidega.
LV
Pirms lasīšanas atveriet lapu ar attēliem un iepazīstieties ar visām izstrādājuma funkcijām.
DE AT CH
Klappen Sie vor dem Lesen die Seite mit den Abbildungen aus und machen Sie sich
anschließend mit allen Funktionen des Artikels vertraut.
GB Operating and safety information page 7
FI Asennus-, käyttö- ja turvallisuusohjeet sivu 14
SE Bruks- och säkerhetsanvisningar sida 21
PL Uwagi dotyczące obsługi i bezpieczeństwa strona 28
LT Valdymo ir saugos nurodymai puslapis 37
EE Käsitsus- ja ohutusjuhised lehekülg 44
LV Lietošanas un drošības norādījumi lappuse 51
DE/AT/CH Bedienungs- und Sicherheitshinweise Seite 59

B
D
C
E
A
1
2
3 4 5 6 7
89
10
16
17
17
18
18
11 12
141514
13

F
H
G
1919 20
21
90°
90°
90°
60°

5
GB
SE
FI
PL
Introduction������������������������������������������� 7
Explanation of symbols����������������������� 7
Intended use ����������������������������������������� 7
Specications supplied ������������������������ 8
Description of parts������������������������������ 8
Technical data��������������������������������������� 8
Safety instructions�������������������������������� 9
Assembly and installation����������������� 10
Operation�������������������������������������������� 11
Cleaning and storing ������������������������� 12
Troubleshooting���������������������������������� 12
Disposal����������������������������������������������� 13
Warranty��������������������������������������������� 13
Service ������������������������������������������������� 14
Johdanto ��������������������������������������������� 14
Merkkien selitys ��������������������������������� 14
Tuotteen määräystenmukainen
käyttö �������������������������������������������������� 15
Toimitussisältö ������������������������������������ 15
Osien kuvaus �������������������������������������� 15
Tekniset tiedot������������������������������������� 16
Turvallisuusohjeet������������������������������� 16
Asennus����������������������������������������������� 17
Käyttö�������������������������������������������������� 18
Puhdistus ja varastointi ��������������������� 19
Vianpoisto ������������������������������������������� 19
Hävittäminen �������������������������������������� 20
Takuu ��������������������������������������������������� 20
Huolto �������������������������������������������������� 21
Introduktion ���������������������������������������� 21
Förklaring av symboler��������������������� 21
Avsedd användning��������������������������� 22
Leveransomfattning ��������������������������� 22
Komponentbeskrivning ��������������������� 22
Tekniska data ������������������������������������� 23
Säkerhetsanvisningar������������������������ 23
Montering�������������������������������������������� 24
Manövrering ��������������������������������������� 25
Rengöring och förvaring ������������������� 26
Åtgärda fel������������������������������������������ 26
Avfallshantering��������������������������������� 27
Garanti ������������������������������������������������ 27
Service ������������������������������������������������� 28
Wstęp��������������������������������������������������� 28
Objaśnienie symboli �������������������������� 28
Użytkowanie zgodne
z przeznaczeniem������������������������������� 29
Zakres dostawy ��������������������������������� 29
Opis części������������������������������������������� 29
Dane techniczne���������������������������������� 30
Uwagi dotyczące bezpieczeństwa���� 30
Montaż������������������������������������������������� 31
Obsługa����������������������������������������������� 33
Czyszczenie i przechowywanie �������� 34
Usuwanie usterek ������������������������������ 34
Utylizacja��������������������������������������������� 35
Gwarancja ������������������������������������������ 35
Serwis�������������������������������������������������� 36

6
LT
LV
EE
DE AT CH
Įžanga���������������������������������������������������37
Ženklų paaiškinimas ��������������������������37
Naudojimas pagal paskirt���������������38
Tiekiamas rinkinys������������������������������38
Dalių aprašas���������������������������������������38
Techniniai duomenys���������������������������38
Saugos nurodymai������������������������������39
Surinkimas ������������������������������������������ 40
Valdymas �������������������������������������������� 41
Valymas ir laikymas nenaudojant����42
Trikčių šalinimas����������������������������������42
Šalinimas����������������������������������������������42
Garantija ����������������������������������������������43
Klientų aptarnavimas ������������������������ 44
Sissejuhatus ���������������������������������������� 44
Märkide selgitus��������������������������������� 44
Sihipärane kasutamine�����������������������45
Tarnekomplekt�������������������������������������45
Osade kirjeldus �����������������������������������45
Tehnilised andmed ����������������������������� 46
Ohutusjuhised������������������������������������� 46
Montaaž �����������������������������������������������47
Käsitsemine������������������������������������������48
Puhastamine ja ladustamine �������������49
Vigade kõrvaldamine�������������������������49
Jäätmekäitlus ��������������������������������������50
Garantii ������������������������������������������������50
Teenindus �������������������������������������������� 51
Ievads �������������������������������������������������� 51
Simbolu skaidrojums ������������������������� 51
Paredzētais pielietojums�������������������� 52
Piegādes komplekts��������������������������� 52
Daļu apraksts ������������������������������������� 52
Tehniskie dati�������������������������������������� 53
Drošības norādījumi��������������������������� 53
Montāža ���������������������������������������������� 54
Lietošana ��������������������������������������������� 56
Tīrīšana un glabāšana����������������������� 56
Problēmu novēršana�������������������������� 56
Utilizācija��������������������������������������������� 57
Garantija ��������������������������������������������� 57
Serviss�������������������������������������������������� 58
Einleitung��������������������������������������������� 59
Zeichenerklärung ������������������������������� 59
Bestimmungsgemäße
Verwendung ��������������������������������������� 60
Lieferumfang��������������������������������������� 60
Teilebeschreibung������������������������������� 60
Technische Daten�������������������������������� 60
Sicherheitshinweise���������������������������� 61
Montage ���������������������������������������������� 62
Bedienung ������������������������������������������� 64
Reinigung und Lagerung ������������������� 64
Fehlerbehebung���������������������������������� 65
Entsorgung ������������������������������������������ 65
Garantie ���������������������������������������������� 65
Service ������������������������������������������������� 67

7
GB
LED Outdoor Spotlight
zIntroduction
Congratulations on the purchase of
your new product� You have chosen
a high-quality product� Please read
these operating instructions thoroughly and
carefully� These instructions are an essential
part of the product and contain important
information on rst-time use and handling.
Always observe all safety instructions� If you
have any questions or are unsure how to
operate the appliance, please contact your
retailer or service centre� Please keep this
manual in a safe place and pass it on to
third parties where necessary�
zExplanation of symbols
Read the operating instructions!
Issue date of instruction manual
(month/year)
Date of manufacture
(month/year)
Alternating current
Observe warning notices and
safety instructions!
Risk of fatal injury and
accidents for infants and
children!
b
a
Dispose of packaging and
product in an environmentally
friendly manner!
Not suitable for indoor lighting
IP44
Protected against solid foreign
objects with a diameter of ≥
1�0 mm, splash-proof
Motion sensor eld of view
Motion sensor detection range
Illumination time
Beam width
Any protective cover that is
cracked or split must be
replaced� If the outdoor
spotlight is damaged in any
way, stop using it immediately
and contact the service address
indicated below�
Protection class I: the user and
third parties are protected
against electric shock by a
protective earth (PE) conductor�
With the CE label, the
manufacturer conrms that this
electrical device complies with
the applicable European
directives�
MIX
Packaging
Packaging made of FSC-
certied wood mix
The “GS” symbol stands for
safety-tested� Products that are
marked with this symbol meet
the requirements of the
German Product Safety Act
(Produktsicherheitsgesetz)�
zIntended use
This product is classed as a special product
because it can be operated at temperatures
below -21°C and remain fully functional� The
outdoor spotlight is intended for permanent
installation in a place protected from rain
and is intended exclusively for use as
temporary outdoor lighting, e�g� for

8GB
illuminating private passageways, garages
or footpaths and for deterring unauthorised
intruders� The outdoor spotlight is intended
solely for use in private households and is
not suitable for commercial use� You should
only use the outdoor spotlight as described
in these instructions for use� Any other use is
considered use other than intended and may
cause property damage or personal injury�
The outdoor spotlight is not a toy� The
manufacturer or retailer accepts no liability
for loss or damage that occurs as a result of
use other than intended or incorrect use�
zSpecications supplied
1 LED outdoor spotlight with motion sensor
1 wall bracket (for mounting on building
walls or corners) inc. xings (4 wall plugs,
2 screws (10mm), 4 screws (25mm))
1 instruction manual
zDescription of parts
1LED module
2Motion and twilight sensor
3LUX control
(for setting sensitivity of twilight sensor)
4TIME control
(for setting the illumination time)
5SENS control
(for setting the detection range)
6Terminal strip
7Strain relief clamp
8Household mains live conductor L
9Household mains protective earth
conductor PE (green/yellow)
10
Household mains neutral conductor N
11
Gland nut
12
Cover plate
13
Always On/Automatic mode switch
14
Screw (cover plate)
15
Cable grommet
16
Wall bracket
17
Guide holes for xing screws (when
mounting on straight walls)
18
Guide holes for xing screws (when
mounting on corners)
19
Screw (25mm)
20
Wall plugs
21
Screw (10mm)
zTechnical data
Model number: 1002-W/1002-G
Light source: max. 24W
Power supply: 220-240 V AC,
50/60 Hz
Dimensions: approx. 190 x 230 x
200mm
Weight: approx. 0.50kg
Colour
temperature: 6,500 kelvin (cold white)
Luminous power: 1,900lm with diffusor
Beam width: 100 °
Max. projection
area: 294cm²
Colour
reproduction
index: RA > 80
Protection class: IP44
Motion detector: eld of view approx.
110°, range max. 12m

9
GB
Twilight sensor: approx. 15-1000lux
Casing material: Aluminium/Plastic
Rated ambient
temperature: -21°C to +25°C
Mounting height: up to 3m
Suitable
conductor
cross-section for
power supply
terminal:
H05RN-F, 3x 1,0 mm²
zSafety instructions
Safety instructions
WARNING!
RISK OF FATAL INJURY AND
ACCIDENTS FOR INFANTS AND
CHILDREN! Never leave children
unsupervised with the packaging material�
There is a danger of suffocation from the
packaging material� Children often
underestimate the dangers� Always keep
children away from the product�
This product can be used by children aged
8 years and over, as well as by persons
with limited physical, sensory or mental
abilities or lacking in experience and
knowledge if they have been supervised
and instructed as to the safe use of the
product and understand the resulting
hazards� Do not let children play with the
product� Cleaning and maintenance may
not be carried out by children without
proper supervision�
SUFFOCATION RISK!
Keep the product,
packing/protective foil and small parts
away from children� Children may swallow
small parts or protective foil and choke or
suffocate on them�
Do not use the product if you notice any
damage�
Once the lamp has reached its end of life,
it must be disposed of in accordance with
local disposal regulations�
The LEDs are non-replaceable�
RISK OF ELECTRIC SHOCK!
Incorrect
electrical installation or a power supply
voltage that is too high can potentially
cause electric shocks�
Installing this product involves working on
the mains electricity supply so it may only
be carried out by a competent person
according to the national regulations for
installation and connection in the country of
use�
Never tamper with or modify the product�
If the product has any identiable faults,
stop using it immediately�
Do not open up the casing and only have
the product repaired by qualied
professionals� To that end you should
contact a specialist repairer� No liability or
warranty claims are accepted in cases
where repairs have been carried out by
unauthorised persons or the product has
been incorrectly wired or used�
The manufacturer/distributor of this product
accepts no responsibility whatsoever for
personal injury or damage resulting from
incorrect installation or use�
Do not exceed the specied mains voltage
(see “Technical data”)�
Do not immerse the product in water or any
other liquids�
Keep the product away from naked ames
and hot surfaces�
Install the product in a position where it will
be protected from rain�
Before starting installation, cleaning or
maintenance work or if ever a fault occurs,
remove the mains fuse or switch off the
circuit-breaker for the circuit� Use a voltage
tester to check that the product is isolated
from the power supply�

10 GB
RISK OF INJURY!
Incorrect handling of
the product may potentially result in
personal injury�
Any protective cover that is split or cracked
must be replaced�
Never look directly into the light source�
Never point the light into the eyes of other
people or animals�
PLEASE NOTE!
Incorrect handling of the
light may lead to damage to the product�
Check the screw xings at regular intervals.
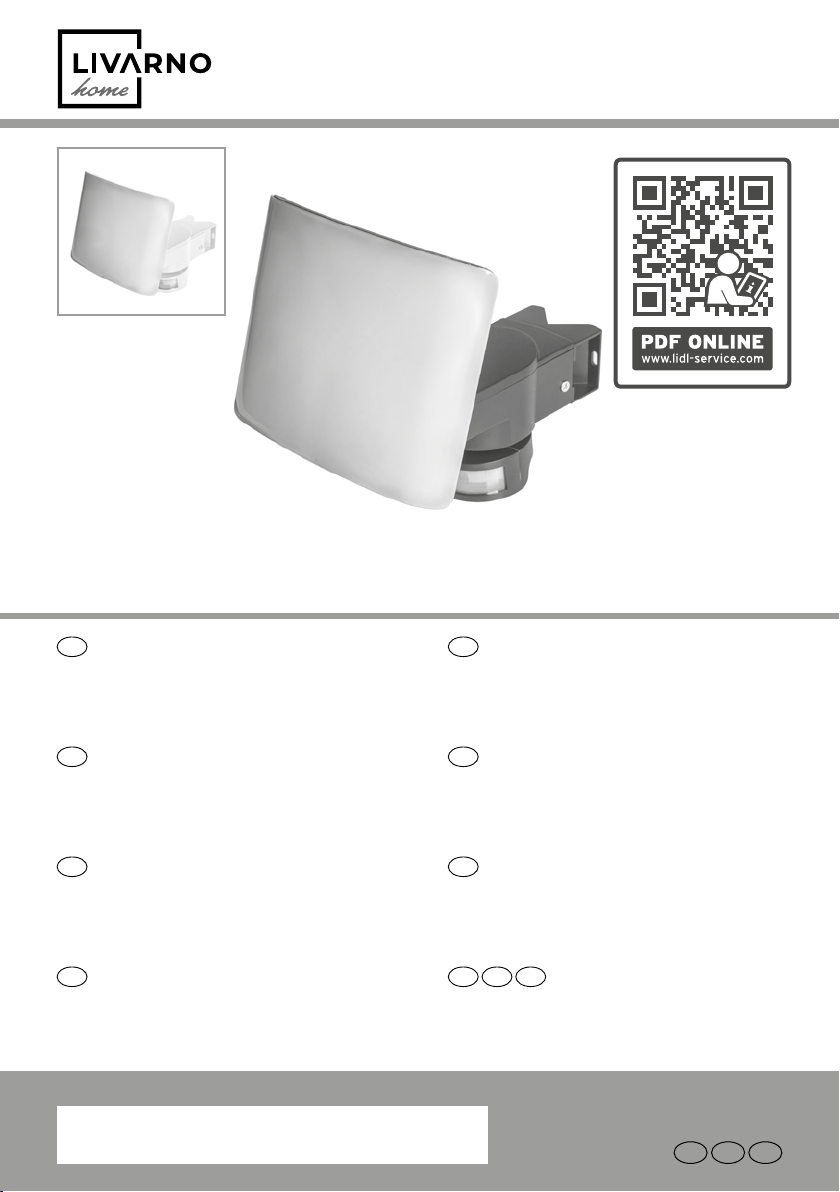
zAssembly and installation
Please note:
remove the product from its
packaging�
Check that all package contents are
present�
Check whether the outdoor spotlight or
individual parts are damaged� If that is the
case, do not use the outdoor spotlight�
Please contact the retailer via the service
address indicated on the warranty card�
Choosing the installation position
Fix the outdoor spotlight at a height of 2-3m
to a sturdy wall that is not subject to
vibration�
Only install the outdoor spotlight outside of
the hand-contact zone so as to prevent it
being touched�
Position it at least 20cm away from other
objects so as to ensure good ventilation�
If possible, mount the outdoor security in a
position where it will not be exposed to dirt
or dust and is protected from rain (e�g�
under a roof overhang), sun and other
weathering effects�
Take care to ensure that the outdoor
spotlight is not affected by interference from
another light source�
Do not point the motion sensor 2towards
heating fans, air conditioning units,
swimming pools or other objects with
rapidly changing temperatures�
Do not point the motion sensor towards
trees, bushes or areas where moving
animals can be detected�
Take into account that the motion sensor
responds primarily to movement across its
eld of view and not so sensitively to
movement directly towards or away from it�
Mounting the outdoor spotlight
RISK OF ELECTRIC SHOCK!
Incorrect
electrical installation or a power supply
voltage that is too high can potentially cause
electric shocks� Failure to take account of
that risk endangers not only yourself but
other people as well�
You should only have the product installed
by a qualied electrician.
When drilling the xing holes, take care to
avoid drilling through wiring, cables or
pipes (e�g� water or gas pipes)�
Make sure the power supply is
disconnected during installation� Switch off
the circuit-breaker for the circuit concerned
or remove the fuse� Safeguard it against
being switched on again (e�g� by
displaying a warning notice)�
Observe the correct polarity when
connecting the wires to the terminal strip
6� Refer to Figure C for details of how to
connect the wiring/supply cable to the
terminals�
Make sure that the mains power supply is
switched off�
The outdoor spotlight can be mounted
either on a straight wall or on a corner
using the wall bracket
16
(see Fig� F)�
Please note:
make sure that you mount the
wall bracket the correct way round� Refer to
Figure F for guidance�
With the wall bracket
16
in its intended
mounting position, mark the positions on
the wall for the xing holes using either the
guide holes
18
(for mounting on building
corner) or guide holes
17
(for mounting on
straight wall) (see Figs� E and F)�

11
GB
Drill two holes (dia� 6mm) and insert the
matching wall plugs
20
(see Fig� F)�
Screw the wall bracket
16
(for straight-wall
or corner mounting) in place by inserting
the screws (25mm)
19
through the guide
holes
17
/
18
and rmly tightening them.
Check that the wall bracket is xed rmly in
place�
Unscrew the gland nut
11
from the outdoor
spotlight�
Remove the screws
14
from the cover plate
12
and pull it away far enough to be able
to access the terminal strip 6attached to
the cover plate�
Feed the power supply cable rst through
the gland nut
11
, then through the cable
grommet
15
, and nally through the cover
plate
12
before starting installation�
Connect the power supply cable to the
terminal strip 6� Make sure that the
individual cable cores are correctly
connected� Take care to ensure that the
earth conductor 9is made longer than
the other conductors so that if the cable is
torn away from the outdoor spotlight, the
earth conductor comes away last� Connect
the neutral conductor
10
to the terminal
marked N and the live conductor 8to the
terminal marked L so as to avoid incorrect
installation and consequent damage to the
product or personal injury (see Fig� C)�
Secure the connecting lead (inc� outer
sleeve) with the strain-relief clamp 7(see
Fig� C)�
Feed the terminal strip 6back into the
casing and screw the cover plate
12
back
onto the outdoor spotlight�
Position the cable grommet
15
between the
cover plate and nut so as to obtain the best
possible seal and x it in place by
hand-tightening the gland nut
11
�
Slot the outdoor spotlight onto the wall
bracket
16
from above and screw it to the
bracket using the two screws (10mm)
21
(see Fig� G)�
Note:
The screw heads of the cover plate
must be countersunk so that the outdoor
spotlight can be tted onto the wall bracket.
Switch the circuit-breaker for the circuit back
on or replace the fuse�
Setting the beam width
Tilt the outdoor spotlight to the desired
position (see Fig� H)�
zOperation
The outdoor spotlight is operated by means
of the three control knobs on the bottom end
of the light (see Fig� B)�
Set the switch
13
to position “I” to activate
Always On mode� Set the switch
13
to
position “0” to activate Automatic mode
(motion sensor)� In this mode the following
settings are possible�
Setting the detection range
Turning the SENS control 5clockwise
increases the detection range so that the
motion sensor responds to movement as far
away as approx. 12m (see Fig. B).
Turning the SENS control 5anticlockwise
decreases the detection range so that the
motion sensor only responds to movement
as close as approx. 0.5m (see Fig. B).
Setting the burn time
Turning the TIME control 4clockwise
increases the illumination time (max.
1 minute) (see Fig� B)�
Turning the TIME control 4anticlockwise
decreases the illumination time (min�
10 seconds) (see Fig� B)�
Setting the sensitivity of the twilight
sensor
Turning the LUX control 3clockwise
increases the sensitivity so that the motion

12 GB
sensor will respond even in brighter
ambient light conditions (e�g� daylight) (see
Fig� B)�
Turning the LUX control 3anticlockwise
decreases the sensitivity so that the motion
sensor will respond only in darker ambient
light conditions (e�g� at night) (see Fig� B)�
zCleaning and storing
RISK OF BURNS!
The light becomes hot
when switched on�
Always allow the outdoor spotlight to
completely cool down before cleaning it�
SHORT-CIRCUIT RISK!
Water penetrating
into the casing can potentially cause a
short circuit�
Before cleaning, remove the mains fuse or
switch off the circuit-breaker for the circuit to
isolate the outdoor spotlight from the mains
power supply� Use a voltage tester to check
that the outdoor spotlight is isolated from
the power supply�
Do not immerse the outdoor spotlight in
water�
Make sure that no water gets into the
casing�
RISK OF DAMAGE!
Cleaning the outdoor
spotlight incorrectly can potentially cause
damage�
Do not use corrosive cleaning agents,
brushes with metal or nylon bristles or sharp
or metallic cleaning implements such as
knives, hard spatulas or the like� They may
damage the surfaces�
Do not use any chemicals for cleaning�
Switch off the circuit-breaker or remove the
fuse for the circuit�
Use a voltage tester to check that the
outdoor spotlight is isolated from the power
supply�
Allow the outdoor spotlight to completely
cool down�
Wipe down the outdoor spotlight with a
slightly moistened cloth� Allow all parts to
dry completely�
If storing the outdoor spotlight away, keep
it in a dry place where it is safely out of the
reach of children�
zTroubleshooting
= Fault
=Cause
= Solution
= The outdoor spotlight fails to function�
= There is a fault with the power supply
or cable�
= Have it checked by a competent
person�
= The outdoor spotlight is incorrectly
adjusted�
= Use the control knobs to adjust the
settings properly�
= The wiring is incorrect�
= Have it checked by a competent
person�
= The detection range of the motion
sensor is badly adjusted�
= Readjust the detection range of the
motion sensor�
= The outdoor spotlight constantly
switches on and off�
= The outdoor spotlight constantly
responds to movement�
= Check the detection zone for moving
objects/animals�
= Check the adjustment of the outdoor
spotlight�
= Readjust the detection range of the
motion sensor�
= Adjust the illumination time�
= Adjust the sensitivity of the twilight
sensor�
= The outdoor spotlight gets hot�
= That is quite normal and not a fault�
= Make sure that the outdoor spotlight
is well ventilated�

13
GB
Please note!
Any other repairs may only
be carried out by a qualied electrician.
zDisposal
b
a
Note the labels on the packaging
materials when sorting the waste;
they are marked with abbreviations
(a) and numbers (b) with the
following meanings:
1-7: Plastics
20-22: Paper and cardboard
80-98: Composite materials
You can nd out how to dispose of
the used product by contacting your
local district or city council�
In the interest of environmental
protection, when the product has
reached the end of its useful life, do
not dispose of it as general
household waste but have it
properly recycled� For information
on recycling centres and their
opening times, please contact your
local council�
zWarranty
Dear customer, This product comes with a
3-year warranty from the date of purchase�
In the event that this product is faulty, you
have legal rights against the seller of the
product� These statutory rights are not
restricted by our warranty as set out below�
Warranty terms
The warranty period begins with the date of
purchase� Please keep the original receipt in
a safe place� It is required as proof of
purchase� If a material or manufacturing
defect occurs within three years of the date
of purchase, we will repair or replace the
product for you free of charge, or refund the
purchase price, at our discretion� This
warranty service is granted provided that the
faulty device and the proof of purchase
(receipt) are presented within three years,
along with a brief written description of the
fault and of when it occurred� If the fault is
covered by our warranty, we will return the
xed product or send you a new one. No
new warranty period shall begin upon repair
or replacement of the product�
Warranty period and statutory
warranty claims
The warranty period is not renewed after a
warranty service has been granted� This rule
shall also apply for any replaced or repaired
parts� Any damage or faults that already
existed when buying the product must be
reported immediately upon unpacking the
product� A fee is charged for any repairs
that are carried out after the end of the
warranty period�
Warranty scope
The device was carefully manufactured
according to the strictest quality guidelines
and thoroughly tested before delivery� The
warranty applies to material or
manufacturing defects� This warranty does
not apply to product parts that are subject to
normal wear and tear and can therefore be
regarded as wearing parts, or damage to
fragile parts, such as switches, rechargeable
batteries or parts that are made of glass�
This warranty is void if the product has been
damaged, improperly used or serviced� To
ensure proper use, all instructions included in
the manual must be followed carefully� All
uses and actions that users are discouraged
from or warned of in the manual must be
avoided under all circumstances� The product
is intended for private household use only,
and not for commercial activities� The
warranty is void, if the product is treated
inappropriately, if force is applied, and in
the case of any manipulation that is not
carried out by our authorised service branch�
Warranty processing

14 FI
To ensure your request is handled swiftly,
please observe the following
Notes:
Please have the receipt and the article
number (e�g� IAN 123456) ready as proof
of purchase for all enquiries�
Please refer to the type plate on the product,
an engraving on the product, the cover of
the manual (bottom left) or the sticker on the
back or base of the product to nd out the
product number�
In the case of any malfunctions or other
defects, please call or email the service
department indicated below as a rst step.
After your product has been registered as
faulty, you can send it to the specied
service address, free of charge� Please
include the proof of purchase (receipt) and
information about the defect and about
when it occurred�
zService
GB
Service Great Britain
Tel�: 00800 80040044
E-Mail: administration@mynetsend�de
IAN 365678_2010
Please have the receipt and the article
number (e�g� IAN 123456) ready as proof of
purchase for all enquiries�
You can nd an up-to-date version of the
operating instructions at: www�citygate24�de
LED-ulkovalaisin
zJohdanto
Onnittelemme sinua uuden tuotteesi
ostamisesta� Olet valinnut
korkealaatuisen tuotteen� Lue tämä
käyttöopas kokonaan ja huolellisesti�
Käyttöopas on osa tuotetta ja se sisältää
tärkeitä ohjeita käyttöönottoa ja käsittelyä
varten� Noudata aina kaikkia
turvallisuusohjeita� Jos sinulla on kysyttävää
tai olet epävarma laitteen käsittelystä, ota
yhteys jälleenmyyjään tai huoltoliikkeeseen�
Pidä tämä opas turvallisessa paikassa ja
luovuta se tarvittaessa kolmansille
osapuolille�
zMerkkien selitys
Lue käyttöopas!
Käyttöohjeen julkaisupäivä
(kuukausi/vuosi)
Valmistuspäiväys (kuukausi/
vuosi)
Vaihtojännite
Noudata varoituksia ja
turvallisuusohjeita!
Lasten suojaaminen tapaturma-
ja hengenvaaralta!
b
a
Hävitä pakkaus ja laite
ympäristöystävällisesti!
Ei sovellu sisävalaistukseen
IP44
Suojattu kiinteiltä vierailta
esineiltä, joiden halkaisija on
≥ 1,0 mm, roiskevesitiivis

15
FI
Tunnistuskulma liiketunnistin
Tunnistusetäisyys liiketunnistin
Toiminta-aika
Säteen kulma
Halkeileva suojakansi on
vaihdettava� Vahingon
sattuessa sammuta ulkovalaisin
välittömästi ja ota yhteys alla
mainittuun huolto-osoitteeseen�
Suojausluokka I: Käyttäjä ja
kolmannet osapuolet on
suojattu sähköiskulta
potentiaalintasausjohdolla (PE)�
CE-merkinnällä valmistaja
vahvistaa, että tämä sähkölaite
on sovellettavien
eurooppalaisten direktiivien
mukainen�
MIX
Packaging
Pakkaus valmistettu FSC-
sertioidusta sekapuusta
Symboli "GS" tarkoittaa
testattua turvallisuutta� Tällä
symbolilla merkityt tuotteet
täyttävät Saksan tuoteturvalain
(ProdSG) vaatimukset�
zTuotteen määräysten-
mukainen käyttö
Tämä tuote on erikoistuote, koska sitä
voidaan käyttää alle -21 °C:n lämpötiloissa
ja se täyttää tehtävänsä� Ulkovalaisin on
tarkoitettu pysyväksi asennukseksi sateelta
suojatussa paikassa, ja sitä käytetään
yksinomaan ulkotilan väliaikaiseen
valaistukseen, esimerkiksi talokäytävien,
autotallien tai jalkakäytävien valaisemiseen
ja luvattomien henkilöiden estämiseen�
Ulkovalaisin on tarkoitettu yksinomaan
yksityiseen käyttöön, eikä se sovellu
kaupalliseen käyttöön� Käytä ulkovalaisinta
vain tässä käyttöohjeessa kuvatulla tavalla�
Kaikkea muuta käyttöä pidetään
sopimattomana ja se voi johtaa
omaisuusvahinkoihin tai jopa
henkilövahinkoihin� Ulkovalaisin ei ole lasten
lelu� Valmistaja tai jälleenmyyjä ei vastaa
vahingoista, jotka ovat aiheutuneet
määräystenvastaisesta tai väärästä käytöstä�
zToimitussisältö
1x LED-ulkovalaisin liiketunnistimella
1x seinäkiinnike (talon nurkkiin tai seiniin),
mukaan lukien asennusmateriaali
(4x tapit, 2x ruuvit (10 mm), 4x ruuvit
(25 mm))
1x käyttöpas
zOsien kuvaus
1LED-moduuli
2Liiketunnistin + hämäräanturi
3LUX (hämäräanturin herkkyyden asetus)
4TIME (valon keston asetus)
5SENS (tunnistusalueen asetus)
6Luster-pääte
7Vedonpoisto
8Ulkoinen johdin L-taloliitäntä
9Suojajohdin PE-taloliitäntä (keltainen /
vihreä)
10
Neutraalijohdin N-taloliitäntä
11
Lukko
12
Kansi
13
Jatkuva valo / automaattisen tilan kytkin
14
Ruuvi (kansi)
15
Kaapelin ulostulo / kaapeliläpivienti
16
Seinäpidike

16 FI
17
Ohjausreiät ruuvien kiinnittämiseen
(talon seinät)
18
Ohjausreiät ruuvien kiinnittämiseen
(talon nurkat)
19
Ruuvi (25 mm)
20
Tapit
21
Ruuvi (10 mm)
zTekniset tiedot
Mallin numero: 1002-W / 1002-G
Lamppu: maks� 24 W
Virransyöttö: 220–240 V ~, 50/60 Hz
Mitat: n. 190 x 230 x 200 mm
Paino: n� 0,50 kg
Värilämpötila: 6 500 Kelviniä (kylmä
valkoinen)
Valovirta: 1900 lm hajottimella
Säteen kulma: 100°
Suurin
projektioalue: 294 cm²
Värintoistoin-
deksi: RA > 80
Suojausaste: IP44
Liiketunnistin: n� 110 ° anturi, kantama
enintään 12 m
Hämäräanturi: n. 15–1000 Lux
Materiaalikotelo: Alumiini / muovi
Mittauslämpötila: - 21°C - + 25°C
Asennuskorkeus maks� 3 m
Sopiva johtimen
poikkileikkaus
liitäntäpäätteelle: H05RN-F, 3x 1,0 mm²
zTurvallisuusohjeet
Turvallisuusohjeet
VAROITUS!
LASTEN SUOJAAMINEN
TAPATURMA- JA
HENGENVAARALTA! Lapsia ei saa koskaan
jättää pakkausmateriaalien luo ilman
valvontaa� Pakkausmateriaalit voivat aiheuttaa
tukehtumisvaaran� Lapset usein aliarvioivat
vaarat� Lapset on aina pidettävä poissa
tuotteen luota�
Tätä tuotetta voivat käyttää vähintään
8-vuotiaat lapset sekä henkiöt, joiden
fyysiset, aistitoimintoihin liittyvät tai
psyykkiset kyvyt ovat heikentyneet tai joilta
puuttuu asianmukainen kokemus ja tieto,
mikäli heitä valvotaan tai opastetaan
tuotteen turvalliseen käyttöön ja he
ymmärtävät siitä aiheutuvat vaarat� Lapset
eivät saa leikkiä tuotteella� Tuotteen
puhdistus- ja huoltotoimenpiteitä ei saa
antaa lasten tehtäväksi ilman valvontaa�
TUKEHTUMISVAARA!
Pidä tuote,
pakkaus ja suojakalvot sekä pienet osat
poissa lasten ulottuvilta� Lapset voivat niellä
pieniä osia tai suojakalvoja ja tukehtua
niihin�
Tuotetta ei saa käyttää, jos siinä havaitaan
vaurioita�
Käyttöikänsä lopun saavuttanut valaisin on
hävitettävä paikallisten määräysten
mukaisesti�
LEDit eivät ole vaihdettavissa�
SÄHKÖISKUNVAARA!
Viallinen

17
FI
sähköasennus tai liian korkea verkkojännite
voi johtaa sähköiskuun�
Tämän tuotteen asentaminen edellyttää
verkkojännitettä; Siksi sen saa suorittaa
vain valtuutettu asiantuntija maakohtaisten
asennusmääräysten ja liitäntäehtojen
mukaisesti�
Älä koskaan käsittele tai vaihda tuotetta�
Ota tuote välittömästi pois käytöstä, jos
havaitset vian�
Älä avaa koteloa, vaan jätä korjaus
ammattilaisille� Voit tehdä tämän ottamalla
yhteyttä erikoistuneeseen korjaamoon�
Itsenäisesti suoritettujen korjausten, väärän
liitännän tai virheellisen käytön yhteydessä
vastuu ja takuuvaatimukset ovat
poissuljettuja�
Tämän tuotteen valmistaja / jakelija ei ole
vastuussa vahingoista, jotka johtuvat
virheellisestä asennuksesta / väärästä
käytöstä�
Älä ylitä määritettyä verkkojännitettä (katso
“Tekniset tiedot“)�
Älä upota tuotetta veteen tai muihin
nesteisiin�
Pidä tuote etäällä avotulesta ja kuumista
pinnoista�
Asenna tuote siten, että se on suojattu
sateelta�
Irrota sulake tai sammuta automaattisulake
ennen asennuksen, puhdistus- ja
huoltotöiden aloittamista tai vian ilmetessä�
Tarkista jännitetesterillä, onko tuotteessa
jännite�
LOUKKAANTUMISVAARA!
Tuotteen
väärä käsittely voi johtaa loukkaantumisiin�
Halkeileva suojakansi on vaihdettava�
Älä katso suoraan valonlähteeseen�
HUOMIO!
Valaisimen virheellinen käsittely
voi vahingoittaa valaisinta� Tarkista
ruuviliitokset säännöllisin väliajoin�
zAsennus
Huomio:
Ota tuote pakkauksesta�
Tarkista, että toimitus on täydellinen�
Tarkista, onko ulkovalaisin tai yksittäiset
osat vaurioituneet� Jos näin on, älä tällöin
käytä ulkolämmitintä� Ota yhteyttä
jälleenmyyjään käyttämällä takuukortissa
ilmoitettua huolto-osoitetta�
Asennuspaikn haku
Kiinnitä ulkovalaisin vakaaseen ja
tärinättömään seinään 2-3 metrin
korkeudella�
Asenna ulkovalaisin vain käsialueen
ulkopuolelle kosketusten välttämiseksi�
Pidä vähintään 20 cm:n etäisyys muista
esineistä hyvän ilmanvaihdon
varmistamiseksi�
Jos mahdollista, asenna ulkovalaisin
liattomaan ja pölyttömään paikkaan, joka
on suojattu sateelta (esim� Katon ulkoneman
alle), suojattuna auringolta ja muilta
sääolosuhteilta�
Varmista, että mikään muu valonlähde ei
häiritse ulkovalaisinta�
Älä osoita liiketunnistinta 2lämmittimen
puhaltimiin, ilmastointijärjestelmiin,
uima-altaisiin tai muihin esineisiin, joiden
lämpötila vaihtelee nopeasti�
Älä osoita liiketunnistinta puihin, pensaisiin
tai paikkoihin, joissa sen voi nähdä
juoksevien eläinten kanssa�
Huomaa, että liiketunnistin reagoi
ensisijaisesti sivusuunnassa eikä niinkään
pitkittäisliikkeisiin�
Ulkovalaisimen asentaminen
SÄHKÖISKUNVAARA!
Viallinen
sähköasennus tai liian korkea verkkojännite
voi johtaa sähköiskuun� Et vaaranna vain
itseäsi, vaan myös muita ihmisiä�
Anna asennuksen suorittaa vain valtuutettu
sähköasentaja�
Kun poraat asennusreikiä, varmista, ettei
putkiin (esim� vesi- tai kaasuputket) porata�
Suorita asennus jännitteettömässä tilassa�

18 FI
Kytke virrankatkaisin pois päältä tai irrota
sulake� Varmista se (esim� varoitusmerkillä),
ettei sitä voida käynnistää uudelleen�
Huomioi lusterpäätteen 6oikea napaisuus
asennuksen aikana� Katso kuvasta C tietoja
kaapelin / liitäntäkaapelin liittämisestä�
Varmista, että virta on katkaistu�
Sinulla on mahdollisuus asentaa
ulkovalaisin suoralle seinälle tai kulmaan
seinätelineellä
16
(katso Kuva F)�
Huomio:
Varmista, että asennat
seinätelineen oikein päin� Katso Kuva F�
Siirrä seinätelineen
16
reikien paikat
ohjainreijllä
18
(asennus talon nurkkiin) tai
ohjausreijllä
17
(asennus talon seinille)
seinän asennuspisteessä (katso Kuvat E ja
F)�
Poraa kaksi reikää (ø 6 mm) ja aseta
sopivat tapit
20
(katso Kuva F)�
Kiristä seinäkiinnike
16
(seinä- tai
nurkkakiinnitystä varten) asettamalla ruuvit
(25 mm)
19
ohjainreikien
17
/
18
läpi ja
kiristämällä ne tiukasti� Tarkista, että
seinäkiinnike on kunnolla paikallaan�
Irrota ulkovalaisimen suljin
11
�
Irrota ruuvit
14
kannesta
12
ja ota ne pois,
kunnes kanteen kiinnitetty lusterliitin 6on
käytettävissä�
Vie liitäntäkaapeli lukon
11
, kaapelin
läpiviennin
15
ja kannen
12
läpi
seuraavassa järjestyksessä ennen
asennuksen aloittamista�
Liitä liitäntäkaapeli luster-päätteeseen 6�
Varmista, että yksittäiset johdot on kytketty
oikein� Huomaa, että suojajohtimen
liitäntää 9on käytettävä pidempään kuin
muita johtimia, jotta se repäisi viimeisenä,
jos ulkovalaisin repeytyy� Liitä nollajohdin
10
N:llä merkittyyn liittimeen ja ulompi
johdin 8L:llä merkittyyn liittimeen väärän
asennuksen ja siten tuotteen tai henkilöiden
vahingoittumisen välttämiseksi (katso Kuva
C)�
Kiinnitä liitäntäkaapeli (sis� vaippa)
vedonpoistimella 7(katso kuva C)�
Ohjaa luster-pääte 6takaisin koteloon ja
ruuvaa kansi
12
takaisin ulkolämmittimeen�
Aseta kaapelin läpivientitiiviste
15
kannen
ja mutterin välille optimaalista tiivistystä
varten ja kiinnitä se lukolla
11
kääntämällä
se käsin�
Aseta ulkovalaisin seinäkiinnikkeeseen
16
ylhäältä ja ruuvaa se tiukasti kiinni kahdella
ruuvilla (10 mm)
21
(katso Kuva G)�
Huomio:
Kannen ruuvien päiden on oltava
upotettuja, jotta ulkovalaisin voidaan
kiinnittää seinäkiinnikkeeseen�
Kytke virrankatkaisin takaisin päälle tai
sulake takaisin päälle�
Säteen kulman asetttaminen
Kallista ulkovalaisin haluttuun asentoon
(katso Kuva H)�
zKäyttö
Käytät ulkovalalaisinta käyttämällä kolmea
kiertonuppia ulkovalalaismen alaosassa
(katso Kuva B)�
Kytke pysyvä valotila painamalla kytkin
13
asentoon „I“� Kytke automaattitila
(liiketunnistin) painamalla kytkin
13
asentoon „0“� Seuraavat asetukset voidaan
tehdä tässä tilassa�
Tunnistusalueen asettaminen
Jos käännät SENS-ohjainta 5
myötäpäivään, tunnistusalue kasvaa ja
liiketunnistin reagoi jo noin 12 metrin
etäisyydeltä (katso Kuva B)�
Jos käännät SENS-ohjainta 5
vastapäivään, tunnistusalue pienenee ja
liiketunnistin reagoi vasta noin 0,5 metrin
etäisyydeltä (katso Kuva B)�
Valon keston asettaminen
Pidennä valaistusaikaa (enintään 1
minuutti) kääntämällä TIME-säädintä 4
myötäpäivään (katso Kuva B)�

19
FI
Pienennä valaistusaikaa (minimi 10
sekuntia) kääntämällä TIME-säädintä 4
vastapäivään (katso Kuva B)�
Hämäräanturin herkkyyden
asettaminen
Jos käännät LUX-säädintä 3
myötäpäivään, herkkyys kasvaa ja
liiketunnistin reagoi jo kirkkaassa
ympäristössä (esim� päivänvalossa) (katso
Kuva B)�
Jos käännät LUX-säädintä 3vastapäivään,
herkkyys pieneneeja liiketunnistin reagoi
vasta pimeässä ympäristössä (esim� yöllä)
(katso Kuva B)�
zPuhdistus ja varastointi
PALOVAMMAVAARA!
Valaisin
kuumenee päällekytketyssä tilassa�
Anna ulkovalaisimen jäähtyä kokonaan
ennen jokaista puhdistamista�
OIKOSULUNVAARA!
Koteloon
tunkeutunut vesi voi aiheuttaa oikosulun�
Irrota sulake ennen puhdistamista tai
katkaise virrankatkaisin ja irrota ulkovalaisin
virtalähteestä� Tarkista jännitetesterillä,
onko ulkovalaisimessa jännite�
Älä upota ulkovalaisinta veteen�
Varmista, ettei koteloon pääse vettä�
VAURIOITUMISEN VAARA!
Ulkovalaisimen virheellinen puhdistus voi
johtaa vaurioihin�
Älä käytä aggressiivisia puhdistusaineita,
harjoja, joissa on metalli- tai
nailonharjakset, tai teräviä tai metallisia
puhdistusaineita, kuten veitsiä, kovia lastoja
ja vastaavia� Nämä voivat vahingoittaa
pintoja�
Älä käytä kemikaaleja puhdistukseen�
Käännä sulake pois päältä tai kytke
sulakeautomaatti pois päältä�
Tarkista jännitetesterillä, onko
ulkovalaisimessa jännite�
Anna ulkovalaisimen täysin jäähtyä�
Pyyhi ulkovalaisin hieman kostutetulla
liinalla� Anna sitten kaikkien osien täysin
kuivua�
Säilytä ulkovalaisin kuivassa paikassa, joka
on suojattu lapsilta�
zVianpoisto
= Vika
=Syy
= Korjaus
= Ulkovalaisin ei toimi�
= Virtalähde tai liitäntäkaapeli on
viallinen�
= Anna asiantuntijan tarkistaa tämä�
= Ulkovalaisin on väärin asetettu�
= Valitse oikea asetus kiertonupeilla�
= Johdotus on väärä�
= Anna asiantuntijan tarkistaa tämä�
= Liiketunnistimen tunnistusalue on
huonosti säädetty�
= Säädä liiketunnistimen tunnistusalue
uudelleen�
= Ulkovalaisin kytkeytyy jatkuvasti
päälle ja pois�
= Ulkovalaisin tunnistaa jatkuvasti
liikkeet�
= Tarkista tunnistusalue liikkumisen
varalta�
= Tarkista ulkovalaisimen asetus�
= Säädä liiketunnistimen tunnistusalue
uudelleen�
= Säädä valon kestoa�
= Säädä hämäräanturi herkkyyttä�
= Ulkovalaisin lämpenee�
= Tämä on täysin normaalia eikä ole
vika�
= Varmista, että ulkovalaisin tuuletetaan
hyvin�
Huomio!
Kaikki muut korjaukset saa
suorittaa vain valtuutettu asiantuntija�

20 FI
zHävittäminen
b
a
Lajittelun yhteydessä on
noudatettava seuraavia lyhenteillä
(a) ja numeroilla (b) varustettuja
pakkausmateriaalimerkintöjä:
1–7: Muovit
20–22: Paperi ja pahvi
80 – 98: Komposiittimateriaalit
Lisätietoja hävittämisvaihtoehdoista
on saatavana paikallisilta
ympäristöviranomaisilta�
Tuotetta ei ympäristösyistä saa
hävittää kotitalousjätteenä�
Hävittämisessä on noudatettava
asianmukaisia määräyksiä� Tiedot
keräyspisteistä ja niiden
aukioloajoista ovat saatavissa
paikallisilta ympäristöviranomaisilta�
zTakuu
Takuuaika on 3 vuotta ostopäivästä lukien�
Kuluttajalla on oikeus palauttaa viallinen/
puutteellinen tuote myyjälle� Takuu ei rajoita
tätä oikeutta�
Takuuehdot
Takuuaika alkaa ostopäivästä� Säilytä
alkuperäinen ostokuitti huolellisesti� Kyseinen
asiakirja vaaditaan todisteena ostoksesta�
Jos tuotteessa ilmenee materiaali- tai
valmistusvirheitä kolmen vuoden kuluessa
ostopäivästä, tuote korjataan tai korvataan
ilmaiseksi harkintamme mukaan� Tämä
takuupalvelu edellyttää, että viallinen laite ja
ostotodistus (myyntitodistus) esitetään kolmen
vuoden kuluessa ja kuvataan lyhyesti
kirjallisesti mikä vika on ja milloin se ilmeni�
Jos takuumme kattaa vian, saat takaisin
korjatun tai uuden tuotteen� Uutta takuuaikaa
ei voida alkaa, kun tuote on korjattu tai
vaihdettu�
Takuuaika ja lailliset puutteelliset
vaatimukset
Takuu ei pidennä takuuaikaa� Tämä koskee
myös vaihdettuja ja korjattuja osia�
Mahdollisista vaurioista ja virheistä, joita voi
olla jo oston aikana, on ilmoitettava
välittömästi pakkauksesta purkamisen
jälkeen� Takuuajan jälkeiset korjaukset on
maksettava�
Takuun laajuus
Tuote on valmistettu tiukkojen
laatustandardien mukaisesti ja testattu
huolellisesti ennen toimitusta� Takuu koskee
materiaali- ja valmistusvirheitä� Tämä takuu
ei koske tuotteen osia, jotka ovat normaalissa
kulumisessa, joten niitä voidaan pitää
kulutusosina tai hauraiden osien
vaurioitumisena, esim� B� kytkimet, akut tai
tuotteet on valmistettu lasista� Takuu raukeaa,
jos tuote on vahingoittunut tai sitä on
käytetty tai huollettu epäasianmukaisesti�
Tuotteen oikeaa käyttöä varten kaikkia
käyttöohjeissa lueteltuja ohjeita on
noudatettava tarkasti� Käyttöä ja toimia, joita
ei suositella tai varoiteta käyttöohjeissa, on
vältettävä� Tuote on tarkoitettu vain
yksityiseen käyttöön eikä kaupalliseen
käyttöön� Takuu raukeaa väärinkäytöksestä,
voimankäytöstä ja muista toimenpiteistä,
joita valtuutettu huoltokonttorimme ei ole
suorittanut�
Käsittely takuun yhteydessä
Seuraa seuraavia ohjeita varmistaaksesi,
että pyyntösi käsitellään nopeasti
huomio:
Tiedustelujen yhteydessä on esitettävä
ostokuitti ja ilmoitettava tuotenumero (esim�
IAN 123456)�
Tuotenumero löytyy tuotteen tyyppikilvestä,
tuotteen kaiverruksesta, ohjeiden
otsikkosivulta (vasen alaosa) tai tarrasta
tuotteen takana tai pohjassa�
Jos toiminnallisia virheitä tai muita vikoja
esiintyy, ota ensin yhteys alla olevaan
huolto-osastoon puhelimitse tai
sähköpostitse�
Other manuals for 1002-W
6
This manual suits for next models
1
Table of contents
Languages:
Other LIVARNO home Outdoor Light manuals
Popular Outdoor Light manuals by other brands

LSI
LSI TMWP Series Installation and assembly instructions

FOSCARINI
FOSCARINI Lucidi e Pevere Aplomb Outdoor Assembly instructions

Lighting Technologies
Lighting Technologies JET/T LED manual

Somogyi
Somogyi MX 633A instruction manual

JONATHAN Y
JONATHAN Y JYL2076A quick start guide

Quoizel
Quoizel LaSalle LLE8409WT Assembly instruction sheet