Livescribe APA-00002 User manual

PULSE™ SMARTPEN
VERSION 1.7
USER GUIDE
NOTE: This device complies with Part 15 of the FCC Rules. Operation is subject to the
following two conditions: (1) this device may not cause harmful interference, and (2) this
device must accept any interference received, including interference that may cause
undesired operation.

Pulse™ Smartpen User Guide
ii
COPYRIGHT AND TRADEMARK
LIVESCRIBE, PULSE, and PAPER REPLAY are trademarks or registered trademarks of
Livescribe, Inc.
Anoto is a trademark of Anoto Group AB. Microsoft and Microsoft Word are either registered
trademarks or trademarks of Microsoft Corporation in the United States or other countries.
Apple and iTunes are either registered trademarks or trademarks of Apple Computer Inc. in
the United States or other countries. MyScript is a registered trademark of Vision Objects,
Inc. All other brand and product names are trademarks of their respective owners.
Copyright © 2007-2009 Livescribe, Inc. All rights reserved.
NOTE: Please read the End User License Agreement with this product before using the
accompanying software program(s). You accept the terms of the End User License
Agreement by using any part of the software. Using any non-authorized charging
accessories or ink cartridges may damage your Pulse smartpen and voids your Pulse
smartpen’s warranty.
Software Downloads Available
To download Livescribe™ Desktop software, go to www.livescribe.com/install.
Agency Compliance Information
For product, regulatory, and compliance information, see Regulatory Information.
205-00002-000-A-PULSE-01.7.0-PSUG-REV-J
28-Sep-09 1:20 PM

Pulse™ Smartpen User Guide
iii
TABLE OF CONTENTS
INTRODUCING THE PULSE SMARTPEN 1
What’s in the Box 1
What is New in this Version? 1
Your Pulse Smartpen 1
USB Mobile Charging Cradle 2
3D Recording Headset 2
How do binaural recordings work? 3
ABOUT THE PULSE™ SMARTPEN AND LIVESCRIBE™ DOT PAPER 4
Livescribe Dot Paper 4
How the Pulse Smartpen Works 5
USING YOUR PULSE SMARTPEN 5
Changing the Display Orientation 6
Setting Time and Date 7
Charging your Pulse smartpen 8
Checking Status 9
NAVIGATING YOUR PULSE SMARTPEN 10
Using a pre-printed Nav Plus 10
Drawing a Nav Plus 12
USING PAPER REPLAY 13
Recording Audio 14
Tap the Record button on a notebook 14
Use Quick Record 14
Use Nav Plus to begin a recording 15
Stopping Recording or Audio Playback 16
Pausing and Resuming Recording or Audio Playback 16

Pulse™ Smartpen User Guide
iv
Playing Audio 17
Controlling Audio Playback 19
Jumping Forward and Backward 19
Speed Jumping 19
Jumping to a Position 19
Changing Playback Speed 19
Setting Audio Bookmarks 20
Adding Bookmarks 20
Reviewing Bookmarks 20
Changing Playback Volume 20
About Paper Replay Sessions 21
Paperless Sessions 21
Linking Notes to Previously-Recorded Audio 22
Browsing Paper Replay Sessions 22
Deleting Paper Replay Sessions 24
Using Background Recording 26
Using Nav Plus during Paper Replay 27
Sharing your Notes 27
CHANGING PULSE SMARTPEN SETTINGS 27
Setting the Time and Date 27
Setting the Time 27
Setting the Date 27
Setting the Date Format 28
Changing Display Settings 28
Changing Display Brightness 28
Changing Display Scroll Speed 28
Changing Display Orientation 29
Changing Audio Settings 29

Pulse™ Smartpen User Guide
v
Setting Recording Quality 29
Setting Microphone Sensitivity 30
Setting Playback Latency 30
Turning On/Off the Menu Voice 30
Using the Settings Menu 31
ADDITIONAL PULSE SMARTPEN APPLICATIONS 32
Calculator 32
Basic math functions 33
Scientific Functions 34
Using Quick Commands 35
Quick Command List 35
Battery Quick Command 36
Calc Quick Command 37
Storage Quick Command 39
Audio Quick Command 40
Play Quick Command 42
Time and Date Quick Command 43
Translator Demo 44
Translator demo Word List 44
Launching Translator Demo 45
Piano 46
Launching Piano 46
Drawing Your Piano 47
Turning Off the Rhythm Track 48
Adding Sharps and Flats 49
LIVESCRIBE DESKTOP 50
LIVESCRIBE ONLINE 50
ACCESSORIES AND SUPPLIES 50

Pulse™ Smartpen User Guide
vi
3D Recording Headset 50
USB Mobile Charging Cradle 51
Stylus Option 51
PRODUCT SAFETY AND MAINTENANCE 52
Product Safety Information 52
Maintaining Your Pulse Smartpen 53
Resetting Your Pulse Smartpen 53
Cleaning Your Pulse Smartpen 54
Disposal 54
Hearing Notice 54
GETTING HELP 54
Contacting Customer Service 54
Web-based knowledgebase 55
Web-based forum 55
Response form 55
Phone 55
Returns 55
Items purchased directly from Livescribe 55
Items Purchased from A Third party 55
REGULATORY INFORMATION 56
US FCC Statement 56
Canadian, Industrie Canada ICES-003 Statement 57
CE Declaration of Conformity 57
ROHS Compliance Statement 57
UL 58
Battery Warning 58
Static Electricity, ESD, and Your Pulse Smartpen 58

Pulse™ Smartpen User Guide
vii
Description of ESD 59
ESD-susceptible equipment 59
Precautions against ESD 59
Warranty Information 60
GLOSSARY 61

Pulse™ Smartpen User Guide
Introducing the Pulse Smartpen viii
ABOUT THIS GUIDE
This guide contains detailed descriptions of the Pulse smartpen and applications that run
on it. Use this guide along with the Getting Started Guide included with your Pulse
smartpen. For information about desktop software that works with your Pulse smartpen,
see the Livescribe Desktop User Guide.
NOTE: This guide instructs you to tap on paper controls to perform certain functions.
When you see this instruction, use the ink tip of your smartpen to tap on the printed
buttons within the Getting Started Guide and the Livescribe™ Starter Notebook.

Pulse™ Smartpen User Guide
Introducing the Pulse Smartpen 1
INTRODUCING THE PULSE SMARTPEN
Congratulations on the purchase of your new Pulse smartpen. Soon you will be able to
personalize your smartpen settings, use your smartpen applications, share your notes at
Livescribe Online, and download new applications as they become available. To set up
your Pulse smartpen, follow the steps in Using Your Pulse Smartpen.
WHAT’S IN THE BOX
•Pulse smartpen
•3D Recording Headset
•USB mobile charging cradle
•Getting Started Guide
•Tips and Tricks
•Starter single-subject, college-ruled notebook
•Carry-all soft case
•Ink cartridge
WHAT IS NEW IN THIS VERSION?
Livescribe made improvements to the Pulse™ smartpen firmware to correct known
issues, improve usability and performance. For detailed information about this release,
including known issues, read the release notes located here:
http://www.livescribe.com/releasenotes.
YOUR PULSE SMARTPEN
1. Power button
2. Headset jack
3. Built-in microphone
4. Organic Light-Emitting Diode (OLED)
display
5. Built-in speaker
6. USB connector
7. Infrared camera
8. Removable ink cartridge
9. Rechargeable lithium battery (non-
removable)

Pulse™ Smartpen User Guide
Introducing the Pulse Smartpen 2
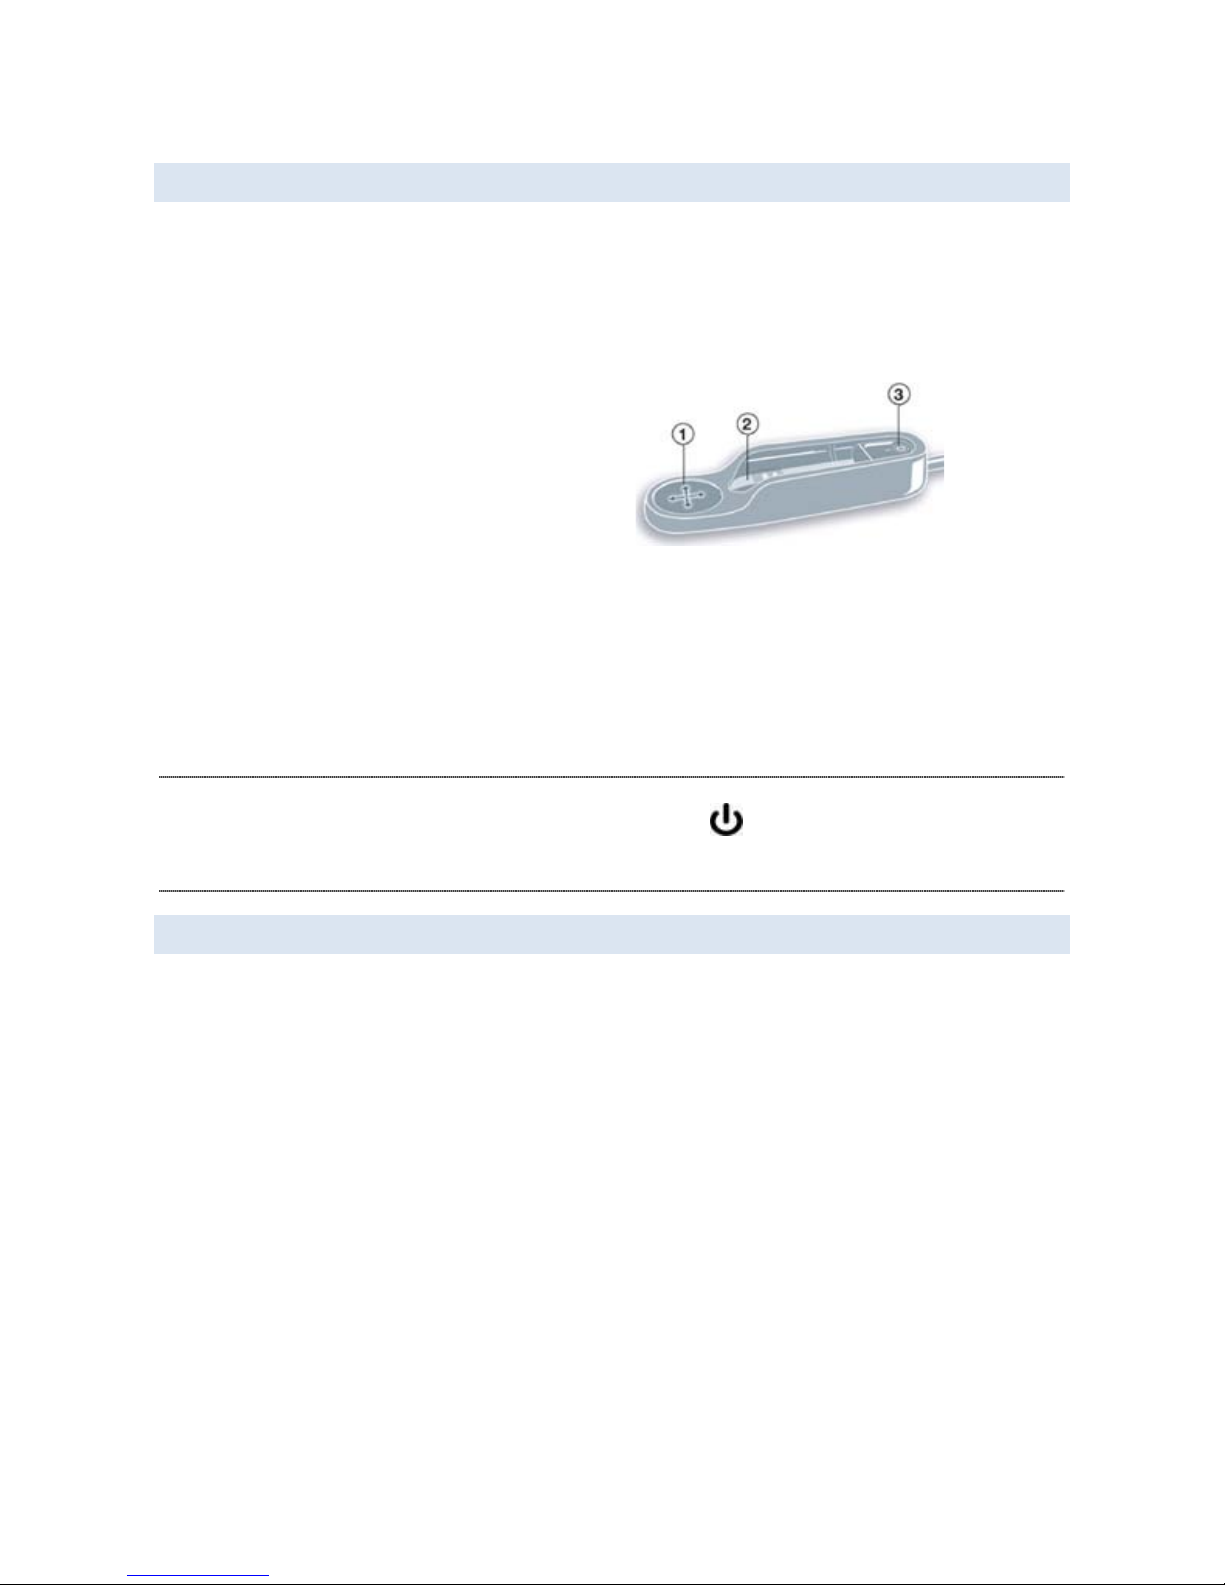
USB MOBILE CHARGING CRADLE
The Pulse smartpen USB mobile charging cradle serves several important functions.
Once you dock your smartpen into the cradle, Livescribe Desktop automatically transfers
your written and recorded data to your computer after the Livescribe Desktop
application is opened. The cradle will also allow you to charge your smartpen through
the USB port on your computer.
1. Nav Plus (navigation control) - If you
have no Livescribe™ dot paper
available, you can use this label to
navigate your smartpen menu and
applications.
2. USB connector - A magnet helps
your smartpen lock snugly into
place.
3. Ink cartridge removal ring - To
replace ink cartridges see Replacing
the Ink Cartridge.
NOTE: Make sure to use the USB Mobile charging cradle that came in the box with your
product. Smartpen models that have a power symbol printed on the power button
are only compatible with USB mobile charging cradles that have SKU: AAA-00012
printed underneath. These cradles are compatible with all Pulse smartpens.
3D RECORDING HEADSET
With your Pulse smartpen, you can record audio with either the built-in microphone or
the 3D Recording Headset. Livescribe designed the built-in microphone for monaural
recordings in smaller recording environments, such as a conference room. When
recording in larger spaces, we recommend using the 3D Recording Headset (see below),
which contains a microphone in each earbud. The dual microphones enable binaural
recordings, which accurately recreate the spatial audio environment.

Pulse™ Smartpen User Guide
Introducing the Pulse Smartpen 3
1. Left and right speakers
2. Left and right
microphones
3. Neckstrap connection
stem
NOTE: Make sure the “L” earbud is in your left ear and the “R” earbud is in your right
ear.
HOW DO BINAURAL RECORDINGS WORK?
Binaural recording is a special type of stereo recording that uses two microphones, one
placed in each ear. This type of recording provides the most accurate spatial sound
quality because the microphones effectively mimic your ears - when you play a binaural
recording back, it sounds like you are actually in the location where you recorded.
Once you record audio, you can play back the binaural effect using stereo earphones.
You can also play back the binaural effect as a regular stereo recording over any type of
headphones or speakers.
NOTE: The included 3D Recording Headset and Pulse smartpen have a custom jack,
required to enable binaural recordings. If you want to use your own 3.5mm stereo
headphone for playback, you can purchase a standard 2.5mm to 3.5mm adaptor that
will enable you to use your current headphones in conjunction with your Pulse smartpen.

Pulse™ Smartpen User Guide
About the Pulse™ Smartpen and Livescribe™ Dot Paper 4
ABOUT THE PULSE™ SMARTPEN AND LIVESCRIBE™
DOT PAPER
The Livescribe Pulse™ smartpen is an advanced paper-based computer, providing both
audio and visual feedback, powerful processing capabilities, and substantial built-in
storage. The smartpen integrates several components and technologies. It also uses
firmware and application software to support the interaction of all of its components and
to enable built-in handwriting recognition, and applications such as Paper Replay™,
among many others.
LIVESCRIBE DOT PAPER
To perform its many operations, the Pulse smartpen requires Livescribe™ dot paper.
This paper is standard paper with printed microdots on its surface. These dots are nearly
invisible to the human eye. However, the smartpen can easily see these dots and uses
them to know which page you are writing on and the exact location on that page. The
smartpen can even see these dots through the ink you write on your pages.
The microdot pattern on each page is based on technology from Anoto AB. This dot
pattern consists of small dots (100 micrometers in diameter) arranged with a spacing of
approximately 0.3 mm. The dot pattern overlays an imaginary square grid. The dots are
slightly displaced from the grid, with each dot in one of four possible positions, forming
the proprietary Anoto dot pattern.
The dot pattern identifies the specific page and locations on the page of the notes you
write. The Pulse™ smartpen uses the dot pattern in a way similar to a geographical
positioning system (GPS). But, instead of identifying locations on land, it finds locations
on paper and stores your writing as digital ink using those locations. Using this patented
dot-positioning system (DPS), the smartpen precisely tracks its own movement on
paper. As a result, anything you write – words, numbers or drawings – can be stored,
recognized, and intelligently responded to by the smartpen.
The area of the entire Anoto dot pattern is huge, and represents a piece of paper the
combined size of Europe and Asia. Livescribe dot paper is based on a portion of the
Anoto dot pattern.

Pulse™ Smartpen User Guide
Using Your Pulse Smartpen 5
HOW THE PULSE SMARTPEN WORKS
When you power on the Pulse smartpen and begin writing on Livescribe paper, the
smartpen captures and stores the notes you write. To capture your writing, the
smartpen uses its built-in infrared camera to take digital snapshots of the dot pattern as
the tip moves over the paper as you write.
When recording audio in a Paper Replay™ session, the smartpen links the recorded
audio to your notes based on the dot pattern on the page. With this information, the
smartpen can play back the audio that was recorded at the exact time you were writing
your notes. Specifically, when you tap on your notes with the smartpen, it locates the
position where you are tapping and starts to play back the audio at the position linked to
that paper location.
USING YOUR PULSE SMARTPEN
This section describes basic information about setting up and using your Pulse smartpen.
NOTE: Before writing with your smartpen, remove the protective plastic coating from
your ink cartridge tip. All new ink cartridges have this coating to prevent the ink from
drying up.

Pulse™ Smartpen User Guide
Using Your Pulse Smartpen 6
CHANGING THE DISPLAY ORIENTATION
1. Turn your smartpen on by pressing
the Power button.
2. Open the inside cover of your
notebook.
3. Under Settings, tap on the Left or
Right button to orient your display
for left- or right-handed use.
NOTE: To learn about Scroll Speed and Brightness settings see Display Settings.

Pulse™ Smartpen User Guide
Using Your Pulse Smartpen 7
SETTING TIME AND DATE
1. Turn your smartpen on by
pressing the Power button.
2. Open the inside cover of
your notebook.
3. Under Settings, tap the Set
Date button and use the
printed keypad to enter the
date.
4. Example: Tapping 061208
sets the date to Thursday,
June 12, 2008.
NOTE: To change the date format
to the international standard, see
Setting the Date Format.
5. Tap the Set Time button
and use the printed keypad
to enter the time.
6. Example: Tapping 1201PM
sets the time to 12:01PM.

Pulse™ Smartpen User Guide
Using Your Pulse Smartpen 8
NOTE: Setting the correct time and date on your Pulse smartpen is important because
files you create with your smartpen are named using the time and date they are
created.
CHARGING YOUR PULSE SMARTPEN
1. Before charging your Pulse
smartpen, download and install the
Livescribe Desktop software from
www.livescribe.com/install.
2. Plug your USB mobile charging
cradle into the USB port on your
computer.
NOTE: Make sure to use the USB Mobile
charging cradle that came in the box with
your product. Smartpen models that have a
power symbol printed on the power
button are only compatible with USB mobile
charging cradles that have SKU: AAA-00012
printed underneath. These cradles are
compatible with all Pulse smartpens.
3. Place your smartpen in your USB
mobile charging cradle.
4. A battery and lightning bolt symbol
will be displayed on your Pulse
smartpen when it is charging.
NOTE: The plug and blinking battery
indicator means the Pulse smartpen needs
to be charged.
NOTE: A full charge can take up to 2.5 hours. To determine if your Pulse smartpen is
fully charged, tap on the Battery button referred to in the Checking Status below.

Pulse™ Smartpen User Guide
Using Your Pulse Smartpen 9
CHECKING STATUS
Check the status of your Pulse smartpen using the buttons in the printed Status box
located on the inside covers of your notebook.
Tap the Time button to check the current time.
Tap the Date button to check the current date.
Tap the Battery button to see the current
battery charge. The indicator pictured
shows a full battery.
Tap the Storage button once to see amount of remaining storage in
megabytes and tap a second time to see the remaining recording time
based on the current audio quality settings.
NOTE: If you see the circled exclamation mark
indicator on the right side of the OLED, check your
available memory on your Pulse smartpen as it is
almost full.

Pulse™ Smartpen User Guide
Navigating Your Pulse Smartpen 10
NAVIGATING YOUR PULSE SMARTPEN
The Nav Plus is a paper-based 5-way navigator that enables you to navigate through the
smartpen Main Menu and application menus.
USING A PRE-PRINTED NAV PLUS
You can use any Nav Plus you see printed on any Livescribe™ dot paper product, such
as the included notebook. To use a printed Nav Plus:
1. Double-tap the center of the Nav Plus. A
double-tap is two taps in quick
succession.
NOTE: Double-tapping on the center of a Nav Plus will exit the current application or
sub-menu and take you to the Main Menu. The one exception to this rule is that if you
are recording using the Paper Replay™ application, double-tapping the center will take
you to the Main Menu but background recording will continue.
2. Main Menu will be displayed on your
Pulse smartpen.
3. Tap down on the directional arrow of the
Nav Plus to scroll through a list of
applications on your Pulse smartpen.

Pulse™ Smartpen User Guide
Navigating Your Pulse Smartpen 11
4. When the desired application name is
displayed, tap right to select that
application.
5. Tap down to scroll through the
application menu.
6. Tap right to select an item in the
application menu list.
7. Tap left to return to the previous menu.
8. To return to the Main Menu, tap a series
of lefts OR double-tap on the center of
the Nav Plus to jump to the Main Menu.

Pulse™ Smartpen User Guide
Navigating Your Pulse Smartpen 12
NOTE: Your Pulse smartpen will display small directional arrows to indicate the
directions in the menu that you can scroll through.
DRAWING A NAV PLUS
If a pre-printed Nav Plus is not easily accessible, create your own simply by drawing
one.
To draw a Nav Plus:
1. Using any Livescribe™ dot paper
product, such as the included
Starter notebook, draw intersecting
vertical and horizontal lines.
2. Promptly double-tap in the center
of the Nav Plus. This will complete
the process of creating a Nav Plus.
NOTE: Once drawn, the Nav Plus is
always accessible for future use.
3. Main Menu is displayed on your
smartpen when you have
successfully created a Nav Plus.
This manual suits for next models
1
Table of contents
Other Livescribe Computer Accessories manuals