Livid Guitar Wing User manual

www.lividinstruments.com
Quick Start Guide

Guitar Wing Quick Start Guide
Thanks for purchasing the Guitar Wing™ from Livid Instruments.
We’ve designed Guitar Wing to encourage you to experiment and
expand your creative possibilities. We can’t wait to see and hear
what you do with it!
For additional resources and instruction on using your Guitar Wing
please visit lividinstruments.com/guitarwing.
Guitar Wing™, WingFX™, and Livid Instruments™ are registered
trademarks of Livid Instruments Inc.
Designed in Austin, TX USA.
© 2014 Livid Instruments Inc., Viditar Inc., Patents Pending, All Rights Reserved

Contents
In the Box 2
Product Registration 2
Quick Start 2
Fitting your Guitar Wing 2
Swivel 3
Thickness Adapter 3
Fit 4
Safety Strap 4
Using Guitar Wing 6
Controls 6
Other Controls 7
Connections 7
Charging and Power 7
Wireless Usage 8
Pairing your Guitar Wing with the USB receiver 8
WingFX™ 8
Controls Overview 9
Using the Editor 10
MIDI Map 10
Default MIDI settings 10
Support 10
Warranty 11
Certication and Compliance 13
1

In the Box
● Guitar Wing
● USB receiver
● Charging cable
● Safety strap
● Spacer pack
● Quick start guide
Product Registration
Thank you for purchasing the Guitar Wing from Livid Instruments. We
hope this new device and concept will inspire you with new possibilities
for creative expression. Please register your device by going to
lividinstruments.com/register to make sure you get the latest updates,
news, and tips for using your Guitar Wing.
Quick Start
Although Guitar Wing is customizable, it’s very easy to use out of
the box. Just follow this Quick Start Guide and you’ll be playing in
minutes.
1. Power on the Guitar Wing using the slide switch on the side of
the device
2. Connect the wireless USB Receiver to your computer or tablet
3. Clamp the Guitar Wing on your guitar or bass and position the
safety strap
4. Check your software’s MIDI preferences or settings to choose
Guitar Wing as your USB MIDI device
5. Start using your Guitar Wing!
Fitting your Guitar Wing
The Guitar Wing is designed to t a wide variety of guitars and basses
ranging from 1.25”(30mm) to 1.75”(45mm) Some setup may be required
to get the Guitar Wing to t your exact guitar model. We have designed
2

the device to both swivel and change thickness using the space shim.
Swivel
The Guitar Wing is designed to t to the guitar with the lower arm
touching the inside curve of the guitar cut-out. In this position, you can sit
down with the guitar and the Guitar Wing will not move as it rests against
your leg. The top housing should match the angle of the horn. To adjust
the angle the Guitar Wing sits at, ip the Guitar Wing over so the controls
are face down. Where the arm is mounted to the housing, you will see
three position holes. The Guitar Wing ships in position ‘A.’ You can adjust
the mounting angle by removing the position screw and rotating the arm
to either position ‘B’ or ‘C.’ Once it’s properly positioned, replace the
position screw in the new position hole. Be careful not to over-torque the
position screw when adjusting the swivel.
Fit
Since the design of electric guitars vary from model to model, we’ve
included a spacer pack with your Guitar Wing so you can custom t
it to your guitar. There are three sizes of spacers included in with the
Guitar Wing, small, medium, and large. By default the small spacers are
attached to the Guitar Wing. The other sized spacers can be strategically
placed to the underside of the Guitar Wing for maximum playability.
3

Safety Strap
The Guitar Wing is designed to stay clamped to the guitar and move
as little as possible. To protect against damage and drops during more
active performances, there are two strap anchors and an elastic safety
strap included. It is recommended that you loop the safety strap on the
bottom anchor and leave it attached. When you place the Guitar Wing on
the guitar and have it in the correct position, stretch the safety strap over
the guitar and hook the end into the upper strap anchor. ALWAYS use the
saftey strap during the performance.
4

Using Guitar Wing
Controls
Default behaviors of Guitar Wing’s controls are described below. Use the
Guitar Wing Editor to change how different controls respond.
A. Pads - The Guitar Wing has ve pressure/velocity sensitive pads
that send MIDI Note messages and CC aftertouch messages. By
default, the smallest pad located near the horn of the controller is
used to turn the Motion Control on and off.
B. Function Buttons - The four function buttons act as on/off
switches and send note on/off messages when pressed. These
are not pressure sensitive.
C. Direction Buttons - The two directional buttons act as on/off
switches and send note on/off messages when pressed.
D. Side Buttons - The four function buttons act as on/off switches
and send note on/off messages when pressed.
5

E. Touch Fader - The long touch fader sends CC messages for
position, and note on/off messages when touched.
F. Dual Touch Fader - The dual-touch fader acts as two faders
and sends CC messages for position and note on/off messages
when touched.
Other Controls
● Accelerometer (Motion Control) - The accelerometer sends
CC messages when enabled. To use the accelerometer or
Motion Control, simply tilt the device up and down or lean
forward when enabled to send these messages. By default, the
accelerometer is enabled by toggling the fth pad at the end of
the horn of the instrument.
● Power Switch - The power switch turns the Guitar Wing on and
off. Turn the Guitar Wing off when not in use to conserve battery
life.
● Strap Anchor - Connect the safety strap to the strap anchor for
added stability when performing.
Connections
● Charging Port - The Guitar Wing is charged with a micro USB
cable and can be charged using any 5V USB charging source,
including the USB port on your computer. The Charging Port
does not act as a data transfer between the computer and the
device, it is used for charging only.
● Wireless Receiver - The USB wireless receiver send messages
back and forth to the Guitar Wing and connects to the USB port
of your computer, tablet, or non-computer MIDI host devices.
Charging and Power
The Guitar Wing is powered by a lithium ion battery and a full charge will
give you approximately eight hours of use. The Guitar Wing is charged
using a micro USB cable and can be connected to any 5V USB charging
source, such as a USB port on your computer. The Charging Port does
6

not act as a data transfer between the computer and the device, it is
used for charging only.
Wireless Usage
The Guitar Wing can only be used as a wireless device; the USB
connection is for charging only. The Guitar Wing uses its own proprietary
USB receiver to send MIDI messages back and forth to the device. This
receiver acts as a plug-and-play class-compliant MIDI device and works
with OS X, Windows, Linux, iOS (with camera connection kit) or any
USB MIDI host, without the need for drivers. Simply connect the Guitar
Wing USB receiver to your host and power up the Guitar Wing.
While the Guitar Wing uses Bluetooth as a protocol for communicating
between the device and the receiver, pairing the Guitar Wing to your
computer is not required for use.
Pairing your Guitar Wing with the USB receiver
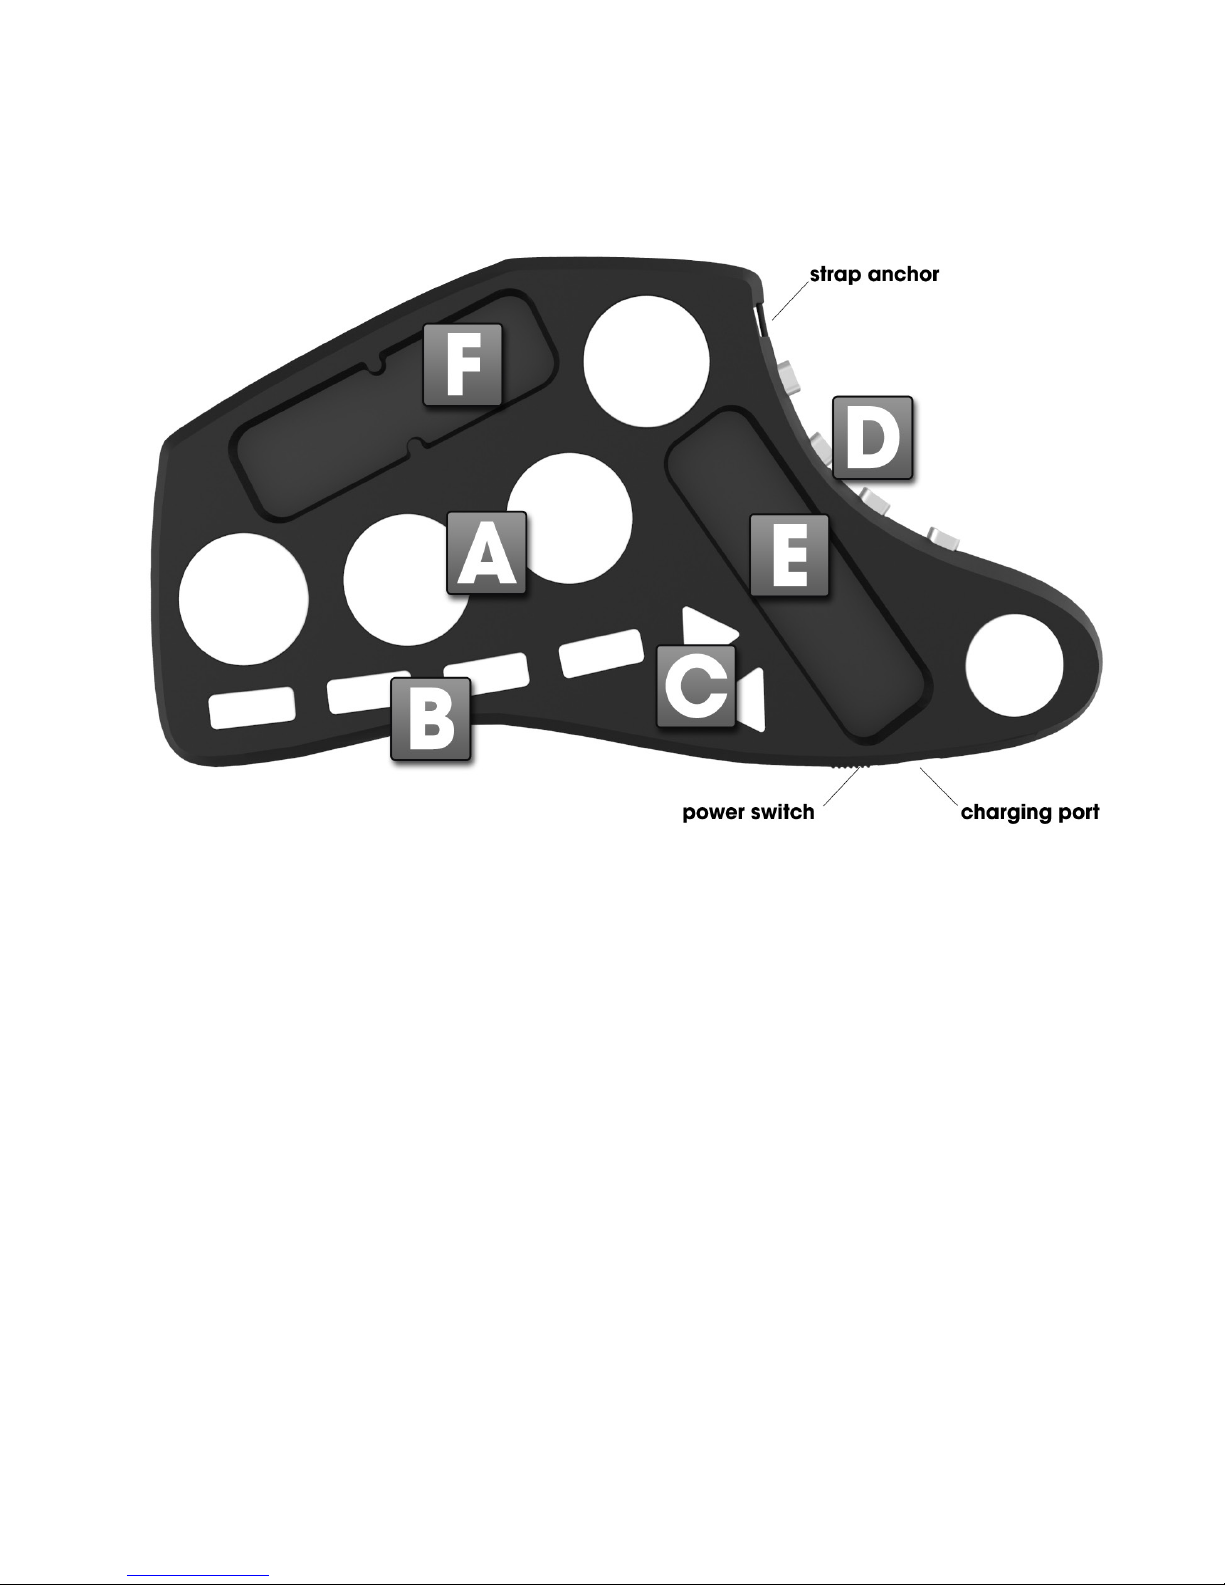
1. Power on your Guitar Wing using the power switch
2. Plug your USB receiver into your computer, tablet, or USB MIDI host
3. Wait 10 seconds and start using your Guitar Wing
WingFX™
The Guitar Wing is a class-compliant MIDI controller that can be used
with any software that supports MIDI. It can be used with a wide range
of Digital Audio Workstations (DAWs), effect or instrument plug-ins, DJ,
lighting, and video software platforms.
To help you enjoy your Guitar Wing right out of the box, we’ve created
WingFX, a software package custom-designed for your Guitar Wing.
WingFX is a cross-platform application that can be used as a standalone
software or a VST/AU in your favorite DAW or plug-in host. It offers
instant access to effects, lters, samples, and more, specically matched
to the unique controls on your Guitar Wing. WingFX is available for free
for Guitar Wing, Just visit lividinstruments.com/guitarwing
7

Controls Overview
1. LFO Hi-pass lter
2. Autochop
3. Pitch shift up 5th
4. Pitch shift up 1 octave
5. Pitch dive down
6. Pitch dive up
7. Motion control (accelerometer) enable for wah effect
8. Lo crusher
9. Sample volume down
10. Sample volume up
11. Sample slot 1
12. Sample slot 2
13. Sample slot 3
14. Sample slot 4
15. Distortion on/off
16. Reverb on/off
17. Delay on/off
18. Delay tap-tempo
8

For full instructions on how to use WingFX please visit
lividinstruments.com/guitarwing
Using the Editor
The Guitar Wing Editor allows you to edit all of the settings on the device.
You can customize the messages that the controls send, and change the
colors of all of the LEDs on the device. For more information about the
Guitar Wing Editor visit lividinstruments.com/guitarwing
MIDI Map
Default MIDI settings
Support
For additional support please visit lividinstruments.com/guitarwing
where you’ll nd downloads, tutorials, FAQ, forums, and a direct link to
9

us. We’re always excited to hear from our users and see what you are
doing with our products, so don’t be shy!
Warranty
Damage
Your Instrument should be inspected immediately upon receiving it.
If there are any damages they should be reported immediately. All of
our instruments are fully tested just prior to leaving our plant. We’re
reasonable people, if you let us know about it right away we’ll take care
of it for you.
Warranty
Livid Instruments warrants that this product is free of defects in
materials and workmanship under normal conditions for one year from
the purchase date, so long as the product is: owned by the original
purchaser; the original purchaser has proof of purchase from Livid
Instruments or an authorized dealer. Warranty does not include repairs
needed due to misuse , abuse, or abnormal normal wear and tear. If
you decide to light your guitar on re in a glorious encore with the Guitar
Wing attached, there is little chance your warranty won’t be voided.
In the event that Livid Instruments receives written notice of defects
in materials or workmanship from such an original purchaser, Livid
Instruments will either replace the product, repair the product, or refund
the purchase price at its option. In the event any repair is required,
shipment to and from Livid Instruments and a nominal handling charge
shall be born by the purchaser. In the event that repair is required,
a Return Authorization (RMA) number must be obtained from Livid
Instruments. After the RMA number is obtained, the unit should be
shipped back to Livid Instruments in a protective package with a
description of the problem and the Return Authorization (RMA) clearly
written on the package.
In the event that Livid Instruments determines that the product requires
repair because of user misuse or regular wear, it will assess a fair repair
or replacement fee. The customer will have the option to pay this fee and
have the unit repaired and returned, or not pay this fee and have the unit
returned un-repaired.
10

Outside of the US
If you purchased your unit from a dealer in your country, please contact
the dealer directly before attempting to return the unit. We have many
authorized repair locations around the world. If you are unsuccessful
contacting them please let us know and we’ll do our best to remedy the
situation.
THE REMEDY FOR BREACH OF THIS LIMITED WARRANTY SHALL
NOT INCLUDE ANY OTHER DAMAGES. LIVID INSTRUMENTS WILL
NOT BE LIABLE FOR CONSEQUENTIAL, SPECIAL, INDIRECT, OR
SIMILAR DAMAGES OR CLAIMS INCLUDING LOSS OF PROFIT
OR ANY OTHER COMMERCIAL DAMAGE, EVEN IF ITS AGENTS
HAVE BEEN ADVISED OF THE POSSIBILITY OF SUCH DAMAGES,
AND IN NO EVENT WILL LIVID INSTRUMENTS’ LIABILITY FOR
ANY DAMAGES TO THE PURCHASER OR ANY OTHER PERSON
EXCEED THE PRICE PAID FOR THE PRODUCT, REGARDLESS OF
ANY FORM OF THE CLAIM. LIVID INSTRUMENTS SPECIFICALLY
DISCLAIMS ALL OTHER WARRANTIES, EXPRESSED OR IMPLIED.
SPECIFICALLY, LIVID INSTRUMENTS MAKES NO WARRANTY THAT
THE PRODUCT IS FIT FOR ANY PARTICULAR PURPOSE.
This warranty shall be construed, interpreted, and governed by the laws
of the state of Texas. If any provision of this warranty is found void,
invalid or unenforceable, it will not affect the validity of the balance of the
warranty, which shall remain valid and enforceable according to its terms.
In the event any remedy hereunder is determined to have failed of its
essential purpose, all limitations of liability and exclusion of damages set
forth herein shall remain in full force and effect.
© Livid Instruments Inc, Viditar Inc. Austin, TX USA
11

Certication and Compliance
__________________________________________________________
U.S.
Model: Livid Guitar Wing 1
FCC ID: 2AB3B-GUITAR-WING
U.S.
Model: Livid USB Receiver 1
FCC ID: 2AB3B-RECEIVER
Canada
Model: Livid Guitar Wing 1
FCC ID: 2AB3B-GUITAR-WING
Canada
Model: Livid USB Receiver 1
FCC ID: 2AB3B-RECEIVER
E.U.
Declaration of Conformity
We Viditar, Inc. DBA Livid Instruments, 3108 Industrial Terrace, Austin,
TX 78758, USA (512) 582-7272, declare under our sole responsibility
that the product Guitar Wing V1 and Receiver V1 complies with part
15 of the FCC Rules. Operation is subject to the condition that (1) this
device does not cause harmful interference, and (2) this device must
accept any interference received, including interference that may cause
undesired operation.
Note: This equipment has been tested and found to comply with the limits
for a Class B digital device, pursuant to part 15 of the FCC Rules. These
limits are designed to provide reasonable protection against harmful
interference in a residential installation. This equipment generates, uses
and can radiate radio frequency energy and, if not installed and used in
12

13
accordance with the instructions, may cause harmful interference to radio
communications. However, there is no guarantee that interference will
not occur in a particular installation. If this equipment does cause harmful
interference to radio or television reception, which can be determined by
turning the equipment off and on, the user is encouraged to try to correct
the interference by one or more of the following measures:
• Reorient or relocate the receiving antenna.
• Increase the separation between the equipment and receiver.
• Connect the equipment into an outlet on a circuit different from that to
which the receiver is connected.
• Consult the dealer or an experienced radio/TV technician for help.
NOTE: Modications not expressly approved by Viditar, Inc. DBA Livid
Instruments could void user’s authority to operate the equipment.
Table of contents
Other Livid Recording Equipment manuals
Popular Recording Equipment manuals by other brands

CZone
CZone 80-911-0009-00 User & installation manual

Yamaha
Yamaha TX-216 Performance notes

Native Instruments
Native Instruments Maschine manual

Changzhou Xionghua Tongtai Atuomation Equipment
Changzhou Xionghua Tongtai Atuomation Equipment XHYK-10 manual

Sontay
Sontay SonNet Trend Technical guide

Altinex
Altinex YZ810-106 user guide