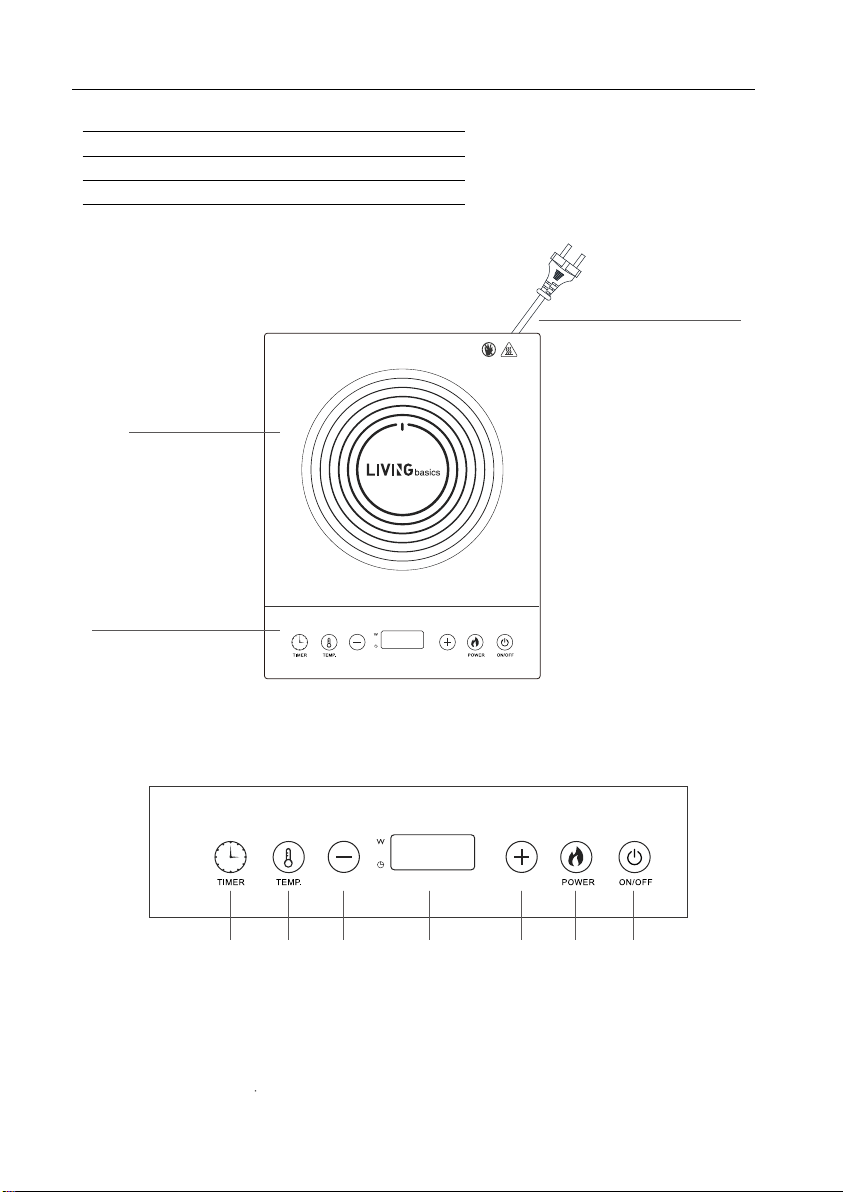
2. Product operating instructions
Insert the plug into the socket, a “Beep” will emit and all the indicators flash a time, the
indicator of [On/Off] lights up, indicating the appliance in connection with a power source,
known as standby mode.
Place a suitable cookware on the center of the cooking zone. The [On/Off] button is pressed
a time, the appliance goes to selection mode and the display shown[----]. Press the
corresponding function buttons to start operation.
Stop the operation and switch to standby mode by pressing [On/Off] button after cooking.
2.1 Cooking Mode:
Power: Press the [POWER] button and the indicator of [W] lights up, display will show [1500]
representing that the default power is 1500W. Press [+] or [-] to set the desired power, there
are 10 power levels in total (200W, 400W, 600W, 800W, 1000W, 1200W, 1400W, 1500W,
1600W, 1800W). To cancel this mode, press other function button or [On/Off] button to stop
the operation.
Temp. (°F): Press the [TEMP.] button once and the indicator of [℉] lights up, display will show [
320F] representing that the default temperature is 320℉. Press [+] or [-] to set the desired
temperature, there are 10 temperature levels in total (140℉, 176℉, 212℉, 248℉, 284℉, 320℉,
356℉, 392℉, 428℉, 464℉). To cancel this mode, press other function button or [On/Off]
button to stop the operation.
Temp. (℃): Press the [TEMP.] button again and the indicator of [℃] lights up, display will show
[ 160°] representing that the default temperature is 160℃. Press [+] or [-] to set the desired
temperature, there are 10 temperature levels in total (60℃, 80℃, 100℃, 120℃, 140℃, 160℃,
180℃, 200℃, 220℃, 240℃). To cancel this mode, press [Power/temp.] key again or [On/Off]
key to stop the operation.
2.2 Timer Function:
User can set the cooking time when the unit is working. Press the [TIMER] button once
to access the timer function, The indicator of [] will lights up. Display will flash and
show [00:00].
1.The power over 1500W(indule 1500W),the time can be adjusted from 0 minute to 1
hour.Press [+]/[-] to adjusted the time by 1 minute. Press and hold the button to quick
adjust the cooking time.
2.The power under 1500W,the time can be adjusted from 0 minute to 3 hours.Press
[+]/[-] to adjusted the time by 1 minute.Press and hold the button to quick adjust the
cooking time by 30 minutes.
After setting, user can press [TIMER] button once to confirm or wait until the display
stop flashing. After the “Beep” signal, the appliance will stop the operation and change
to standby mode automatically when the end of the countdown.
4. Maintenance and Daily Care
1. Remove the power plug prior to clean the unit. Do not clean it until the surface cools down.
2. Glass plate, panel and the shell:
- Soft cloth for slight stain.
- For greasy, dirt, blot by using a clean damp cloth with neutral detergent.
3. While the radiator-fan working, dust and dirt would remain on the gas vent, please clean it
by brush or cotton stick regularly.
4. Remember do not washing the unit by water directly to avoid damaging.
5. To protect induction cooker, be sure to have a good contact between plug and socket
before using.
6. Do not pull out the power cord directly during operation. To extend the appliance's using
life,, press the "ON/OFF" button first, then pull out the power cord.
7. In order to make operating time longer, the fan would still working for cooling the plate, is
better to plug out after the fan stops working.
8. Please pull out the power cord and put it away when not used for a long time.
9. Some models have structural design to against cockroaches, if needed, can put something
like mothball to expel the cockroaches.
Symptoms Check points Remedy
After connecting the
power and pressing
the “power” key, the
appliance has no
response.
Heating being
interrupted in normal
use and a “Beep”will be
heard.
Is the electricity in suspension?
Incompatible cookware or no
cookware is used?
Is the cookware not considerably
placed form the center of the
heating zone?
Is the cookware empty or the
temperature too high?
No operation during the
heating being in use.
Is the air intake/exhaust vent
clogged or dirt has accumulated?
E0 Internal circuit error
E1 Without cookware or
Incompatible cookware
used
E2 Internal overheat
E3 Over-voltage
E4 Under-Voltage
E5 Top plate sensor open/short
circuit
E6 IGBT sensor open
circuit/short circuit
E7 Top plate overheat
Is the cooker working over 2 hours
without any external instruction?
Please check whether the
appliance is being misused.
Remove the stu clogging the air
intake/exhaust vent. Operate the
appliance again after cooling
down.
Reset cooking modes or use timer
function.
When showing error signal
E1, E2 and E7, please check
whether the cookware is not
suitable, or switch on the
appliance again after it is
cooled down naturally. When
showing E0, E3-E6, please
contact service Centre for
checking and repairing.
Is the cookware being heated but
continually being removed?
Replace compatible cookware for
the induction cooker.
Place the cookware at the center
of the dened heating zone.
Place a cookware inside the
heating zone.
Is the fuse broken down?
Is the plug connected rmly?
Use after resuming the electricity.
Check the root causes carefully. If
the problem cannot be xed,
please contact Service Centre for
checking and repairing.
If the above remedies/controls can not fix the problem, unplug the appliance immedi-
ately, contact service Centre for inspection and repairing, note the error code and
report it to Service Centre Ltd. To avoid any danger and damage to the appliance, do
not disassemble or repair it by yourself.
5
5. Troubleshooting and Treatment
During operations, if any error occurred, please check the following table before calling for
service. Below are common errors and the checks to perform.
Error codes occur.
To cancel this function, user can either press the [On/Off] button to return to standby mode
or hold the [Timer] button to resume the desired power or temperature operation.
Both the POWER and TEMP. function can be timed.
English