Livingstone easy air ENQ-GT50 User manual

The Company reserves the rights to redesign this product in instruction
without any advanced notice
Smart Air Purifier
User Manual
easy
air.
by Livingstone
BATCH NO
ITEM NO ENQ-GT50
G11FS
Version No.: 2
Issue Date: 04/10/2023

Caution
Keeping away from water, liquids or flammable liquids to avoid risk of electric shock
or fire. Do not use water, liquids or flammable liquids to clean this purifier.
Warning
Before using the device for the first time, please ensure that the voltage indicated on
the back or bottom of the purifier matches the local voltage.
Do not use the appliance if the plug, power cord, or the appliance is damaged.
Damaged power cord must be replaced immediately by authorised person.
Service or repair must be performed by a qualified technician, in compliance with
the manufacturer’s instructions and following local safety norms.
People with physical or mental disabilities, children and in-experienced users,
are to only use the product with specific training on how to operate the appliance
given by an individual representing their security and well-being. The purifier is not
intended for use by people with physical or mental disabilities, children or
inexperienced users without appropriate supervision.
Do not clog the air inlet and outlet, for example, do not place purifier on the air outlet
or in front of the air inlet.
This purifier is not intended to be used as medical equipment.
This purifier is not a substitute for normal ventilation, daily vacuum cleaners or
kitchen ventilator.
If the power outlet is in poor contract, the device may become heated. Make sure that
the power cord is properly plugged in.
Place and use the appliance on a drys stable, flat and horizontal plane.
Leave at least 20 cm of space on the rear and sides of the appliance and at least
30 cm of space on the top of the purifier.
Thank you for choosing
Smart Air Purifier
Please read the instruction carefully before use.
Please save the instructions for future reference.
Introduction
Important Notes
This air purifier uses advanced purification technology, HEPA
technology as the working principle, with high purification
efficiency, purification speen and other significant features.
Please read the “Safety Precautions” section to ensure safety.

Do not sit or place any object on top of the purifier.
Do not place the purifier directly under the air conditioner to prevent condensate water
drip into the purifier.
Before powering on the purifier, make sure that all filters are properly installed.
Only use the original filters designed specifically for this purifier by the manufacturer.
Do not use any from other brand and other types.
Do not tap the purifier with hard objects (especially air inlet and outlet), and do not
insert fingers or other objects into the air inlet and outlet.)
Do no use this purifier while spraying insect repellents or in places filled with oily,
flammable gases or chemical fumes.
This purifier only for home use and in normal operating condition.
Do not use the purifier near gas appliances, heating units or stoves.
Always unplug the power supply before and after cleaning the purifier.
Do not use the purifier in rooms with large temperature changes, as this may cause
condensation inside the purifier.
To prevent interference, maintain a distance of at least 2 meters between the purifier
and other appliances that use radio waves, such as televisions, radios and radio
control clocks.
Do not use the purifier in wet or high temperature environments such as bathrooms,
toilets or kitchens.
This appliance does not remove carbon monoxide (CO) or helium (Rn) therefore
cannot be used as a safety purifier in the event of combustion and hazardous
chemical accidents.
* PM2.5: Refers to particulate matter, also known as fine particulate matter, with an
aerodynamic equivalent diameter of less than or equal to 2.5 microns in ambient air.
(The higher this value, the more serious the air pollution.) Inhalable particulate matter,
also known as PM10, refers to particulate matter with an aerodynamic equivalent
diameter of less than 10 microns.
* According to the World Health Organisation in 2008 Microbiological Risk
Assessment Report, the size of Avian influenza, influenza viruses, Legionella
bacteria, hepatitis B virus and SARS coronavirus are about 0.02 microns.
1. Humidification module 5. Filter Bottom Cover
2. Touch Key 6. Sensor Cover
3. Display Panel 7. Filter
4. Air Inlet 8. Remote Control
1
2
3
4
5
6
7
8
remote control
Child
Lock
Negative
Ion
Timing
Humidify
Energy
Conservation
Intelligent
Smart air purifieri
Important Notes
About PM2.5
Product Overview

2. Press the button to turn on the
purifier.
• Smart and fan speed indicators
lights on.
Note:
When the purifier is turned on, the air
quality sensor takes a short time to
detect indoor air quality.
The air quality indicator changes colour
and eventually stays on the colour
corresponding to the accurate indoor
air quality.
Air Quality Indicators
Note:
Built-in air sensing measures air quality
and automatically selects the appropriate
colour for the air quality indicator, which is
blue when the air if clean, and changes
from dark purple to red when air quality
deteriorates.
The air quality indicator turns on
automatically when the device is turned on.
1. Plug the power cord of the purifier
into the socket.
• A beep is heard and all the lights
come on at the same time. After that,
the lights will go out again.
• The air quality indicator will show the
air quality at the time.
Blue Very Well
Dark Purple Well
Purple Red Ordinary
Air quality indicator Air quality
colour
ON/OFF
Set Up Set Up
• Put the bottom cover of the filter back
and screw counterclockwise to tighten.
Installing the Filter
All filters are included inside this purifier,
but it is important to remove the packaging
of the filter before using the product.
Follow the instructions below to remove all
filters and their packaging, then place them
back in the purifier.
Note:
Ensure the filter is plugged into a
correct position.
• Screw the bottom cover clockwise to
open.
• Remove the filter from the purifier.
• Remove the packaging material from
the filter.
• Place the filter back into the purifier.

How to Use Instructions for Use
Using the smart air purifier for the first time
3. Press and hold the button to turn off the purifier.
Note:
If the purifier is unplugged, setting on the purifier are reset to smart mode.
ON/OFF
Turning the purifier on/off
SPEED
ON/OF F
ON/OF F
Technical parameters
Rated voltage: AC220V/50Hz
Power: 68W
Ip ionvolume: 30million cc
Particulate CADR: 513M3/h
Size: 320 x 320 x 660 mm
Weight: 7.05kg
Air volume: 810m/h
Applicable area: 40-60m
WIFI
SPEED
HUMID
ON/OFF
Power ON/OFF function
The purifier has the following fan speed setting:
1. Smart 2. Level 1 3. Level 2
4. Level 3 5. Level 4 6. Automatic
(Based on the sensor of feedback operating gear)
The appropriate fan speed can be selected according to the requirement.
The four lights on the control panel correspond to the setting and the
display panel also displays the setting.
The timer function can be used to set up the purifier running time.
The device will automatically shut down once the settings are met.
The display panel displays the timer settings.
1H, 4H, 8H, 12H, display time for the corresponding work time.
Controls the device’s negative ion switch function.
In models with UV light, this also controls the UV function.
Function controls the humidification settings.
Press and hold WIFI button 5 seconds to enter the set up mode.
(This is function is optional)
TIMER
Introduction the usage of control keys
WIFI
ON/OFF SPEED TIMER
3SLOCK
HUMID
UV-C
UV-C

Child lock
To set up a child lock, press and hold the buttons for 3 seconds.
The display panel shows the setting. Repeat the step to unlock the
child-lock.
Humidify Function (Purified Water)
Check the tank for liquid before turning on the Humidification function.
The purifier may be damaged if the function is turned on with sufficient liquid in the tank.
(If the influence of atomisation is poor, it needs to change the cotton swab regularly.)
1. The atomiser module is fixed in place with magnets. Gently lift it up to remove.
2. Fill the liquid tank to the marked level and replaced into the device.
3. Put the atomiser module back to the purifier, carefully to place registration mast
and groove into alignment.
Atomiser Module
Cotton Swab
Liquid Tank
Registration Mast
Instructions for Use Cleaning the Purifier
TIMER UV-C
Note:
• While shifting the purifier, make sure
that the power plug has been unplugged.
• Unplug the power cord before cleaning
the purifier.
• Do not immerse this purifier in water or
any other liquid.
• Do not clean and part of the purifier
with abrasive, corrosive or flammable
cleaners such as bleach or alcohol.
• Only pre-filters can be cleaned with water.
Cleaning the purifier
Clean the purifier inside and outside
regularly to prevent dust build-up.
1. Use a soft, dry cloth to wipe the dust
off the body.
2. Clean the air quality sensor inlet/air
outlet with a soft dry cloth.
Cleaning the air quality
sensor
Clean the air quality sensor every 2
months to ensure that the purifier is
operating at optimum performance
levels. If the purifier is used in a dusty
environment, clean it frequently.
Note:
While indoor humidity is very high,
condensate may form on the sensors
leading to poor air quality indication.
In this case, you must clean the air
quality sensor or use any manual
speed setting.
1. Use a soft brush to clean the air
quality sensor inlet or outlet.
2. Remove the protective cover of the
air quality sensor.
3. Use slightly wet cotton swabs to
clean the sensor, air inlet and outlet.
4. Dry it with a dry cotton swab.
5. Replace the protective cover of the
air quality sensor.

Filter Replacement Light
Note:
• The life of the filter depends on how much the air purifier cleans and the users
intended use.
• In environments with heavy air pollution, the life of the filter may be shorter than
recommended.
• If you remove the front panel to replace the filter when the purifier is on, all lights
will off.
• When the front panel is put back into the purifier, it starts running in its previous state.
• The replaceable filter is not washable or cleanable by the vacuum cleaner.
Note:
Place the filter in the correct position.
Make sure that the side with the pull piece faces you.
Reorder EasyAir Air Purifier Replacement Filter
Item Code: ENQ-GT50FLT
1. Turn off the purifier and unplug it.
2. Screw clockwise to remove the bottom
cover of the filter.
3. Remove the filter from the purifier.
4. Hold both side of the discarded filter
and gently place it in the trash.
Note:
Avoid to touch the surface of discarded
filters and do not smell discarded filters
containing airborne contaminants.
5. Remove the packaging material from
the filter network.
6. Put the filter in the purifier.
7. Put the bottom cover of the filter
to the right installation position,
screw counterclockwise direction
to tighten.
8. After the user replaces the filter,
restart the purifier and touch the
replacement filter key for 5 seconds.
The filter timing is zeroed and the
timing is restarted the purifier is
running normally.
Replace the Filter Replace the Filter

Turned on the humidity
function but there is no humidification.
This chapter summarises the most common problems when you use the purifier.
If you are unable to resolve the issue based on the information below,
please contact customer service centre.
Issue Possible workarounds
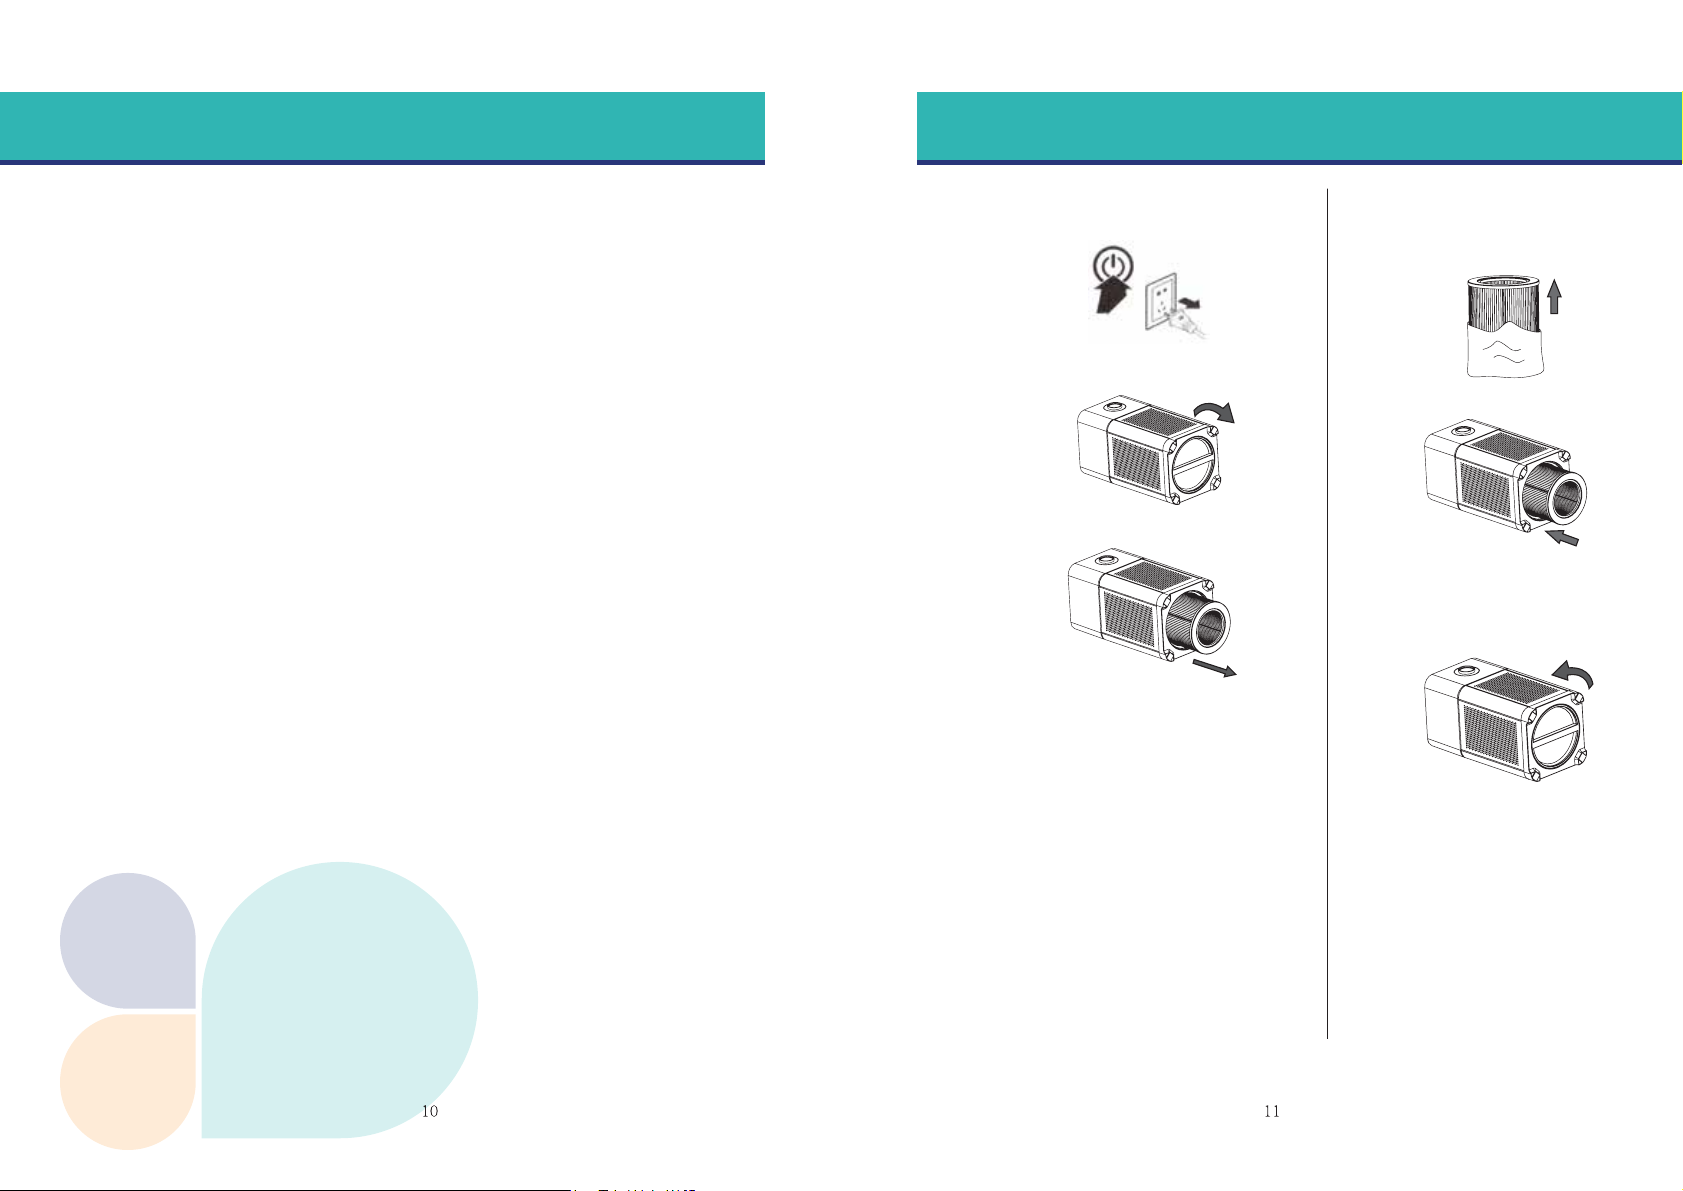
The replacement filter light on The filter is fully loaded. Replace the filter and
reset the purifier
There is no air discharge in the air outlet.
The purifier is not connected to the power supply,
Plug the purifier into the power supply and start
the purifier.
When mute mode is on, the
wind speed does not change
In mute mode, wind speed is set at a
very low level.
The air flow from the outlet is significantly
less than before
You have not removed all packaging materials
from the filter. Make sure you have removed all
the packaging materials
Even though the purifier has been running
for a long time, the air quality has not
improved significantly
The air quality sensor is wet. Indoor humidity is
too high, resulting in condensate.
Make sure that the air quality sensor is clean and
dry (please refer the Clean air Quality Sensor)
section
The colour of the air quality indicator
remains the same.
The air quality sensor becomes dirty.
Clean the air quality sensor (please refer the
Clean Air Quality Sensor) section
I am an allergy sufferer and need cleaner
and fresher air.
You can change the sensitivity of the air quality
sensor to allow the purifier to purify the air more
fully and simply.
The noise of purifier is too loud.
You have not removed all packaging materials
from the filter. Make sure you have removed all
the packaging materials.
The wind speed is too high, and you can change
the fan speed to reduce the fan speed level.
I have replaced the filter, but the purifier
still prompts you to replace the filter.
You may not press the button correctly to filter
reset.
There is not enough liquid in the tank cotton
swab does not contact well with the atomiser
Troubleshooting Warranty and Service
Electromagnetic Field (BMF)
This Purifier complies with all applicable standards and regulations regarding
exposure to electromagnetic fields.
Our main operating principle is to take all necessary health and safety measures.
We commit to the development, production and sale of products that do not pose
any hazard to human health. We ensure our products comply with all applicable
legal requirements.
Reclaim
When disposing of a product, do not dispose of it with ordinary household wastage
and return it to an official recycling centre, which is beneficial to the environment.
Contact our Livingstone After Sales Team:
Phone No.: 1300 556 556
Email: [email protected]
Table of contents