Livoo SL250 User manual

www.livoo.fr
Notice d’utilisation
User Manual / Bedienungsanleitung / Manual de instrucciones /
Manuale d'uso / Manual de instruções / Gebruiksaanwijzing
Référence : SL250
Station météo barométrique
Weather station with barometer / Wetterstation mit Barometer / Estación
meteorológica barométrica / Stazione meteo con barometro / stação de tempo com
barómetro / Weerstation met barometer
Version : v.1.5

www.livoo.fr
Schéma de l’appareil
Device diagram / Gerätediagramm / Diagrama de dispositivos / Diagrama do
dispositivo / Apparaatdiagram
Figure 1
Figure 2
Figure 3

www.livoo.fr
Merci d’avoir choisi un produit Livoo !
Votre mixer, votre barbecue, vos écouteurs ne sont pas simplement des objets, c’est une extension de
vous qui vous permet de vous rapprocher des vôtres, de les réunir, de rire et de partager.
L’ambition de Livoo est de vous aider à vivre votre vie à fond qu’elles que soient vos envies tout au long
de l’année. Hiver raclette, été barbecue. Ou l’inverse. C’est vous qui décidez. Profitez de cette liberté pour
des feel good moments au quotidien.
C’est pour cela que nous innovons sans cesse et créons des produits astucieux, plein de pep’s et surtout
accessibles.
Retrouvez l’ensemble de notre collection sur notre site www.livoo.fr
Livoo, complice de votre quotidien jusque sur les réseaux
Consigne de sécurité
Merci de lire les instructions ci-dessous avec attention avant d’utiliser l’appareil et de les conserver pour
un usage ultérieur.
Une mauvaise utilisation de l'appareil peut l'endommager ou blesser l'utilisateur. Assurez-vous que vous
utilisez l'appareil dans le but pour lequel il est conçu. Nous refusons toutes responsabilités quant aux
dégâts (aux dommages et intérêts) dus à une utilisation incorrecte ou une mauvaise manipulation.
1. Avant son utilisation, vérifiez que la tension de votre prise murale correspond aux
conditions de la tension nominale.
2. Si le câble d'alimentation est endommagé il doit être remplacé par le fabricant ou son
service après vente ou des personnes de qualification similaire afin d'éviter un danger
(*).
3. Ne jamais immerger l'appareil dans de l'eau ou tout autre liquide.
4. Débranchez la prise :
-lorsqu'un incident se produit.
-avant de nettoyer l'appareil.
-si vous n'utilisez pas l'appareil pendant longtemps.
5. N’insérez aucun objet dans l’appareil.
6. Cet appareil est réservé à un usage domestique uniquement.
(*)Personne compétente qualifiée : technicien du service après-vente du constructeur
ou de l'importateur ou toute personne qualifiée, habilitée et compétente pour effectuer
ce type de réparation.
@livoo_officiel
@Livoo
@Livoo
FR

www.livoo.fr
Caractéristiques techniques
Horloge radio-pilotée par signal DCF garantissant l’affichage de l’heure exacte et mise à jour.
Fréquence d’émission : 433,92 MHz
Calendrier perpétuel jusqu'en 2099.
Affichage de la date et du jour disponible en 7 langues (anglais, allemand, italien, français, espagnol,
néerlandais et danois).
Affichage de l'heure au format 12h ou 24h.
Alarme et rappel d'alarme automatique.
Plage de mesure de la pression atmosphérique : 600 mb/HPa à 1100 mb/HPA soit 17,72 inHg à 32,50 inHg
Unités de mesure de la pression atmosphérique : mb/HPa ou inHg
Affichage sous forme d’histogramme de la tendance de la pression atmosphérique des dernières 24
heures.
Humidité intérieure et extérieure : plage de mesure de 20% RH à 95% RH (humidité relative)
Plage de mesure de la température intérieure : de 0°C (32°F) à 50°C (122°F)
Mesure de la température extérieure : -20°C (-4°F) à 60°C (140°F)
Deux unités de température : °C ou °F.
Sonde extérieur sans fil et alerte température.
Affichage du taux d’humidité et des températures minimum et maximum enregistrés.
Portée de transmission entre la sonde extérieure et la station : 60 mètres dans un espace ouvert
Prévision météo
Chargeur USB
Alimentation :
Station météo
Batterie : 2 x AA LR6 ou chargeur DC5.0V 1.2A
Sonde extérieur
Batterie : 2 x LR03 AAA
Schéma de l’appareil
Figure 1 - Ecran LCD
A1 : Heure, calendrier, heure de
l'alarme
A2 : Phases lunaires et marrée
A3 : Pression barométrique
A4 : Histogramme indiquant la
tendance de la pression
atmosphérique durant les
dernières 24 heures
A5 : Humidité et température
intérieures
A6 : Humidité et température
extérieures
A7 : Prévisions météorologiques
Figure 2 –Arrière
B1 : Bouton “MEM”
B2 : Bouton “SNOOZE/LIGHT”
B3 : Bouton “TIME”
B4 : Bouton “ALARM”
B5 : Bouton “▲”
B6 : Bouton “▼”
B7 : Bouton “ALERT”
B8 : Bouton “ ”
B9 : commutateur “ALARM
ON/OFF”
B10 : commutateur “BACKLIGHT
HI/LO”
B11 : Prise de sortie du chargeur
USB
B12 : Prise d’alimentation secteur
B13 : Compartiment de la
batterie
Figure 3 –Sonde extérieure
C1 : Compartiment de la batterie

www.livoo.fr
Utilisation de l’appareil
Mise en service
Alimentation par pile : Ouvrez le couvercle du compartiment de la batterie. Insérez 2 piles AA en
respectant le sens de la polarité.
Alimentation secteur : branchez l’appareil avec le cordon d’alimentation fourni en utilisant
l’emplacement B12 de l’appareil (voir figure 2).
Une fois l’appareil alimenté, l'écran LCD s’allume. Vous entendrez alors un bip et la station mesurera
immédiatement la température et l'humidité intérieure (emplacement A6 figure 1), la pression
atmosphérique et la tendance de la pression atmosphérique (emplacement A3 figure 1), et affichera les
prévision météorologiques (emplacement A7 figure 1).
La température s’affiche initialement en ° C. Une brève pression sur le bouton “▲”(bouton B5 figure 2)
vous permet de basculer entre les différentes unités °C et °F.
Note : Si la mesure de la température est en dessous de la plage de mesure, la sonde affiche LL.L.. Si la
mesure de la température est au-dessus de la plage de mesure, HH.H sera affiché.
La pression atmosphérique s’affiche initialement en mB/hPa. En appuyant brièvement sur le bouton "HPA
/ INHG" (bout B8 figure 2), vous pouvez basculer entre les unités "HPA / INHG" et « inHg ».
Trois tendances de pression barométrique peuvent être affichée par la station :
La pression
atmosphérique augmente
La pression
atmosphérique est stable
La pression
atmosphérique diminue
Les prévisions météo sont calculées à partir de l'évaluation des fluctuations de la pression barométrique
et peuvent déroger aux conditions météorologiques réelles. S'il des différences existent entre les
prévisions de la station et celles du service de prévision météorologique locale, prenez l’avis de ce
dernier comme faisant autorité. Ces prévisions indiquent la fluctuation probable de la météo pour les
huit prochaines heures et non pas la météo actuelle.
La station peut afficher 6 prévisions différentes :
Ensoleillé
Partiellement
nuageux
Nuageux
Pluvieux
Fortement
pluvieux
Nuageux
La station va afficher automatiquement le niveau de confort (emplacement A6 figure 1).
Le niveau de confort intérieur est calculé en fonction de la température et de l’humidité intérieure. Il
existe 5 niveaux :
Très bon
Bon
Moyen
Dégradé
Mauvais
La station météo va afficher automatiquement la phase lunaire et l’indicateur de la marée selon la date
et l’heure paramétrée (emplacement A2 figure 1). Il y a 12 différentes phases lunaires et 3 indicateurs de
marées.

www.livoo.fr
Nouvelle
Lune
Premier
croissant
Premier
quartier
Lune
gibbeuse
croissante
Pleine
lune
Lune
gibbeuse
décroissante
Dernier
quartier
Dernier
croissant
H
M
L
Marée haute
Entre les deux marées
Marée basse
Paramétrage automatique de l’heure et de la date (Signal radio DCF)
Après sa mise en service, l'horloge procède automatiquement à la recherche d’un signal DCF. La
réception du signal DCF permet à l’appareil de recevoir et d’afficher automatiquement l'heure, la date, et
le jour de la semaine. Le changement entre l'heure d'été et d'hiver est automatique.
Pendant la recherche du signal DCF, le logo (emplacement A1 figure 1) clignote. Si la recherche
échoue, le logo disparait. Si l’appareil capte un signal DCF, le logo s’affiche en continue.
Pour relancer manuellement la procédure de recherche du signal DCF appuyez et maintenez enfoncé le
bouton «▲» pendant deux secondes.
L’appareil relance automatiquement toutes les heures la recherche d’un signal DCF jusqu’à en trouver
un. Pendant la recherche, seuls les fonctions "SNOOZE / LIGHT" et le bouton "▲" fonctionnent.
La nuit, la station se synchronise avec le signal DCF pour corriger les écarts. Si cette tentative de
synchronisation échoue, l'icône de la radio disparaît de l'écran d’affichage. Le système tentera
automatiquement une autre synchronisation lors de la prochaine heure.
Nous recommandons une distance minimale de 2,5m avec toutes les sources d'interférence, tels que les
téléviseurs ou des moniteurs d'ordinateur. La réception radio est plus faible dans des endroits avec des
murs en béton (par exemple : dans les caves et dans les bureaux). Dans de telles conditions, placez
l’appareil près d’une fenêtre.
Paramétrage manuel de l’heure et de la date
Appuyez sur le bouton "TIME " (bouton B3 figure 2) une fois pour afficher les secondes. Appuyer une
nouvelle fois pour afficher la date.
Appuyez sur le bouton "TIME" pendant 2 secondes pour entrer dans le mode paramétrage.
Dans le mode paramétrage, le paramètre en cours de réglage clignote. Utilisez les boutons “▲”et “▼”
pour modifier la valeur et sur le bouton "TIME" pour à la fois valider votre choix et passer au paramètre
suivant.
L’appareil affiche comme premier paramètre le mode 12/24 heures. Vous pouvez choisir d’afficher
l’heure au format 12h ou au format 24h.
Le second paramètre est le fuseau horaire. Vous pouvez définir un fuseau horaire dans la plage -12 à +12.
Le troisième paramètre est l’heure. Utiliser "▲" et "▼" pour régler l'heure.
Le quatrième paramètre sont les minutes. Utiliser "▲" et "▼" pour les régler.
Le cinquième paramètre est le format d’affichage de la date. Vous pouvez choisir d’afficher la date au
format Jour –Mois ou Mois –Jour.

www.livoo.fr
Le sixième paramètre est l’année. Utiliser "▲" et "▼" pour la régler.
Le septième paramètre est le mois, le huitième est la date du jour.
Le neuvième paramètre est la langue d’affichage des informations. Vous pouvez choisir parmi les
langues ci-dessous pour afficher l’abréviation du jour de la semaine : GE (allemand), EN (anglais), FR
(français), IT (italien), SP (espagnol), DU (néerlandais), DA (danois).
Appuyez sur le bouton « TIME» pour confirmer votre choix et sortir du mode paramétrage.
Après 20 secondes sans appuyer sur une touche, la station sort automatiquement du mode
paramétrage.
Réglage de l’alarme
Appuyez une fois sur la touche "ALARM" (bouton 4 figure 2) pour afficher l’heure paramétrée de l’alarme
à la place de l’affichage de la date du jour (écran A1 figure 1).
Appuyez sur la touche "ALARM" pendant 2 secondes pour entrer dans le mode paramétrage de l’alarme.
En mode paramétrage, utilisez "▲" et "▼" pour régler l'heure requise puis le bouton "ALARM" pour valider le
heures et passer au paramétrage des minutes. Utilisez "▲" et "▼" pour régler les minutes et "ALARM" pour
valider et quitter le mode paramétrage.
Pour activer l’alarme, utiliser le commutateur "ALARM" à l’arrière de la station (bouton B9 figure 2).
Si le commutateur est sur "ON", l’icône s’affiche à côté de l’affichage de la date du jour (écran A1
figure 1) et l’alarme est activée. Si le commutateur est sur "OFF", l’icône ne s’affiche pas et l’alarme est
désactivée.
L'alarme sonne pendant 2 minutes à moins que vous ne la désactiviez en appuyant sur n’importe quel
bouton. Si l’alarme est désactivée, elle sera répétée automatiquement uniquement après 24 heures.
Si vous appuyez sur le bouton « SNOOZE/LIGHT » (bouton B2 figure 2) pendant que l’alarme sonne, elle ne
sera pas désactivée. Elle se déclenchera 5 minutes après que vous aurez pressé ce bouton.
L’alarme sonne de plus en plus fort pendant les 2 minutes et change de volume 4 fois.
Sonde extérieure
Pour mettre en marche la sonde extérieure, insérez 2 piles AA en respectant le sens de la polarité (figure
3). Lorsque vous insérez les piles, une brève lumière rouge apparait indiquant la mise sous tension de la
sonde. La sonde transmet automatiquement les informations à la station météo.
Appuyez brièvement sur le bouton "▼" pour sélectionner un canal de communication. La station météo
dispose de 3 canaux (de 1 à 3). La sonde incluse avec l’appareil transmet la température, l’humidité et la
tendance de la pression atmosphérique de son environnement sur le canal 1 de la station.
Si la station ne parvient pas à capter les informations transmises par la sonde extérieure, la station
affiche comme valeurs ‘--‘.
Pour relancer la connexion entre la station et la sonde, maintenez le bouton "▼" enfoncé pendant 3
secondes.

www.livoo.fr
Maximum et minimum
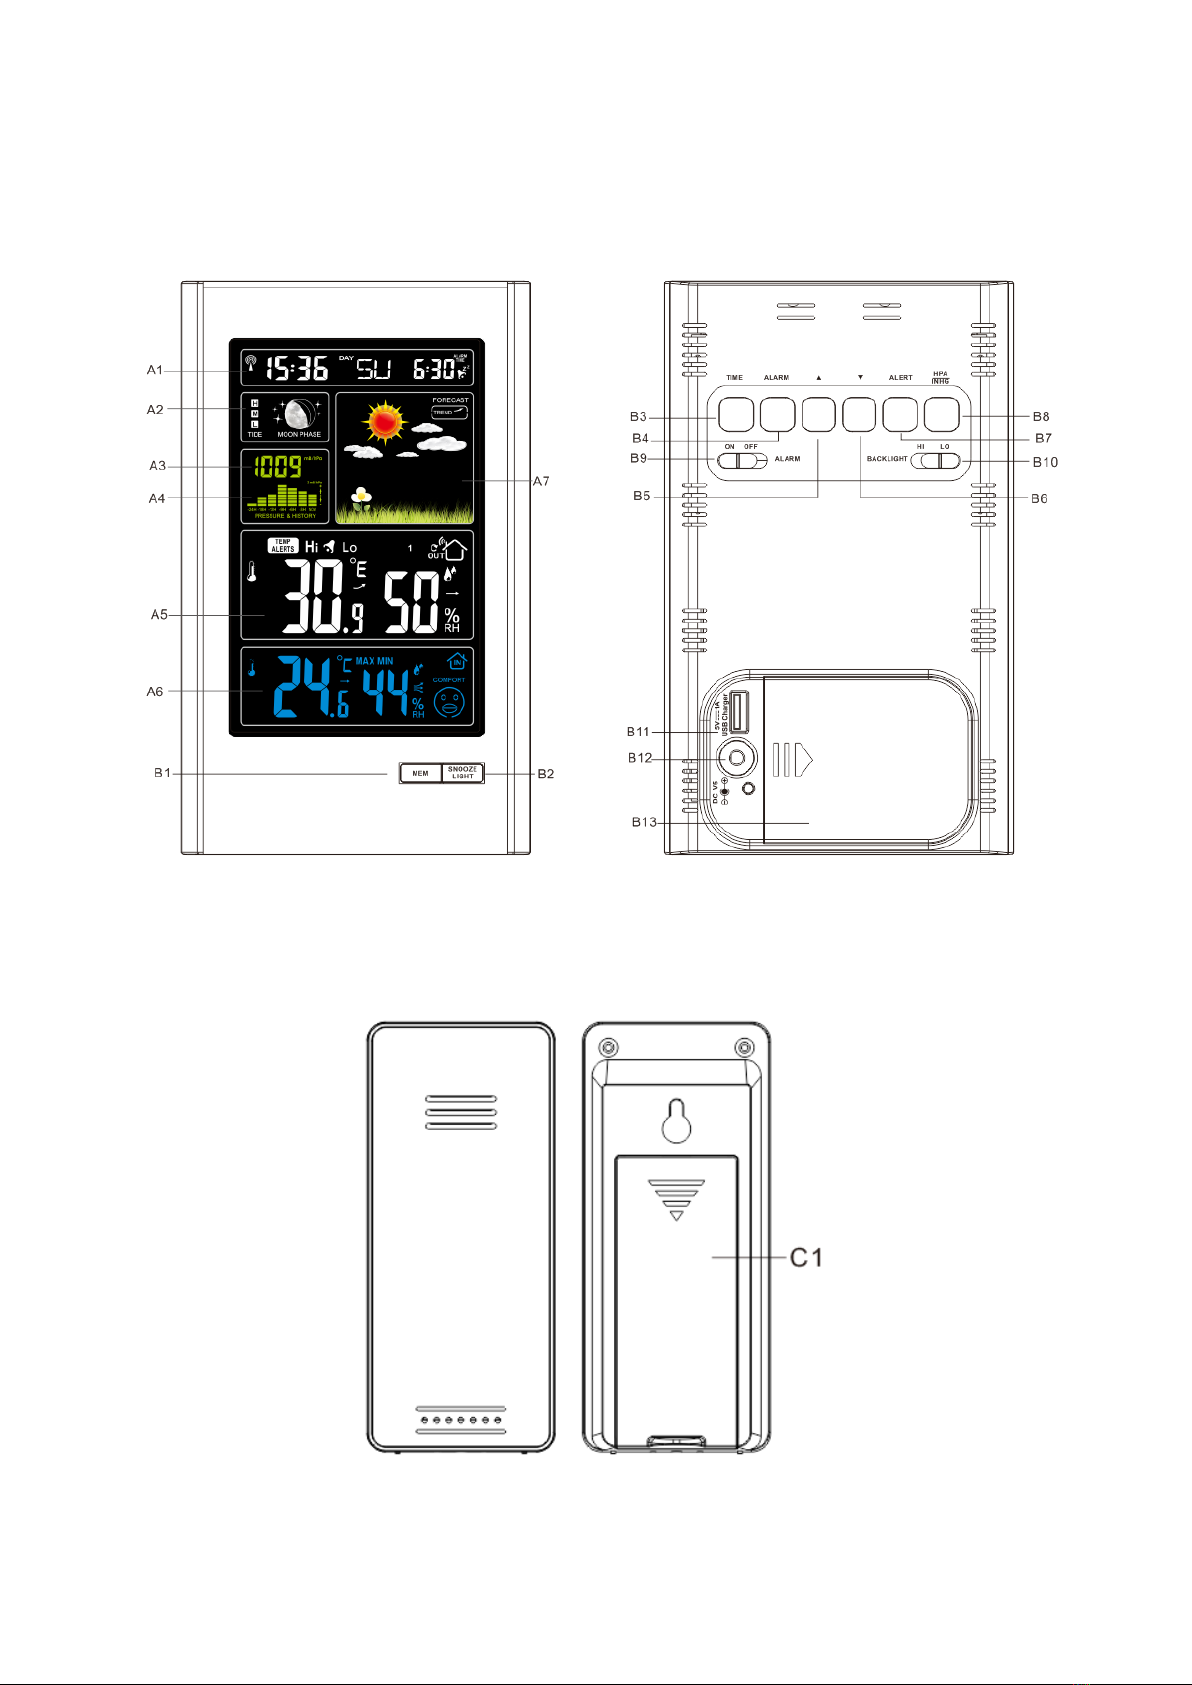
En appuyant sur la touche “MEM” (bouton B1 figure 2), l’appareil affichera la température et l’humidité
maximum détecté par votre station depuis sa dernière mise en marche, à la fois celles capté par la
station et celle captée par la sonde via le canal 1.
En appuyant à nouveau sur le bouton “MEM”, la station affichera les valeurs minium.
L’affichage est symbolisé par l’apparition du logo « MAX » ou « MIN » sur les écrans A5 et A6.
Pour réinitialiser les valeurs maximales et minimales enregistrées, appuyez et maintenez enfoncé le
bouton "MEM" environ 2 secondes.
Alerte de température extérieure
Appuyez brièvement sur le bouton « ALERT» pour activer la fonction « alerte température ».
Si l'alerte est activée, le symbole « TEMP ALERTS » apparaît à côté de la température extérieure (écran A5
figure 1). Le signal d'alarme retentit lorsque la température extérieure passe sous la température
minimale d’alerte définie ou passe au-delà de la température maximale d’alerte définie.
Pour définir les températures maximales et minimales d’alerte, appuyez et maintenez enfoncé le bouton
« ALERT» pendant 2 secondes. La température extérieure clignote et deux icônes apparaissent « Hi » et
« Lo » (écran A5 figure 1). Lorsque l’icône « Hi » clignote, vous pouvez définir la température maximale
d’alerte. En pressant brièvement le bouton « ALERT», vous pouvez paramétrer ensuite la température
minimale d’alerte. L’icône « Lo » clignote quand vous pouvez définir cette température.
Vous pouvez définir des températures maximales et minimales d’alerte pour chacun des 3 canaux que
possède la station. Sélectionnez en premier lieu le canal que vous voulez paramétrer avant de régler les
températures maximales et minimales d’alerte (voir chapitre sonde extérieur).
Éclairage
Lorsque vous alimentez la station avec des piles, appuyez sur le bouton « SNOOZE / LIGHT » pour activer
le rétro-éclairage pendant 15 secondes. Passé cette durée, l’appareil se remet en mode de conservation
de l’énergie.
Si vous alimentez l’appareil avec le cordon d’alimentation, l’appareil ne bascule pas en mode de
conservation de l’énergie. L’éclairage reste toujours le même.
Le commutateur « BACKLIGHT » (bouton B10 figure 2) à l’arrière de l’appareil vous permet de choisir entre
deux modes d’éclairage de l’écran : « HI » pour un éclairage puissant, « LO » pour un éclairage doux.
Chargeur USB
L’emplacement USB produit un courant continu de charge d’alimentation. Vous pouvez connectez dans
cette emplacement un câble de chargement USB pour recharger vos appareils mobiles (non inclus).
Nettoyage et entretien
Nettoyez la station et la sonde extérieur à l’aide d’un chiffon légèrement humide et non cotonneux.
N’utilisez aucun détergent ni aucun savon pour nettoyez ces appareils.
Si vous n’utilisez pas l’appareil, débranchez-le ou retirer les piles.
N’utilisez pas simultanément une alimentation par pile et par secteur.
En cas de mal fonction, contacter notre service après vente en suivant les informations de contact de
notre site internet livoo.fr

www.livoo.fr
Mise au rebut correcte de l'appareil (Equipement électrique et électronique).
(Applicable dans l'Union européenne et dans les autres pays d'Europe qui ont adopté des systèmes de
collecte séparés). La directive Européenne 2012/19/EU sur les Déchets des Equipements Electriques et
Electroniques (DEEE), exige que les appareils ménagers usagés ne soient pas jetés dans le flux normal des
déchets ménagers. Les appareils usagés doivent être collectés séparément afin d'optimiser le taux de
récupération et le recyclage des matériaux qui les composent et réduire l'impact sur la santé humaine et
l'environnement. Le symbole de la poubelle barrée est apposé sur tous les produits pour rappeler les
obligations de la collecte séparée. Les consommateurs devront contacter les autorités locales ou leur
revendeur concernant la démarche à suivre pour l'enlèvement de leur appareil.

www.livoo.fr
Thank you for choosing a Livoo product!
Your blender, your barbecue, and your headphones are not just objects, they are extensions of yourself,
allowing you to get closer to your friends and family, to bring them together, to laugh and to share
experiences. Livoo's aim is to help you live your life to the fullest, whatever wishes you have throughout the
year. Winter raclette, summer barbecue. Or the other way around. It's up to you. Take advantage of this
freedom for feel good moments every day.
That's why we're constantly innovating and creating clever products full of zest, but most of all, accessible.
Find our entire collection on our website www.livoo.en.
Livoo, your daily companion till social networks
Safety Instructions
Please, take time to read well the instruction sheet before the first use and keep them for a future use.
A misuse of the appliance can damage it or hurt the user. Assure that you use the appliance for the use
for which it is designed. We refuse any responsibilities as for the damages by an incorrect use or a bad
manipulation.
1. Before use, check that the voltage of your wall outlet meets the requirements of
the voltage rating.
2. If the power cable is damaged, it should be replaced by the manufacturer or its
service center or similarly qualified persons to avoid danger (*).
3. Never immerse the device in water or any other liquid.
4. Unplug the unit :
- when an incident occurs.
- before cleaning the unit.
- if you are not going to use the product for a long time.
5. Do not insert any objects into the unit.
6. This appliance is intended for home use only.
(*)Qualified service technician: service technician of the manufacturer or importer or
any other person qualified, authorized and competent to carry out this type of repair.
Technical Specifications
Radio-controlled clock with DCF signal guaranteeing the display of the exact and updated time.
Transmission frequency: 433.92 MHz
Perpetual calendar until 2099.
Date and day display available in 7 languages (English, German, Italian, French, Spanish, Dutch and
Danish).
Time display in 12h or 24h format.
@livoo_officiel
@Livoo
@Livoo
EN

www.livoo.fr
Automatic alarm and snooze.
Atmospheric pressure measurement range: 600 mb/HPa to 1100 mb/HPA or 17.72 inHg to 32.50 inHg
Air pressure measurement units: mb/HPa or inHg
Histogram display of the air pressure trend for the last 24 hours.
Indoor and outdoor humidity: measuring range from 20% RH to 95% RH (relative humidity)
Indoor temperature measurement range: 0°C (32°F) to 50°C (122°F)
Outdoor temperature measurement: -20°C (-4°F) to 60°C (140°F)
Two temperature units: °C or °F.
Wireless outdoor sensor and temperature alert.
Display of humidity level and minimum and maximum temperatures recorded.
Transmission range between the outdoor sensor and the station: 60 meters in open space
Weather forecasting
USB charger
Power :
Meteo station
Battery : 2 x AA LR6 or charger DC5.0V 1.2A
Outdoor sensor
Battery : 2 x LR03 AAA
Drawing of the device
Figure 1 - LCD Screen
A1: Time, calendar, alarm time
A2: Moon phase and tide
A3: Barometric pressure
A4: Histogram showing air
pressure trend over the last 24
hours
A5 : Indoor humidity and
temperature
A6: Outdoor humidity and
temperature
A7 : Weather forecast
Figure 2 - Rear
B1 : "MEM" button
B2 : "SNOOZE/LIGHT" button
B3 : "TIME" button
B4 : "ALARM" button
B5 : "▲" button
B6: "▼" button
B7: "ALERT" button
B8: " " button
B9: "ALARM ON/OFF" switch
B10: "BACKLIGHT HI/LO" switch
B11 : USB charger output socket
B12 : Power supply socket
B13 : Battery compartment
Figure 3 –Outdoor sensor
C1 : Battery compartment
Use of the device
Getting started
Battery power: Open the battery compartment cover. Insert 2 AA batteries, observing the correct polarity.
Power supply: Connect the unit with the supplied power cord using slot B12 on the unit (see figure 2).
Once the unit is powered, the LCD screen will light up. You will hear a beep and the station will
immediately measure the indoor temperature and humidity (slot A6 figure 1), air pressure and air
pressure trend (slot A3 figure 1), and display the weather forecast (slot A7 figure 1).
The temperature is initially displayed in ° C. A quick press of the "▲" button (button B5 figure 2) allows
you to toggle between the different °C and °F units.

www.livoo.fr
Note: If the temperature measurement is below the measuring range, the probe displays LL.L. If the
temperature measurement is above the measuring range, HH.H will be displayed.
The air pressure is initially displayed in mB/hPa. By briefly pressing the "HPA / INHG" button (tip B8 figure
2), you can toggle between the units "HPA / INHG" and "inHg".
Three barometric pressure trends can be displayed by the station:
The atmospheric pressure
increases
The atmospheric pressure
is stable
The atmospheric pressure
decreases
Weather forecasts are calculated from the evaluation of barometric pressure fluctuations and may
deviate from actual weather conditions. If there are differences between the station forecast and the
local weather forecast service, take the latter's advice as authoritative. These forecasts indicate the likely
fluctuation of the weather for the next eight hours, not the actual weather.
The station can display 6 different forecasts:
Sunny
Partly cloudy
Cloudy
Rainy
Very rainy
Cloudy
The station will automatically display the comfort level (location A6 figure 1).
The indoor comfort level is calculated according to the indoor temperature and humidity. There are 5
levels:
Very good
Good
Fair
Poor
Bad
The weather station will automatically display the moon phase and the tide indicator according to the
set date and time (location A2 figure 1). There are 12 different moon phases and 3 tide indicators.
New
moon
First crescent
First
quarter
Waxing
Gibbous
Moon
Full
moon
Waning
Gibbous
Moon
Last
quarter
Last
crescent
H
M
L
Hogh tide
Between the two tides
Low tide
Automatic setting of time and date (DCF radio signal)

www.livoo.fr
After being switched on, the clock automatically searches for a DCF signal. When the DCF signal is
received, the unit automatically receives and displays the time, date and day of the week. The unit
automatically switches between daylight savings time and winter time.
While the unit is searching for the DCF signal, the logo (location A1 in figure 1) flashes. If the search is
unsuccessful, the logo disappears. If the unit detects a DCF signal, the logo is displayed continuously.
To manually restart the DCF signal search procedure, press and hold the "▲" button for two seconds.
The unit automatically resumes the search for a DCF signal every hour until one is found. During the
search, only the "SNOOZE / LIGHT" function and the "▲" button operate.
At night, the station synchronizes with the DCF signal to correct any discrepancies. If this synchronization
attempt fails, the radio's icon disappears from the display screen. The system will automatically attempt
another sync at the next hour.
We recommend a minimum distance of 2.5m from all sources of interference, such as TVs or computer
monitors. Radio reception is weaker in places with concrete walls (e.g. in cellars and offices). In such
conditions, place the unit near a window.
Manual time and date setting
Press the "TIME" button (button B3 figure 2) once to display the seconds. Press it again to display the
date.
Press the "TIME" button for 2 seconds to enter the setting mode.
In the parameter setting mode, the parameter being set will flash. Use the "▲" and "▼" buttons to change
the value and the "TIME" button to both confirm your choice and move to the next parameter.
The device displays the 12/24 hour mode as the first parameter. You can choose to display the time in
12-hour or 24-hour format.
The second parameter is the time zone. You can set a time zone in the range -12 to +12.
The third parameter is the time. Use "▲" and "▼" to set the time.
The fourth parameter is the minutes. Use "▲" and "▼" to set them.
The fifth parameter is the date display format. You can choose to display the date in Day - Month or
Month - Day format.
The sixth parameter is the year. Use "▲" and "▼" to set it.
The seventh parameter is the month, the eighth is the current date.
The ninth parameter is the language of information display. You can choose from the languages below
to display the abbreviation of the day of the week: GE (German), EN (English), FR (French), IT (Italian), SP
(Spanish), DU (Dutch), DA (Danish).
Press the " TIME" button to confirm your choice and exit the setting mode.
After 20 seconds without pressing any button, the station will automatically exit the setup mode.
Setting the alarm
Press the "ALARM" button (button 4, figure 2) once to display the alarm setting time instead of the current
date display (screen A1, figure 1).

www.livoo.fr
Press the "ALARM" button for 2 seconds to enter the alarm setting mode. In the setting mode, use "▲" and
"▼" to set the required time and then the "ALARM" button to confirm the time and move to the minute
setting. Use "▲" and "▼" to set the minutes and "ALARM" to validate and exit the setting mode.
To activate the alarm, use the "ALARM" switch on the back of the station (button B9 figure 2).
If the switch is set to "ON", the icon appears next to the current date display (screen A1 figure 1) and the
alarm is activated. If the switch is set to "OFF", the icon will not appear and the alarm will be disabled.
The alarm sounds for 2 minutes unless you turn it off by pressing any button. If the alarm is turned off, it
will only automatically repeat after 24 hours.
If you press the "SNOOZE/LIGHT" button (button B2, Figure 2) while the alarm is sounding, it will not be
disabled. It will go off 5 minutes after you press this button.
The alarm will sound louder and louder during the 2 minutes and change its volume 4 times.
Outdoor sensor
To power up the outdoor sensor, insert 2 AA batteries, observing the correct polarity (Figure 3). When you
insert the batteries, a brief red light will appear indicating that the sensor is powered on. The sensor will
automatically transmit the information to the weather station.
Briefly press the "▼" button to select a communication channel. The weather station has 3 channels
(from 1 to 3). The sensor included with the unit transmits the temperature, humidity and air pressure
trend of its surroundings on channel 1 of the station.
If the station is unable to receive the information transmitted by the outdoor probe, the station displays
'--' as the value.
To restart the connection between the station and the probe, hold down the "▼" button for 3 seconds.
Maximum and minimum
By pressing the "MEM" button (button B1 in Fig. 2), the instrument will display the maximum temperature
and humidity detected by your station since it was last switched on, both those detected by the station
and those detected by the probe via channel 1.
Pressing the "MEM" button again will cause the station to display the minimum values.
The display is symbolized by the appearance of the "MAX" or "MIN" logo on screens A5 and A6.
To reset the stored maximum and minimum values, press and hold the MEM button for about 2 seconds.
Outdoor Temperature Alert
Briefly press the ALERT button to activate the temperature alert function.
If the alert is activated, the "TEMP ALERTS" symbol will appear next to the outdoor temperature (screen A5
figure 1). The alarm signal will sound when the outdoor temperature falls below the set minimum alert
temperature or rises above the set maximum alert temperature.
To set the maximum and minimum alert temperatures, press and hold the ALERT button for 2 seconds.
The outdoor temperature will flash and two icons will appear "Hi" and "Lo" (screen A5 figure 1). When the
"Hi" icon is flashing, you can set the maximum alert temperature. By briefly pressing the "ALERT" button,

www.livoo.fr
you can then set the minimum alert temperature. The "Lo" icon flashes when you can set this
temperature.
You can set maximum and minimum alert temperatures for each of the 3 channels that the station has.
First select the channel you want to set before setting the maximum and minimum alert temperatures
(see outdoor sensor section).
Lighting
When you power the station with batteries, press the " SNOOZE / LIGHT " button to activate the backlight
for 15 seconds. After this time, the unit will revert to power conservation mode.
If you power the unit with the power cord, the unit will not switch to power conservation mode. The
lighting always remains the same.
The "BACKLIGHT" switch (button B10 figure 2) on the back of the unit allows you to choose between two
screen illumination modes: "HI" for strong illumination, "LO" for soft illumination.
USB charger
The USB slot produces a continuous power charge. You can connect a USB charging cable to this slot to
charge your mobile devices (not included).
Cleaning and maintenance
Clean the station and outdoor sensor with a slightly damp, non-cottony cloth. Do not use detergents or
soap to clean these units.
If you are not using the unit, unplug it or remove the batteries.
Do not use both battery and AC power simultaneously.
In case of malfunction, contact our service department by following the contact information on our
website livoo.fr

www.livoo.fr
Correct disposal of the unit (Electrical and Electronic Equipment).
(Applicable in the European Union and the rest of Europe that have adopted separate collection systems
countries). The European Directive 2012/19/EU on Waste Electrical and Electronic Equipment (WEEE), requires
that old household electrical appliances must not be disposed of in the normal household waste stream. Old
appliances must be collected separately in order to optimize the recovery and recycling of the materials they
contain and reduce the impact on human health and the environment. The symbol of the crossed out dustbin
is marked on all products to remind the obligations of separate collection. Consumers should contact their
local authority or retailer for information concerning the correct disposal of their product.
•Non contractual illustration
•Product information is subject to change without prior notice.

www.livoo.fr
----------------------------------------------------------------------------------------------
Danke, dass du dich für ein Livoo-Produkt entschieden
hast!
Ihr Mixer, Ihr Grill, Ihre Kopfhörer sind nicht einfach nur Gegenstände, sie sind eine Erweiterung Ihrer selbst,
die es Ihnen ermöglicht, Ihren Mitmenschen näher zu kommen, sie zu treffen, mit ihnen zu lachen und
sich mit ihnen zu unterhalten. Livoo will Ihnen dabei helfen, ihr Leben in vollen Zügen zu genießen, egal zu
welcher Jahreszeit. Winter Raclette, Sommer Grillen. Oder umgekehrt. Sie entscheiden. Nutzen Sie diese
Freiheit für Feel Good-Momente im Alltag. Aus diesem Grund sind wir ständig innovativ und schaffen
Produkte, die clever, peppig und vor allem erschwinglich sind.
Unser gesamtes Sortiment findest du auf unserer Webseite www.livoo.fr.
Livoo, Ihr täglicher Begleiter in den sozialen Netzwerken!
Sicherheitshinweise
Bitte nehmen Sie sich die Zeit, die Gebrauchsanweisung vor dem ersten Gebrauch gut zu lesen und
bewahren Sie sie für einen späteren Gebrauch auf. Eine Fehlbedienung des Gerätes oder ein
unsachgemäßer Gebrauch kann Schaden anfügen oder den Benützer verletzen. Vergewissern Sie sich,
dass Sie das Gerät für den vorhergesehenen Zweck benützen; wir lehnen jede Verantwortung für
Schäden durch unsachgemäßen Gebrauch oder schlechte Handhabung ab.
1. Vergewissern Sie sich vor dem Gebrauch, dass die Spannung Ihrer
Wandsteckdose den Bedingungen der Nennspannung entspricht.
2. Wenn das Netzkabel beschädigt ist, muss es vom Hersteller oder seinem
Kundendienst oder ähnlich qualifizierten Personen ausgetauscht werden, um eine
Gefahr zu vermeiden (*).
3. Tauchen Sie das Gerät niemals in Wasser oder andere Flüssigkeiten ein.
4. Ziehen Sie den Stecker aus der Steckdose :
- wenn ein Zwischenfall auftritt.
- bevor Sie das Gerät reinigen.
- wenn Sie das Gerät längere Zeit nicht benutzen.
5. Führen Sie keine Gegenstände in das Gerät ein.
6. Dieses Gerät ist nur für den Gebrauch im Haushalt bestimmt.
(*)Qualifizierte Fachkraft: Ein Kundendiensttechniker des Herstellers oder Importeurs
oder eine andere Person, die qualifiziert, befugt und kompetent ist, diese Art von
Reparaturen durchzuführen.
@livoo_officiel
@Livoo
@Livoo
DE

www.livoo.fr
Technische Spezifikationen
Funkuhr mit DCF-Signal, das die Anzeige der genauen und aktualisierten Uhrzeit garantiert.
Sendefrequenz: 433,92 MHz.
Ewiger Kalender bis 2099.
Anzeige von Datum und Wochentag in 7 Sprachen verfügbar (Englisch, Deutsch, Italienisch, Französisch,
Spanisch, Niederländisch und Dänisch).
Anzeige der Uhrzeit im 12- oder 24-Stunden-Format.
Automatischer Alarm und Alarmwiederholung.
Messbereich für den Luftdruck: 600 mb/HPa bis 1100 mb/HPA oder 17,72 inHg bis 32,50 inHg.
Maßeinheiten für den Luftdruck: mb/HPa oder inHg.
Anzeige des Luftdrucktrends der letzten 24 Stunden in Form eines Histogramms.
Luftfeuchtigkeit innen und außen: Messbereich von 20% RH bis 95% RH (relative Luftfeuchtigkeit).
Messbereich der Innentemperatur: von 0°C (32°F) bis 50°C (122°F).
Messbereich für die Außentemperatur: -20°C (-4°F) bis 60°C (140°F).
Zwei Temperatureinheiten: °C oder °F.
Drahtlose Außensonde und Temperaturwarnung.
Anzeige der gespeicherten Luftfeuchtigkeit sowie der minimalen und maximalen Temperatur.
Übertragungsreichweite zwischen Außenfühler und Station: 60 Meter in einem offenen Raum.
Wettervorhersage
USB-Ladegerät
Stromversorgung :
Wetterstation
Batterie: 2 x AA LR6 oder Ladegerät DC5.0V 1.2A
Sonde für den Außenbereich
Batterie: 2 x LR03 AAA
Zeichnung des Gerätes
Abbildung 1 - LCD-Bildschirm
A1: Uhrzeit, Kalender, Weckzeit.
A2: Mondphasen und Gezeiten
A3: Barometrischer Luftdruck
A4: Histogramm, das den Trend
des Luftdrucks in den letzten 24
Stunden anzeigt.
A5: Luftfeuchtigkeit und
Temperatur innen
A6: Luftfeuchtigkeit und
Temperatur außen.
A7: Wettervorhersage
Abbildung 2 - Rückseite
B1: Taste "MEM".
B2 : Taste "SNOOZE/LIGHT".
B3 : Taste "TIME".
B4 : Taste "ALARM".
B5 : Schaltfläche "▲".
B6 : Schaltfläche "▼"
B7: Schaltfläche "ALERT".
B8 : Schalter " "
B9: Schalter "ALARM ON/OFF".
B10: Schalter "BACKLIGHT HI/LO".
B11: Ausgangsbuchse für das
USB-Ladegerät.
B12: Buchse für das Netzteil
B13: Batteriefach
Abbildung 3 - Externer Sensor
C1: Batteriefach
DE

www.livoo.fr
Verwendung des Gerätes
Inbetriebnahme
Batteriebetrieb: Öffnen Sie den Deckel des Batteriefachs. Legen Sie 2 AA-Batterien ein und achten Sie
dabei auf die richtige Polarität.
Netzstromversorgung: Schließen Sie das Gerät mit dem mitgelieferten Netzkabel über den Steckplatz B12
am Gerät an (siehe Abbildung 2).
Sobald das Gerät mit Strom versorgt wird, leuchtet der LCD-Bildschirm auf. Sie hören dann einen Piepton
und die Station misst sofort die Innentemperatur und Luftfeuchtigkeit (Standort A6, Abbildung 1), den
Luftdruck und den Luftdrucktrend (Standort A3, Abbildung 1) und zeigt die Wettervorhersage an (Standort
A7, Abbildung 1).
Die Temperatur wird zunächst in ° C angezeigt. Durch kurzes Drücken der Taste "▲" (Taste B5 Abbildung
2) können Sie zwischen den verschiedenen Einheiten °C und °F umschalten.
Hinweis: Wenn die Temperaturmessung unterhalb des Messbereichs liegt, zeigt die Sonde LL.L. an. Wenn
die Temperaturmessung über dem Messbereich liegt, wird HH.H angezeigt.
Der Luftdruck wird anfangs in mB/hPa angezeigt. Durch kurzes Drücken der Taste "HPA / INHG" (Ende B8
Abbildung 2) können Sie zwischen den Einheiten "HPA / INHG" und "inHg" umschalten.
Die Station kann drei Luftdrucktrends anzeigen:
Der Luftdruck steigt
Der Luftdruck ist stabil
Der Luftdruck sinkt
Wettervorhersagen werden aus der Auswertung von Schwankungen des barometrischen Drucks
berechnet und können von den tatsächlichen Wetterbedingungen abweichen. Wenn es Unterschiede
zwischen den Vorhersagen der Wetterstation und denen des örtlichen Wetterdienstes gibt, nehmen Sie
die Meinung des Wetterdienstes als maßgeblich an. Diese Vorhersagen geben die wahrscheinlichen
Wetterschwankungen für die nächsten acht Stunden an und nicht das aktuelle Wetter.
Die Station kann sechs verschiedene Vorhersagen anzeigen:
Sonnig
Teilweise
bewölkt
Bewölkt
Regnerisch
Stark
regnerisch
Bewölkt
Die Station wird automatisch die Komfortstufe anzeigen (Standort A6 Abbildung 1).
Die Komfortstufe in Innenräumen wird auf der Grundlage der Innentemperatur und der Luftfeuchtigkeit
berechnet. Es gibt fünf Stufen:
Sehr gut
Gut
Mittelmäßig
Abgestuft
Schlecht
Die Wetterstation wird automatisch die Mondphase und den Gezeitenindikator entsprechend dem
eingestellten Datum und der eingestellten Uhrzeit anzeigen (Standort A2 Abbildung 1). Es gibt 12
verschiedene Mondphasen und 3 Gezeitenindikatoren.

www.livoo.fr
Neuer
Mond
Erste Sichel
Erstes
Viertel
Zunehmend
er
Gibbonmond
Voller
Mond
Abnehmende
r
Gibraltarmon
d
Letztes
Viertel
Letzte
Sichel
H
M
L
Flut
zwischen den beiden
Gezeiten
Ebbe
Automatische Einstellung von Uhrzeit und Datum (DCF-Funksignal)
Nachdem die Uhr in Betrieb genommen wurde, sucht sie automatisch nach einem DCF-Signal. Wenn
das DCF-Signal empfangen wird, kann die Kamera automatisch die Uhrzeit, das Datum und den
Wochentag empfangen und anzeigen. Die Umstellung zwischen Sommer- und Winterzeit erfolgt
automatisch.
Während der Suche nach dem DCF-Signal blinkt das Logo (Position A1 Abbildung 1). Wenn die Suche
fehlschlägt, verschwindet das Logo. Wenn das Gerät ein DCF-Signal empfängt, wird das Logo
kontinuierlich angezeigt.
Um die Suche nach dem DCF-Signal manuell neu zu starten, drücken und halten Sie die Taste "▲" zwei
Sekunden lang gedrückt.
Das Gerät startet automatisch jede Stunde erneut die Suche nach einem DCF-Signal, bis es eines
gefunden hat. Während der Suche funktionieren nur die Funktionen "SNOOZE / LIGHT" und die Taste "▲".
In der Nacht synchronisiert sich die Station mit dem DCF-Signal, um Abweichungen zu korrigieren. Wenn
dieser Synchronisierungsversuch fehlschlägt, verschwindet das Symbol des Senders vom
Anzeigebildschirm. Das System wird in der nächsten Stunde automatisch einen weiteren
Synchronisierungsversuch unternehmen.
Wir empfehlen einen Mindestabstand von 2,5 m zu allen Störquellen, wie z. B. Fernsehern oder
Computermonitoren. Der Radioempfang ist an Orten mit Betonwänden (z. B. in Kellern und Büros)
schwächer. Stellen Sie das Gerät unter solchen Bedingungen in der Nähe eines Fensters auf.
Manuelles Einstellen von Uhrzeit und Datum
Drücken Sie die Taste "TIME " (Taste B3 Abbildung 2) einmal, um die Sekunden anzuzeigen. Drücken Sie sie
ein weiteres Mal, um das Datum anzuzeigen.
Halten Sie die Taste "TIME" 2 Sekunden lang gedrückt, um in den Einstellungsmodus zu gelangen.
Im Einstellungsmodus blinkt der Parameter, der gerade eingestellt wird. Verwenden Sie die Tasten "▲"
und "▼", um den Wert zu ändern, und die Taste "TIME", um sowohl Ihre Auswahl zu bestätigen als auch
zum nächsten Parameter zu wechseln.
Das Gerät zeigt als erste Einstellung den 12/24-Stunden-Modus an. Sie können wählen, ob die Uhrzeit im
12-Stunden- oder im 24-Stunden-Format angezeigt werden soll.
Der zweite Parameter ist die Zeitzone. Sie können eine Zeitzone im Bereich von -12 bis +12 einstellen.
Other manuals for SL250
1
Table of contents
Languages:
Other Livoo Weather Station manuals
Popular Weather Station manuals by other brands

THOMSON
THOMSON 513630 manual

La Crosse Technology
La Crosse Technology WS-9121U-IT instruction manual

LEXIBOOK
LEXIBOOK Meteo Clock Elegance First SM1840 owner's manual

DAVIS
DAVIS Vantage Pro2 Weather Envoy user manual

Spectrum Technologies
Spectrum Technologies WatchDog 2400 product manual

König Electronic
König Electronic KN-WS400 manual