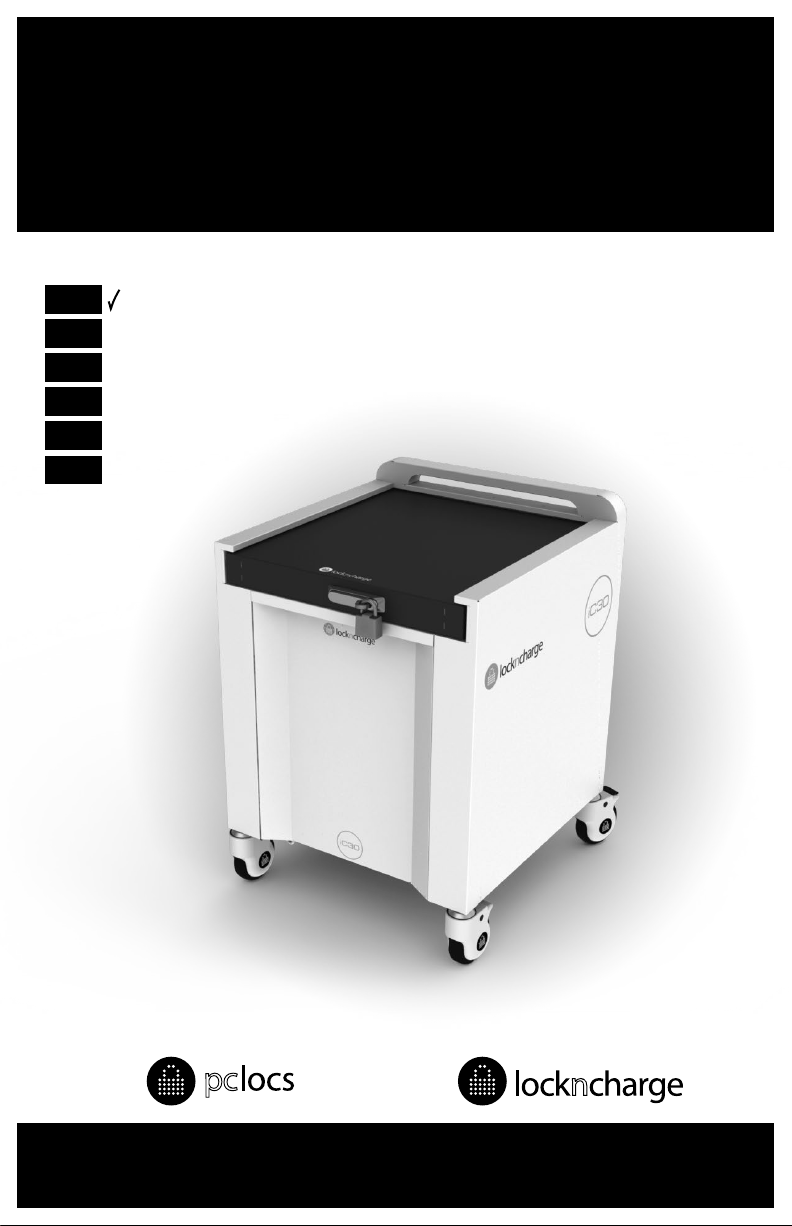
LocknCharge PC Locs iC 30 Cart User manual

USER INSTRUCTIONS
ENG
NLD
ESP
SWE
FRA
DEU
www.pclocs.com.au www.lockncharge.com
iC 30 Cart™

iC 30 Cart
Congratulaons on your purchase.
Follow these instrucons for easy and fast set-up of your iC 30 Cart.
PC Locs, LocknCharge and the Padlock device are Trademarks of IWS Global Pty Ltd.
Copyright IWS Global Pty Ltd, February 2016.
Disclaimer.
This informaon is the intellectual property of IWS Global Pty Ltd and may not be distributed, duplicated
or copied in part or full without the wrien permission. Since the use of this informaon, the equipment
connected and the condions by which any IWS Global product is used is beyond the control of IWS Global,
it is the obligaon of the owner to ensure the correct and safe use of any equipment and product. To the
extent that the law permits, any liability which may be incurred as a result of the use or future use of a
product manufactured or sold by IWS Global is limited to the cost of repairing or replacing the failed product
or component at the discreon of IWS Global either within, or outside of warranty periods, and does not
extend to any loss or damage which may be caused as a consequence of misuse or failure of the equipment
or product or the informaon contained herein. IWS Global shall not in any event be liable for economic loss
of prots, indirect, special, bodily injuries or consequenal damages.
Specicaons and images are for illustraon purposes only. Final product and instrucon manual may dier
and is subject to change without noce. Refer to the website for up to date instrucons.

INSTRUCTION MANUAL
Swing the handle to unlock the sliding top lid.
Remove the two black knobs.
Slide tray hard up against observaon window opening.
Place the Power Tray over the bolts.
Secure the Power Tray using the two black knobs.
Once opened, remove the Baskets and shelves.
Pull the handle to slide open the lid.
EXTRA STEP - Installing the Power Tray.
STEP 1 - Opening and unpacking the iC 30 Cart.
NOTE: If your iC 30 Cart was shipped with a separate Power Tray please install this rst by following this Extra
Step. If your iC 30 Cart was shipped with the Power Tray pre-installed, skip this secon.

iC 30 Cart
Install the power adaptors into the power strips.
Route the device cables through the channel
opening one at a me.
Pull the cable out to the desired length. Repeat for
the remaining device power adaptors and cables.
Replace the plasc baskets and insert the devices.
Connect the device cables, adjusng length as
required
Tidy cables using supplied velcro cable es.
Feed the cable through Gripweld and slide along.
Evenly space the device cables along the cart.
Replace the shelves at the desired height (3 levels).
Install the mat.
Connect the power cord and switch on at the wall
socket. Read the instrucons for operang the
ECO Safe Charge power management unit.
STEP 2 - Roung the device cables and connecng devices.

INSTRUCTION MANUAL
Close the sliding lid and secure the swing handle.
Power reset buon.
Mode status indicators.
MODE switch.
Power indicator.
When the cart is not in use, wrap the power cable
around the cable cleat.
CAUTION:
Always unplug power cable
before moving the cart.
Aach and lock the supplied combinaon padlock.
STEP 3 - Closing and securing your iC 30 Cart.
Observaon window for the ECO Safe Charge power management unit.

iC 30 Cart
Tools required:
• Masonry hammer-drill
• 10mm masonry drill bit
• Pencil and ruler/tape
• Hammer
• 13mm and 17mm spanners
The Security Chain Kit contains the following:
• 1 x 3 holed Anchor Plate and security chain
• 3 x 55mm long, 8mm Anchor Bolts
• 3 x Shear Nuts and washers
• 1 x Lock and key set
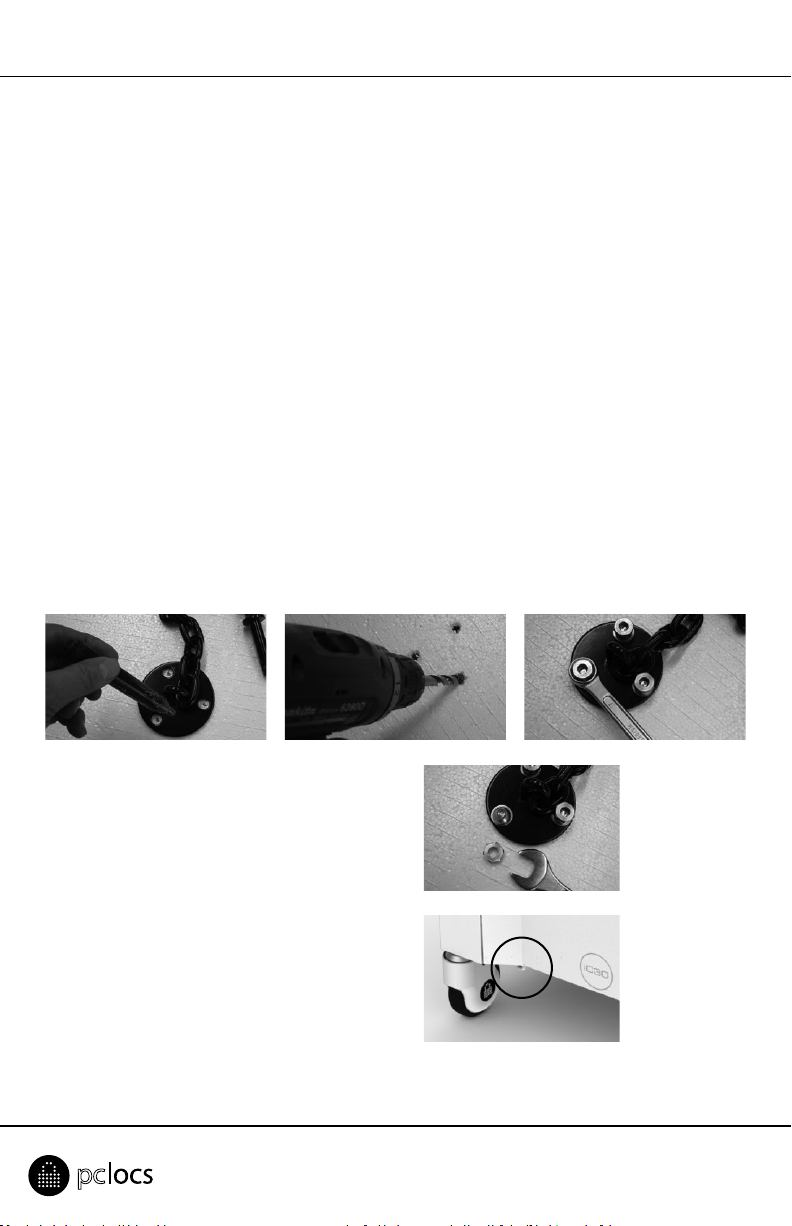
STEP 4 - Installing the Security Chain Kit.
Move the Trolley to where you intend to store and secure it. It is best if the Floor Plate is as close as possible
to a wall to reduce the hazard of tripping and injury.
Aach the end of the chain to the steel loop with the padlock and posion the plate end in the desired
posion on the oor.
(NOTE: If mounng on carpet you will need to cut out the carpet from the area where the oor plate
aaches, otherwise the carpet will wrap around the drill when drilling).
Mark the center of each of the
3 holes, using the oor plate as
a guide.
Drill a 10mm hole through each
of the 3 marked centers to a
depth of 50mm.
Insert the anchor bolts with nut
aached into the holes through
the oor plate. Using the 13 mm
spanner, progressively ghten
down each of these anchor nuts
so that all three bolts are rmly
anchored into the concrete.
Now undo each of the three nuts, and in their
place thread on the three silver shear-nuts.
Ensure that the ‘cone’ is down and the hexagonal
nut is up. Using the 17mm spanner ghten down
the three shear nuts unl the hexagonal ‘head’
shears o, leaving just the cone ‘base’.
Aach the security chain through the steel loop
under the side of the trolley using the padlock.

INSTRUCTION MANUAL
PC Locs/LocknCharge warrants the product to be free of defects in design, materials, assembly and crasmanship
from the date of purchase to the original retail purchaser. Evidence of original purchase will be required to
obtain warranty service.
In the event that a defect, malfuncon or failure occurs or is discovered during the warranty period,
PC Locs/LocknCharge will repair or replace, at its opon, the products which in the reasonable judgment of PC
Locs/LocknCharge are deemed defecve. All transportaon costs shall be borne by the owner and the risk of
loss shall be upon the party iniang the transportaon.
The warranty does not apply to any product that has been subject to misuse, tampering, neglect, or accident or as
a result of unauthorized alteraons or repairs to the product. The warranty is in lieu of all warranes expressed or
implied, including the implied warranes of merchantability and tness for a parcular purpose which are expressly
excluded or disclaimed. In no event will PC Locs/LocknCharge, their directors, ocers, employees, or agents be
liable for any harm, consequenal, incidental, third party, special or indirect damages whatsoever arising out of the
useorinabilitytousetheproductsevenifPCLocs/LocknChargehasbeenadvisedofthepossibilityofsuchdamages.
PC Locs/LocknCharge obligaon is strictly and exclusively limited to the replacement or repair of any defecve
products. Some states do not allow the exclusion or limitaon of incidental or consequenal damages, so the
above limitaon or exclusion may not apply to you.
Compliances and Approvals
Warranty
CE (Europe)
SAA (Australia)
UL Compliant (USA and Canada)
KCC (Korea) - pending
SIRIM (Malaysia) - pending
SPRING (Singapore) -pending

www.pclocs.com.au www.lockncharge.com

BEDIENUNGSANLEITUNG
ENG
NLD
ESP
SWE
FRA
DEU
www.pclocs.com.au www.lockncharge.com
iC 30 Cart™

iC 30 Cart
Herzlichen Glückwunsch zu Ihrem Kauf.
Folgen Sie diesen Anweisungen für eine einfache und zügige Inbetriebnahme.
PC Locs, LocknCharge und die Padlock-Vorrichtung sind Marken der IWS Global Pty Ltd.
Copyright IWS Global Pty Ltd, Februar 2016.
Haungsausschluss
Diese Informaonen sind geisges Eigentum von IWS Global Pty Ltd. Sie dürfen ohne vorherige schriliche
Genehmigung weder teilweise noch vollständig verteilt, reproduziert oder kopiert werden. Da die Nutzung
dieser Informaonen, die angeschlossenen Geräte und die Einsatzbedingungen für IWS Global-Produkte
sich außerhalb der Kontrolle von IWS Global benden, obliegt die richge und sichere Nutzung aller Geräte
und Produkte der Verantwortung der jeweiligen Eigentümer. Innerhalb der gesetzlichen Vorschrien ist
jede Haung als Folge des Gebrauchs oder des späteren Gebrauchs eines Produkts, das durch IWS Global
hergestellt oder verkau wurde, begrenzt auf die Kosten der Reparatur oder des Austausches des fehlerhaen
Produkts oder einer fehlerhaen Komponente im Ermessen von IWS Global innerhalb oder außerhalb
der Garanezeit. Eine Haung für eventuelle Verluste oder Schäden infolge unsachgemäßer Handhabung
oder eventueller Fehler von Geräten, Produkten oder hier gegebenen Informaonen ist ausgeschlossen.
IWS Global haet in keinem Fall für wirtschaliche Verluste durch entgangene Gewinne, indirekte oder
spezielle Körperverletzungen oder Folgeschäden.
Alle Daten und Abbildungen dienen nur der Veranschaulichung. Endprodukte und Bedienungsanleitungen
können voneinander abweichen und ohne vorherige Ankündigung geändert werden. Aktuelle
Bedienungsanleitungen nden Sie auf unserer Website.

BEDIENUNGSANLEITUNG
Entsperren Sie mit dem Gri die obere Schublade.
Nach dem Önen entnehmen Sie die Körbe und Fächer.
Ziehen Sie zum Önen am Gri.
SCHRITT 1: iC 30 Cart önen und auspacken
Enernen Sie die zwei schwarzen
Rändelschrauben.
Schieben Sie den Netzeinschub kräig ein.
Platzieren Sie den Netzeinschub oberhalb der
Bolzen.
Sichern Sie den Netzeinschub mit den beiden
schwarzen Rändelschrauben.
ZUSATZSCHRITT: Netzeinschub installieren
HINWEIS:
Wurde der iC 30 Cart mit einem separaten Netzeinschub geliefert, installieren Sie ihn mit diesem Zusatzschri.
Wurde der iC 30 Cart mit einem vorinstallierten Netzeinschub geliefert, überspringen Sie diesen Abschni.

iC 30 Cart
Stecken Sie die Netzadapter in die
Stromversorgungsleisten.
Verlegen Sie die Gerätekabel jeweils durch den
Kabelkanal.
Ziehen Sie die Kabel in der benögten Länge
heraus. Wiederholen Sie diese Schrie für alle
Netzadapter und Kabel.
Setzen Sie die Plaskkörbe wieder ein. Setzen Sie
die Geräte ein. Verbinden Sie die Gerätekabel und
passen Sie ggfs. die Kabellängen an.
Ordnen Sie die Kabel mit den mitgelieferten
Kleverschluss-Kabelbindern.
Verlegen und schieben Sie die Kabel durch die
Kabelführung. Verteilen Sie die Kabel gleichmäßig.
Installieren Sie die Fächer jeweils in der
gewünschten Höhe (3 Wahlstufen).
Legen Sie die Mae ein.
Verbinden Sie den Cart über das Netzkabel mit
einer Wandsteckdose. Lesen Sie die mitgelieferten
Anweisungen zum Betrieb der ECO Safe Charge-
Stromversorgung.
SCHRITT 2: Gerätekabel verlegen und Geräte verbinden

BEDIENUNGSANLEITUNG
Schließen Sie die Schublade und arreeren Sie
den Gri.
Betriebs-Rücksetztaste
Modus-Zustandsanzeigen
Modus-Schalter
Betriebsanzeige
Wickeln Sie das Netzkabel bei Nichtbenutzung um
die Kabelklemme.
ACHTUNG:
Ziehen Sie vor dem Bewegen des Carts
immer das Netzkabel aus der Steckdose.
Befesgen und verriegeln Sie das mitgelieferte
Vorhängeschloss.
SCHRITT 3: iC 30 Cart schließen und sichern
Sichenster der ECO Safe Charge-Stromversorgungseinheit

iC 30 Cart
Benögte Werkzeuge:
• Bohrhammer
• 10-mm-Steinbohrer
• S und Lineal oder Maßband
• Hammer
• Schraubenschlüssel 13 mm und 17 mm
Der Sicherheitskeensatz umfasst Folgendes:
• 1x Ankerplae mit drei Löchern und Sicherheitskee
• 3x Ankerbolzen 8 mm, Länge 55 mm
• 3x Abreißmuern und Unterlegscheiben
• 1x Vorhängeschloss und Schlüsselsatz
SCHRITT 4: Sicherheitskeensatz installieren
Rollen Sie den Wagen an den vorgesehenen Ort für die Lagerung und Sicherung. Die Bodenplae sollte
möglichst nahe einer Wand gelegt werden, um die Stolper- und Verletzungsgefahr zu reduzieren.
Befesgen Sie das Ende der Sicherheitskee mit dem Vorhängeschloss an der Stahlöse, und richten Sie das
Plaenende in der gewünschten Posion am Boden aus.
(HINWEIS: Bei einer Montage auf Teppichboden sollten Sie aus ausreichend Platz für die Bodenplae
herausschneiden, da sich sonst der Teppichboden um den Bohrer wickeln kann.)
Markieren Sie mithilfe der
Bodenplae als Vorlage das
Zentrum der zu bohrenden drei
Löcher.
Bohren Sie durch jede der drei
Markierungen ein 10-mm-Loch
bis zu einer Tiefe von 50 mm.
Führen Sie die Ankerbolzen mit
beigefügten Muern durch die
Bodenplae in die Bohrlöcher
ein. Ziehen Sie mithilfe des
13-mm-Schraubenschlüssels alle
Ankermuern gleichmäßig fest,
sodass alle drei Bolzen fest im
Beton verankert sind.
Lösen Sie nun die drei Muern und drehen Sie an ihrer Stelle
die drei silberfarbenen Abreißmuern ein. Stellen Sie sicher,
dass der „Kegel“ nach unten zeigt und die Sechskantmuer
oben liegt. Ziehen Sie mithilfe des 17-mm-Schraubenschlüssels
die drei Abreißmuern fest, bis die sechseckigen „Köpfe“
abreißen und nur die Kegelbasis bleibt.
Befesgen Sie die Sicherheitskee mit dem Vorhängeschloss
an der Stahlöse an der Unterseite des Wagens.

BEDIENUNGSANLEITUNG
PC Locs/LocknCharge garanert Endverbrauchern, die Originalprodukte im Einzelhandel erwerben, dass diese
frei von Entwicklungs-, Material- und Herstellungsfehlern sind. Zur Inanspruchnahme der Garaneleistung ist
ein Nachweis über das Erstverkaufsdatum vorzulegen.
Sollte in der Garanezeit ein Defekt, eine Störung oder ein Ausfall aureten, wird PC Locs/LocknCharge nach
einer Prüfung die als fehlerha bestägten Produkte in eigenem Ermessen reparieren oder ersetzen. Alle
Transportkosten sind vom Eigentümer zu tragen. Das Transportrisiko trägt die versendende Partei.
Die Garane gilt nicht für Produkte, die missbräuchlich eingesetzt, manipuliert, vernachlässigt, durch
einen Unfall beschädigt oder unautorisiert verändert bzw. repariert wurden. Mit Ausnahme des gesetzlich
geregelten Umfangs handelt es sich bei dieser Garane um eine ausschließliche Garane. Sie enthält keine
sonsgen ausdrücklichen oder sllschweigenden Garanen, einschließlich aber nicht ausschließlich der
Zusicherung der Markähigkeit und Eignung für einen besmmten Zweck. PC Locs/LocknCharge oder seine
Direktoren, Führungskräe, Arbeitnehmer oder Vertreter übernehmen keine Haung für direkte, indirekte,
zufällige, mielbare, beiläuge oder Folgeschäden, die direkt oder indirekt auf die Nutzung der Produkte
zurückzuführen sind, selbst wenn PC Locs/LocknCharge auf die Möglichkeit solcher Schäden hingewiesen wurde.
Die Verpichtungen von PC Locs/LocknCharge beschränken sich strikt und ausschließlich auf den Austausch
oder die Reparatur defekter Produkte. Da manche Landesgesetze die Ausschließung oder Einschränkung
der Haung für beiläuge Schäden oder Folgeschäden nicht zulassen, gelten die obigen Einschränkungen
eventuell nicht für Sie.
Länderzulassungen
Garane
CE (Europa)
SAA (Australien)
UL-Konformität (USA und Kanada)
KCC (Korea) - ausstehend
SIRIM (Malaysia) - ausstehend
SPRING (Singapur) - ausstehend

www.pclocs.com.au www.lockncharge.com

INSTRUCCIONES PARA EL USUARIO
ENG
NLD
ESP
SWE
FRA
DEU
www.pclocs.com.au www.lockncharge.com
iC 30 Cart™

iC 30 Cart
Enhorabuena por su compra.
Siga estas instrucciones para instalar de forma fácil y rápida el iC 30 Cart.
PC Locs, LocknCharge y el disposivo Padlock son marcas comerciales de IWS Global Pty Ltd.
Derechos de autor de IWS Global Pty Ltd, febrero de 2016.
Descargo de responsabilidad
Esta información es propiedad intelectual de IWS Global Pty Ltd y no se puede distribuir, duplicar o copiar,
parcial o totalmente, sin tener autorización por escrito. Puesto que el uso de esta información, los equipos
relacionados y las condiciones bajo las cuales se usa cualquier producto de IWS Global son circunstancias
ajenas a la voluntad de IWS Global, el dueño o el usuario enen la obligación de determinar el uso correcto
y seguro de cualquier equipo y producto. En la medida que lo permita la ley, cualquier responsabilidad en la
que se pueda incurrir como resultado del uso o el uso futuro de un producto fabricado o vendido por IWS
Global, se limita al coste de reparar o reemplazar el producto o componente averiado según el criterio de
IWS Global, ya sea dentro o fuera de los periodos de garana, y no se exende a ninguna pérdida o daño que
puedan ser causados como consecuencia del mal funcionamiento o el uso indebido del equipo, el producto
o la información aquí incluida. IWS Global no será responsable en ningún caso de ningún daño por lucro
cesante, daño indirecto, daño especial, daño consecuente o lesión corporal.
Las especicaciones e imágenes se proporcionan únicamente con nes ilustravos. El producto nal puede
ser diferente y está sujeto a cambios sin previo aviso. Consulte la página web para obtener instrucciones
actualizadas.

MANUAL DE INSTRUCCIONES
Gire la manija para desbloquear la tapa superior
deslizante.
Quite las dos perillas negras.
Deslice la bandeja rmemente contra la abertura de
la ventana de observación.
Coloque la bandeja sobre los pernos.
Asegure la bandeja usando las dos perillas negras.
Una vez abierta, saque las canastas y los estantes.
Tire de la manija para deslizar la tapa y abrirla.
PASO ADICIONAL: INSTALACIÓN DE LA BANDEJA DE ALIMENTACIÓN.
PASO 1: Cómo abrir y desembalar el iC 30 Cart.
NOTA: Si el iC 30 Cart se ha enviado con una bandeja de alimentación separada, instálela en primer lugar
siguiendo este paso adicional. Si el iC 30 Cart se ha enviado con una bandeja de alimentación preinstalada,
puede omir esta sección.

iC 30 Cart
Instale los adaptadores de alimentación en las
regletas.
Pase los cables de los disposivos a través de la
abertura del canal de uno en uno.
Tire del cable hasta lograr la longitud deseada.
Repita para el resto de los cables y adaptadores
de alimentación de los disposivos.
Vuelva a poner las canastas de plásco e inserte
los disposivos. Conecte los cables de los
disposivos, ajustando la longitud según sea
necesario.
Ordene los cables usando los sujetacables de
velcro que se proporcionan.
Pase el cable a través de la junta de sujeción
y deslícelo a lo largo de la misma. Coloque los
cables de los disposivos a distancias iguales a lo
largo del carro.
Vuelva a colocar los estantes a la altura deseada (3
niveles). Instale la alfombrilla.
Conecte el cable de alimentación y enchúfelo
a un tomacorriente. Lea las instrucciones de
funcionamiento de la unidad de administración
de energía ECO Safe Charge.
PASO 2: Tendido y conexión de los cables de los disposivos.
Table of contents
Languages:
Popular Storage manuals by other brands

IBM
IBM TotalStorage IP Storage 200i 110 installation guide

IBM
IBM System Storage DS3300 Installation, user's, and maintenance guide

Freecom
Freecom Mobile Drive Secure datasheet

Philips
Philips FM16FD05B/00 Specification sheet

Brocade Communications Systems
Brocade Communications Systems DCX Backbone Hardware installation guide

THOMSON
THOMSON K2 instruction manual