Locosys GW-60 User manual

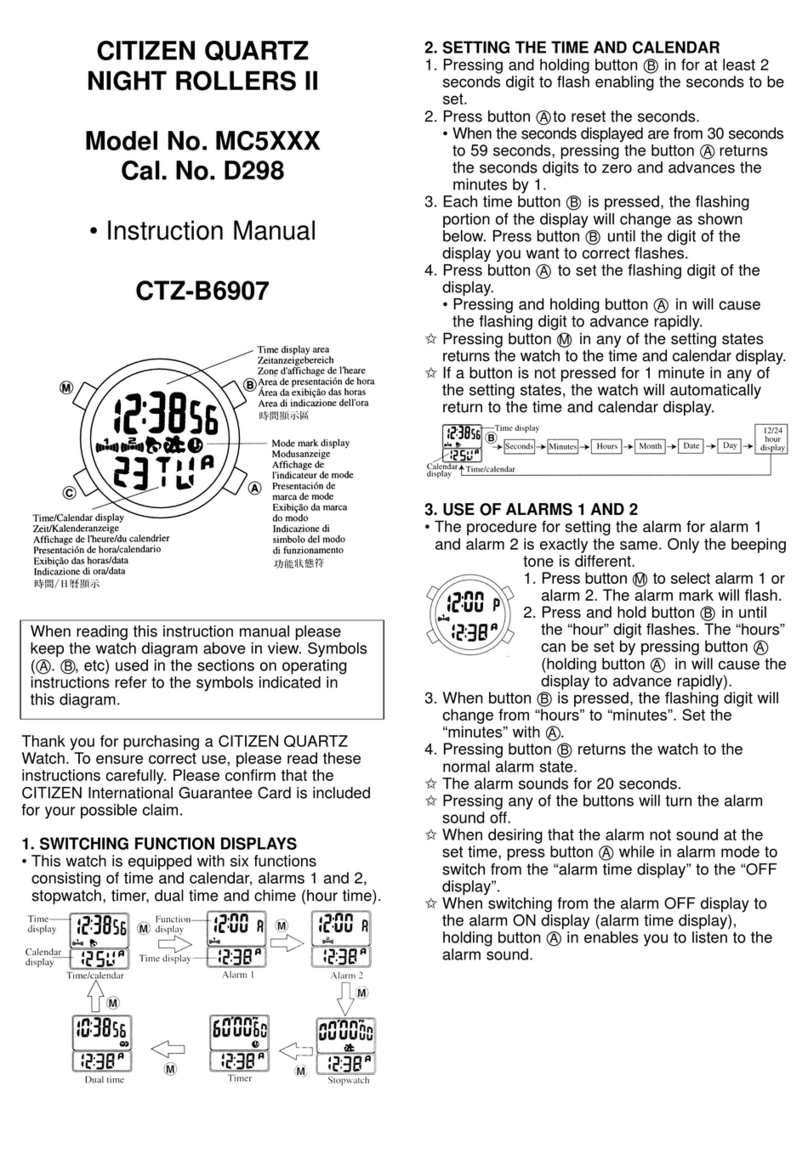
1
www.locosystech.com
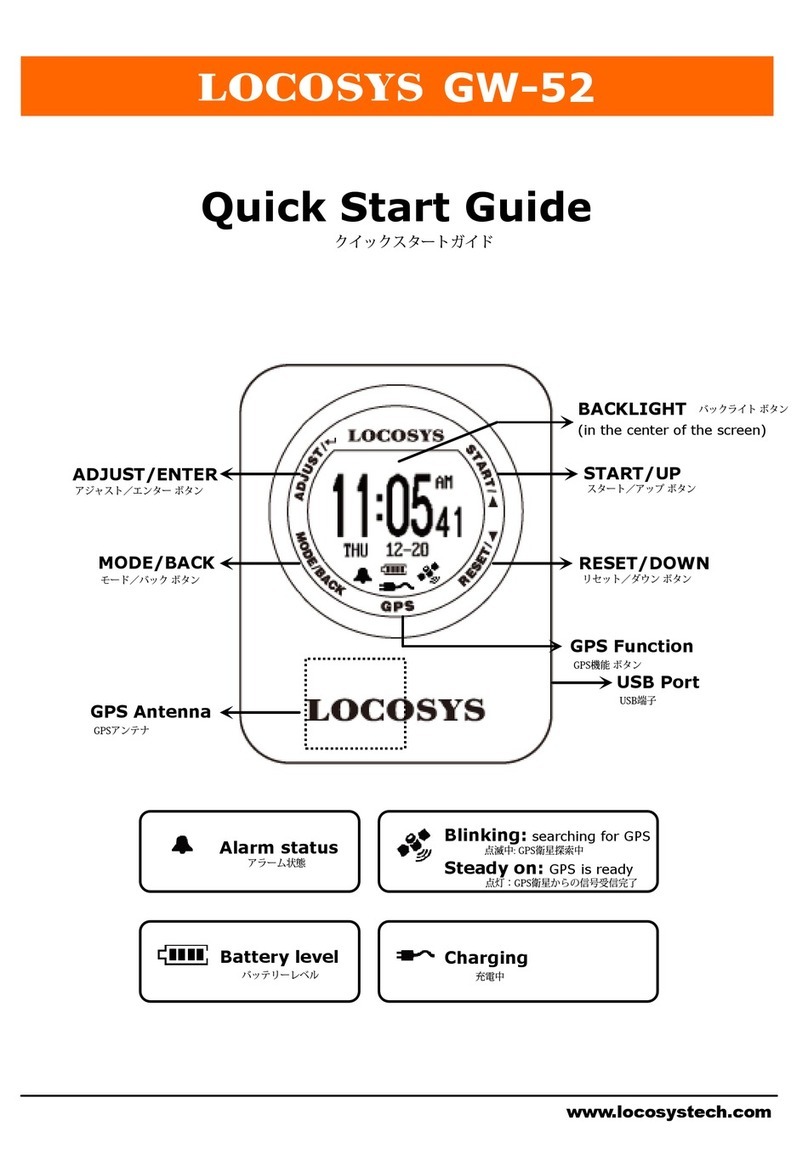
Quick Start Guide
GW-60
RESET/▼
GPS Function
MODE/BACK
Blinking:
searching for GPS
Steady on:
GPS is ready
Alarm status
Battery level
Charging
status
ADJUST/
↵
START/▲
GPS Antenna
Full charge

2
www.locosystech.com
Section 1. Brief Introduction
1.1 Before operating your GW-60, clip the device and
full-charge it with DC +5V/500mA charger for at least
3~4 hours.
1.2 Press MODE/BACK to select Time modes
(1) CLOCK; (2) ALARM; (3) STOPWATCH; (4) TIMER
1.3 Press ADJUST/
↵
to setting page.

3
www.locosystech.com
1.4 Press GPS to GPS mode. GPS signal will be searched
automatically.
1.5 Backlight: Hold MODE/BACK for 2 sec.
(Press any key to extend backlight time)
1.6 Lock screen: START+MODE, press again to unlock.
1.7 Sleep mode: Hold GPS for 1 sec to sleep mode.
At clock mode, GW-60 will turn to sleep mode in 15sec.
Tip: Press MODE/BACK to wake up the watch.

4
www.locosystech.com
Section 2. Time Mode
2.1 Clock Mode
Display local time based on the GMT setting.
Tip: Quick clock time setup for first time usage.
(1) GMT Setting: Refer to 3.6
(2) GPS Time Synchronization: Under open sky
environment, switch to GPS mode and wait until the
GPS fixed. GW-60 will automatically synchronize to
precise GPS UTC time.
2.2 Alarm Mode
Press ADJUST/
↵
to adjust alarm time.
Press ▲ / ▼ button to select numbers and
ADJUST / BACK to start/end adjustment.
2.3 Stopwatch Mode
Press START to start counting time and press again
to pause.
Press RESET to reset counting time to “00:00
00
”.
Press MODE/BACK to exit.
2.4 Timer Mode
Press ADJUST to start adjusting timer.
Press ▲ / ▼ to change numbers and MODE/BACK
button to end adjustment.
Press START to start counting down and press again
to pause.
Press RESET to restart timer

5
www.locosystech.com
Section 3. Setting
3.1 Setting page:
ADJUST/
↵
: Enter edit mode/ Confirm.
▲: Up.
▼: Down.
MODE/BACK: Exit edit mode/ Cancel.
3.2 BUZZER: set buzzer/ sound.
O : On/ Enable.
X : Off/ Disable.
3.3 LOGGING: Log rate setting.
OFF : No logging.
1HZ : When speed over [MIN SPEED], log rate in 1Hz.
5HZ : When speed over [MIN SPEED], log rate in 5Hz.
SMART:
[MIN SPEED] ≦ Speed < [SPD GENIE] : 1Hz log rate.
[SPD GENIE] ≦ Speed : 5Hz log rate.
3.4 MIN SPEED: Speed threshold, only logged speed above
[MIN SPEED].
Available number: 0 to 15 [UNIT].

6
www.locosystech.com
3.5 UNIT: Speed measurement unit.
KM : Kilometer.
MI : Mile.
NM : Nautical mile.
3.6 GMT: Set GMT/Time zone, e.g. +8:00 for Taipei.
Available number: GMT-12:00 to GMT+13:00.
3.7 SPEED AVG: Time interval for speed averaging.
Available number: 1 sec to 60 sec.
3.8 SPD GENIE: Auto-speed report, setting the minimum
speed threshold to initiate [SPD GENIE].
Available number: 0 to 63 [UNIT].
3.9 ACTION SPEED: Speed display type
SPEED : Current speed (200ms average)
NS AVG : N-second average speed based on [SPEED
AVG].

7
www.locosystech.com
3.10 SPD FONT: Speed display font for Speed report.
SMALL : Small font.
BIG : Big font.
3.11 SPEED HISTORY: Display speed history record in
speed report.
O : On/ Enable.
X : Off/ Disable.
3.12 SCROLL SECOND: Set scroll second in speed report
Available number: 1 sec to 2.5 sec.
3.13 USB CLASS: Connection type
COM: Virtual COM PORT for Windows platform user.
UMS: USB Mass Storage for non-Windows platform user.
(Note: Set UMS before entering “MSC mode”on 3.14)

8
www.locosystech.com
3.14 TO USB MSC: Connection by Mass Storage Class (MSC)
mode mainly for non-Windows platform user.
Tip: How to get GPS data in USB MSC mode
(1) Set“USB CLASS”option to“UMS”first.
(Note: Before setting, the USB charging cable MUST be
disconnected.)
(2) Connect to USB, and press ADJUST/
↵
“TO USB
MSC”to enter USB MSC state.
(3) Find a new flash drive with a READ only file—
GPSLOG.SBP on your host PC.
(4) Remove USB cable to exit.
3.15 FIRMWARE VERSION: check device status
Firmware Version: VX.XXXXXX
User Name: XXXXXX
Serial Number: SXXXXXXXX
GPS Version: XXXX

9
www.locosystech.com
Section 4. GPS Mode
4.1 Action Speed: Display current instant speed or N-sec.
average speed.
Vertical Bar: Log memory usage.
Horizontal Bar: Speed accuracy indicator.
(Long bar means good signal)
Symbol :Not logging data
Symbol : logging data
Press ▲ / ▼ to move on next page “Top 10
Speeds”, “Top 10 AVG Speeds” and “PVT”.
GPS searching
GPS fixed

10
www.locosystech.com
4.2 Auto Speed Report: If [SPD GENIE] is enabled, the
auto speed report screen shows at the end of each
session.
e.g. MAX SPEED: 61.65 KH
N-SEC SPEED: 50.57 KH
(Medal icon: New record achieved.)
When in Big Font mode, 3 screens are displayed one
after another
MAX SPEED
N-SEC SPEED
SPEED HISTORY (If SPEED HISTORY turns on)
4.3 Distance Traveled: Display distance traveled when
data logging.
Press ▲ / ▼ to next page/ previous page.
Small Font
Big Font

11
www.locosystech.com
4.4 Top 10 Max Speeds: Display Top 10 max speed record.
Press ▲ / ▼ to next page/ previous page.
Press MODE/BACK to scroll page.
Press ADJUST/
↵
to delete records.
4.5 Top 10 AVG Speeds: Display Top 10 average speed
records.
Press ▲ / ▼ to next page/ previous page.
Press MODE/BACK to scroll page.
Press ADJUST/
↵
to delete records.
4.6 PVT: Display position, velocity, and time
Press ▲ / ▼ to next page/ previous page.

12
www.locosystech.com
Section 5. GW-60 PC Utility
(Windows platform only)
5.1 Device connection procedure : (Make sure USB driver is installed)
(1) Select COM port properly.
(2) Click “Connect” to connect device.
Once the device is connected, the firmware version will be displayed.
(Note: click ② “Disconnect” before unplugging the USB cable.)
5.2 Click “Settings” to select setting function page.
In setting function page, users can change username, UTC offset, log
interval….

13
www.locosystech.com
5.3 Click “Log Data” to select log function page.
In this page, users can see “Log Info”, and be able to download log data
(in SBP format).

14
www.locosystech.com
5.4 Click “Convert Log” to convert the SBP file into PLT, CSV, KML and GPX files.
(Check [] Google Earth View to see the travel trajectory)

15
www.locosystech.com
5.5 Click “Google Earth View” to link with Google Earth Viewer.

16
www.locosystech.com
5.6 Click “Download” to download the TOP 10 Speeds in SBP file.

17
www.locosystech.com
5.7 Click “Browse” to view logged data.
Click item number to link up Google Map.

18
www.locosystech.com
5.8 Click the SBP record in the browse page to view the point on Google Map.
Or, to view the converted GPX and KML files on Google Earth.

19
www.locosystech.com
Section 6. Maintenance & Support service
All GW-60 go through inspections before users have it. In this section, we will explain how
to prevent the malfunctions, and how to care for the watch.
1. Do not operate buttons under water.
2. Do not operate the device in extreme temperatures.
3. After using the device, wash it lightly in tap water and wipe all moisture with a dry cloth,
and allow it air dry.
4. Do not clean the device with spray cleaners, alcohol, thinners, gasoline, organic
solvents, aerosol sprays and paint.
5. Do not drop the device or any abuse treatments.
6. If the consumption parts (e.g. panel, buttons, strap, free loops, buckles, and seals) are
damaged by misuse, hit, scratch, and affect the normal operation on GW-60.
Contacting your local LOCOSYS-authorized dealer for a repair service. The repair will
hold a charge, and price depends on the inspections. The dealer will provide a quote
and help you return the watch to LOCOSYS. LOCOSYS will view the condition and
advise dealer the repair assessment.
(Note: Before repairing your GW-60, LOCOSYS will charge the inspection fee in advance.)
7. Do not try to open the device, or it may cause your watch lose waterproof capability.
8. If the device hasn’t been used for a long time or months, do not forget to charge your
watch periodically for maintaining the battery lifetime.
9. To download the latest firmware version for GW-60, visit our website for ”Download
page” www.locosystech.com

20
www.locosystech.com
Section 7. Warranty & Return Information
Warranty Coverage
1. GW-60 is warranted for 12 months and warranty coverage is effective from the date of
purchases.
(Note: Some areas may extend to 24 months)
2. LOCOSYS warrants our products and its parts against defects in material and
workmanship under normal use within the warranty period.
3. The warranty does not cover any product where damage has been caused by accident,
abuse, misuse, natural disaster, any unauthorized disassembles, or modification.
(Note: LOCOSYS will repair it for free, and customers will pay the inbound shipping cost.)
4. For warranty returns, the product “MUST” be returned by LOCOSYS authorized
dealers.
5. Before shipping a returned product to LOCOSYS, dealers shall inform LOCOSYS and
apply the RMA (Return Merchandise Authorization) request form.
Out-of-Warranty Service
1. Out-of-warranty products, or damage condition not be covered under the warranty will
be charged to the customer. If the product fails forgoing conditions, we can usually
repair it for a very reasonable price. We’ll provide a quote including shipping charge for
repair.
(Note: Repairs will be performed upon the receipt of payment.)
2. Customers will prepay for shipping both ways, plus parts and labor.
Other manuals for GW-60
1
Table of contents
Other Locosys Watch manuals
