manuals.online logo
Brands
  1. Home
  2. •
  3. Brands
  4. •
  5. Loctek
  6. •
  7. Indoor Furnishing
  8. •
  9. Loctek MT025-7040 User manual

Loctek MT025-7040 User manual

This manual suits for next models

1

Other Loctek Indoor Furnishing manuals

Loctek ET118W-N User manual

Loctek

Loctek ET118W-N User manual

Loctek GET119X-L User manual

Loctek

Loctek GET119X-L User manual

Loctek MT101-SD User manual

Loctek

Loctek MT101-SD User manual

Loctek ET120 User manual

Loctek

Loctek ET120 User manual

Popular Indoor Furnishing manuals by other brands

Regency LWMS3015 Assembly instructions

Regency

Regency LWMS3015 Assembly instructions

Furniture of America CM7751C Assembly instructions

Furniture of America

Furniture of America CM7751C Assembly instructions

Safavieh Furniture Estella CNS5731 manual

Safavieh Furniture

Safavieh Furniture Estella CNS5731 manual

PLACES OF STYLE Ovalfuss Assembly instruction

PLACES OF STYLE

PLACES OF STYLE Ovalfuss Assembly instruction

Trasman 1138 Bo1 Assembly manual

Trasman

Trasman 1138 Bo1 Assembly manual

Costway JV10856 manual

Costway

Costway JV10856 manual

moss DESIGN Caisson Credenza Assembly instructions

moss DESIGN

moss DESIGN Caisson Credenza Assembly instructions

Aquaglide FULL DECK 15.0 owner's manual

Aquaglide

Aquaglide FULL DECK 15.0 owner's manual

AREBOS AR-HE-SW30 user manual

AREBOS

AREBOS AR-HE-SW30 user manual

Till-Hilft Fulda 87005.330 Assembly instructions

Till-Hilft

Till-Hilft Fulda 87005.330 Assembly instructions

Twoey Outside 2010 quick start guide

Twoey Outside

Twoey Outside 2010 quick start guide

Hettich Easys 200 operating instructions

Hettich

Hettich Easys 200 operating instructions

The bedboss RELAX 404 Series owner's manual

The bedboss

The bedboss RELAX 404 Series owner's manual

Oeseder Möbelindustrie Bern 991 720 Assembly instructions

Oeseder Möbelindustrie

Oeseder Möbelindustrie Bern 991 720 Assembly instructions

Costway HW68469 user manual

Costway

Costway HW68469 user manual

Next ALIX A27743 Assembly instructions

Next

Next ALIX A27743 Assembly instructions

BROSA Hans Assembly guide

BROSA

BROSA Hans Assembly guide

Prodigg MINIKA PBA015T-FUR installation manual

Prodigg

Prodigg MINIKA PBA015T-FUR installation manual

manuals.online logo
manuals.online logoBrands
  • About & Mission
  • Contact us
  • Privacy Policy
  • Terms and Conditions

Copyright 2025 Manuals.Online. All Rights Reserved.

7KG
650mm
2
Ax1Bx2Cx4
700x400mm
1030mm
①③
②
x2
B
x1
A
< The pictures below are for reference only, please refer to the actual product. >
Please read this product manual carefully before use, and keep it properly.
Technical Data
Product List
Accessory List
Part List Installation Steps
Install the column
①
②
③
1 2 3
Kandevõime
Max kõrgus
Tõstejalg
Lauaplaadi mõõdud
Min kõrgus
NR OSA OSANR
Lauaplaat x1 Jalg x1
Tõstejalg x1
Eemaldage Turvakate
Libistage
sisse
SAMM 1
18709 (MT025-7040)
Tehnilised andmed Kokkupanekujuhend
Osade loetelu
Enne tõstejala paigaldamiste eemaldage
amortisaatori turvakate
TÄHELEPANU!
Pilt on illustratiivene.
Enne laua kokkupanemist lugege juhend läbi.
Tähelepanu: joonised on ainult suunavad ja võivad tootest või
tarvikutest veidi erineda.
Probleemide korral võtke ühendust müüjaga.
Ettevalmistamine
Asetage osad vaibale, et vältida
kriimustuste teket. Laua kokkupanemiseks
on vaja 2 inimest
x4
C
x1
A●
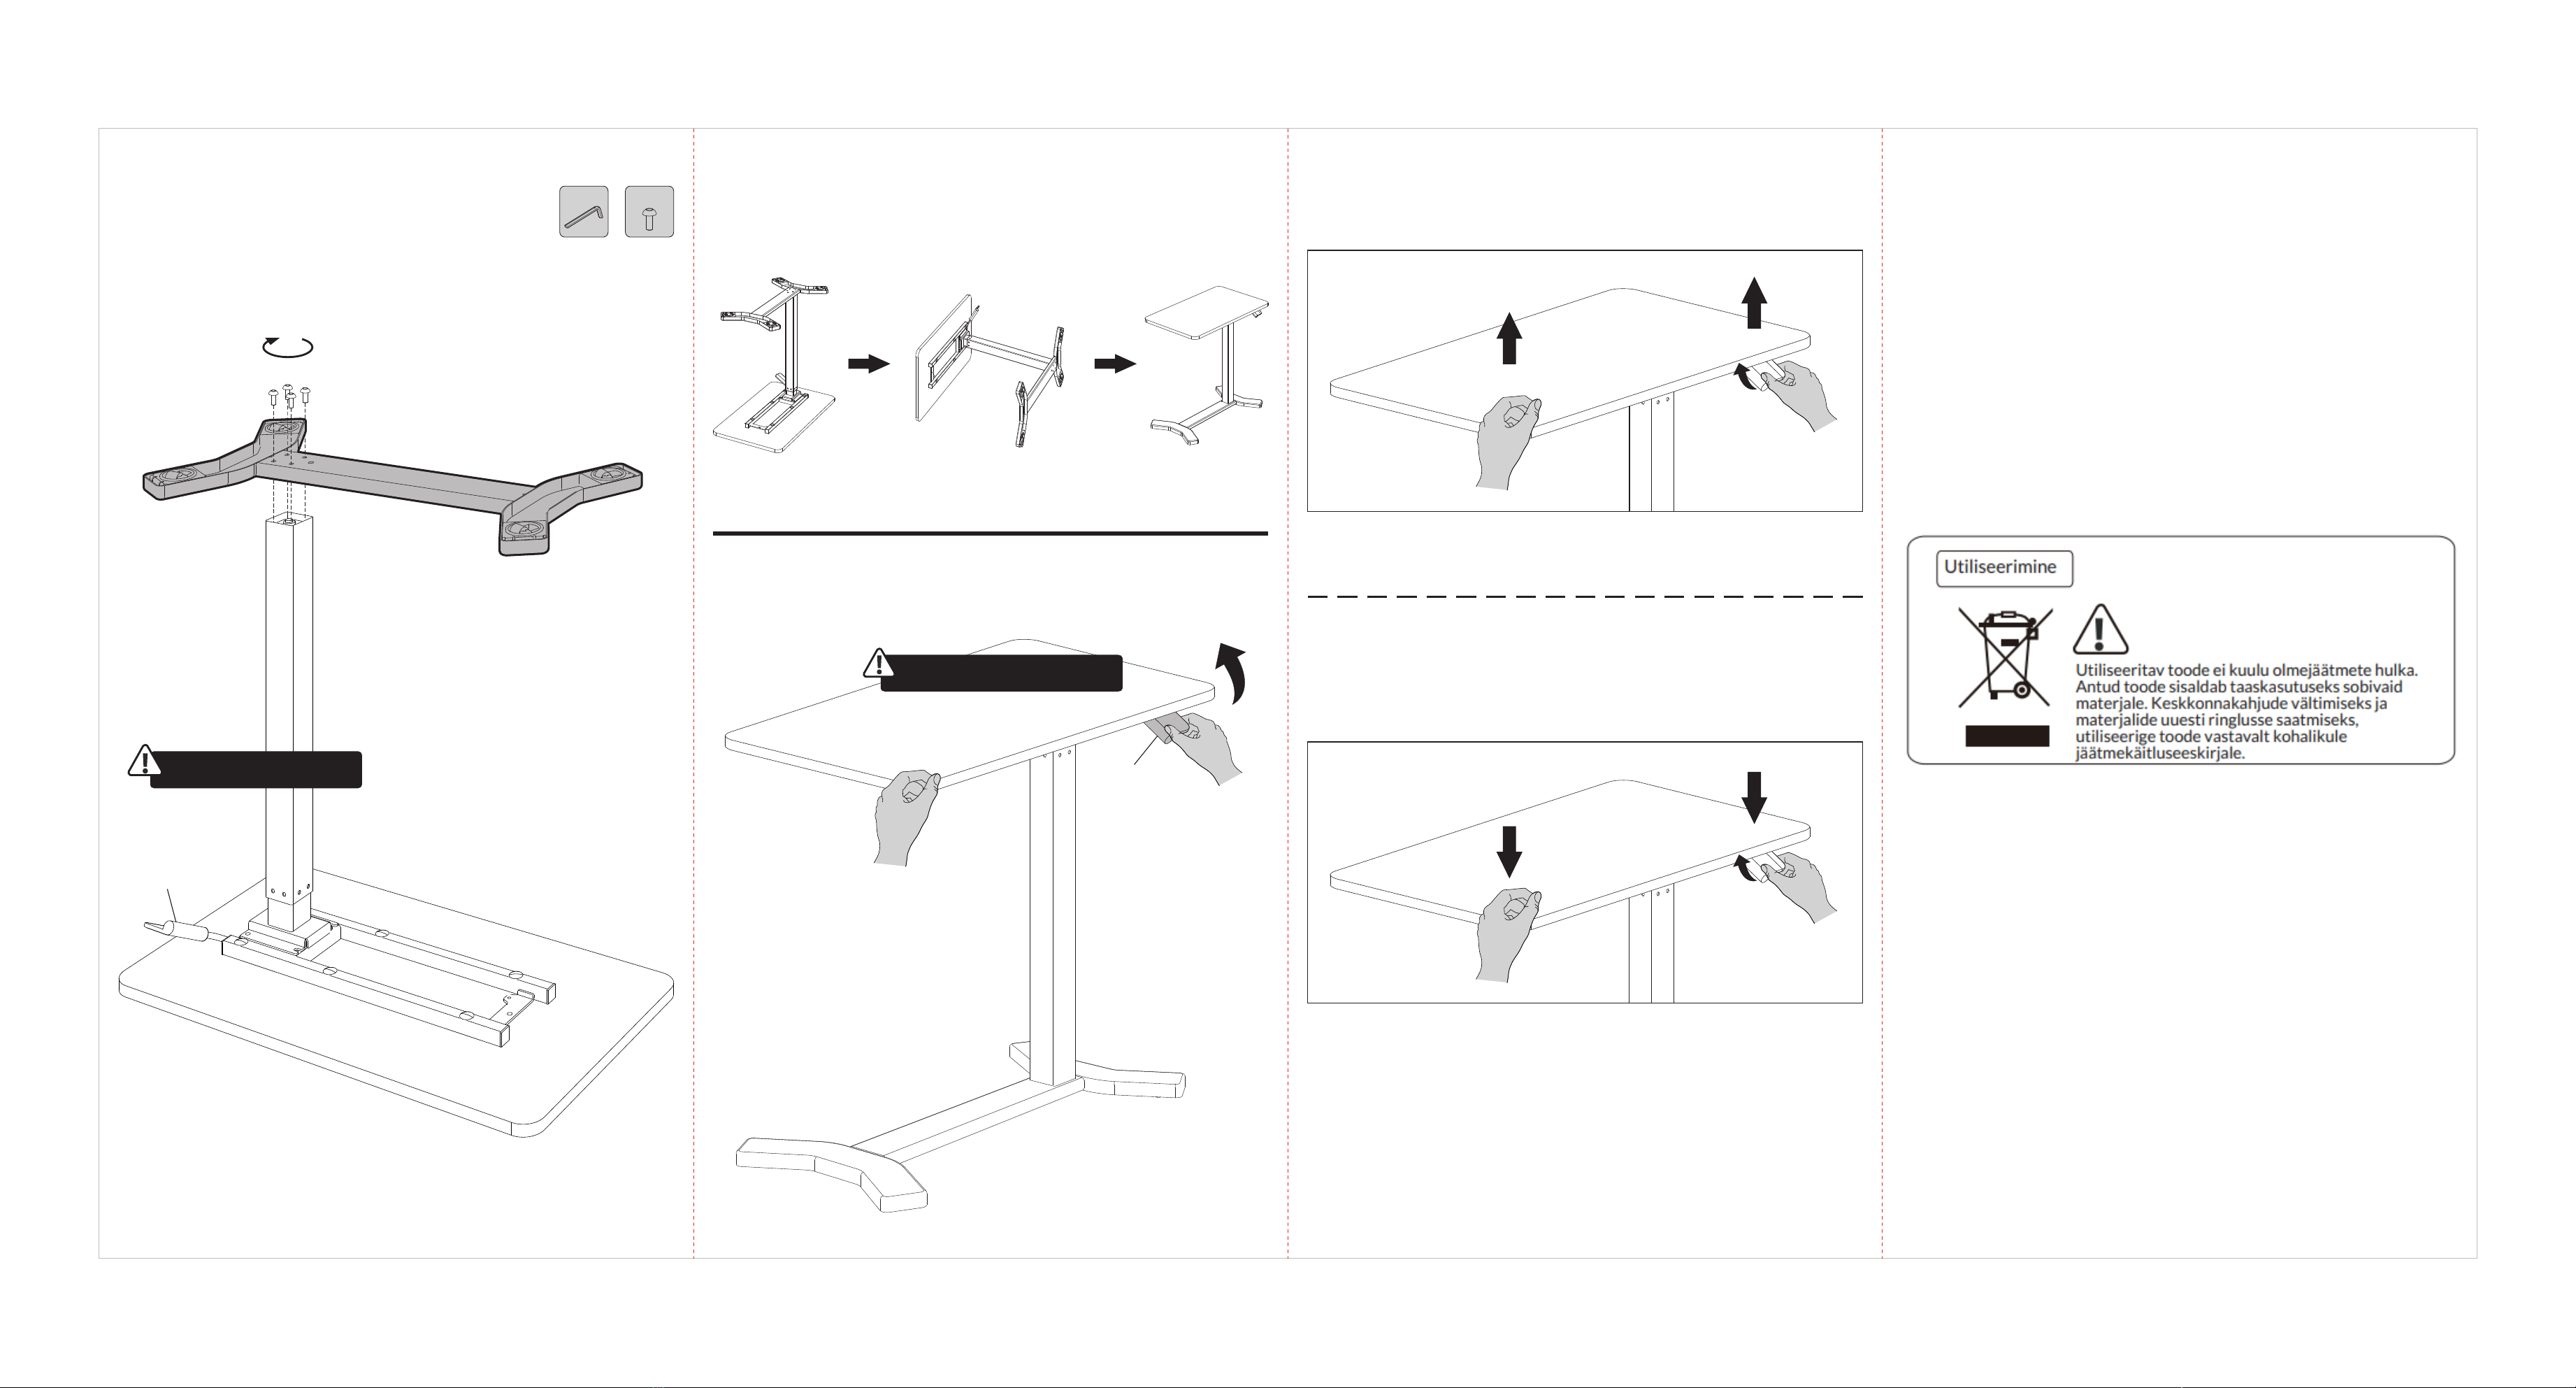
STEP2 Install the foot STEP3 Flip the table
STEP4 Adjust the table height
●
This marking indicates that this product should not be disposed with other
household wastes. To prevent possible harm to the environment or human
health from uncontrolled waste disposal, recycle it responsibly to promote the
sustainable reuse of material resources. To return your used device, please use
the return and collection systems or contact the retailer where the product was
purchased. They can take this product for environmental safe recycling.
There's spare parts in the package, which will lead to asphyxia if swallowed by accident. Please keep out of the reach
of children for the spare parts.
● Make sure you have read and comprehend the manual for installation. Please contact the specialized persons if
there's any confusion in the steps.
● Children are forbidden to play on the product because of unforeseen action when playing, so any dangerous
consequences caused by this improper action will not be on
● This appliance can be used by children aged from 7 years and above and persons with reduced physical, sensory or
mental capabilities or lack of experience and knowledge if they have been given supervision or instruction concerning
use of the appliance in a safe way and understand the hazards involved. Children shall not play with the appliance.
● Children must not perform cleaning and user maintenance without supervision.
● Please make sure there is no hazard sources in your operating environment. e.g., do not litter the tools around.
Always be careful to treat the packaging materials in order to avoid any possible danger, e.g. plastic bag may lead to
choking hazard to children.
● Keep the original package of the equipment if necessary in case of the future use in transportation.
Käepide
Käepide
Kõrguse reguleerimiseks
keerake käepide üles
2. Suruge lauaplaat alla, hoidke
kahe käega.
Ärge vajutage käepidet
kokkupanemise ajal
Hoiatus
SAMM 2 SAMM 3
SAMM 4
Reguleerimine kõrgemale
Reguleerige madalamale
1. Keerake käepide üles
2. Tõstke lauaplaati kahe käega
1. Keerake käepide üles
* Pakend sisaldav väikeseid osi, mis alla neelamisel võivad
põhjustada lämbumisohtu. Hoidke lapsed laua kokkupanemise
ajal ohutus kauguses.
* Tutvuge juhendiga enne laua kokkupanemist.
Probleemide korral võtke müüjaga ühendust.
* Ärge lubage väikestel lastel lauaga mängida.
* Veenduge, et töökeskkonnas ei oleks ohuallikaid.
Hoidke tööriistad ja pakkematerjal lastele kättesaamtuna.
* Alla 7 aastased lapsed ja erivajadusega inimesed
võivad laua kõrgust reguleerida ainult järelevalve all olles.
* Hoidke originaalpakend alles, juhuks kui on vaja lauda edaspidi
transportida.
7KG
650mm
2
Ax1Bx2Cx4
700x400mm
1030mm
①③
②
x2
B
x1
A
MT025-7040
Installation guide
< The pictures below are for reference only, please refer to the actual product. >
Please read this product manual carefully before use, and keep it properly.
Technical Data
Max. load capacity
Highest height
Column stage
Desktop dimension
Lowest height
Product List
Accessory List
Attention: The drawings below are for guidance only and they may differ slightly from the product and
fittings received. Please contact customer service if there are any missing tools or installation problems.
Preparation before installation
Install on carpet to prevent scratches. Need two or more people to cooperate together.
Part List
No. Part PartNo.
Desktop x1 Foot x1
Column x1
Installation Instruction
Installation Steps
STEP1 Install the column
Before installing the column, please
remove the gas spring safety cap
Remove Gas spring
safety cap
Slide in
①
②
③
1 2 3
x4
C
x1
A●
STEP2 Install the foot
Handle
STEP3 Flip the table
STEP4 Adjust the table height
Handle
Adjust the table height by flipping
the handle up.
Adjust height up
1. Flip the handle up
2. Use both hands to adjust the
table upwards at the same time
●
Adjust height down
1. Flip the handle up
2. Press down on the table with
both hands at the same time
This marking indicates that this product should not be disposed with other
household wastes. To prevent possible harm to the environment or human
health from uncontrolled waste disposal, recycle it responsibly to promote the
sustainable reuse of material resources. To return your used device, please use
the return and collection systems or contact the retailer where the product was
purchased. They can take this product for environmental safe recycling.
There's spare parts in the package, which will lead to asphyxia if swallowed by accident. Please keep out of the reach
of children for the spare parts.
● Make sure you have read and comprehend the manual for installation. Please contact the specialized persons if
there's any confusion in the steps.
● Children are forbidden to play on the product because of unforeseen action when playing, so any dangerous
consequences caused by this improper action will not be on
● This appliance can be used by children aged from 7 years and above and persons with reduced physical, sensory or
mental capabilities or lack of experience and knowledge if they have been given supervision or instruction concerning
use of the appliance in a safe way and understand the hazards involved. Children shall not play with the appliance.
● Children must not perform cleaning and user maintenance without supervision.
● Please make sure there is no hazard sources in your operating environment. e.g., do not litter the tools around.
Always be careful to treat the packaging materials in order to avoid any possible danger, e.g. plastic bag may lead to
choking hazard to children.
● Keep the original package of the equipment if necessary in case of the future use in transportation.
Warning
Do not press the handle when
installing to prevent injury.