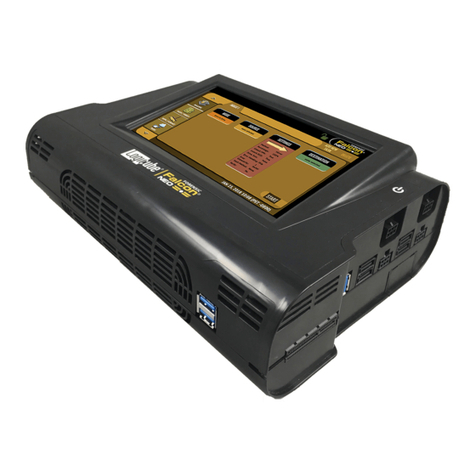
Logicube ZClone Xi Installation and operating instructions

Application Note
ZClone Xi System Restore v1.2h Page 1 of 9
Revised date: 04/30/2021
Logicube, Inc. • 19755 Nordhoff Pl.,Chatsworth, CA 91311 USA• tel:+1-818-700-8488• fax:+1-818-435-0088
www.logicube.com
ZClone™Xi (ZXi) System Restore
1.0 INTRODUCTION ......................................................................................................... 1
2.0 REQUIREMENTS......................................................................................................... 1
3.0 CREATING THE SYSTEM RESTORE USB FLASH DRIVE .......................................... 2
4.0 USING THE SYSTEM RESTORE FLASH DRIVE ......................................................... 5
4.1 SYSTEM RESTORE USB FLASH DRIVE –NOT DETECTED .....................................................................6
5.0 UPDATING THE SOFTWARE ..................................................................................... 6
5.1 REQUIREMENTS .................................................................................................................................6
5.2 UPDATING THE SOFTWARE.................................................................................................................7
5.2.1 From Network (Over the internet)............................................................................................7
5.2.2 From USB Drive (Through a software file download)................................................................8
6.0 FIRMWARE UPDATE .................................................................................................. 8
7.0 RE-ENABLE WATCHDOG TIMER....................................................................................... 9
1.0 Introduction
This document provides instructions on how to create and use a bootable flash drive to perform a
system restore for the ZXi. The system restore will restore the Operating System and ZXi software to
version 1.2.
2.0 Requirements
•Your own 1 GB or larger capacity USB flash drive
•A computer with a Windows Operating System
•A wired USB keyboard

Application Note
ZClone Xi System Restore v1.2h Page 2 of 9
Revised date: 04/30/2021
Logicube, Inc. • 19755 Nordhoff Pl.,Chatsworth, CA 91311 USA• tel:+1-818-700-8488• fax:+1-818-435-0088
www.logicube.com
3.0 Creating the system restore USB flash drive
Here are the steps to prepare the flash drive with the software necessary to be bootable:
It is recommended to use Chrome or Firefox
to download the files. Internet Explorer and
Edge do not download *.img files properly.
1. Go to http://updates.logicube.com/zxi-recovery/. Look for the following two files:
•The ZXi image file (a file with a *.img extension)
•win32diskimager-v1.0.0-binary.zip –An open-source tool used for writing images to
USB flash drives or SD/CF cards
2. Download both files. If the image file will not download, right-click on the link and use the ‘Save
Target As…’ or ‘Save Link As’ option and make sure it is saved with the *.img file extension.
3. Extract all the files within the win32diskimager-v1.0.0-binary.zip file to a folder or directory of
your choosing.
4. Connect a USB flash drive that is at least 1 GB in capacity to the computer where the software
was downloaded. It is recommended that all other USB drives are unplugged.
The contents of the USB flash drive will be overwritten.
If there is data on the USB flash drive that should not be
deleted, back up the contents of the USB flash drive or
use another USB flash drive for this procedure.
5. In the win32diskimager-v1.0.0-binary folder where the software was unzipped, run the file
Win32DiskImager.exe. The Win32 Disk Imager window will appear.

Application Note
ZClone Xi System Restore v1.2h Page 3 of 9
Revised date: 04/30/2021
Logicube, Inc. • 19755 Nordhoff Pl.,Chatsworth, CA 91311 USA• tel:+1-818-700-8488• fax:+1-818-435-0088
www.logicube.com
6. Click the folder icon to select a disk image.
7. In the folder where the files were downloaded (in step 2), select the system restore file and click
the Open icon. Note the screenshot below shows a different file name.
8. The Image file should now be seen in the Win32 Disk Imager screen under ‘Image File’.

Application Note
ZClone Xi System Restore v1.2h Page 4 of 9
Revised date: 04/30/2021
Logicube, Inc. • 19755 Nordhoff Pl.,Chatsworth, CA 91311 USA• tel:+1-818-700-8488• fax:+1-818-435-0088
www.logicube.com
9. Under ‘Device’, select the drive letter for the USB flash drive that was connected during step 3
then click the Write icon.
10. A confirmation screen will appear. Make sure that the “Target Device” is set to the correct drive
letter. If it is the correct drive letter, click Yes to continue. If it is showing the wrong drive letter,
click No. This will take you back to the previous screen where you can select the correct drive
letter (back to step 9).
11. The USB flash drive is now being prepared and the progress bar should be advancing.

Application Note
ZClone Xi System Restore v1.2h Page 5 of 9
Revised date: 04/30/2021
Logicube, Inc. • 19755 Nordhoff Pl.,Chatsworth, CA 91311 USA• tel:+1-818-700-8488• fax:+1-818-435-0088
www.logicube.com
12. When it is finished, a prompt should appear stating the write was successful. Click the OK icon
to continue. Close the Win32 Disk Imager window. The USB flash drive is now ready to be used.
13. Disconnect the USB flash drive from the computer.
4.0 Using the system restore flash drive
1. Turn the ZXi OFF and disconnect all drives (and any drive adapters) connected to all drive bays
and USB 3.0 ports (the blue USB ports).
2. Connect a wired USB keyboard to any open USB port in the back of the ZXi.
3. Insert the system restore USB flash drive to the U1 port (front USB).
4. Turn the ZXi on and immediately press and hold the Del key on the keyboard. Keep holding the
Del key down until the BIOS appears.
5. In the BIOS, using the arrow keys, navigate to the Chipset menu then press the Enter key.
6. In the Chipset menu, navigate to the Others Configuration menu then press the Enter key.
7. Change WATCHDOG Timer Enable to Disabled then press the Enter key.
8. Press the Esc key to go back one menu.
9. Navigate to Save & Exit and highlight Save Changes and Exit then press the Enter key.
10. A window will pop. Select Yes to Save & Exit setup.
11. The ZXi will reboot. Let it boot completely.
12. Once the ZXi boots completely, turn it back off.
13. Turn the ZXi on and immediately press and hold the F7 key on the keyboard. Keep holding the
F7 key down until a boot menu appears.
14. A boot menu should appear and show ‘Please select boot device’.
*** NOTE: If the system restore USB flash drive is not detected, follow the steps in Section 4.1.
15. Select the USB flash drive that was inserted. Do not select the one that is labeled ASMT 2115 or
SanDisk Cruzer Fit (unless your system restore USB flash drive is a Sandisk Cruzer Fit). Make
sure that you do not select the line that shows UEFI.
16. The system restore USB flash drive should boot. Wait about 2 minutes for the boot process to
complete.
17. Once the boot process is complete, tap the Restore icon on the screen to restore the system.
18. Wait for the restore process to complete. It can take up to 15 minutes.

Application Note
ZClone Xi System Restore v1.2h Page 6 of 9
Revised date: 04/30/2021
Logicube, Inc. • 19755 Nordhoff Pl.,Chatsworth, CA 91311 USA• tel:+1-818-700-8488• fax:+1-818-435-0088
www.logicube.com
19. When the restore process is complete, tap the Power Off icon on the screen to turn the ZXi off.
Remove the system restore USB flash drive and the USB keyboard from the ZXi.
20. Turn the ZXi on. The ZXi should boot up properly with the newly recovered software.
4.1 System Restore USB flash drive –Not detected
If the system restore USB flash drive is not detected, follow these steps:
1. Turn the ZXi off.
2. Turn the ZXi on and immediately press and hold the Delete key on the keyboard. Keep
holding the Delete key down until the BIOS appears. In the BIOS, navigate to the
Advanced menu.
3. Navigate to Onboard Configuration and press the Enter key.
4. Navigate to Onboard Device Configuration and press the Enter key.
5. Navigate to USB boot device filte and press the Enter key.
6. Use the Up Arrow or Down Arrow key to change the selection to Disabled and press the
Enter key.
7. Press the Esc key to go back one menu level.
8. Use the Right Arrow key to navigate to Save & Exit.
9. Make sure Save Changes & Exit is highlighted then press the Enter key.
10. A confirmation screen will appear. Make sure Yes is selected and press the Enter key.
Immediately after pressing the Enter key to exit the BIOS, press and hold the F7 key
while the ZXi reboots. Keep holding down the F7 key until a boot menu appears.
11. When the boot menu appears, continue with Steps 15 through 20 in Section 4.0.
5.0 Updating the software
The system restore process will bring the ZXi software to version 1.2. To update the software and/or to
install any purchased ZXi options, the latest software release will need to be installed.
5.1 Requirements
To perform the software update and/or enable any purchased ZXi option, one of the following
is required:
•The ZXi connected to a network with internet access (for updating “FROM NETWORK”),
or
•The ZXi with your own USB flash drive. The USB flash drive must be formatted FAT32
or NTFS (for updating “FROM USB DRIVE”)

Application Note
ZClone Xi System Restore v1.2h Page 7 of 9
Revised date: 04/30/2021
Logicube, Inc. • 19755 Nordhoff Pl.,Chatsworth, CA 91311 USA• tel:+1-818-700-8488• fax:+1-818-435-0088
www.logicube.com
5.2 Updating the software
There are two methods available to update/reinstall the ZXi software:
A. FROM NETWORK –Over the Internet through a network connection.
B. FROM USB DRIVE –Through a software file download onto a USB flash drive.
5.2.1 From Network (Over the internet)
The ZXi software can be updated/reinstalled by connecting the ZXi to a network with
Internet access.
It is recommended to disconnect all
drives and drive adapters from the ZXi
before the update/reinstall process.
1. Connect the ZXi to a network with Internet access and turn the ZXi on.
2. From the main menu on the ZXi, locate and tap the Software Updates icon on
the left side.
3. Select From Network. The ZXi will check for software on Logicube’s server.
After a few seconds, one of the following messages will appear:
•Newer version available –This message will appear if there is a newer
software version found. Tap the OK icon to continue.
•Up to date –This message will appear if the software version found is
the same as the version currently installed. Tap the OK icon to continue.
•No new version found –This message will appear if the ZXi does not
have any internet access. Tap the OK icon to continue. If this message is
seen, try the following:
i. Go to the About tab in the Statistics screen and check the N/W
Interfaces to make sure the ZXi is connected to a network and
has a valid IPAddress, or
ii. Make sure the network the ZXi is connected to has Internet
access, or
iii. Try using the “From USB DRIVE” option (see Section 5.2.2).
4. Tap the Update icon to begin the update/reinstall. The ZXi should begin the
update/reinstall process. Do not interrupt this process. It may take several
minutes. Once completed, a screen will appear stating the update is complete
and will prompt you to turn the unit off then back on.
5. Turn the ZXi off. Wait at least 5 seconds then turn the ZXi back on.
6. Verify the software version by going to the Software Updates screen then go to
section 6.0 Firmware Update to check if there is a firmware update available.

Application Note
ZClone Xi System Restore v1.2h Page 8 of 9
Revised date: 04/30/2021
Logicube, Inc. • 19755 Nordhoff Pl.,Chatsworth, CA 91311 USA• tel:+1-818-700-8488• fax:+1-818-435-0088
www.logicube.com
5.2.2 From USB Drive (Through a software file download)
Aside from the network option, the latest software can also be downloaded from
Logicube’s website and be placed onto a USB flash drive to perform the
reinstall/update. It is recommended to use an empty USB flash drive.
It is recommended to disconnect all
drives and drive adapters from the ZXi
before the update/reinstall process.
1. Using a computer, download the latest software from the ZXi product support
page at https://www.logicube.com/knowledge/zclonexi.
2. Extract the contents of the downloaded zip file to the root of the USB flash
drive.
3. Turn the ZXi on. When the main software screen appears, connect the USB flash
drive (that has the extracted software from step 2) to the U1 port (the front USB
port).
4. From the main menu on the ZXi, locate and tap the Software Updates icon on
the left side.
5. Select From USB Drive. The ZXi will check for the version of the software on the
USB drive. After a few seconds, one of the following messages should appear:
•Software found –A software version is found on the USB flash drive.
Tap the OK icon to continue.
•No new version found –The ZXi did not find any software on the USB
flash drive or could not detect the USB flash drive. If this message is
seen, try the following:
i. Make sure the correct software was downloaded and the files
were extracted to the root of the USB flash drive, or
ii. Format and use a different USB flash drive, or
iii. Try using the “From Network” option (see Section 5.2.1)
6. Tap the Update icon to begin the update/reinstall. The ZXi should begin the
update/reinstall process. Do not interrupt this process. It may take several
minutes. Once completed, a screen will appear stating the update is complete
and will prompt you to turn the unit off then back on.
7. Turn the ZXi off. Wait at least 5 seconds then turn the ZXi back on.
8. Verify the software version by going to the Software Updates screen then go to
section 6.0 Firmware Update to check if there is a firmware update available.
6.0 Firmware Update
ZXi software releases may contain a firmware update. This section provides instructions on how to
check if a firmware update is required, and how to perform the firmware update.

Application Note
ZClone Xi System Restore v1.2h Page 9 of 9
Revised date: 04/30/2021
Logicube, Inc. • 19755 Nordhoff Pl.,Chatsworth, CA 91311 USA• tel:+1-818-700-8488• fax:+1-818-435-0088
www.logicube.com
1. After the software is updated/reinstalled on the ZXi, locate and tap the Software Updates icon
on the left side.
2. Tap the “Firmware Update” tab. One of two screens will appear:
a. FIRMWARE UPGRADE AVAILABLE –Tap the Update icon. A message will appear:
“FIRMWARE UPDATE COULD TAKE UP TO A FEW MINUTES TO COMPLETE; PLEASE DO
NOT INTERRUPT POWER DURING THIS TIME. ON COMPLETION THE UNIT WILL AUTO-
RESTART AND CONFIRM THE UPDATE.” Tap the OK icon to start the firmware update
process.
When the OK icon is tapped, the screen may appear to do
nothing. Do not keep tapping the OK icon. The firmware
update typically takes no more than 60-120 seconds. When
the firmware update finishes, the ZXi will reboot automatically.
b. FIRMWARE UPGRADE NOT AVAILABLE –This message will appear if the device does
not require a firmware update. No further action is necessary if this message appears.
7.0 Re-Enable Watchdog Timer
1. Turn the ZXi OFF and disconnect all drives (and any drive adapters) connected to all source and
destination ports.
2. Connect a wired USB keyboard to any open USB port in the back of the ZXi.
3. Turn the ZXi on and immediately press and hold the Del key on the keyboard. Keep holding the
Del key down until the BIOS appears.
4. In the BIOS, using the arrow keys, navigate to the Chipset menu then press the Enter key.
5. In the Chipset menu, navigate to the Others Configuration menu then press the Enter key.
6. Change WATCHDOG Timer Enable to Enabled and make sure the other WATCHDOG settings
are as follows:
a. WATCHDOG Timer Run/St [RUN]
b. WATCHDOG Timer ACTION [Reset]
c. WATCHDOG Timer COUNT [300 SEC]
7. Press the Esc key to go back one menu.
8. Navigate to Save & Exit and highlight Save Changes and Exit then press the Enter key.
9. A window will pop. Select Yes to Save & Exit setup.
10. The ZXi should reboot. At this time you can disconnect the USB keyboard and let the ZXi boot
up completely.
Other manuals for ZClone Xi
1
This manual suits for next models
1
Table of contents
Other Logicube Network Hardware manuals
Popular Network Hardware manuals by other brands

ETL
ETL MC68HC912 user guide

Piera Systems
Piera Systems Canaree I1E quick start guide

Inalp Networks
Inalp Networks SmartNode 1000 Series Hardware installation guide

Ubiquiti
Ubiquiti LiteBeam LBE-5AC-23 quick start guide

TYANO
TYANO TS70-B8056 Service engineer's manual

USAVision
USAVision UA-SNVR Series quick start guide