Longevity 7236 User manual

1
Congratulations on purchasing a Longevity Acrylics bathware
product. Be assured that your product has been developed and is
a highly engineered, quality product that is strong and durable to
withstand the rigors of everyday life.
• Strength, durability and toughness to withstand frequent use
• Resistant to everyday wear and tear, stains, and superficial scratches
• Resistant to UV, and many household chemicals
• Qualities that make light work of cleaning and maintenance
• Beautiful warm, smooth surfaces that feel comfortable against the
skin
INSPECTION: THIS ACRYLIC UNIT HAS BEEN CAREFULLY
INSPECTED AND PACKED FOR SHIPMENT AT LONGEVITY
ACRYLICS INC. PLEASE FULLY INSPECT THE UNIT BEFORE
INSTALLATION.
Carefully remove the unit from the carton. Do not destroy the
cardboard until you have inspected the unit thoroughly. Should your
inspection reveal any damage or defect in the finish, do not install the
unit—contact your distributor immediately.
The warranty does not cover damages or defects to the finish claimed
after the unit has been installed. Longevity’s responsibility for shipping
damages ceases upon delivery of the product in good order to the
carrier.
Refer any claims for damages to the carrier.
INSTALLATION INSTRUCTIONS
BUILDING CODES
Be sure to follow local building codes when installing the bathware
unit.
IT IS ALWAYS RECOMMENDED TO HAVE A PROFESSIONAL
AND COMPETENT PLUMBER INSTALL LONGEVITY ACRYLICS
BATHWARE.
CAUTION
• To cut plumbing fixture openings on your bathware unit ensure
that you use the correct size hole saw based on the selected unit
design.
• Always cut a plumbing fixture opening from the finished side of
the unit.
• Always ensure that the surface of the unit is protected to prevent
scratches in the surface.
• Install plumbing fixtures based on the manufacturers
recommended installation instructions.
• The drain location on the unit is shown; however actual
installation will depend on the waste and overflow which is
purchased separately.
LONGEVITY ACRYLICS INC. IS NOT RESPONSIBLE FOR ANY
DAMAGES INCURRED AS A RESULT OF POOR INSTALLATION
OF THE PRODUCT.
REQUIRED TOOLS
Screwdriver Pencil Silicone Sealant Gun
Electric DrillLevel Square
Safety Equipment:
Gloves, Boots and Glasses
Every effort has been made to offer the most current, correct, and clearly expressed information possible. Nevertheless, inadvertent errors or inaccuracies in the information may occur.
Longevity Acrylics disclaims any responsibility for errors or accuracy of information that may be contained in its documents or web pages. Longevity Acrylics Inc. makes no warranties or
representations whatsoever regarding the quality, content, completeness, suitability, adequacy, sequence, accuracy or timeliness of such information and data.
BATHTUBS
(Excludes Freestanding 6636 & 6634 models)
V1-08/2020 IJM

2
INSTALLATION
GENERAL INSTALLATION NOTES
IMPORTANT: READ ALL INSTRUCTIONS CAREFULLY
BEFORE PROCEEDING. STRUCTURE MEASUREMENTS
MUST BE VERIFIED AGAINST THE UNIT. ENSURE THE
STRUCTURE MEETS THE REQUIRED DIMENSIONS, IT IS
LEVEL AND SQUARE.
Check that floor is level, adjust as necessary. Shimming may be
required to level the bathware unit to ensure adequate drainage.
Do not level directly behind or under the flange and/or at the
front of the unit.
ALWAYS ENSURE THAT THE SURFACE OF THE UNIT IS
PROTECTED TO PREVENT SCRATCHES IN THE SURFACE.
DIMENSIONS VARY FROM A TUB ONLY, WHIRLPOOLS
AND THERAPEUTICS. IT IS ALWAYS BEST TO HAVE THE
TUB ON SITE BEFORE PREPARING TO INSTALL FOR
ACCURATE HEIGHT DIMENSION.
INSTALLATION STEPS
1. Unpack the bathtub and be very careful during installation
so as to not damage the acrylic surface of the tub. It is
important that the tub rest on the floor. The deck is not to be
used to support the tub.
2. Do not build a frame and sit the tub onto it until the tub is
installed, plumbed, shimmed and tested. Doing so can result
in cracks on the deck if the tub is not firmly sitting on the
floor. It is important that the tub rest on the floor. The deck
is not to be used to support the tub.
The acrylic tub must be installed level to ensure proper
operation and drainage. Since all floors are not level,
shimming of the base may be required. All shims used to
level base should be nailed or screwed into place.
3. Electrical power supply must have ground fault breaker in
circuit.
4. Bathtub fittings should be installed as per manufacturers
instructions.
5. Always ensure access to motors and blowers as the
manufacturer can not be held responsible for removal of
tiles etc. should warranty work be required.
6. Always test installation. Fill with water and test all working
pump parts before closing around the tub with finishing
trim.
CLEANING
For normal care and cleaning use a soft cloth using our
Longevity Acrylics Acrylic Bathtub & Shower Clean & Shine:
• It will gently clean all acrylic surfaces without scratching
• Leaves a lustrous shine that resists fogging, repels dust, and
eliminates static
• Resist finger marking
• Contains no abrasive or harsh chemicals
• Leaves a clean smooth, greaseless shine
If using a household cleaner, make sure it is recommended for
use on acrylic by the manufacturer. Be sure to read the label
and follow the cleanser’s recommendations. Never use abrasive
cleaners.
Every effort has been made to offer the most current, correct, and clearly expressed information possible. Nevertheless, inadvertent errors or inaccuracies in the information may occur.
Longevity Acrylics disclaims any responsibility for errors or accuracy of information that may be contained in its documents or web pages. Longevity Acrylics Inc. makes no warranties or
representations whatsoever regarding the quality, content, completeness, suitability, adequacy, sequence, accuracy or timeliness of such information and data.
A
B
C
D
E
FRAMING —
RECTANGULAR
BATHTUB
E
B A
C
D
FRAMING — CORNER BATHTUB
LOCATION FOR THE SCREWS

3
Every effort has been made to offer the most current, correct, and clearly expressed information possible. Nevertheless, inadvertent errors or inaccuracies in the information may occur.
Longevity Acrylics disclaims any responsibility for errors or accuracy of information that may be contained in its documents or web pages. Longevity Acrylics Inc. makes no warranties or
representations whatsoever regarding the quality, content, completeness, suitability, adequacy, sequence, accuracy or timeliness of such information and data.
Do not allow your Longevity bathware surface to come
into contact with products such as ketones or esters such as
acetone or ethyl acetate (nail polish remover), Wintergreen
oil (methyl salicylate), nail polish, dry cleaning solution or
other chlorinated organic solvents, lacquer thinners, gasoline,
aromatic solvents, pine oil, etc.
Remove dust and dry dirt with a soft, damp cloth. Clean grease,
oil, paint and ink stains with isopropyl (rubbing) alcohol. Dry
with a clean, soft cloth.
Avoid using razor blades or other sharp instruments that might
scratch the surface.
If you use a rubber or plastic anti-skid mat, make sure to remove
it after every shower to avoid harming the surface finish.
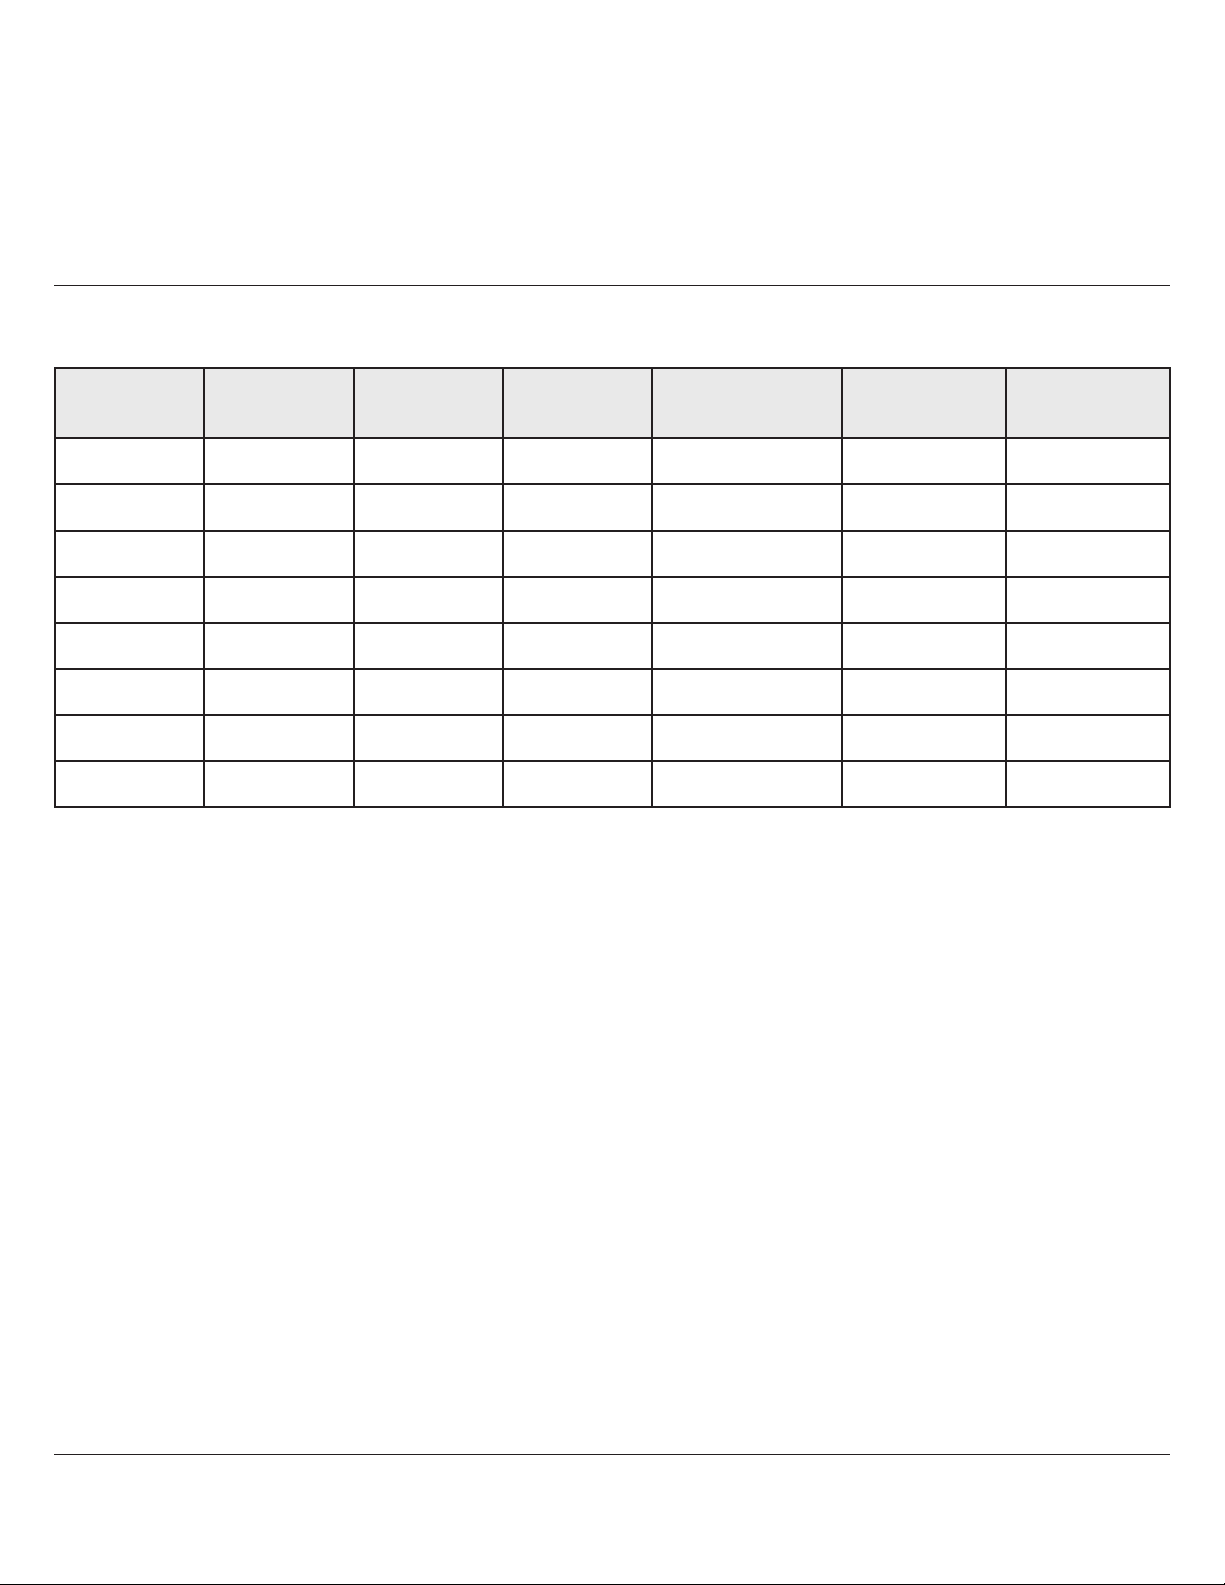
TABLE 1 - TECHNICAL DATA
Model# A
Wide
B
Long
C
High
Drain
Location
D
DrainBack
E
DrainEnd
7236 36" 72" 20" END DRAIN 18" 8½"
7234S 34" 72" 20" END DRAIN 17" 8"
6036 36" 60" 19" END DRAIN 16½" 8½"
6032S 32" 60" 20" END DRAIN 16" 8"
6032A 32" 60" 18½" END DRAIN 16" 8"
6032 31½" 60" 20" END DRAIN 16" 8½"
6063C 60" 60" 20" CENTER DRAIN 42" 11½"
5454C 54" 54" 20" CENTER DRAIN 38" 12"
INSTALLATION GUIDELINES — SPA SYSTEMS
• If you are ordering a combination system (air massage system/
hydro massage system/mini lateral system), you must order the
optional access panel, and there must be an additional access
point for the blower (models 6032S, 7234S, 2170, 2060).
• If you are installing a combination system (air massage system
& hydro massage system/mini lateral system), the optional
access panel only gives you access to the motor (hydro massage
system). You cannot access the blower through the optional
access panel.
• When ordering a combination system a 3' extension kit is
available so that the blower can be installed in a remote area.
• If you are installing a combination system (air massage
system & hydro massage system/mini lateral system),
you need an additional 6" behind the flange of the tub to
accommodate both systems (headrest end).
• If you are installing only the air massage system, or only the
hydro massage system no additional space is required behind
the flange of the tub (headrest end).

This manual suits for next models
7
Other Longevity Bathtub manuals
Popular Bathtub manuals by other brands

Jacob Delafon
Jacob Delafon PLUS quick start guide

Sapho
Sapho G7800 Blanice Installation and user guide

Kohler
Kohler MEMOIRS K-1418-M specification

American Standard
American Standard DXV LYNDON D12536-004 installation instructions

Kohler
Kohler REVIVAL K-1375-RV specification

Kohler
Kohler K-1108-LA Installation and care guide

decina
decina ALEGRA AG1500BTWCNW Installation & owners guide

Fleurco
Fleurco CONCERTO petite BZCO5931 Installation and user guide

Jacob Delafon
Jacob Delafon EVOK EXCELLENCE E5BD214L-00 Instructions for installation

Empava
Empava EMPV-67AIS13 manual

STROMBERG
STROMBERG Arden quick start guide

Signature Hardware
Signature Hardware Kateryn Bateau 953420 manual