manuals.online logo
Brands
  1. Home
  2. •
  3. Brands
  4. •
  5. LOWE'S
  6. •
  7. Outdoor Light
  8. •
  9. LOWE'S W0192 Instruction manual

LOWE'S W0192 Instruction manual

Other LOWE'S Outdoor Light manuals

LOWE'S T0463 Instruction manual

LOWE'S

LOWE'S T0463 Instruction manual

LOWE'S 20443-000 User manual

LOWE'S

LOWE'S 20443-000 User manual

LOWE'S Westwood collections 30461 User manual

LOWE'S

LOWE'S Westwood collections 30461 User manual

LOWE'S T0324 Instruction manual

LOWE'S

LOWE'S T0324 Instruction manual

LOWE'S 20442-000 User manual

LOWE'S

LOWE'S 20442-000 User manual

Popular Outdoor Light manuals by other brands

Kichler Lighting HELEN 37536 instructions

Kichler Lighting

Kichler Lighting HELEN 37536 instructions

Thorn OXANE L installation instructions

Thorn

Thorn OXANE L installation instructions

esotec Solar Globe Light multicolor 20 operating instructions

esotec

esotec Solar Globe Light multicolor 20 operating instructions

mitzi HL200201 ELLIS Assembly and mounting instructions

mitzi

mitzi HL200201 ELLIS Assembly and mounting instructions

HEPER TILA S AFX 3 Module Installation & maintenance instructions

HEPER

HEPER TILA S AFX 3 Module Installation & maintenance instructions

Designplan TRON 180 installation instructions

Designplan

Designplan TRON 180 installation instructions

Sealey LED37 instructions

Sealey

Sealey LED37 instructions

nordlux VEJERS Mounting instruction

nordlux

nordlux VEJERS Mounting instruction

SImx ELITE LED LHTC637 installation instructions

SImx

SImx ELITE LED LHTC637 installation instructions

GEV CAROLINE 10833 manual

GEV

GEV CAROLINE 10833 manual

WE-EF PFL540 LED Installation and maintenance instructions

WE-EF

WE-EF PFL540 LED Installation and maintenance instructions

HEPER DOGO Side LW6048.585-US Installation & maintenance instructions

HEPER

HEPER DOGO Side LW6048.585-US Installation & maintenance instructions

BEGA 84 253 Installation and technical information

BEGA

BEGA 84 253 Installation and technical information

HEPER LW8034.003-US Installation & maintenance instructions

HEPER

HEPER LW8034.003-US Installation & maintenance instructions

HEPER MINIMO Installation & maintenance instructions

HEPER

HEPER MINIMO Installation & maintenance instructions

LIGMAN BAMBOO 3 installation manual

LIGMAN

LIGMAN BAMBOO 3 installation manual

Maretti TUBE CUBE WALL 14.4998.04 quick start guide

Maretti

Maretti TUBE CUBE WALL 14.4998.04 quick start guide

Maxim Lighting Carriage House VX 40428WGOB installation instructions

Maxim Lighting

Maxim Lighting Carriage House VX 40428WGOB installation instructions

manuals.online logo
manuals.online logoBrands
  • About & Mission
  • Contact us
  • Privacy Policy
  • Terms and Conditions

Copyright 2025 Manuals.Online. All Rights Reserved.

Bulb type A Max. 60W
(not include)
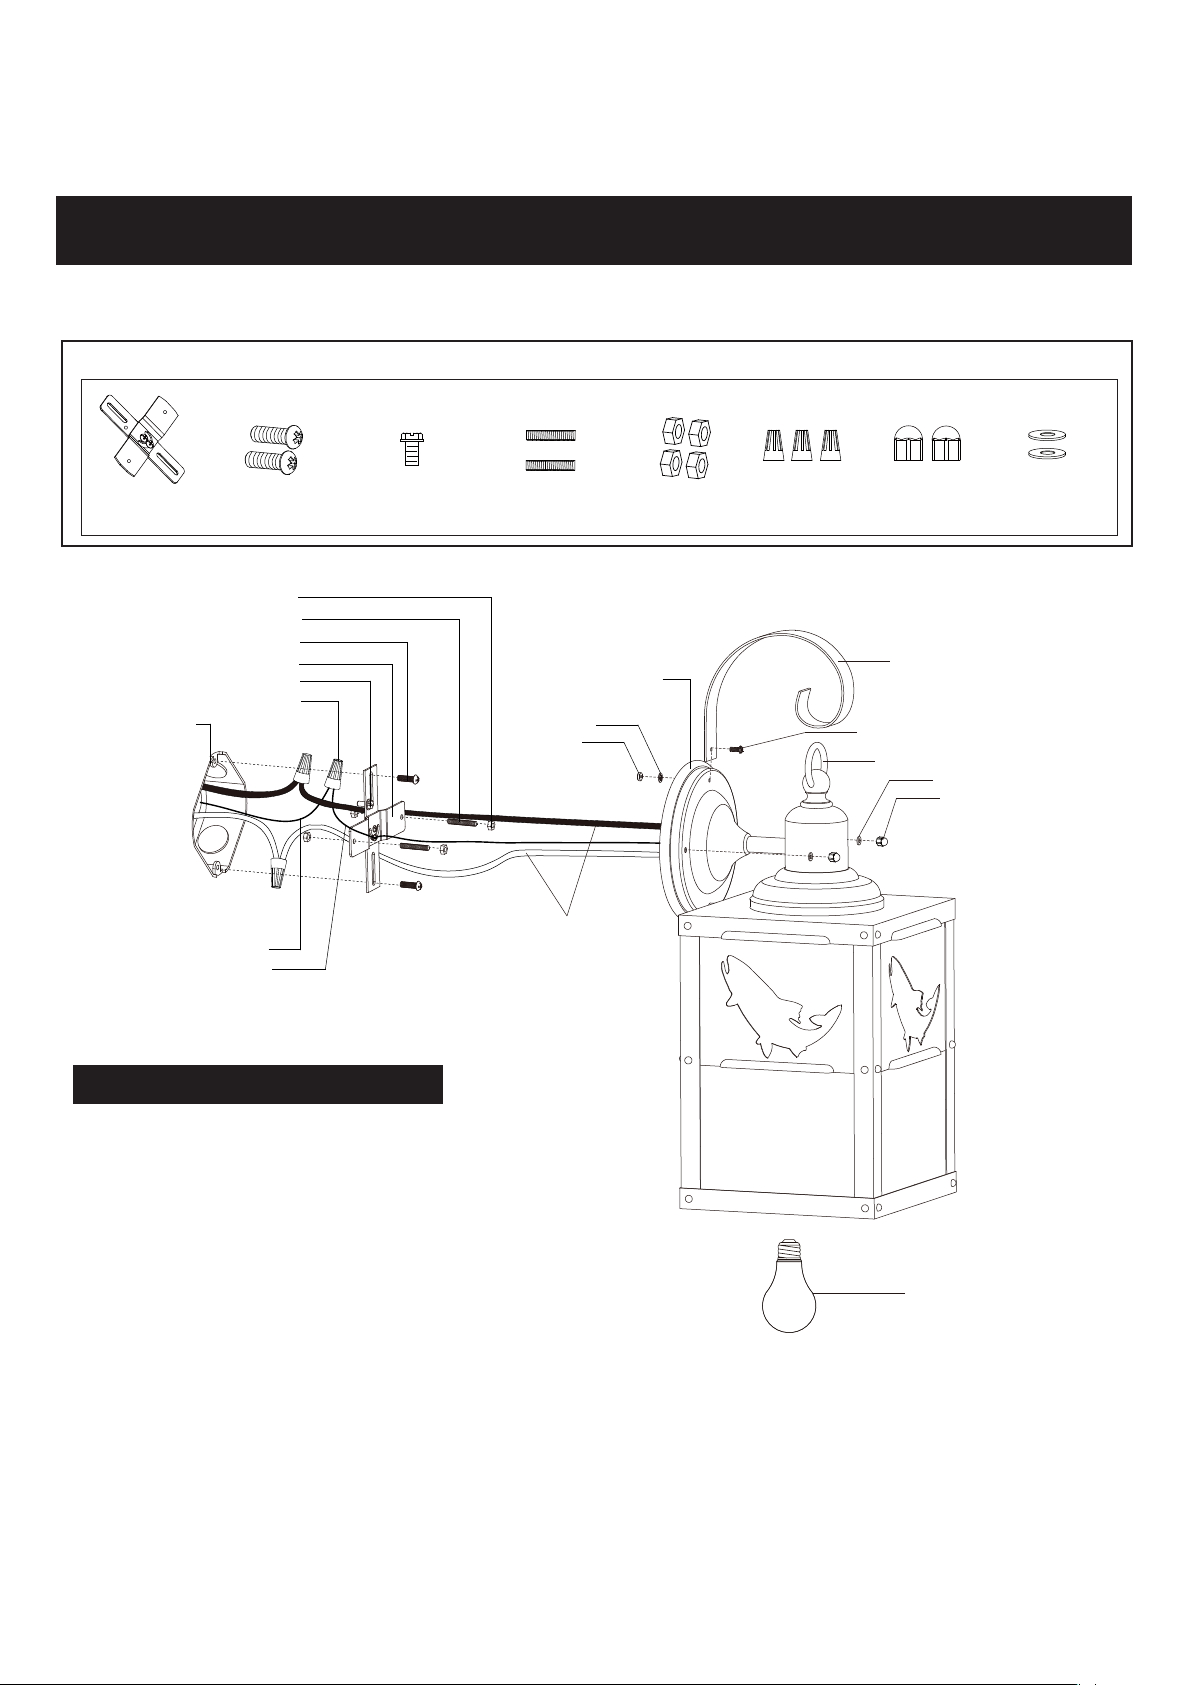
ASSEMBLY AND INSTALLATION
INSTRUCTIONS
NOTES: 1. Before installing, consult local electrical codes for wiring and grounding requirements.
2. READ AND SAVE THESE INSTRUCTIONS.
Hardware Package (included):
WARNING:
TO AVOID RISK OF ELECTRICAL SHOCK, BE SURE TO SHUT OFF
POWER BEFORE INSTALLING OR SERVICING THIS FIXTURE.
Turn off the power at fuse or circuit box.
Installation Steps
Rubber Pad (H)
Cross Bar (A)
Green Grounding Screw (C)
Outlet Box
Wire Nut (F)
Headless Screw (D)
Cross Bar (A)
Mounting Screw (B)
Lock Nut
(E)
House Grounding Wire
Fixture Grounding Wire
Back Plate
Set Screw
Loop
Curved Arm
Lock Nut-2
Washer
Rubber Pad (H)
Ball Nut(G)
Fixture Wire
1. Thread two headless screws through the cross bar, and then
secure them with four lock nuts (two on each side of the cross
bar). Adjust the length of the headless screws if necessary.
Note: Make sure that the headless screws are lined up
horizontally to make the fixture level.
2. Attach cross bar to the outlet box using two mounting screws.
3. Unscrew the set screw, lock nut-2 and washer from the curved arm.
4. Hook the curved arm to the loop, and then attach the curved arm to the back plate by using the set screw, washer
and lock nut-2.
5. Pull out the source wires from the outlet box. Make wire connections using wire nuts as follows:
---Connect the hot wire (usually black insulation) from the fixture to the black wire from the power source.
---Connect the neutral wire (usually white insulation) from the fixture to the white wire from the power source.
---Attach the fixture grounding wire (usually green insulation or bare wire) to the cross bar with the green
grounding screw, and then connect it to the house grounding wire with the wire nut.
Carefully put the wires back into the outlet box.
Mounting Screw (B) Wire Nut (F) Ball Nut (G)
Lock Nut (E)
Headless Screw(D)
Green Grounding
Screw (C)
Turn on the power at fuse or circuit box
Rubber Pad (H)
Cross Bar (A)
Curved Arm Set Screw Washer Lock Nut-2
6. Attach the back plate to the cross bar by inserting two headless screws, and then secure it with two rubber pads and
two ball nuts.
NOTE: With silicone caulking compound, caulk completely around where the back plate meets with the wall
surface to prevent water from seeping into the outlet box.
7. Install a bulb (not included). Check relamping label at socket area or packaging for maximum allowed wattage.
A
B
C
A
B
C
Mounting Screw (B)
Wire Nut (F) Ball Nut (G)
Lock Nut (E)
Headless Screw(D)
Green Grounding
Screw (C)
The following parts are available for re-order if damaged or missing.
Spare Parts List:
A: 5" B: 13" C: 6"
Assembly Kit
(1 SET)
Glass Panel
Mounting Hardware