Lowrey EZP8 Virtual Orchestra User manual

Owner’s Guide

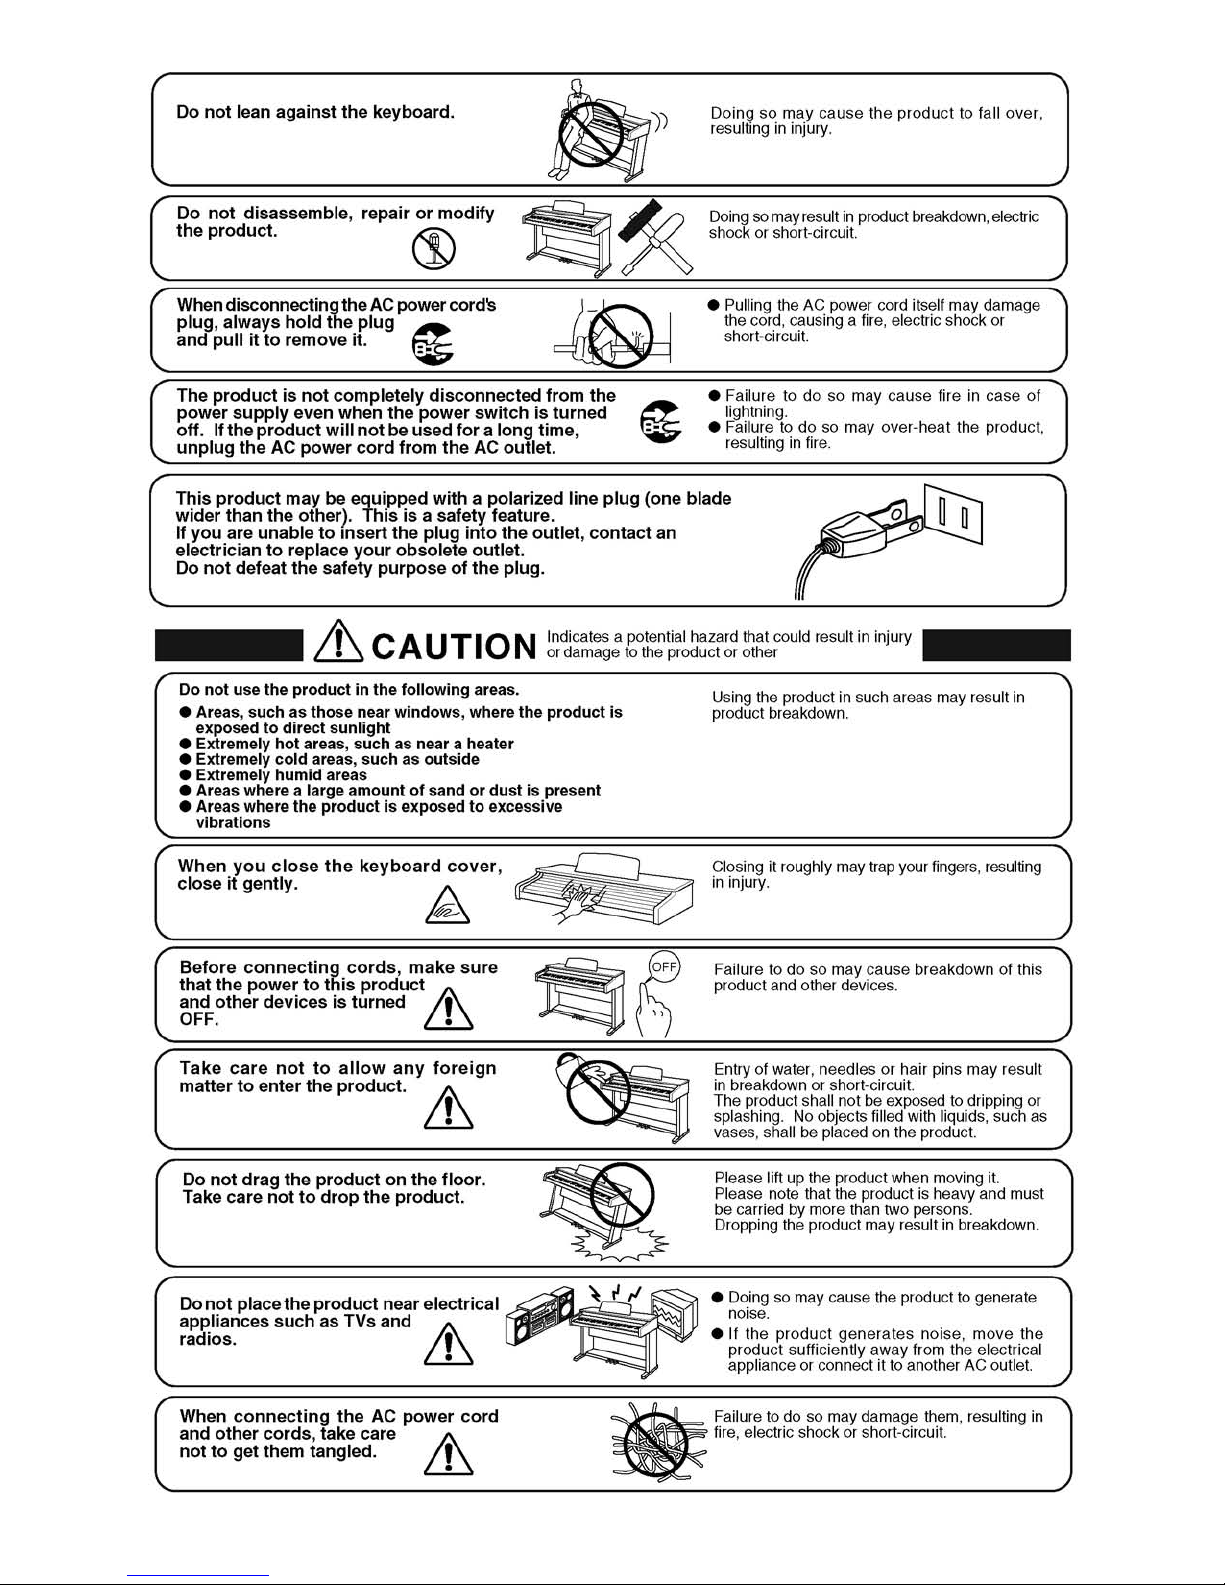
Important Safety Instructions . . . . . . . . . 1
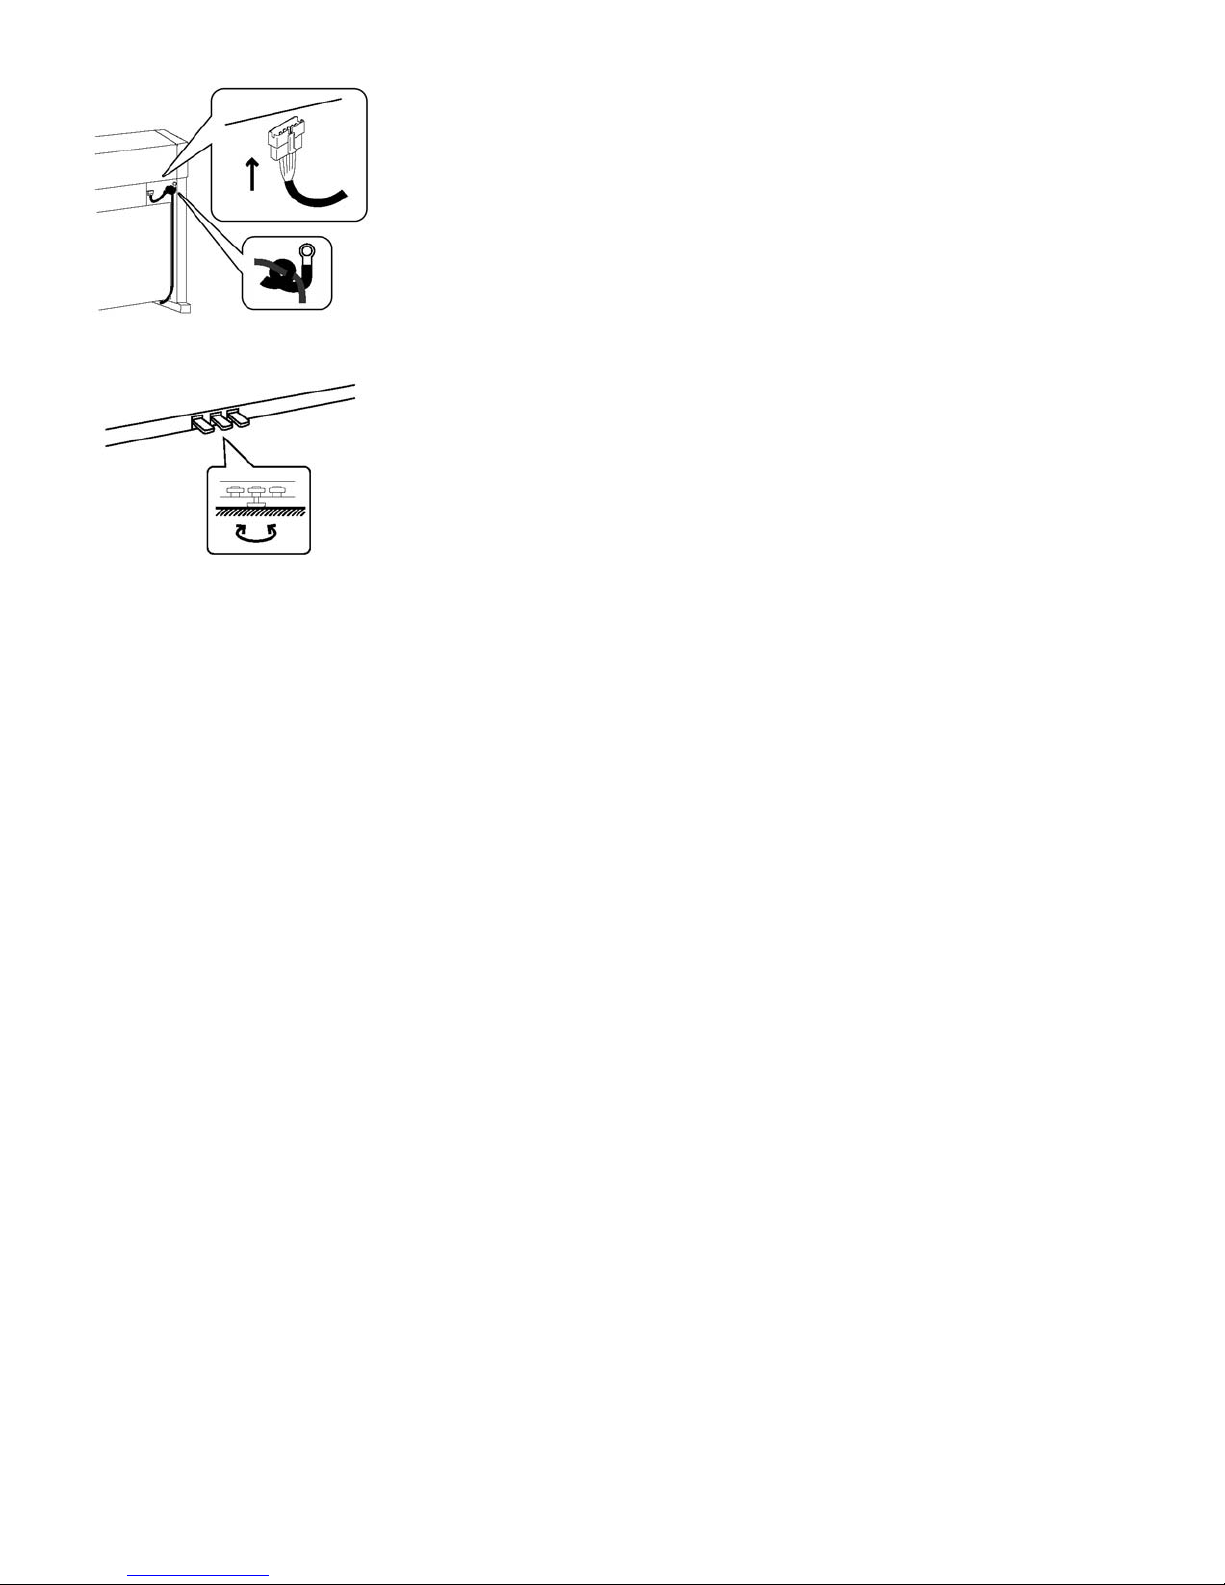
Assembling The Stand . . . . . . . . . . . . . . 4
Assembling The Bench . . . . . . . . . . . . . 7
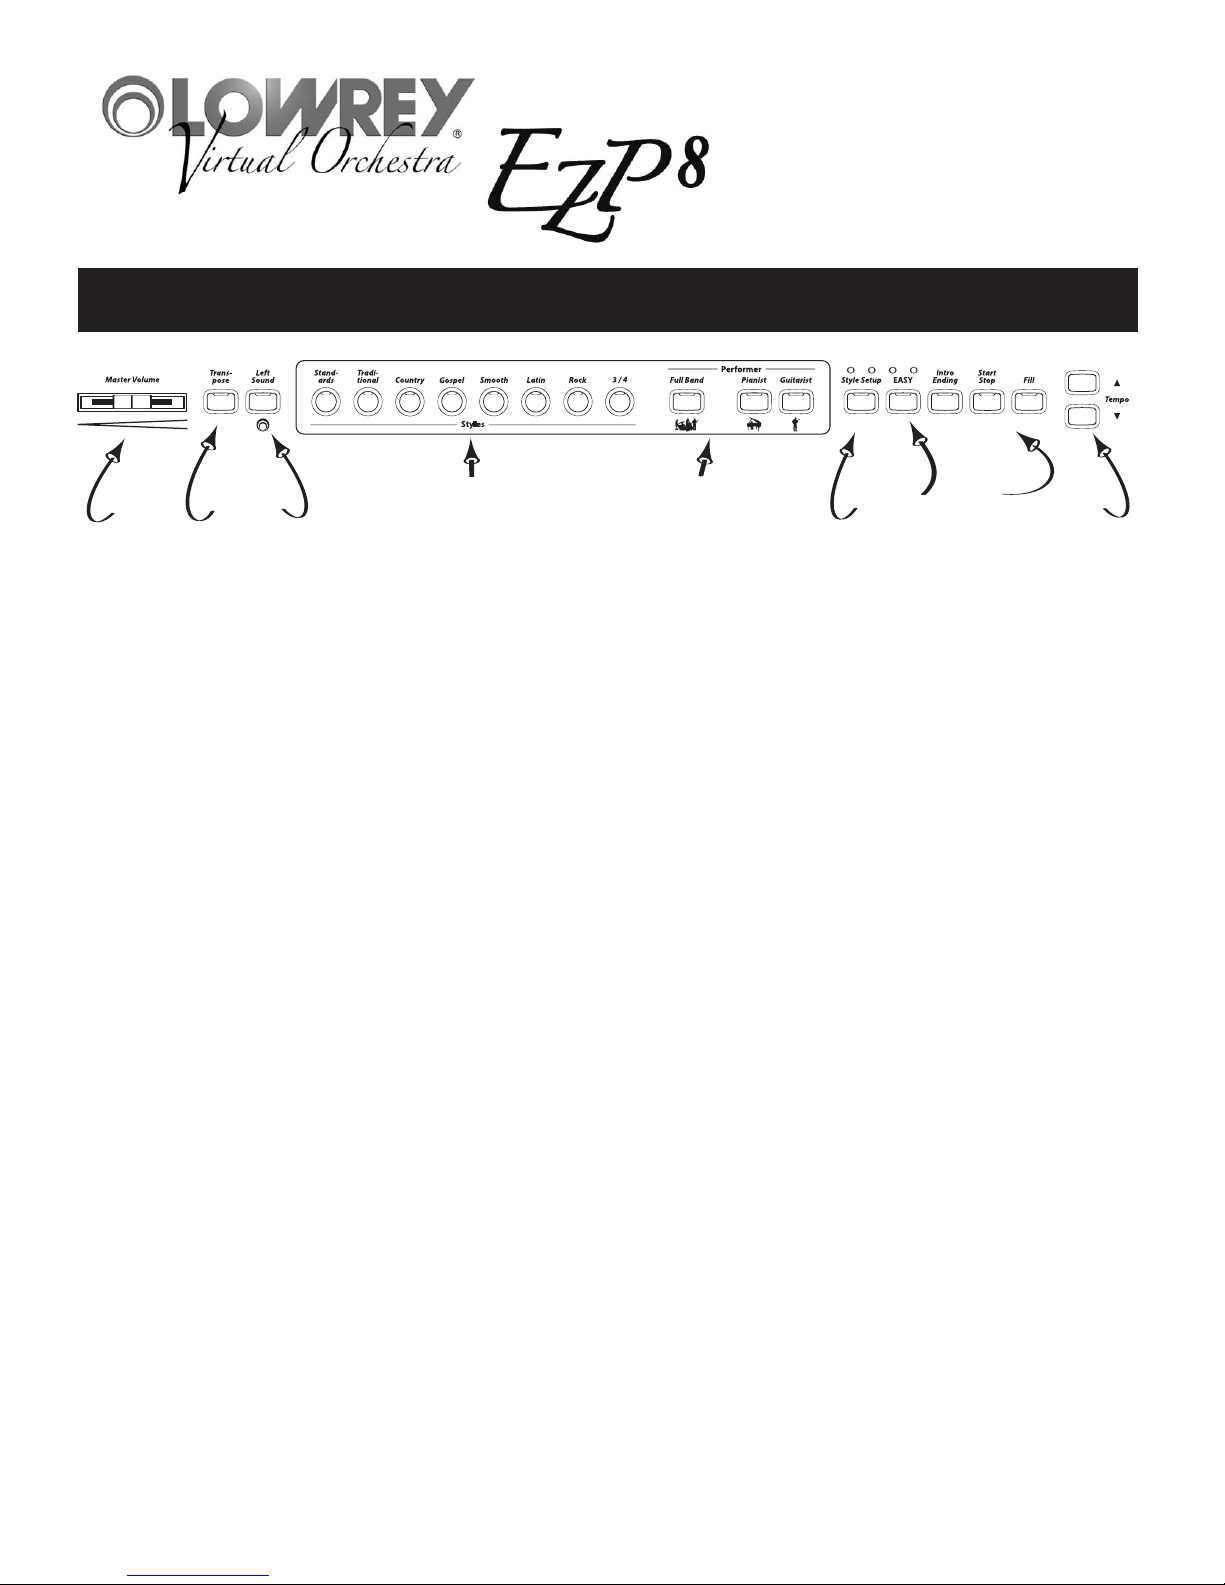
Control Panel . . . . . . . . . . . . . . . . . . . . 8
Let’s Get Started . . . . . . . . . . . . . . . . . . 10
Power Button . . . . . . . . . . . . . . . . . . . 10
Master Volume . . . . . . . . . . . . . . . . . . 10
Play - Pick A Sound . . . . . . . . . . . . . . 10
Listen - Demonstration Songs . . . . . . . 10
Styles . . . . . . . . . . . . . . . . . . . . . . . . . . 11
Style List . . . . . . . . . . . . . . . . . . . . . . 11
Selecting A Style . . . . . . . . . . . . . . . . . 11
Style Control . . . . . . . . . . . . . . . . . . . . 11
Balance . . . . . . . . . . . . . . . . . . . . . . 12
Style Setup . . . . . . . . . . . . . . . . . . . 12
EASY . . . . . . . . . . . . . . . . . . . . . . . . 12
Auto Bass . . . . . . . . . . . . . . . . . . . 12
Chord Memory . . . . . . . . . . . . . . . 12
MCS-Music Chord System . . . . . . . 12
Red, Blue, Green Dots . . . . . . . . . . 12
Major Chord . . . . . . . . . . . . . . . . . 12
Minor Chord . . . . . . . . . . . . . . . . . 13
Seventh Chord . . . . . . . . . . . . . . . 13
Intro Ending . . . . . . . . . . . . . . . . . . . 13
Minor Chord Intro . . . . . . . . . . . . . . . 14
Start Stop . . . . . . . . . . . . . . . . . . . . 14
Fill . . . . . . . . . . . . . . . . . . . . . . . . . . 14
Tempo/Downbeat Indicator . . . . . . . . 14
Tempo Control . . . . . . . . . . . . . . . . . 14
Thank you for choosing the Lowrey EZP8 Virtual Orchestra for your home!
This guide offers information to help you enjoy your new instrument. Please read the guide and keep it
close by for future reference.
Table of Contents
Sounds . . . . . . . . . . . . . . . . . . . . . . . . . 15
Left Sounds . . . . . . . . . . . . . . . . . . . . 15
Left Hand Sounds List . . . . . . . . . . . . . 15
Sounds (right/upper) . . . . . . . . . . . . . . 15
Dual Sounds . . . . . . . . . . . . . . . . . . . . 15
Organ Sounds . . . . . . . . . . . . . . . . . . 16
Keyboard Setup . . . . . . . . . . . . . . . . . 16
Piano Only . . . . . . . . . . . . . . . . . . . . . 16
Right Hand Sounds List . . . . . . . . . . . . 16
Organ Sounds . . . . . . . . . . . . . . . . . . 17
Vibra Trem . . . . . . . . . . . . . . . . . . . . . 17
Harmony . . . . . . . . . . . . . . . . . . . . . . 17
Fake It! . . . . . . . . . . . . . . . . . . . . . . . . 18
Song Setup . . . . . . . . . . . . . . . . . . . . 18
Glide . . . . . . . . . . . . . . . . . . . . . . . . . 18
Transpose . . . . . . . . . . . . . . . . . . . . . 19
Features . . . . . . . . . . . . . . . . . . . . . . . . 20
1. Keyboard Split . . . . . . . . . . . . . . . . 20
2. Touch . . . . . . . . . . . . . . . . . . . . . . . 20
3. Drum Volume . . . . . . . . . . . . . . . . . 21
4. Drums Only. . . . . . . . . . . . . . . . . . 21
5. Keyed Bass . . . . . . . . . . . . . . . . . . 21
6. Orch Octave . . . . . . . . . . . . . . . . . . 21
7. Transpose . . . . . . . . . . . . . . . . . . . . 21
MCS Chord Chart . . . . . . . . . . . . . . . . . 22
Songs List . . . . . . . . . . . . . . . . . . . . . . . 23
Song Setup List . . . . . . . . . . . . . . . . . . . 24
Warranty . . . . . . . . . . . . . . . . . . . . . . . . 25

1EZP8

2Lowrey Virtual Orchestra

3EZP8

4Lowrey Virtual Orchestra
Be sure that all parts are included before starting to assemble your EZP8 stand.
1. Insert the Adjuster (H) on the underneath side of the Foot Pedal Unit.
2. Untie the pedal cable on the bottom of the Pedal Board (C).
3. Fasten the Side Panels (A) to the Pedal Board (C) with two screws (G) for each Side Panel (total of 4
screws).
4. Hold the Back Panel
(B) to the back of the
Pedal Board and Side
Panels.
Fasten the Back Panel
to the Side Panels
using two screws (F).
Fasten the Back Panel
to the Pedal Board
using four screws (E).
PARTS PROVIDED
Side Panel (A) . . . . . . . . . . . .2 pcs.
Back Board (B) . . . . . . . . . . .1 pc.
Pedal Board (C) . . . . . . . . . . .1 pc.
Screw (D) . . . . . . . . . . . . . . .4 pcs.
Screw (E) . . . . . . . . . . . . . . .4 pcs.
Screw (F) . . . . . . . . . . . . . . .2 pcs.
Screw (G) (Silver) . . . . . . . . . .4 pcs.
Adjuster (H) . . . . . . . . . . . . . .1 pc.
Assembling The EZP8 Stand

5EZP8
CAUTION:
To prevent personal injury, do not handle the main unit from the ends.
6. Maintaining a firm grasp under the front of the main unit, slide it toward the rear of the stand until
both hook brackets engage at the rear top of the side panels. See this detail in the illustration below.
This hook arrangement is designed to prevent the main unit from tilting forward while the screws are
installed (two screws per side). Keep one hand under the front of the main unit, push down on the
front to be certain that hooks are properly engaged.
7. Fasten the main unit and the stand with four screws (D).
CAUTION:
Be sure to secure the main unit to the stand with the screws. If you fail to do so, the unit could fall from
the stand causing damage or personal injury.
5. The next step requires one person on each end of the
main unit.
Grasp the unit with both hands, one under the front, the
other under the rear (remember, not the end) and
carefully center the main unit on top of the stand so
that the two hook brackets located on the bottom rear
of the main unit are inside the stand side panels (A) and
approximately one-third of the rear, top edge of the side
panels are exposed. (See the illustration to the right)

8. Insert the pedal connection cord that comes from Pedal Board into
the EZP8 pedal jack and fasten to the side panel with the clamp.
9. Turn the adjuster (installed on the bottom of the Pedal Unit) down
until it makes firm contact with the floor. If the floor is carpeted,
place a spiked furniture cup under the adjuster so that it makes firm
contact with the carpet backing. Press any pedal with your foot. If
the pedal rail flexes, lower the adjuster until flexing is minimized.
CAUTION:
Before moving your EZP8, turn the adjuster up so that it clears the
floor.
6Lowrey Virtual Orchestra

7EZP8
1. Place the seat upside down on a flat surface.
2. Place one of the legs in a corner of the seat making sure the mounting holes align.
Fasten the leg to the seat corner using a bolt and spring washer.
Use just your fingers to tighten the bolt at this point. Do not tighten completely with the wrench yet.
3. Repeat step 2 for the remaining three legs. Again, tighten all bolts only finger tight at this point.
4. Once all four legs are fastened (finger tight) stand the bench on its legs. When possible you will want
to stand the bench in the location where it will be used. A flat surface is satisfactory.
Press down on the bench and at the same time gently shake it from side to
side to help the parts settle into place. This step helps to achieve a solid
and tight bench.
5. Once the bench feels stable and secure, carefully turn it upside down again.
Now firmly tighten all four bolts using the wrench provided.
Note: Repeat Steps 4 and 5 if the bench is not stable.
Please follow these instructions carefully and completely for your safety and comfort. A poorly assembled
bench can cause injury.
CAUTION:
1. Do not use the bench for any purpose other than its intended use as the EZP8 bench.
2. Only one person at a time may sit on the bench.
3. Be sure all bolts are firmly tightened during the final stage of assembly.
4. Be sure to immediately retighten any bolts that may loosen over time.
Be sure that all parts are included before starting to assem-
ble your EZP8 bench.
PARTS PROVIDED
Seat . . . . . . . . . . . . . . . . .1 pc.
Leg . . . . . . . . . . . . . . . . . .4 pcs.
Bolt . . . . . . . . . . . . . . . . . .4 pcs.
Spring Washer . . . . . . . . . .4 pcs.
Wrench . . . . . . . . . . . . . . .1 pc.
Assembling The EZP8 Bench

8Lowrey Virtual Orchestra
1. Master Volume - Page 10
Controls the volume level. Move the volume slider to the right to increase volume.
Move the slider to the left to decrease volume.
2. Transpose - Page 19
Change the key in which you play. The EZP8 standard setting is the key of C.
3. Left Sound - Page 15
Select sounds for the left hand/accompaniment.
4. Styles - Page 11
Select fully-orchestrated musical accompaniments.
5. Performer - Page 11
Each Style features three distinctive types of orchestration: Full Band (standard setting for each style)
Pianist or Guitarist.
6. Style Setup - Page 12
Select a complete sound preset for each Style and Style Type.
7. Easy - Page 12
Press the Easy button and the Lowrey easy play features are active: EZ Chords, Chord Memory and
Auto Bass.
8. Style Controls - Page 11
Control aspects of each Style. Intro Ending - Add a professionally composed Introduction and Ending
to your songs. Start Stop - Starts and Stops a Style. Fill - Add a rhythmic break or fill-in to your
song.
9. Tempo - Page 14
Speed up or slow down the tempo of any Style. Tempo value is shown in the LCD display.
1 2 3 45 9
8
67
Control Panel

9EZP8
10. LCD Display
Used along with many features. Shows data, values and feature choices.
11. EZP8 Controls - Page 20
Scroll - show different feature options
Select - Implement a feature option
Feature - A list of EZP8 control parameters
12. Balance - Page 12, 15
Adjust the relative volume level between two sounds. Balance the volume level between the right
hand (melody) sounds and the Style.
13. Sounds - Page 15
Select from a wide variety of musical instrument sounds.
14. Harmony - Page 17
Select from a number of easy play harmony types.
15. Fake It! - Page 18
Play a professional sounding solo with just one finger.
16. Songs - Page 10
Listen to prerecorded musical performances loaded in the EZP8.
17. Song Setup - Page 18
Choose complete sound presets for 100 song titles. Setups appropriate for many, many more titles.
Pedals - Page 16
Three pedals perform traditional piano functions
plus activate/control special Lowrey player features.
Connections
Two headphone jacks provide connection for two sets of
stereo headphones. Located on the under side, to the left.
Line out jacks for connection to external audio devices.
Pedal jack connects the pedal cord to the main unit.
Located on the under side of the EZP8 main unit.
TEMPO CHORD KEY
123 C C
10 11 12 13 14 1716
15
PEDAL
PHONES
R L/MONO
LINE OUT
PEDAL R L/MONO
LINE OUT

10Lowrey Virtual Orchestra
Play
The EZP8 offers many different ways to make music. No matter how you choose to play, Lowrey
provides the tools and technology so you sound fantastic.
Pick a Sound - Press any of the Sound buttons and explore the variety of instrumental sounds
available. The Sound buttons represent categories of sounds. For example...
- Press the Guitars button and look at the LCD Display. A guitar sound is displayed.
Play the keyboard to hear the sound.
-Press either Scroll button to change sounds. Look at the LCD Display to see the different
sounds.
-Press the Songs button on the right end of the control panel.
-The LCD Display will show Chain Loop, which will play all 30 songs in sequence repeatedly.
To begin Chain Loop play press the Select button. Press Start/Stop or Songs to end play.
- To play individual tiles press either Scroll button to the right of the Display to select single titles.
Press a Scroll button repeatedly to find the desired title.
Press and hold a Scroll button to accelerate selection.
-Press Select to begin play of the title in the Display.
Listen
The performance of a ‘Demo Song’ plus 29 songs from the first three books of the
Lowrey Magic course are in the EZP8. The Songs list is in the back of this guide.
Master Volume
Play any note on the keyboard and adjust the volume by moving the
Master Volume slider. Slide the control to the right to increase the
volume. Slide the control to the left to decrease volume.
Power Button
Turn the EZP8 on by pressing the Power button on the right end of the
control panel. The instrument will fully power up in just a few seconds.
The Grand Piano sound is the Power On sound.
Press the button again to turn the power off.
Let’s Get Started

11 EZP8
Selecting a Style
Press one of the Style buttons. The button will light red.
The Full Band Performer button lights red along with the Easy button.
To select a different Performer group for the chosen Style simply press Pianist or Guitarist.
The keyboard splits at the third F# key, as shown below. See Features to adjust the Split location.
-Play your melody notes on the upper keyboard/right hand section of the keyboard.
- Play your accompaniment chords on the lower keyboard/left hand section of the keyboard.
Style Control
A number of features can operate along with or control aspects of the Styles.
Upper Keyboard
(Right Hand)
Lower Keyboard
(Left Hand)
Piano Keyboard
Button Name Full Band Pianist Guitarist
Standards Frank & The Count 2-Beat Piano Guitar Swing
Traditional March/Polka Classical Piano Jazz Guitar
Country Roadside Cafe’ Rinkie Tink Country Basic
Gospel Hand Clappin’ Gospel Ballad Guitars
Smooth EZ 4/4 (8-Beat) Heart Songs Guitar 4/4
Latin Ballroom Latin Piano Bossa Latin Guitar
Rock 8-Beat Rock 6/8 Ballad (50’s Love Songs) 50’s Rock Guitar
3/4 EZ Waltz Southern 3/4 Guitars 3/4
Styles

Style Setup completely sets up the EZP8 with sounds and settings for the right hand / upper
keyboard that complement the selected style. Style Setup is activated when a Style is selected.
Use the Setup as is or select different sounds or turn Style Setup off and create your own.
EASY - Just as Style Setup takes care of the right hand/upper keyboard, EASY sets up sounds for
the left hand/lower keyboard sounds. EASY also activates three features that support lower keyboard
play: Auto Bass,Chord Memory and MCS (Music Chord System).
-Auto Bass plays a bass accompaniment that is unique to each Style and is appropriate for the
chord being played.
-Chord Memory holds the last MCS chord played after the keys have been released, making your
chords sound smooth and connected.
-MCS (Music Chord System) is the Lowrey chord recognition feature that enables one-finger, easy-
play chords to be played on the left hand / lower keyboard. It has the unique ability to respond to
different methods of chord formation. MCS responds in a musically correct fashion when you play
multi-fingered chords or single-fingered chords.
MCS matches the color-coded chord symbols in your black Lowrey Songbook and the music used in
the Lowrey Magic course. Red is C, blue is F, green is G. You may elect to apply the color dots on
the Left Hand / Lower Keyboard to help guide your left hand play. Color dots should be applied higher
on the keys, close to the black keys. Use the illustration below as a guide.
Major Chord - Any major chord can be played with the conventional three notes or a single note.
For example, to play a C Major chord with one finger play the second Ckey in the left hand / lower
keyboard section of the keyboard.
F# 3
Keyboard Split
4
5
32
1
2
Red
C Key
Blue
F Key
Green
G Key
Balance the volume level between the right hand (melody) sounds
and the Style using the Balance slider control.
- Slide the control to the right to decrease the Style volume.
- Slide the control to the left to decrease the right hand volume.
12Lowrey Virtual Orchestra

Minor Chord - Any minor chord can be played with the conventional three notes or with two notes.
The two note Minor Chord formula for MCS is... chord letter name + three notes up.
- The first note to play is the letter name of the chord.
-The second note to play is three up (to the right) of the first note.
For example, to play a C Minor (Cm) chord play the Cnote and the black Ebnote to the right of C.
Play both keys at the same time.
Seventh Chord - Any seventh chord can be played with the conventional four notes or with two notes.
The two note Seventh Chord formula for MCS is... chord letter name + two notes down.
- The first note to play is the letter name of the chord.
-The second note to play is two down (to the left) of the first note.
For example, to play a C Seventh (C7) chord play the Cnote and the black Bbnote to the left of C.
Play both keys at the same time.
The MCS Chord Chart in the back of this guide lists the notes needed to form a variety of chords
using MCS in addition to examples given.
-Press the Style button for your song. Use Full Band or select one of the other Performer options.
-Press the Intro Ending button.
-Play the first chord of your song in the left hand/lower keyboard section of the keyboard;
conventional or MCS.
You can start the Introduction by pressing the Start Stop button in place of playing a chord.
-Begin playing your song when the introduction is through and the Style is playing.
Intro Ending adds introductions and endings to your songs. There are unique
introductions and endings for each of the 24 Styles. Watch the LCD Display
while the introduction is playing to see a cue for when to start playing: 1, 2,
Ready, Play!
F# 3
Keyboard Split
4
5
32
1
2
3
F# 3
Keyboard Split
4
5
32
1
32
13 EZP8

- When you are finished playing your song, lift your left hand off of the keys and press the Intro
Ending button again to hear a professional sounding ending.
Minor Chord Intro - Hear a different introduction to the Styles.
-Select a Style, select a Performer, press Intro Ending and start by playing a Minor Chord.
Use the Start Stop to temporarily pause a Style without changing the setup.
Any left hand / lower keyboard chord (Easy or conventional) will start a selected Style playing without
pressing the Start Stop button.
There are two ways to activate the Fill feature. While a Style is playing...
-Press the Fill button.
-Press the middle Foot Pedal.
Tempo - Each Style has a preset Tempo. To increase or decrease the Tempo press the up or down
buttons.
-Press either button repeatedly to achieve the desired Tempo.
-Press and hold either button to accelerate the change in value.
-The value of the Tempo can be seen in the LCD Display.
The LCD Display also shows the left hand/lower keyboard Chord being played and the Key setting
(transpose).
TEMPO CHORD KEY
123 C C
Downbeat Indicator - When a Style is playing the four lights above the
Style Setup and EASY buttons flash in time with the tempo. The red light
indicates the Downbeat of the Style - the first beat of a measure.
Fill adds a rhythmic break to a Style when the style is playing. Fill is a fun
feature to use whenever you wish. There are no set rules for using the Fill
feature. Try using Fill between sections of a song(Verse to Chorus) or whenever
you feel like adding a break. Press and hold Fill for different lengths of time to
hear different variations.
Start Stop - The Start Stop button becomes lighted when a Style button is
selected.
-Press Start Stop to start a Style playing. The button light turns off.
-Press Start Stop while a Style is playing to cause it to stop. The button
lights again.
- Press Start Stop again and the Styles start playing again on the downbeat
(first beat of a measure).
14Lowrey Virtual Orchestra

Upper Keyboard Sounds
The sounds for the right hand/upper keyboard section of the keyboard are arranged in categories of
instruments in the Sounds section.
-Press one of the instrument category buttons.
-Press either Scroll button to select a different instrument within the selected category.
-Instrument choices are shown in the LCD Display.
Play some keys to hear the sound shown in the Display.
-The More button holds a variety of additional sounds beyond the other categories.
Refer to the sounds lists on the following page.
Dual Sounds
Select two (non-organ) sounds to play together on the right hand/upper keyboard.
-Press and hold a Sound button. Press either Scroll button to select a sound within the button.
Watch the LCD Display to see the sound names.
-While holding the first button press and release a second sound button, then release the first
sound buttton. Press either Scroll button to select a sound with that button.
-Play and hear both sounds. Piano and Strings are a very popular combination.
There are numerous possibilities.
1Bass: Acoustic 9Lower Flute 8’
2Bass: Electric 10 Piano: Grand
3Bass: Finger Slap 11 Piano-El: Detune
4Choir 12 Piano-El: Dolce
5Guitar: Acoustic 13 Strings: Ens 1
6Guitar: Jazz 2 14 Vibes
7Guitar: Nylon 15 Vocal: Doo
8Marimba 16 Xtra: Soft-Warm
Lower Keyboard Sounds
Press the Left Sound button to select from 16 dynamic instruments for the left
hand/lower keyboard section of the keyboard.
- Press either Scroll button to select different instruments.
-Instrument choices are shown in the LCD Display.
Sounds
15 EZP8

Organ Sounds
Select from a variety of organ sounds to play on the right hand/upper keyboard.
-Press the Organ category button.
-Press either Scroll button to select from the different types of organ sounds.
-Choices are shown in the LCD Display.
Play some keys to hear the sound shown in the Display.
-More button holds a variety of additional sounds beyond the other categories.
Organ sounds may be selected along with other instrumental sounds and even added to Dual
Sounds settings for an added layer of sound.
Keyboard Setup
- When the EZP8 is first turned on the Grand Piano sound is pre-selected and played across the
entire keyboard. All sounds section sounds play across the entire keyboard.
Keyboard Split is not active.
- When a Style has been selected or the EASY button is active the right hand sounds are played
above, to the right, of the Keyboard Split Point located at the third F# from the left.
-Press the Piano Only button anytime you wish to return to the Power On setting with Grand
Piano and no Keyboard Split.
-Piano Only Foot Pedals are conventional piano settings.
Upper Keyboard Sounds (36)
Pianos Guitars Strings Wood Winds Brass Organs
1Piano: Grand Guitar: Acoustic Strings: Ens.1 Breathy Sax Brass Section Sweet
2Piano: Honky Tonk Guitar: Country Strings: Ens.2 Clarinet Tromone Rich
3Piano-El: Detune Guitar: Jazz Strgs: Pizzicato Flute Trumpet Full
4Piano-El: Classic Guitar: Nylon Violin Oboe Trumpet: Muted Jazz
5Piano: Society Guitar: Hawaiian Viola Sax: Alto Sax French Horn Pipe
6Harpsichord Guitar: Rock Cello Sax: Bari Sax Flugel Horn 8’
Upper Keyboard
(Right Hand)
Lower Keyboard
(Left Hand)
Piano Keyboard
16Lowrey Virtual Orchestra

More Sounds (32)
- When the Organs button is selected the Middle Foot Pedal (Sostenuto) becomes a Vibra Trem
controller. Vibra Trem adds authentic organ motion to the sound, like the mechanical rotating
speakers of the past.
-There are two Vibra Trem speeds: Fast and Slow.Pressing the Middle Foot Pedal changes the
speed from one to the other.
- Press the Harmony button.
-Press either Scroll button to choose a harmony type.
-The LCD Display shows active harmony type.
-The Harmony feature functions when...
You play single notes on the Upper Keyboard (to the right of the split)...
While you play a chord (MCS or Conventional) on the Lower Keyboard (to the left of the split).
There are four different Harmony types from which to chooose.
-AOC takes all of your left hand/lower keyboard notes and adds them below the right hand/upper
keyboard note being played. Any notes within a whole step of the upper keyboard note being
played may be excluded.
-Duet adds one more note to the right hand/upper keyboard note being played. Duet creates a
nice, light sound.
-Rock harmony adds two notes below the right hand/upper keyboard note being played.
This harmony style is often heard on electric guitar in rock n’ roll and contemporary country.
-Octave harmony adds the lower octave note to the right hand/upper keyboard note being played.
A good harmony type for piano or jazz guitar.
Harmony is the playing of two or more notes at the same time to create a
pleasant sound. Much like the EASY button, which makes playing left hand
chords easier, Harmony makes right hand harmonies with just one finger.
1Accordion 9Ens: Big Band 17 Organ: Perc.4 25 Sax Section
2Animal: Cat 10 Guitar: Mute-Dynam 18 Organ Perc. 2 2/3 26 Scat
3Animal: Dog 11 Harmonica 19 Organ: Tibia Soft 27 Steel Drums
4Bag Pipe 12 Harp 20 Organ-Rock 28 Vocal: Doo
5Banjo 13 Mandolin 21 Organ-Combo: 60's 29 Vibes
6Bells: Crystal 14 Marimba 22 Pan Flute 30 Whistle
7Bells: Church 15 Organ: 8' Celeste 23 Piano-El: Detune 2 31 Xylophone
8Choir 16 Organ: Pipe 24 Piano: Toy 32 Xtra: Synth-Saw
17 EZP8

- Press the Fake It! button.
- Play single notes to hear a solo.
- Any right hand/upper keyboard sound may be used.
-Fake It! works with or without a Style.
-Fake It! follows your left hand/lower keyboard chord changes.
-Press the Song Setup button.
-Press either Scroll button to choose from the 100 song title-based setups.
-Press and hold either Scroll button to accelerate through the listing.
-The LCD Display shows active selection.
-Press the Select button when the desired title is shown in the LCD Display.
-Begin playing your song.
You will discover that Song Setups are appropriate for many different song, not just the one given in
the EZP8. For example, the setup for Anytime works well with many country music songs. Amazing
Grace is a good setup for many hymns titles.
Glide - Authentic instruments, such as guitars, strings and some woodwinds are able to glide.
The Glide feature adds this authenticity to these types of EZP8 sounds. When implemented, Glide
lowers the pitch of a sound one half step and then ‘Slides’ the sound back up to the original pitch.
- Select a sound that would naturally Glide,like Country Guitar.
-Press and hold the left Foot Pedal.
- Play and hold the note you wish to glide.
- Release the Foot Pedal and the note Glides up.
Song Setup gives you 100 great sounding setups that are inspired by certain
song titles. A listing of the song titles is in the back of this guide. Song Setup
takes the guesswork out of selecting Styles and Sounds for many songs.
Fake It! is a fun and exciting feature that enables you to step out and play a
professional sounding solo, or ‘Riff’ with just one finger. All you need to do is
play a single right hand/upper keyboard key in a rhythmic fashion.
18Lowrey Virtual Orchestra
Table of contents