LP TENT STRONGMAN ZP330 Manual

STRONGMAN SET UP
MODELS: ZP330, ZP345, ZP360, ZP660, ZP440, ZP460, ZP480,
ZP480R, ZPH550, ZPH660, ZP330P, ZP440P, ZP550P
www.lptentcanada.com/www.lptentusa.com

VISIT THE SUPPORT PAGE AT LPTENTUSA.COM / LPTENT.CA FOR MORE INFORMATION ON LP TENT PRODUCTS.
POP UP TENT |Strongman (ZP)
Thank you for choosing the Strongman.
When the decision comes to the audience for best
performance, the ZP Strongman pop up canopy tent is
considered the people’s choice; it leaves all of its
spectators in awe, and is an absolute ambassador for
the entire pop up series. First-class engineering
enables the model to be drafted for instant assembly,
as well as malleable for frequent use in near perma-
nent settings. The overall technology of this series
includes many LP TENT patents, making this canopies
design unparalleled.
For an optimal use of this product we invite you to
follow our setup guide.
Reinforced Corner and
Connection Fabric
Reinforced Aluminum Scissors
Aluminum Tension Bar
Integrated Walls
Using Keder System
Aluminum Frame
Reinforced By Channels
Stainless Steel Screws
Half Wall Attached
Using Keder System
& Velcro Fiberglass Injected
Connections
Anchor Points
Window Wall
Attached Using
Keder System
& Velcro
Self Locking
Fiber Glass
Injected Corner
Steel Foot Plates

VISIT THE SUPPORT PAGE AT LPTENTUSA.COM / LPTENT.CA FOR MORE INFORMATION ON LP TENT PRODUCTS.
Open the structure 60% of the way then position 2 (3 for
Hexagon) people face to face, grab the scissors and pull
while backing up.
The center pole lock pin (A) should pass over the scissor
connection (B). Keep pushing the top of the pole up until
you hear a click (C).
Grasp the
handle (A) in the
center of the
tent and unclip
the punch from
its location (B),
then push
vertically (C) to
raise the pole to
its maximum
height. Once the
pole is extended
insert the pin (B)
in the hole.
Do not tighten the Velcro on the roof
during the assembly of the canvas.
Deploying
With two people, open the roof and grab at each corner.
Correctly position the peak and the corners of your top.
Open the frame 40% of the way
Position the frame
Once each corner of the top is correctly placed on the corners of the structure (A) attach the Velcro
straps in the corners like as shown above (B), finally open the tent all the way and attach the
Velcro straps in the center of the valences to the scissors like as shown above (C)
Position the top Secure the top to the frame
SET UP INSTRUCTIONS |Strongman (ZP)
FRAME DEPLOYMENT
TOP INSTALLATION
1 2 3
1 2 Locking the center pole
For models: ZP440, ZP460, ZP480,
ZP480R, ZPH550, ZPH660
3Locking the center pole
For models: ZP330P, ZP440P, ZP550P
4
Place the tent on a flat surface,
standing upright on its 4 feet. Then
loosen the roof strap.
Position the frame
A B C
Do not grab or pull at feet.
B
C
A
A
B
B
C
A

VISIT THE SUPPORT PAGE AT LPTENTUSA.COM / LPTENT.CA FOR MORE INFORMATION ON LP TENT PRODUCTS.
For models: ZP550, ZP330P, ZP440P, ZP550P
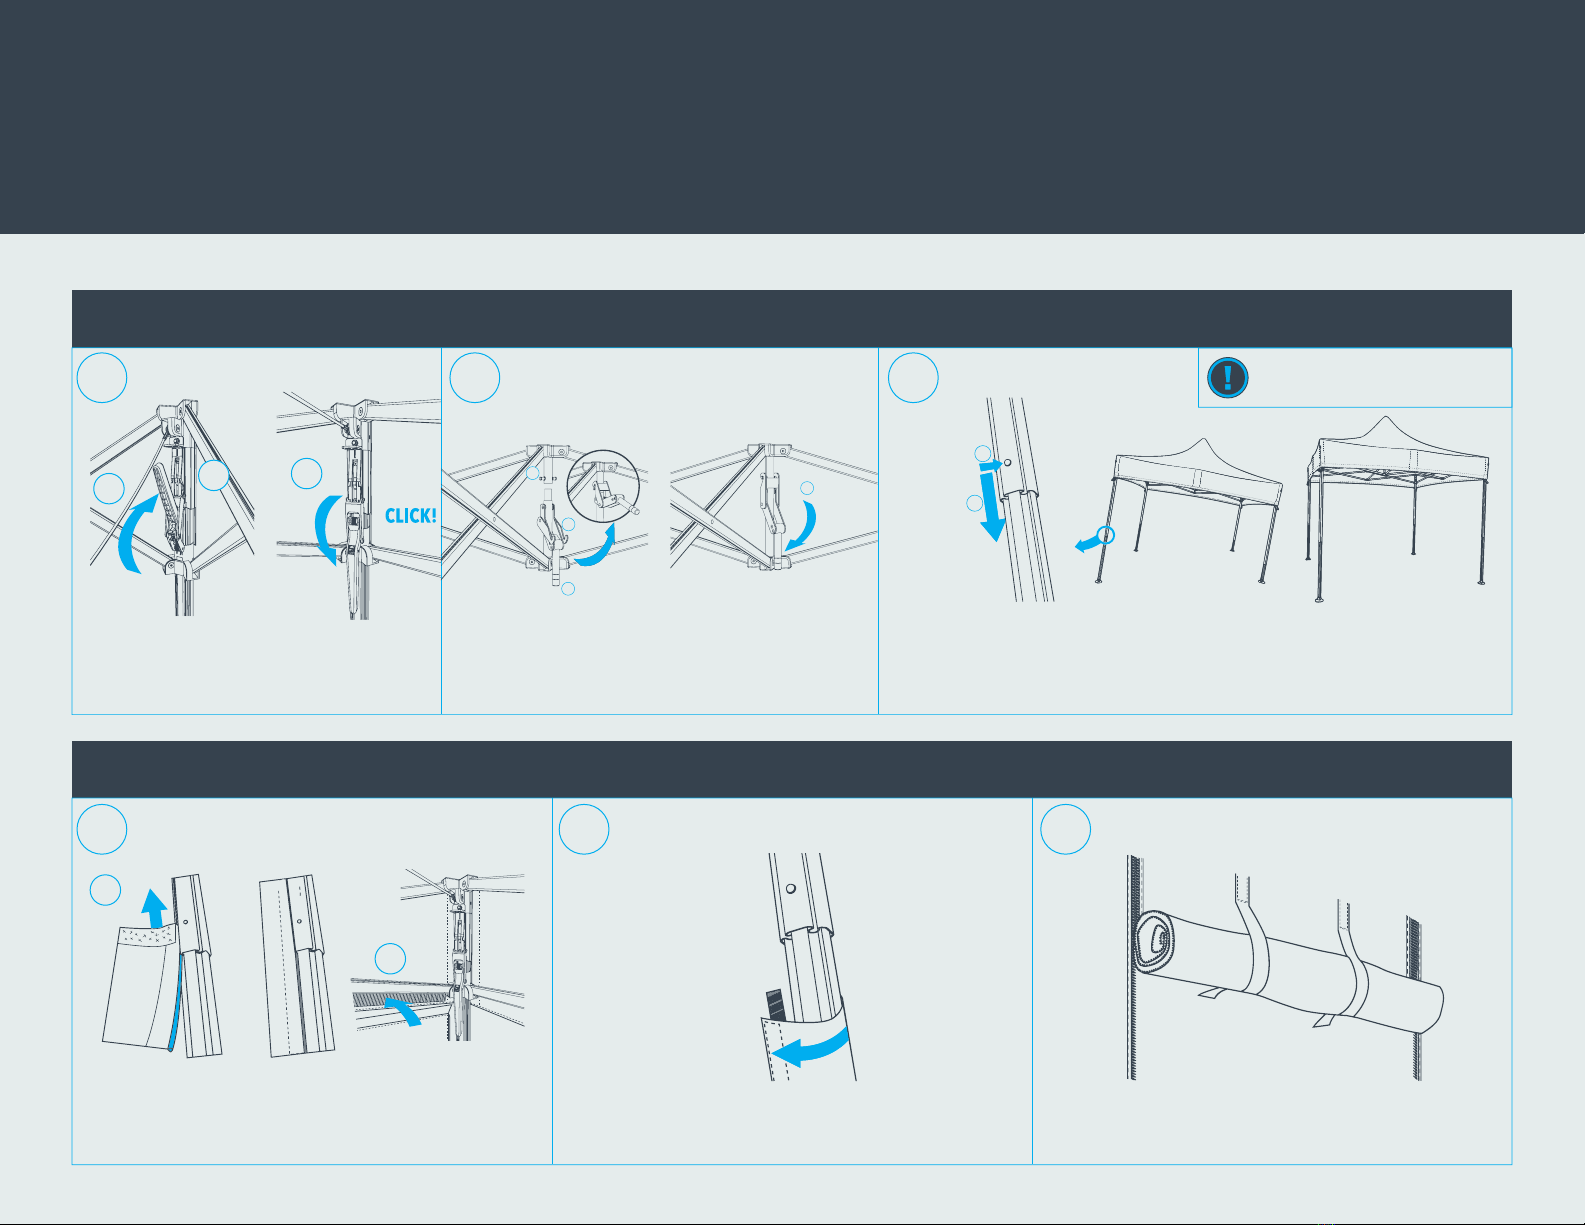
Lift the blue handle upwards A) make sure the
aluminum lever guide hooks into the track (B) Pull
down the blue handle until you hear a click (C).
Adjust the height of the tent using the extendable legs. To do this, push the pin on the
leg inwards (A) and slide the lower part of the leg (B). The lower part must slide by itself.
You can choose between 3 height settings.The walls are provided for the maximum
height. (When extending the legs do not stand on the foot plate)
Grasp the handle (A) and hook the aluminum lever guide (B)
to the piece above (C). Then lock the connection brace by
pressing the handle down fully (D).
Repeat on the remaining 3 sides.
ZP automatic locking system Height adjustment
Position the wall so that the Velcro strip on the top faces the
outside of the tent. Insert the keders into the frame (A) (INSERT
MID FRAME) and attach the Velcro to the roof strip (B) (Inner side).
Insert the wall keders into the frame Attaching the wall to the bottom of the leg
Wrap the bottom of the wall around the bottom of the leg and
attach it to the inside of the wall. If there is more than one wall,
attach the Velcro to the adjacent wall.
Unzip the two vertical zippers (door only), roll the door/curtain and
hang it with the Velcro strips on the top of the wall.
Opening the door/window wall curtain
Do not force the frame. Close the
frame and check for blockage
WALL INSTALLATION
FRAME DEPLOYMENT
5 Locking scissor reinforcement6 7
1 2 3
A
A
C
SET UP INSTRUCTIONS |Strongman (ZP)
A
B
B
B
A
B
D
C

VISIT THE SUPPORT PAGE AT LPTENTUSA.COM / LPTENT.CA FOR MORE INFORMATION ON LP TENT PRODUCTS.
Place the weight on the foot plate of your tent (A). Stack any extra weights if necessary. Attach the carabiners to the anchor points on each corner of the tent (A). Place the stakes at a
minimum distance of 3ft.
Weighting Anchoring
• Wash with a damp cloth and soapy water (no abrasive sponge or
detergent).
• Rinsing possible with a hose (high pressure not recommended).
• Air dry before storing.
• To remove dirt, grass, clean the frame with a damp cloth (No
detergent).
Cleaning the roof, walls and frame: Storing: Transportation:
• Wash and dry before storing.
• Store the tent upright in its carrying case.
• Store the material in a dry place not subject to high humidity.
• Transport the tent preferably upright.
• In case of horizontal transport, do not put weight on the structure.
CLEANING & MAINTENANCE
WEIGHTING & ANCHORING
1 2
1 2 3
AA
SET UP INSTRUCTIONS |Strongman (ZP)

VISIT THE SUPPORT PAGE AT LPTENTUSA.COM / LPTENT.CA FOR MORE INFORMATION ON LP TENT PRODUCTS.
A
B
C
FE
A
Grasp the telescopic bar on the side of the plastic ring (A) and unfold (B). Make sure the two
bars are locked together with the locking clip (C).
Place the tension bar on the lugs (located on the feet) along one side of the tent (E). Insert the
pins(D) into the lugs (F).
Repeat on the opposite side to ensure optimal stability.
Hook the carabiner in the hole beside the tension bar pin on the foot of the frame (A). Hang the
carabiner at the top of the structure the designated metal bracket (B) located near the locking
handle (C).
Repeat on the opposite side to ensure optimal stability.
x2
Dx4
SET UP INSTRUCTIONS |Strongman (ZP)
Installing the tension bars Installing the tension cables1 2
TENSION KIT INSTALLATION
B
C
This manual suits for next models
12
Table of contents
Other LP TENT Tent manuals