Lucky FF718LiC-W User manual

FF718Li -W C


FISHFINDER
1
FF718Li -W FISH FINDER WIRELESS MODE
OPERATIONS MANUAL
C
1. Thank you for choosing FF718Li -W fish finder. C
This amazing product is especially designed for amateur and professional fisherman alike, to
find out the location of fish, depth and bottom contour of water. The unit can be used in ocean,
river or lake,and is fantastic for detecting schools of fish in any particular area.Using amazing
and innovative technology, this fish finder is the ideal tool to bring the fish to you!
The FF718Li -W has two user modes: WIRELESS/SIMULATION.Use the Mode menu choice
to change between these two user modes.
C
USER MODE
WIRELESS
USER MODE
SIMULATION
WIRELESS:This user mode allows you to operate the with the wireless sonar
sensor. When signal indicator( )is displayed on the screen, the unit is in Wireless mode.
FF718Li-CW
wireless sonar sensor signal
connect indicator

2
The Wireless user mode allows you to use the Wireless Sonar Sensor. Simply attach the
wireless sensor to the end of your fishing line and cast it into the water as you would a normal
float or lure, then power on the FF718Li -W and you are ready to fish. In Wireless mode, your
uses
C
FF718LiC-W sonar technology to send sound waves from the wireless sonar sensor,the
returned “echoes” are transmitted with wireless technology to the display unit and displayed
on the LCD. New information appears on the right . As this information moves to the left a
very accurate picture of the underwater world is displayed, Including the depth of underwater
objects such as the bottom, fish, and structures.
2. Using the Wireless sonar sensor
fig-1
The Wireless user mode allows you to use the Wireless Sonar Sensor. Simply attach the
wireless sensor to the end of your fishing line and cast it into the water as you would a
normal float or lure, then power on the FF718Li -W and you are ready to fish. In C Wireless
mode, your FF718LiC-W uses sonar technology to send sound waves from the wireless sonar
sensor,the returned “echoes” are transmitted with wireless technology to the display unit
and displayed on the LCD.
New information appears on the right .
As this information moves to the left a very accurate picture of the underwater world is
displayed, including the depth of underwater objects such as the bottom, fish, and structures.
3.Using the Wireless sonar sensor

A.
B.
front hole
second hole
antenna tower
3
FISHFINDER
NOTE: When casting the Wireless Sonar Sensor into water,
shock from abrupt contact with rocks will damage your
Wireless sonar sensor, we recommend using your wireless
sensor in water deeper than 1 foot only.
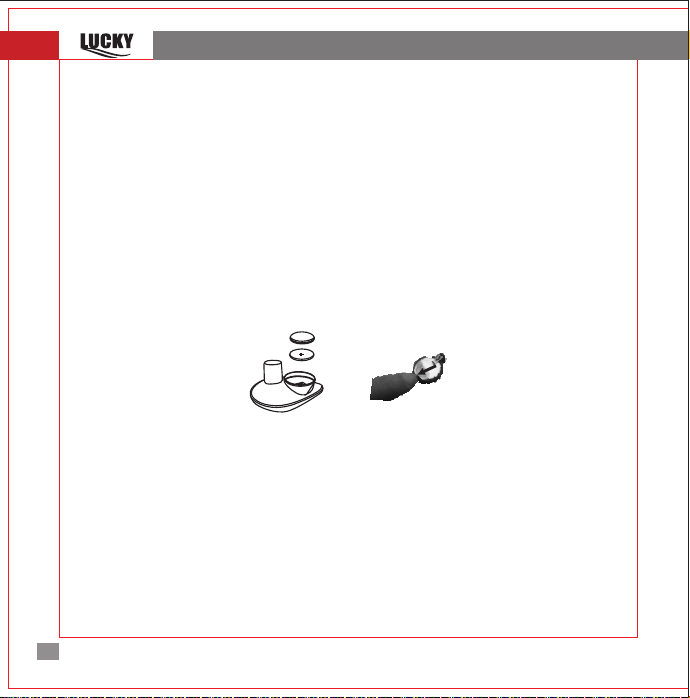
4.Attaching the Wireless sonar sensor
The line coming from your reel can be tied off to the front hole in the Wireless Sonar
Sensor. If you wish to use the Wireless Sonar Sensor as a conventional float, use the
second hole to attach your hook using a lighter weight line.
A snag will break the lighter line if you have to break free. Slip line techniques are not
recommended because of the higher risk of losing the Wireless Sonar Sensor. If you do
use the slip line method, use a lighter weight line after the lower stop, enabling retrieval
of the Wireless Sonar Sensor if the lower line with hook breaks away.
Handle the Wireless Sonar Sensor by the antenna tower when it has been in water.Use a
heavy test line, standard knots, and tackle such as a swivel.
The second leader hole is for using the Wireless Sonar Sensor as a float. Connect a lighter
weight hook line to this hole. Do not over-weight the hook line as this will submerge the
Wireless Sonar Sensor, causing signal loss.
NOTE : You will increase the possibility of breaking your line if you use light test pound line on
your reel. The Wireless Sonar Sensor is positively buoyant . The maximum amount of weight
for any attachment to the Wireless Sonar Sensor is approximately 5.67 grams, and includes
the combined weight of any hook, line, weight, swivel/snap swivel and bait that is attached to
the Wireless Sonar Sensor.

4
NOTE :Store the Wireless Sonar Sensor in a dry, non-metallic container, such as a tackle
box, in a separate compartment, and isolated from any metallic devices.
NOTE : The Wireless Sonar Sensor is not intended for use by children younger than 6 years old without
adult supervision as the Wireless Sonar Sensor may represent a choking hazard to small children.
NOTE :The bottom of the Wireless Sonar Sensor should not be handled during sonar
operation, as this may cause physical discomfort and may result in personal injury in the
form of tissue damage. Handle the Wireless Sonar Sensor only by the antenna tower when
it has been in the water.
The Wireless Sonar Sensor has a CR-2032 Lithium battery .It is can be replaced.Pls check
the attach pictures to change the battery.Remove the battery door of the Wireless Sonar
Sensor and press the lock-block of the battery holder,the battery will flip automaticly.
5.Wireless Sonar Sensor Power
NOTE: Make sure that the O-ring in the battery compartment is present,positioned
correctly in the grooves, and free of debris before reinstalling the battery door.The Wireless
Sonar Sensor has contacts that perceive when the device is immersed in the water.
These contact turn on the Sonar Sensor/Receiver and begin transmitting the sonar
information via RF to the display. The Wireless Sonar Sensor automatically stops using
power a few seconds after being pulled out of the water.
NOTE : Do not place the Wireless Sonar Sensor in a wet area when not in use as this will
turn on the Wireless Sonar Sensor and shorten its usable life. Store the Wireless Sonar
Sensor in a dry area when not in use to conserve power. Never place the Wireless Sonar
Sensor in a wet area of a boat or on a metal surface that could accidentally power it on.

5
FISHFINDER
NOTE : If the Wireless Sonar Sensor was used in salt water, rinse it with fresh water before
storing it. Display View A simple menu system allows you to access your FFW718LiC-W
adjustable settings. To activate the menu system, press the POWER-MENU key.
Press the POWER-MENU key repeatedly to display the FF718LiC-W menu settings,one at a
time. When a menu settings is on the display, use the UP and DOWN Arrow keys to adjust
the menu setting. Menus settings are removed from the screen automatically after several
seconds. In Normal operating mode, most menu settings saved to memory.
The FF718Li -W displays underwater information in an easy-to-understand format. The top of
the display corresponds to the water surface at the transducer, and the bottom of the display
corresponds to the Depth Range automatically selected for the current water depth. The
Bottom Contour varies as the depth under the boat changes. Digital readouts provide precise
information for depth, fish and water temperature.
C
As the boat moves, terrain and bottom composition variations are displayed. Fish, baitfish and
the rmoclines (underwater temperature changes) are displayed when detected. Underwater
conditions vary greatly, so some experience and interpretation is needed to realize all the benefits
of the use the picture as a guide to the most common conditions and practice
using the over known bottom types.
FF718LiC-W
FF718LiC-W
6. Display View
a. Sensiti ty
b. Sensor connect indicator
c Fish finder battery strength
d Water depth
e Water temperature
f Water surface
vi
.
.
.
.
g. Bottom contour
h. upper zoom range
I. Small fish icon with depth
j. Middle fish icon with depth
k. Large fish icon with depth
l. Lower zoom range
h
I
j
k
l
a
b
c
d
e
f
g

6
7. Powering ON and OFF
Press and release the POWER-MENU key to power the FF718Li -W on. Press and hold the
POWER-MENU key until the unit shuts down to power off.
C
Zoom
Left Arrow key
Mode
Right Arrow Key
Power/Menu Key
When the FF718Li -W powers on, the will temporarily display on C screen last for 5seconds.
Then will show ,From this menu, use the arrow keys to select either Start-Up,
Simulation.If you do nothing, the unit will default to normal on the water use.
- Use Start-Up for on the water use.
71 8L ic
Color fu l
- Use Simulation for learning how to use the system with
simulated sonar data; access Simulation by pressing the
right Arrow Key once
USER MODE
SIMULATION
START UP
START UP
START UP
START UP
8. The Menu System
A simple menu system allows you to access your FF718Li -W adjustable settings. To activate
the menu system, press the POWER-MENU key. Press the POWER-MENU key repeatedly to
display the FF718Li -W menu settings, one at a time. When a menu settings is on the display,
use the UP and DOWN Arrow keys to adjust the menu setting. Menus settings are removed
from the screen automatically after several seconds. In normal operating mode, most menu
settings saved to memory will not return to their default values when the unit is turned off.
See individual menu choices for more information.
C
C

7
FISHFINDER
NOTE: Each time the POWER-MENU key is pressed, the backlight momentarily illuminates
for easy viewing at night. Adjust the LIGHT menu setting to keep the backlight on.
SENSITIVITY
1 10
5
USER MODE
WIRELESS
8.1 User mode------
Press the POWER-MENU key until USER MODE menu appears. Select a setting from
8.2 Sensitivity—
Press the POWER-MENU key until SENSITIVITY appears. Sensitivity controls how much detail
is shown on the display. Increasing the sensitivity shows more sonar returns from small baitfish
and suspended debris in the water; however, the display may become too cluttered. When
operating in very clear water or greater depths, increased sensitivity shows weaker returns
that may be of interest. Decreasing the sensitivity eliminates the clutter from the display that is
sometimes present in murky or muddy water. If Sensitivity is adjusted too low, the display may
not show many sonar returns that could be fish. (1 –10).
USER MODE
WIRELESS
USER MODE
SIMULATION
8.3 Depth Range---
DE TH RANGE P
AUTO 4 5
AUTO
Press the POWER-MENU key until DEPTH RANGE appears. Automatic is the default setting.
When in automatic, the lower range will be adjusted by the unit to follow the bottom.
(Auto, 1 to 45 meter)

8
NOTE: In manual operation, if the current depth is greater than the depth range settings, the
bottom will not be visible on the display. Select AUTO to return to automatic operation.
8.4 ZOOM—
Press the POWER-MENU key until ZOOM appears. Select Auto to magnify the area around
the bottom in order to reveal fish and structure close to the bottom that may not be visible
during normal operation. When ZOOM is set to Auto, the upper and lower Depth Ranges are
automatically adjusted to keep the area above and below the bottom on the display.
Select Off to return to normal operation. (Off, 1 to 45 ) meter
ZOOM
OFF
OFF
45
Upper Zoom Range
Lower Zoom Range
There is also a series of manual ranges which can be selected. The manual depth ranges are
determined by the present depth conditions.
8.5 Depth Alarm –
Press the POWER-MENU key until DEPTH ALARM appears. Select OFF for no Depth Alarm,
or select 1 to 45 to set the alarm depth. An audible alarm sounds when the depth is
equal to or less than the setting. (Off, Off, 1 to 45 )
meter
meter
DEPTH ALARM
OFF
OFF
45

Large fish only
Large fish/Middle fish
Large fish/Middle/Small fish
9
FISHFINDER
8.6 Fish Icon
Make sure press the POWER-MENU key until FISH ICON appears. Select either Off to view
“raw” sonar returns, or On to view Fish symbols. Fish ICON uses advanced signal processing
to interpret sonar returns, and will display a Fish Symbol when very selective requirements
are met.
A select number of possible fish returns will be displayed with their associated depth. (On, Off)
FISH ICON
ON
FISH ICON
OFF
8.7 Fish Alarm—
FISH ALARM
Press the POWER-MENU key until FISH ALARM appears.Select Off for no fish alarm, or one
of the following symbols to set the alarm. An alarm will sound when the FF718LiC-W detects
fish that correspond to the alarm setting. Fish Alarm will only sound if Fish ID+ is also set to
On. (Off, Large fish, Large fish/Small fish).

10
8.8 Units
Make sure press the POWER-MENU key until UNITS appears. UNITS selects the Depth units
of Feet or Meter and TEMPE units selects the ℃ or℉。
8.9 Color tone
UNITS
M/℃
COLOR TONE
BLUE
Press the POWER-MENU key until Color tone menu appears. Select a setting from BLUE,
ORANGE or GREY.
BRIGHTNESS
1 9
4
8.10 Battery alarm
LANGUAGE
ENGL ISH
Press the POWER-MENU key until Battery alarm menu appears. Select a setting from OFF
or from 3.6V-4.2V, Battery alarm sounds when the input battery voltage is equal to or less than
the menu setting.
8.11 Language—
Press the POWER-MENU key until LANGUAGE appears.The FF718Li -W fish finder has 20
language choice.
C
8.12 Brightness
BATTERY ALARM
OFF
4.2
3.8V

11
FISHFINDER
CHART SPEED
1 9
9
Press the POWER-MENU key until Brightness appears.Use the backlight for night fishing.
Select 1-9 to activate the backlight at the desired level.
8.13 Chart Speed
Press the POWER-MENU key until CHART SPEED menu appears.Select a setting from 1-9 to
increase or decrease the chart speed ,where 1 is the slowest and 4 is the fastest chart speed.
(1 to 9)
9. Maintenance
Follow these simple procedures to ensure your FF718Li -W continues to deliver top
performance.
If the unit comes into contact with salt spray, wipe the affected surfaces with a cloth dampened
in fresh water.
Do not use a chemical glass cleaner on the less-this may cause cracking in the lens.
When cleaning the LCD protective lens, use a chamois and non-abrasive, mild cleaner. Do not
wipe while dirt or grease is on the lens. Be careful to avoid scratching the lens.
Never leave the unit in a closed car or trunk - the extremely high temperatures generated in
hot weather can damage the electronics.
C
10. Wireless sonar sensor Maintenance
After using the Wireless sonar sensor in salt water, wipe the affected surfaces with a cloth
dampened with fresh water. The Wireless sonar sensor Cuprum-switch must be rinsed with
fresh water after exposure to salt water prevent corrosion.
If your Wireless sonar sensor remains out of the water for a long period of time, it may take
some time to wet it when returned to the water. Small air bubbles can cling to the surface of
the Wireless sonar sensor and interfere with proper operation. Wipe the face of the Wireless
sonar sensor with a wet cloth to remove them.
Never leave the Wireless sonar sensor in a closed car or trunk-the extremely high temperatures
generated in hot weather can damage the electronics.

12
11. Trouble
1. The FF718Li -W loses signal in wireless User Mode.
If the FF718Li -W, while in Wireless user mode, is not able to get an RF signal from the
Wireless sonar sensor, the display will stop updating and the NO SINGAL will be displayed
after several seconds. Whenever reception is lost or the Wireless sonar sensor pulled out from
C
C
will be displayed until the Wireless sonar
sensor is placed back in the water and reception is regained.
the water for more than a few seconds, the
1) The Wireless sonar sensor uses line -of-sight wireless technology. If objects are placed
between the FF718Li -W and the Wireless sonar sensor, reception may be lost.
2) The Wireless sonar sensor depth range is 2 to 147 feet (0.7 to 45 meters). Erratic readings
may occur in water that is shallower than 2 feet. In addition, because of the nature of sonar,
this product is not intended for use in swimming pools or small enclosed bodies of water.
3) Reeling the Wireless sonar sensor too fast can cause loss of signal and the screen will freeze.
C
4) Check the buoyant balance between the Wireless sonar sensor and your tackle; over 0.2
ounce will submerge the Wireless sonar sensor, causing signal loss.
5) The Wireless sonar sensor may not obtain its maximum RF distance of 590 feet unless the
water is smooth. Waves or chop may reduce the RF range significantly.
2. When in very shallow water, I get gaps in the bottom reading and inconsistent digital depth
indication.
The Wireless sonar sensor will work reliably in water 2 feet (0.7 meters) or deeper. The depth
is measured from the Wireless sonar sensor.
A Wireless sonar sensor to FF718LiC-W distance of greater than 590ft may cause intermittent
screen display. Excessively rough water may cause the Wireless sonar sensor to submerge,
again losing contact.
3.The display shows fluctuating depth readings and excessive clutter, including vertical bars
that may be drawn on top of fish icons.
4.The screen jumps and the bottom has an abrupt change; sometimes a vertical line is missing
or a black line from top to bottom is displayed.This screen image jump is due to an automatic
change in depth. New returns graphed at a different scale will not match up with the historic
data already graphed at a higher or lower scale. Vertical lines can also occur as the radio
signal from the Wireless sonar sensor is lost and then regained in rough water conditions.

13
FISHFINDER
SPECIFICATIONS
Fish finder:
1.Input power: ---------------------------3.7 Volt rechargeable lithium battery
2.Display Type-------------2. 8 inch color TFT LCD dispaly,240*(RGB)*320
3.Running time--------------------------20 hours (depend on actual using and
working status)
Wireless sonar sensor:
1.Power requirement--------------------CR-2032 cell battery
2.Sonar operation Frequency-------------125 KHz
3.Sonar coverage---------------------------90 degrees
4.Depth capability ------------------45 meters (147 feet)/0.7 meters (2 feet)
5.Surface water temperature---------------built in transducer
6.Wireless operational frequency---------433.92 MHz
7.Wireless operational range-------------- 100 meters (328 feet)

14
FF718LiC-W FISCHFINDER WIRELESS
BEDIENUNGSANLEITUNG
1. Danke dass Sie sich für den FF718LiC-W Fischfinder entschieden
haben.
Dieses erstaunliche Produkt wurde speziell für Hobbyangler und professionelle Angler
entwickelt, um die Position von Fisch, Tiefe und Bodenkontur des Wassers herauszufinden.
Die Einheit kann in Meer, Fluss oder See verwendet werden und ist hervorragend geeignet,
um Fischschwärme in einem bestimmten Gebiet zu entdecken.Mit erstaunlicher und innovativer
Technologie ist dieser Fischfinder das ideale Werkzeug, um den Fisch zu Ihnen zu bringen!
Das FF718LiC-W hat zwei Benutzermodi: WIRELESS / SIMULATION. Verwenden Sie die
Menüoption Modus, um zwischen diesen beiden Benutzermodi zu wechseln.
USER MODUS
WIRELESS
USER MODUS
SIMULATION
WIRELESS: In diesem Benutzermodus können Sie das FF718Li-CW mit dem drahtlosen
Sonarsensor betreiben. Wenn die Signalanzeige ( ) auf dem Bildschirm angezeigt
wird, befindet sich das Gerät im drahtlosen Modus.
Wireless Sonar Sensor Signal
Verbindungsanzeige

15
FISCHFINDER
2. Verwenden des drahtlosen Sonarsensors
Der kabellose Benutzermodus ermöglicht Ihnen die Verwendung des kabellosen Sonarsensors.
Befestigen Sie den kabellosen Sensor einfach am Ende Ihrer Angelschnur und werfen Sie ihn
wie ein normales Schwimmer- oder Ködergerät ins Wasser, und schalten Sie das FF718LiC-W
ein bereit zu fischen. Im drahtlosen Modus sendet Ihr FF718LiC-W Sonar-Technologie, um
Schallwellen vom drahtlosen Sonar-Sensor zu senden, die zurückgesendeten "Echos" werden
mit drahtloser Technologie an die Anzeigeeinheit übertragen und auf dem LCD angezeigt. Neue
Informationen erscheinen auf der rechten Seite. Wenn sich diese Informationen nach links
bewegen, wird ein sehr genaues Bild der Unterwasserwelt angezeigt, einschließlich der Tiefe
von Unterwasserobjekten wie Boden, Fischen und Strukturen.
3. Verwendung des drahtlosen Sonar-Sensors
Im drahtlosen Benutzermodus können Sie den drahtlosen Sonarsensor verwenden. Befestigen
Sie den Funksensor einfach am Ende Ihrer Angelschnur und werfen Sie ihn wie ein normaler
Schwimmer oder Köder ins Wasser. Schalten Sie dann den FF718LiC-W ein und Sie sind
bereit zu fischen. Im drahtlosen Modus sendet Ihr FF718LiC-W Sonar-Technologie, um
Schallwellen vom drahtlosen Sonar-Sensor zu senden, die zurückgesendeten "Echos" werden
mit drahtloser Technologie an die Anzeigeeinheit übertragen und auf dem LCD angezeigt.
Neue Informationen erscheinen auf der rechten Seite. Wenn sich diese Informationen nach
links bewegen, wird ein sehr genaues Bild der Unterwasserwelt angezeigt, einschließlich der
Tiefe von Unterwasserobjekten wie Boden, Fischen und Strukturen.

16
HINWEIS: Wenn Sie den Wireless Sonar Sensor in Wasser
gießen, können Schäden durch abrupten Kontakt mit Steinen
Ihren Wireless Sonar Sensor beschädigen. Wir empfehlen, den
Wireless Sensor nur in Wasser mit einer Tiefe von mehr als 1
Fuß zu verwenden.
4. Den drahtlosen Sonarsensor anbringen
Die Schnur, die von Ihrer Rolle kommt, kann mit dem vorderen Loch im Wireless Sonar Sensor
verbunden werden. Wenn Sie den Wireless Sonar Sensor als herkömmlichen Schwimmer
verwenden möchten, verwenden Sie das zweite Loch, um Ihren Haken mit einer leichteren
Schnur zu befestigen. Ein Haken löst die hellere Linie, wenn Sie sich befreien müssen.
Schlupflinientechniken werden nicht empfohlen, da das Risiko eines Verlustes des Wireless
Sonar Sensors höher ist. Wenn Sie die Slipline-Methode verwenden, verwenden Sie eine Linie
mit geringerem Gewicht nach dem unteren Anschlag, um das Abrufen des Wireless Sonar
Sensors zu ermöglichen, wenn die untere Linie mit Haken ausbricht. Behandeln Sie den
Wireless Sonar Sensor am Antennenturm, wenn er sich im Wasser befindet. Verwenden Sie
eine schwere Testleine, Standardknoten und einen Angelhaken wie einen Wirbel. Die zweite
Führungsöffnung dient zur Verwendung des Wireless Sonar Sensors als Schwimmer. Verbinde
eine leichtere Hakenlinie mit diesem Loch. Übergewichten Sie die Hakenleitung nicht, da dies
den drahtlosen Sonarsensor unter Wasser setzt und Signalverlust verursacht.
Antennenturm Ein vorderes Loch
A.
B.
Zweites Loch
HINWEIS: Sie erhöhen die Möglichkeit, Ihre Linie zu brechen, wenn Sie eine leichte
Testhämmerlinie auf Ihrer Rolle verwenden. Der Wireless Sonar Sensor ist positiv schwimmfähig.
Das maximale Gewicht für jede Befestigung am Wireless Sonar Sensor beträgt ca. 5,67 Gramm
und beinhaltet das Gesamtgewicht aller Haken, Leinen, Gewichte, Wirbel / Schnappwirbel und
Köder, die am Wireless Sonar Sensor angebracht sind.
HINWEIS: Bewahren Sie den Wireless Sonar Sensor in einem trockenen, nichtmetallischen
Behälter (z. B. einer Gerätekiste) in einem separaten Fach auf und isolieren Sie ihn von allen
metallischen Geräten.

17
HINWEIS: Die Unterseite des Wireless-Sonar-Sensors sollte während des Sonar-Betriebs
nicht behandelt werden, da dies zu körperlichen Beschwerden führen und zu Verletzungen
in Form von Gewebeschäden führen kann. Behandeln Sie den Wireless Sonar Sensor nur
am Antennenturm, wenn er sich im Wasser befand.
HINWEIS: Der drahtlose Sonarsensor ist nicht für Kinder unter 6 Jahren ohne Aufsicht von
Erwachsenen vorgesehen, da der drahtlose Sonarsensor eine Erstickungsgefahr für kleine
Kinder darstellen kann.
5. Drahtlose Sonar Sensor Power
Der drahtlose Sonar-Sensor hat eine CR-2032 Lithium-Batterie. Er kann ausgetauscht werden.
Bitte überprüfen Sie die beigefügten Bilder, um die Batterie zu wechseln. Entfernen Sie die
Batteriefachabdeckung des Wireless Sonar Sensors und drücken Sie den Verriegelungsblock
des Batteriehalters. Der Akku wird automatisch gedreht.
HINWEIS: Stellen Sie sicher, dass der O-Ring im Batteriefach vorhanden ist, richtig in den
Nuten positioniert und frei von Schmutz ist, bevor Sie das Batteriefach wieder anbringen. Der
Wireless Sonar Sensor hat Kontakte, die erkennen, wenn das Gerät in das Wasser getaucht
wird. Diese Kontakte schalten den Sonar - Sensor / Empfänger ein und senden die
Sonarinformationen per RF an das Display. Der Wireless Sonar Sensor stoppt automatisch
einige Sekunden nach dem Herausziehen aus dem Wasser die Stromversorgung.
HINWEIS: Stellen Sie den Wireless Sonar Sensor nicht in einem feuchten Bereich auf, wenn
er nicht benutzt wird, da dies den Wireless Sonar Sensor einschaltet und die Nutzungsdauer
verkürzt. Bewahren Sie den Wireless Sonar Sensor an einem trockenen Ort auf, wenn er
nicht verwendet wird, um Strom zu sparen. Stellen Sie den Wireless Sonar Sensor niemals
in einem nassen Bereich eines Bootes oder auf einer Metalloberfläche auf, die versehentlich
eingeschaltet werden könnte.
FISCHFINDER

18
HINWEIS: Wenn der drahtlose Sonarsensor in Salzwasser verwendet wurde, spülen Sie ihn
vor der Lagerung mit frischem Wasser aus. Anzeigesicht Mit einem einfachen Menüsystem
können Sie auf die einstellbaren FFW718LiC-W-Einstellungen zugreifen. Um das Menüsystem
zu aktivieren, drücken Sie die POWER-MENU-Taste. Drücken Sie wiederholt die POWER-MENU
-Taste, um die FF718LiC-W Menüeinstellungen nacheinander anzuzeigen. Wenn eine
Menüeinstellung auf dem Display angezeigt wird, verwenden Sie die AUFWÄRTS- und
ABWÄRTS-Pfeiltasten, um die Menüeinstellung anzupassen. Die Menüeinstellungen werden
nach einigen Sekunden automatisch vom Bildschirm entfernt. Im normalen Betriebsmodus
werden die meisten Menüeinstellungen gespeichert.
6. Ansicht anzeigen
Der FF718LiC-W zeigt die Unterwasserinformationen in einem leicht verständlichen Format
an. Der obere Teil des Displays entspricht der Wasseroberfläche am Schallkopf und der untere
Teil des Displays entspricht dem Tiefenbereich, der für die aktuelle Wassertiefe automatisch
ausgewählt wurde. Die Bottom Contour variiert, wenn sich die Tiefe unter dem Boot ändert.
Digitale Anzeigen liefern präzise Informationen zur Tiefe, Fisch - und Wassertemperatur.
Während sich das Boot bewegt, werden Gelände- und Bodenzusammensetzungsvariationen
angezeigt. Fische, Köderfische und die Rmoclines (Veränderungen der Unterwassertemperatur)
werden angezeigt, wenn sie erkannt werden. Die Unterwasserbedingungen sind sehr
unterschiedlich, daher sind einige Erfahrungen und Interpretationen erforderlich, um alle
Vorteile des FF718LiC-W zu nutzen. Verwenden Sie das Bild als Leitfaden für die häufigsten
Bedingungen und üben Sie das FF718LiC-W gegenüber bekannten Bodentypen.
Table of contents
Languages:
Other Lucky Fish Finder manuals