LUFTMUSIC LM720 User manual

Please read through these instructions carefully so you will know how to
operate your model properly.
Thank you for purchasing this
LM720 Marine Bluetooth Stereo
After you have finished reading the instructions, keep this document in a
safe place for future reference.
THIS PACKAGE CONTAINS
1-LM720 Marine Stereo
1-1-Trim Bezel
1-Wireless Remote control
1-User Manual
4-Mounting Screws
LM 720
SRC PRE
SEL
SRC

INSTALLATION
MOUNTING(USING MOUNTING PLATE)
IMPORTANT! Do not mount this unit where it can be submerged in water.
2
1.Choose a mounting location on the dash board or instrument panel that will allow
room behind to run radio cables to the power source. Consider how you will use
the AUX IN, LINE OUT and USB connectors and route the appropriate extension
cables to an accessible area.
2.Once you have determined a mounting location, you will need to cut a circular
hole 3"(77mm) in diameter. At least 3.75 inch depth is needed to mount the radio.
3.Slide the mounting plate over the backside of the unit and secure with the
supplied screws.
4.Press on the trim bezel to the front side of the unit.
5.Plug in all wring harnesses and cables. Refer to the wiring diagram for wire
harness connection types.
Source Unit
Mounting Screws
Trim Bezel
Panel

WIRING
3
Getting Started
Tip: When a suitable ground wire is not present in the vehicle wiring harness.
Connect the black ground wire to the vehicle chassis.
Fuse: When replacing the fuse, make sure new fuse is the correct type and
amperage. Using an incorrect fuse could damage the radio.
FUSE 10A Yellow
Blue Remote Control
Receiving Antenna

CONTROL LOCATIONS - RECEIVER
4
1Preset Stations
2
3
4
5
Source
Power
Audio Setting / Select (Confirm)
Volume up / down / Rotate Selection / Mute (press)
6Band
7
8
9
10
Play/Pause/Confirm Selection
Tune Up / Next Track
Tune Down / Previous Track
Crystal Display
3
2
4
1
7
8
6
9
5
10
LM 720
SRC PRE
SEL

GENERAL OPERATION
5
Power on/off -- Press the ' ' button to turn the unit on. Press and hold
to turn the unit off.
Brightness -- Press ' ' to adjust the back light brightness ( High / Medium / Off).
Changing Modes -- Press SRC to select between AM/FM, USB, Auxiliary and
Bluetooth Music. Modes of operation are shown on the display.
Volume -- Adjust volume by rotating the volume knob.
Mute -- Short press VOL knob to silence the audio, short press VOL knob to resume
listening at previous selected volume.
Auxiliary Inputs: Insert a 3.5mm connector in the AUX port, the other end of 3.5mm
connector to the headphone output of an audio device (3.5 mm audio cable sold
separately ).
' ' again
Audio setting
Short press 'SEL' to
enter into AUDIO
SETTING
Navigate between XBASS/
BASS / TREBLE / BALANCE
/ FADER
Rotate the volume knob
to select between EQ
USER/JAZZ/POP/
CLASS/ROCK
System setting
Press and hold 'SEL'
to enter into SYSTEM
SETTING
Navigate between BEEP /
RESET / ABOUT / TIME
SEL
SEL

AM/FM TUNER OPERATION
6
1. Press the SRC button to select TUNER
2. Press VOL konb to MUTE, press again to UNMUTE
3. To manual adjust frequency press >>I or |<<
4. Press the PRESET button to recall PRESETS 1-6
5. Press BAND to switch between FM1, FM2, FM3, MW1, MW2, WB;
Tuner Function Setting
Press and hold
'PRESET' to enter
into Tuner function
mode
Navigate between AUTO
STORE / M STORE/ LOCAL
/ AREA / RDS / AF / TA
/ PTY
Press to enter setting
Rotate the volume
knob to select option
(A-store skip this step)
Press >|| button to confirm
the selection (A-store skip
this step)
A – STORE: Automatic search the strong radio stations and store them into PRESET.
M- STORE: Manual Store the Radio Station, tune to the favorite station, activate the
M-STORE, the PRESET number will flashing on the LCD display, use the VOL+/VOL-
button to adjust to your desired PRESET number ( P1 - P18 ) , then press >II button
to manually save the station.
LOCAL - ON/OFF.
AREA - Select between EUROPE / AUST / USA frequency.
RDS - ON/OFF; AF / TA / PTY – ON/OFF.
PRE

USB OPERATION (MP3/WMA)
7
Playing MP3/WMA Files To play MP3/WMA files, insert a USB device
(not supplied) containing MP3/WMA files.
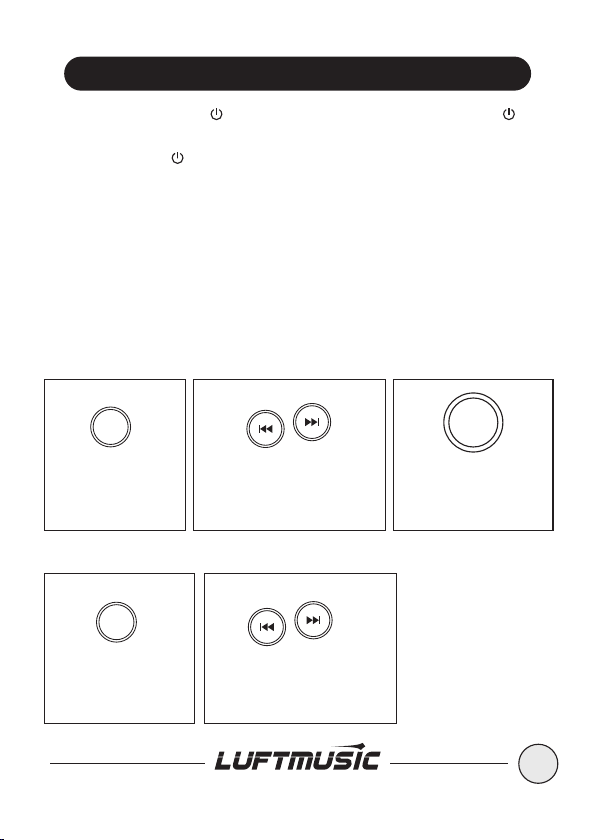
Track Select - Press >> to skip to the beginning of the next track.
- Press << to return to the beginning of the previous track. Press and
Pause
Press >II button to temporarily stop playback.
Press >II button again to resume playback.
Fast forward and reverse
Press and hold >> or << to fast forward or reverse a track.
Folder Search
Short press BND button, 'ROOT' display on the screen, enable to select between
folders.
Short press >> or << button ( or Rotate the VOL knob ) to select folders;
Short press >II button to enter into the selected folder;
After select the folder, press >> or << button ( or Rotate the VOL knob) to select
the songs;
Short press >II button to play the selected song;
Short press PRESET button to activate 'RDM ALL(Random)' - 'RPT ALL(Repeat)
' - 'RPT SONG' and 'RPT FLD' function.
Preparation-Before using a Bluetooth device, it must be paired and connected.
Ensure that Bluetooth is activated on your device before beginning the pairing
process.
Pairing
To pair your smart phone to LM720, press the SRC button to select 'BT
AUDIO' mode, the 'Bluetooth' icon will be flashing on the LCD screen.
Activate the Bluetooth on your smartphone to search for new devices. Connect
with the device name ' LM720 ' when found. (If pin number is required by smart
phone, please enter '0000'). Once pairing is successful, 'Bluetooth' icon will be
displayed on the screen.
Press >> or << button to select next or previous track.
Press >II button to pause or continue play back.
While BT mode, Long press 'SEL' button, then press VOL Knob or Play/Pause
button to force disconnect the current Bluetooth connection.
BLUETOOTH OPERATION

DAB OPERATION (AVAILABLE FOR LM720D ONLY)
8
Note: DAB+ ( Digital Audio Broadcasting) is only available for some European countries and Australia where has
the Digital Radio Broadcasting.
Press SRC button to switch to DAB+ mode, LM720D will automatically scan for
local digital stations. This process may take a few seconds depending on the
numbers of available stations. As DAB+ stations are found, they will be automatically
stored into the DAB+ band memories. Once scanning is complete, LM720D will
begin playing the station stored in the first memory location. And the station will
be displayed on the screen.
Tuning DAB+ stations
Press I<< or >>I button to tune to previous / next DAB+ station.
A – STORE: Long press BAND button for automatically scan and save the
stations.
General
Power supply requirements: DC 12V Negative Ground
Load impedance: 4-8 Ohms/channel
Maximum output power: 45W x 4 (CH)
Operate temperature: -10-50℃
FM Tuner: Tuning range: 87.9MHz-107.9MHz (USA)
87.5MHz-108MHZ (EUR)
AM Tuner: Tuning range: 530KHz-1710 KHz (USA)
522KHz-1620 KHz (EUR)
DAB+ (LM720D only) Tuning Range: BAND III 174-240 Mhz
USB playback
Signal to Noise Ratio: 55dB
Frequency Response: 50Hz- 20KHz
A/D Conversion Filter: 16BIT
USB Storage Capacity: 16GB Max
Bluetooth
Version: 5.0
*Note: Specification may change without notice.
SPECIFICATIONS

TROUBLE SHOOTING
9
ISSUE OPTIONS
Cause: Yellow/red wire not connected or incorrect voltage
Action: Check connections for proper voltage (11-16V DC)
Cause: Black wire not connected
Action: Check connection to ground
Cause: Fuse blown
Action: Replace the fuse
Cause: Speaker wire not connected
Action: Check connections at speakers
Cause: One or more speaker wires touching each other
or touching chassis ground
Action: Insulate all bare speaker wires from each other
and chassis ground
Cause: Yellow/red wire touching chassis ground
Action: Check for pinched wire
Cause: Speaker wires touching chassis ground
Action: Check for pinched wire
Cause: Incorrect fuse rating
Action: Use fuse with correct rating
Unit will not turn
on (no power)
Unit has power
(but no sound)
Unit blows fuses
Table of contents
Popular Marine Audio manuals by other brands

Wet Sounds
Wet Sounds REV 410 Owner's manual & warranty

Louroe Electronics
Louroe Electronics TLSP-F Installation and operating instrictions

Jensen
Jensen MSR2007 Installation and operation manual

Martin Audio
Martin Audio DD6 datasheet

Boss Audio Systems
Boss Audio Systems MRWT69 user manual

Fusion
Fusion MS-RA205 User/instalation manual