Lumenera INFINITYHD User manual

Release 1.1
Lumenera Corporation • 7 Capella Court, Ottawa, ON, Canada K2E 8A7 • (t) 1.613.736.4077 • (f) 1.613.736.4071 • www.lumenera.com • [email protected]
©2012 Lumenera Corporation. All rights reserved.
Design, features, and specifications are subject to change without notice
09112012
Quick Start Guide for INFINITYHD Cameras
The INFINITYHD camera requires only an HDMI connection to your monitor and a
power adapter to provide a sharp, colorful, and very fast live video preview from
your microscope. Insert the CD provided with the camera into your computer to
easily install the INFINITYHD application. The application software provides basic
camera controls to: optimize the camera’s color response to your illumination
source; turn the camera on or off; and capture HD resolution images for storage to
a file.
Camera setup and connection
Follow these simple steps to setup the camera:
1. Remove the lens cap and rotate the camera onto your microscope’s C-mount adapter.
2. Connect the supplied HDMI cable between the HD monitor and the back of the camera.
3. Connect the supplied power adapter (5V DC) between a wall outlet and the camera’s input jack.
4. At this point the camera is operational and streaming video, and the hardware buttons for camera power
and white balance functions are active. Ensure your monitor is turned on and that the monitor is configured
to accept input from the HDMI port being used by the camera.
5. Place the installation CD into your laptop or desktop computer. The application can be installed on any 32-
bit or 64-bit computer running Windows 7, VISTA, or Windows XP.
6. Follow the on-screen instructions to complete the installation.
7. Connect the supplied USB 2.0 cable between the computer and the mini-USB port on the back panel of the
camera, and allow Windows to load the device driver files.
8. Launch the INFINITYHD application from the Windows Start menu.
Camera Control Buttons
Three physical buttons are accessible on the front of the camera. They
provide direct camera control for Power on/off, White Balance and Image
Capture. NOTE: The Image Capture function requires a USB connection
to a PC, with file storage configuration defined, and the INFINITYHD
CAPTURE application must be running.
Using INFINITYHD CAPTURE
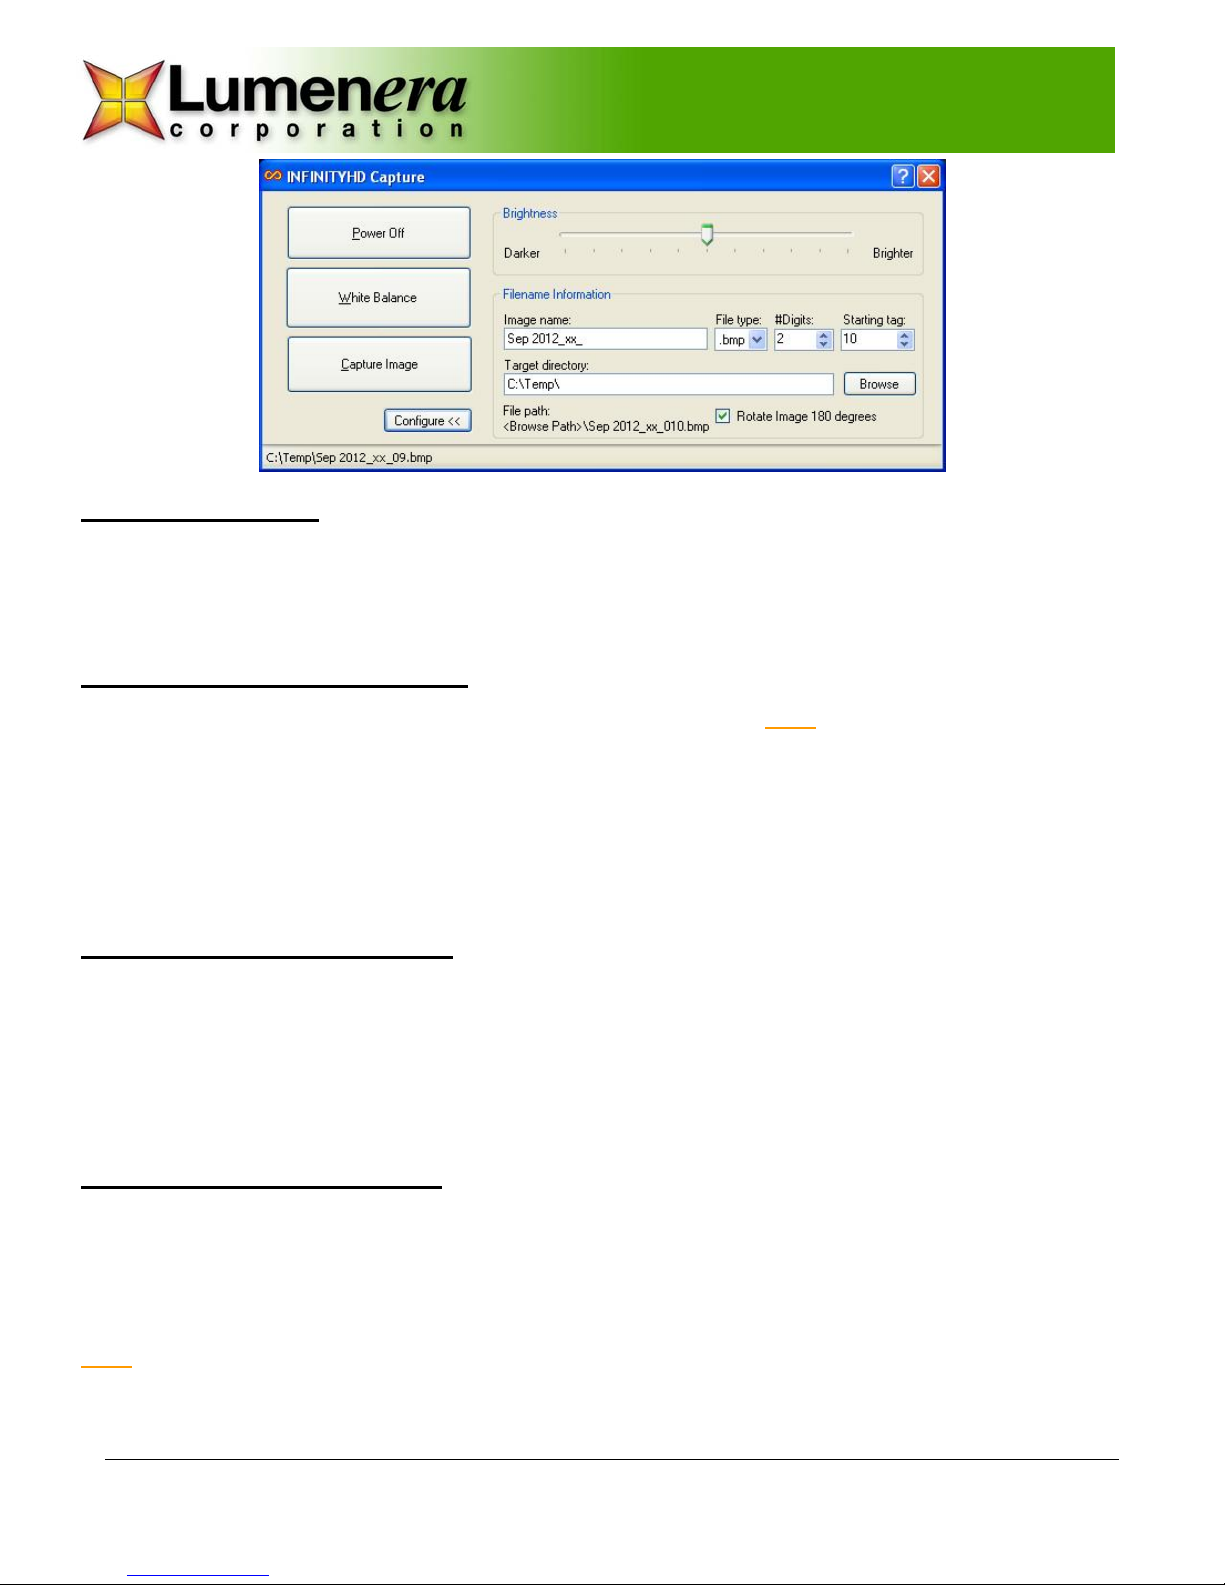
The dialog for controlling the INFINITYHD camera is very simple to use. The main
dialog shows three large button controls, and the Configure >> button, as seen in
the image to the right.
1. Power On – this button is used to toggle the camera output to be either On
or Off.
2. White Balance – select this button to perform a color balance operation
that sets the camera’s color response to match the light source / filter
combination that is in-use. See below for additional details on White
Balance.
3. Capture Image – Use this button to grab an image from the camera’s live
stream and have it saved to the computer.
4. The Configure button is used to expand the application dialog to provide
access to fields that control the filename, file type, and folder location for
the captured images. It is also used to collapse the Configure menu.
5. At the base of the dialog, the current filename specified for
captured images is presented.
Release 1.1
Lumenera Corporation • 7 Capella Court, Ottawa, ON, Canada K2E 8A7 • (t) 1.613.736.4077 • (f) 1.613.736.4071 • www.lumenera.com • [email protected]
©2012 Lumenera Corporation. All rights reserved.
Design, features, and specifications are subject to change without notice
09112012
Image Orientation
Use the option “Rotate Image 180 degrees” on the configure menu to control the orientation of the camera output
image. It takes 15 to 20 seconds to update the on-camera settings when this option is selected. The user interface
buttons will be temporarily disabled, and the status bar shows the progress of the update. Once the settings are saved,
the image orientation will be persistently stored on the camera.
Preview the HD Video Output
The camera’s video output stream is displayed directly on the HD monitor. Note: The monitor must support 1080p60
format in order for the video preview to be displayed.
Adjust the microscope lamp to a bright setting. The camera automatically adjusts the image brightness as the objectives
are switched on the microscope, or as the sample is changed. The best image quality is achieved when plenty of light is
reaching the sensor. The INFINITYHD CAPTURE application provides a target brightness setting to allow the camera’s
default brightness level to be manipulated. Moving the Brightness slider to the right will cause the camera to produce a
brighter image and moving it to the left will darken the image. Return the slider position to the center to restore the
default brightness target value.
Performing a White Balance
This is one of the most important steps to be performed when the camera is setup on the microscope. It must also be
repeated if the illumination conditions are altered. The camera’s red, green, and blue pixels respond to the color
temperature of the light source. If the intensity of the lamp is altered, or if optical filters are placed in the light path, then
the camera’s perception of the light is altered and the display of colors will change. The most recent white balance
setting is automatically stored in the camera, even if the camera is disconnected from the power supply. This enables
the camera to operate without the USB connection to the computer, once the White Balance operation has been
completed.
Configuring Image Capture
The INFINITYHD CAPTURE application will expand when the Configure button is selected. Use the options present on
the dialog extension to specify the prefix for the captured image filename, to specify the number of digits, and a numeric
start value for the filenames applied to each captured image. Images will be stored in the specified folder and will be
sequentially numbered based on the values entered. The folder location for the captured files can be either entered
directly in the Target directory field, or click the Browse button to display a standard Windows directory selection panel.
Note: It is normal for image capture to take a few moments as the camera’s HD format output image must be prepared
for delivery over the USB 2.0 interface to the computer.
Table of contents
Other Lumenera Microscope manuals

Popular Microscope manuals by other brands


VWR
VWR VisiScope 384 Series instruction manual

Nikon
Nikon ECLIPSE E200 POL instructions

Leica
Leica DI C800 User's manual & installation instructions

ThermoFisher Scientific
ThermoFisher Scientific Continuµm manual

ThermoFisher Scientific
ThermoFisher Scientific Continuµm manual

Olympus
Olympus SZ61 instructions